# Import Files in PMS Core and PMS Plus

## Prerequisites

We assume you have all prerequisites you may need, including:

1. [Get Access to Finmars](https://docs.finmars.com/books/user-quick-start/page/get-access-to-finmars)
2. [Link with Finmars ID](https://docs.finmars.com/books/user-quick-start/page/link-with-finmars-id "https://docs.finmars.com/books/user-quick-start/page/link-with-finmars-id")
3. [Install PMS Core or PMS Plus add-on](https://docs.finmars.com/books/user-quick-start/page/install-pms-core-or-pms-plus-add-on)

## Import Files in PMS Core and PMS Plus

In this guide we will demonstrate how to **import excel files in PMS** Plus add-on, while commenting what is available to PMS Plus only and absent in PMS Core (which is the subset of PMS Plus).

**Step 1:** Go to the sidebar menu **Add-ons &gt;** **PMS.

[![image.png](https://docs.finmars.com/uploads/images/gallery/2025-08/scaled-1680-/t0Rimage.png)
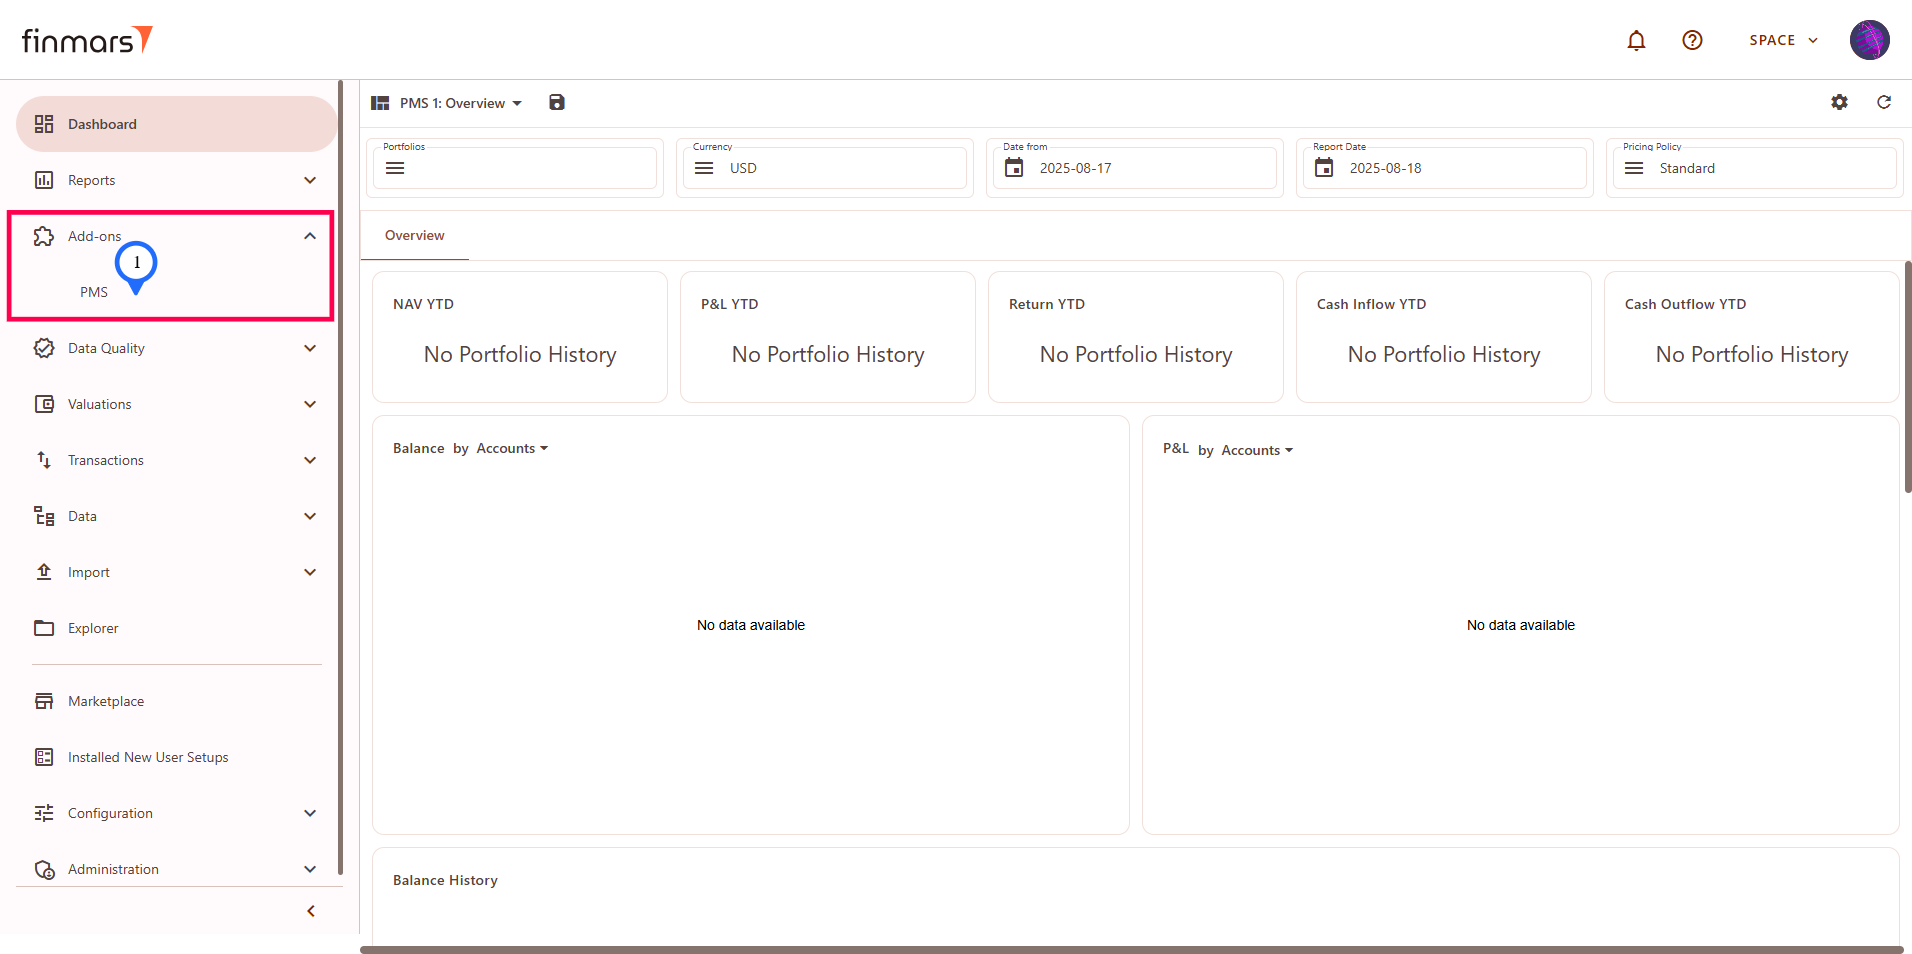
](https://docs.finmars.com/uploads/images/gallery/2025-08/t0Rimage.png)

**Step 2:** You will see the PMS add-on page which provide the access to the Excel Import (1) interface and Helper (2) they both have similar structure of 2 panes: left pane - run page where you configure what to do, and right pane - execution info page where you can see logs and result.

[![image.png](https://docs.finmars.com/uploads/images/gallery/2025-08/scaled-1680-/hH6image.png)
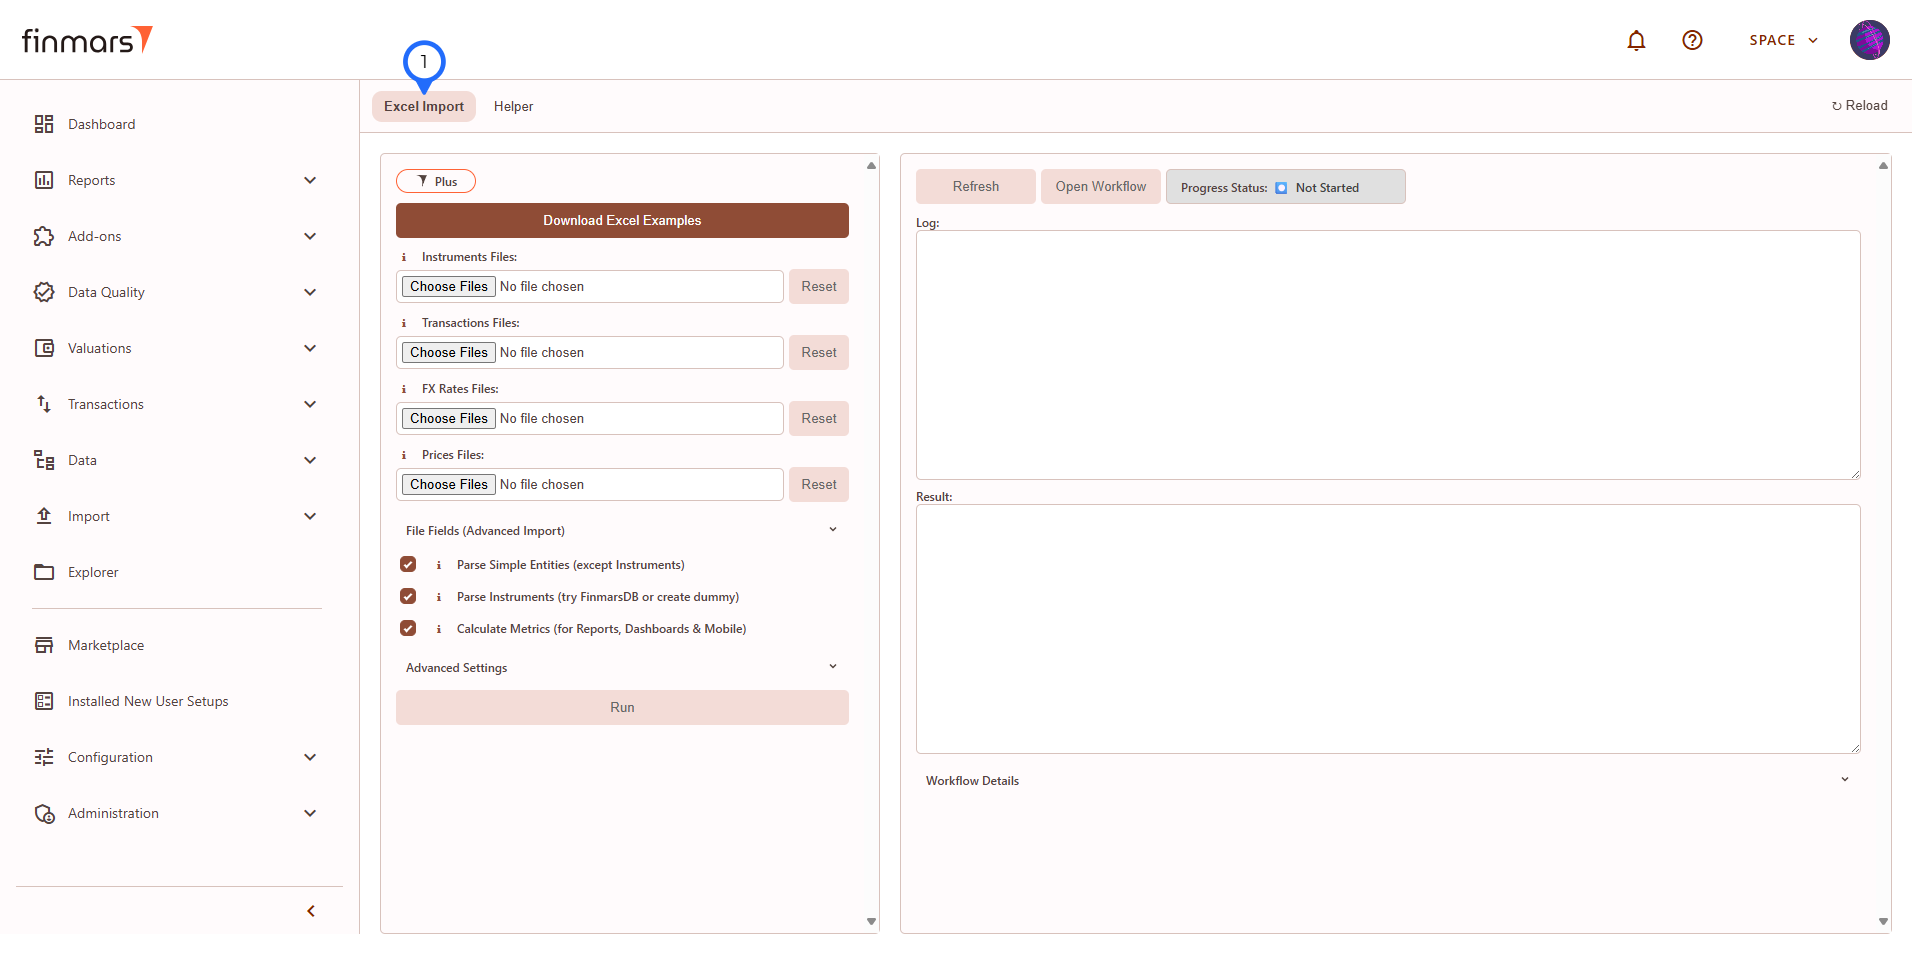
](https://docs.finmars.com/uploads/images/gallery/2025-08/hH6image.png)

[![image.png](https://docs.finmars.com/uploads/images/gallery/2025-08/scaled-1680-/IOqimage.png)
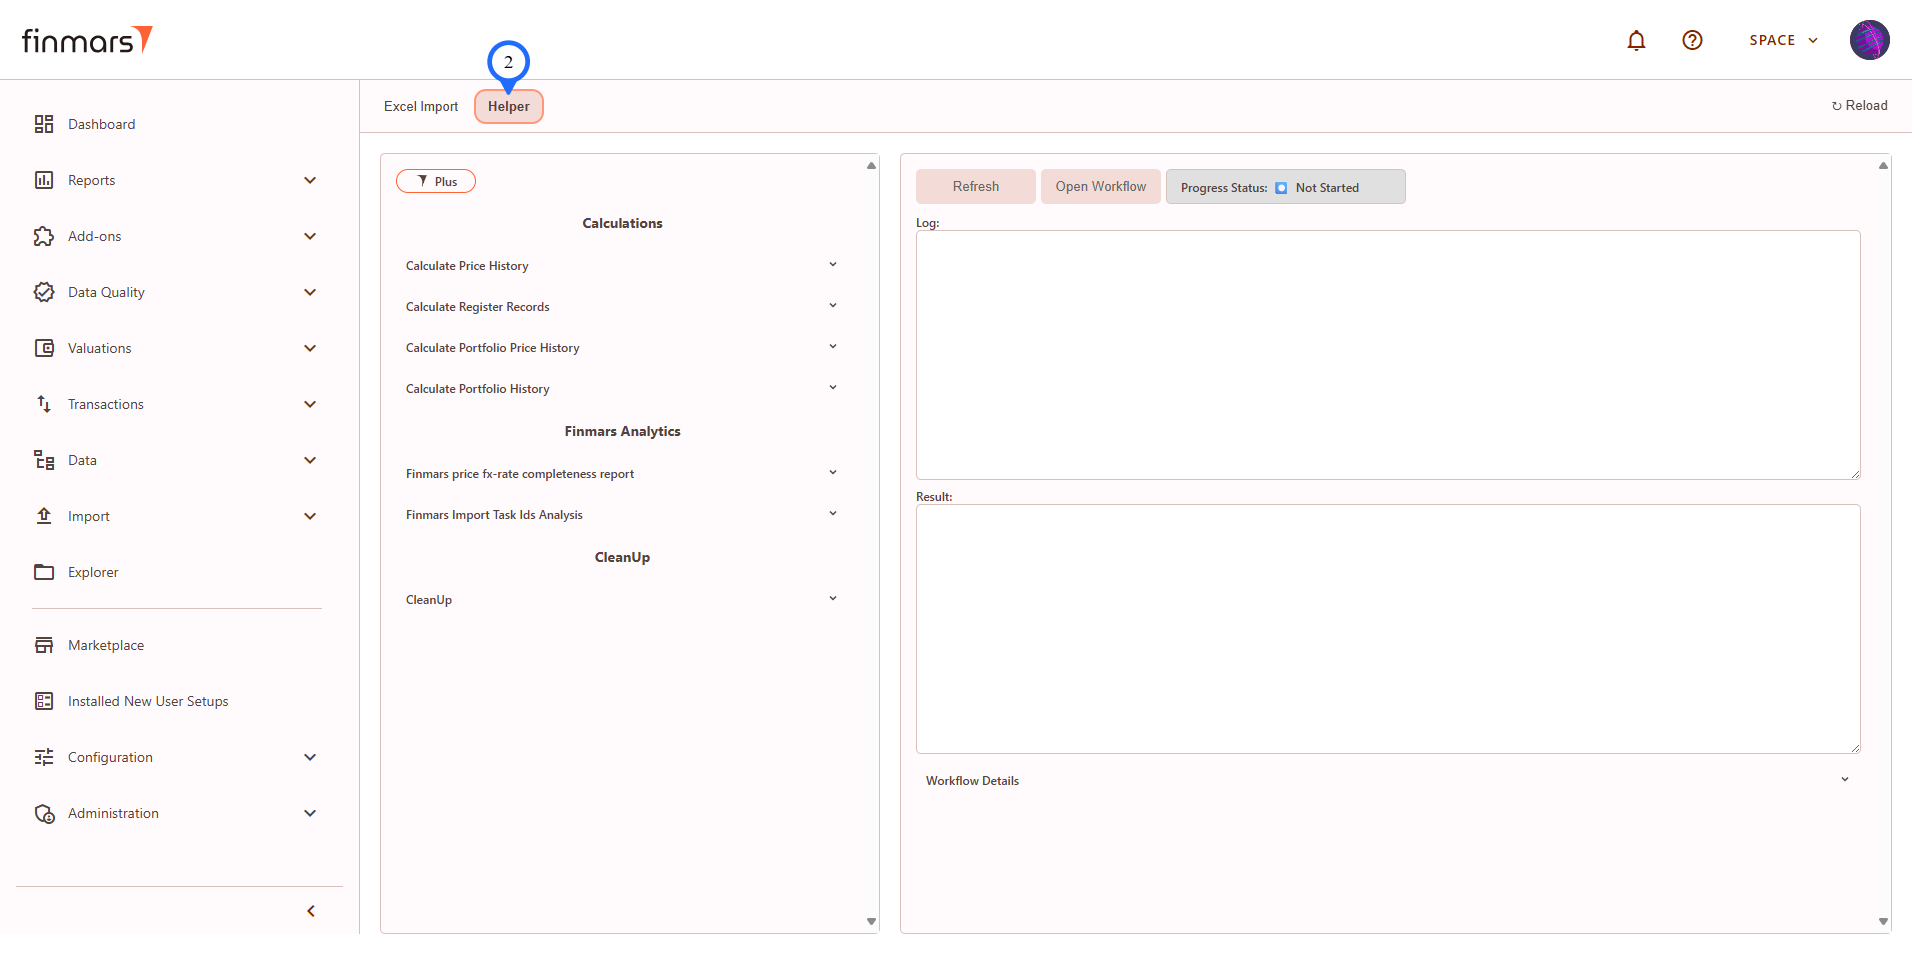
](https://docs.finmars.com/uploads/images/gallery/2025-08/IOqimage.png)

In this guide we will go through how to use Excel Import tab of PMS add-on.

**Step 3**: Go to **Excel Import tab of PMS add-on**.

[![image.png](https://docs.finmars.com/uploads/images/gallery/2025-08/scaled-1680-/KtVimage.png)](https://docs.finmars.com/uploads/images/gallery/2025-08/KtVimage.png)

*PMS Plus version*

[![image.png](https://docs.finmars.com/uploads/images/gallery/2025-08/scaled-1680-/OyVimage.png)](https://docs.finmars.com/uploads/images/gallery/2025-08/OyVimage.png)

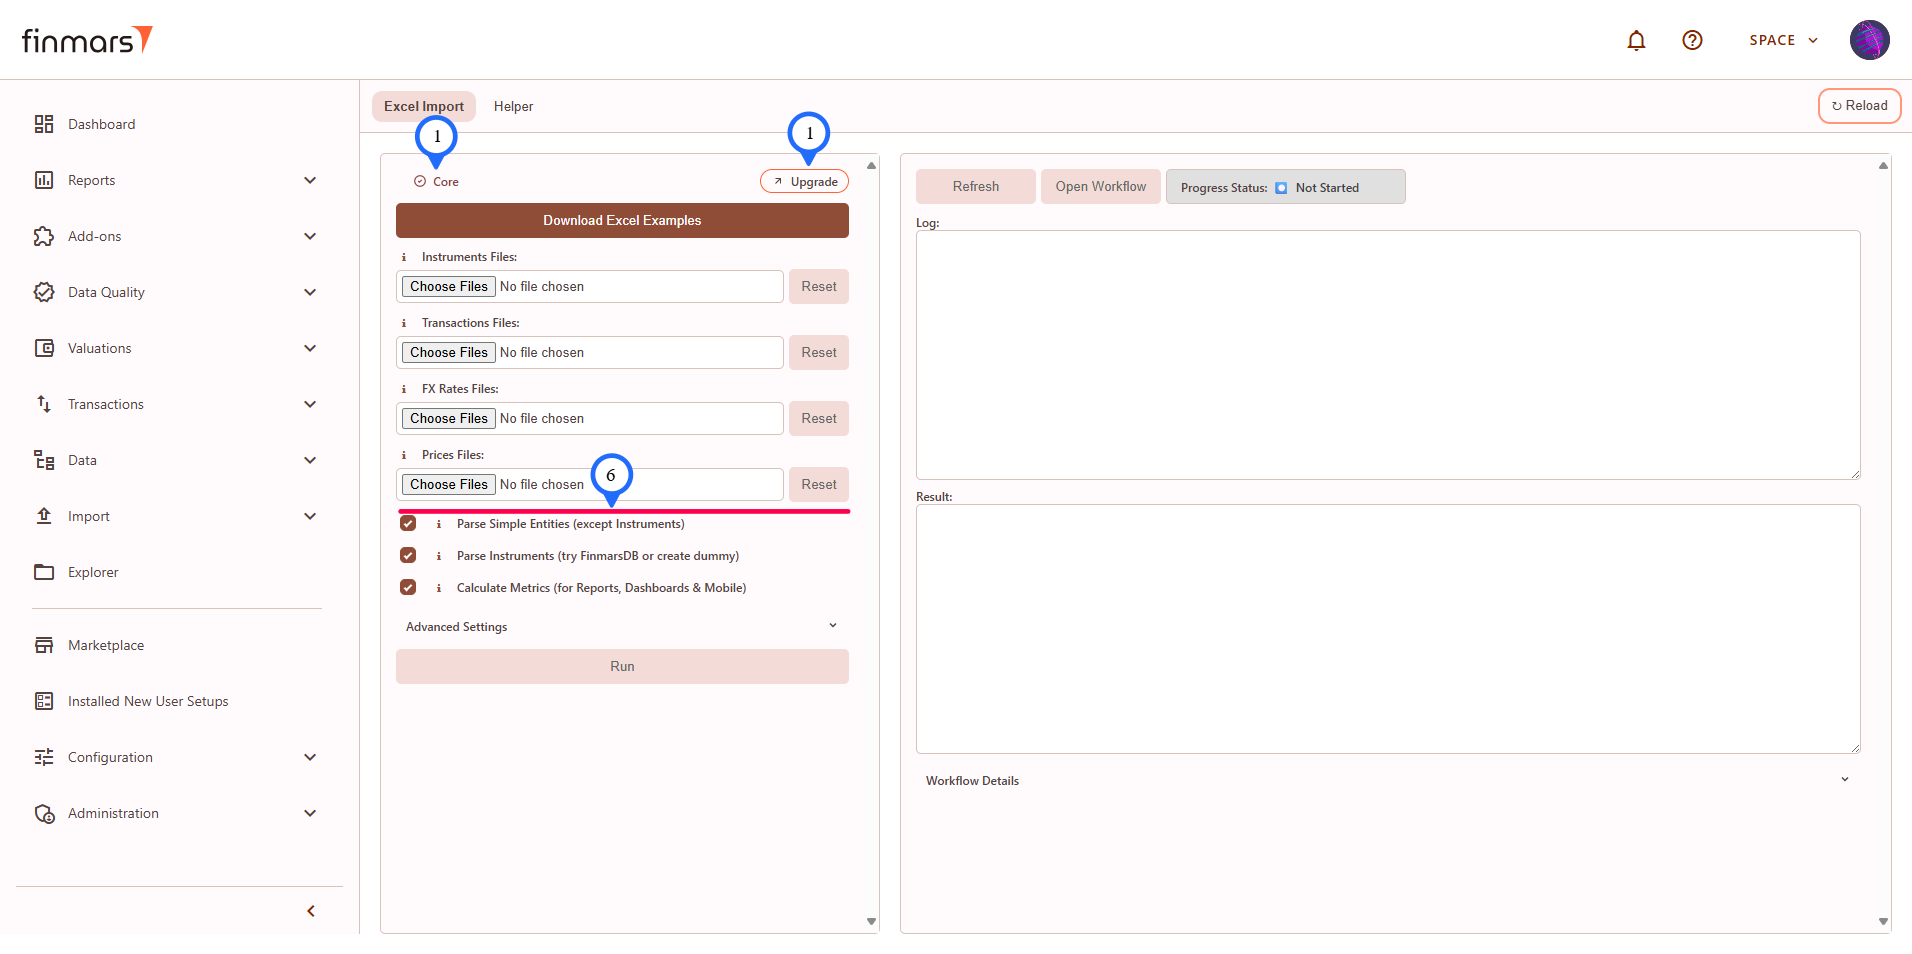
*PMS Core version (marked differences)*

<details id="bkmrk-overview-of-the-elem"><summary>
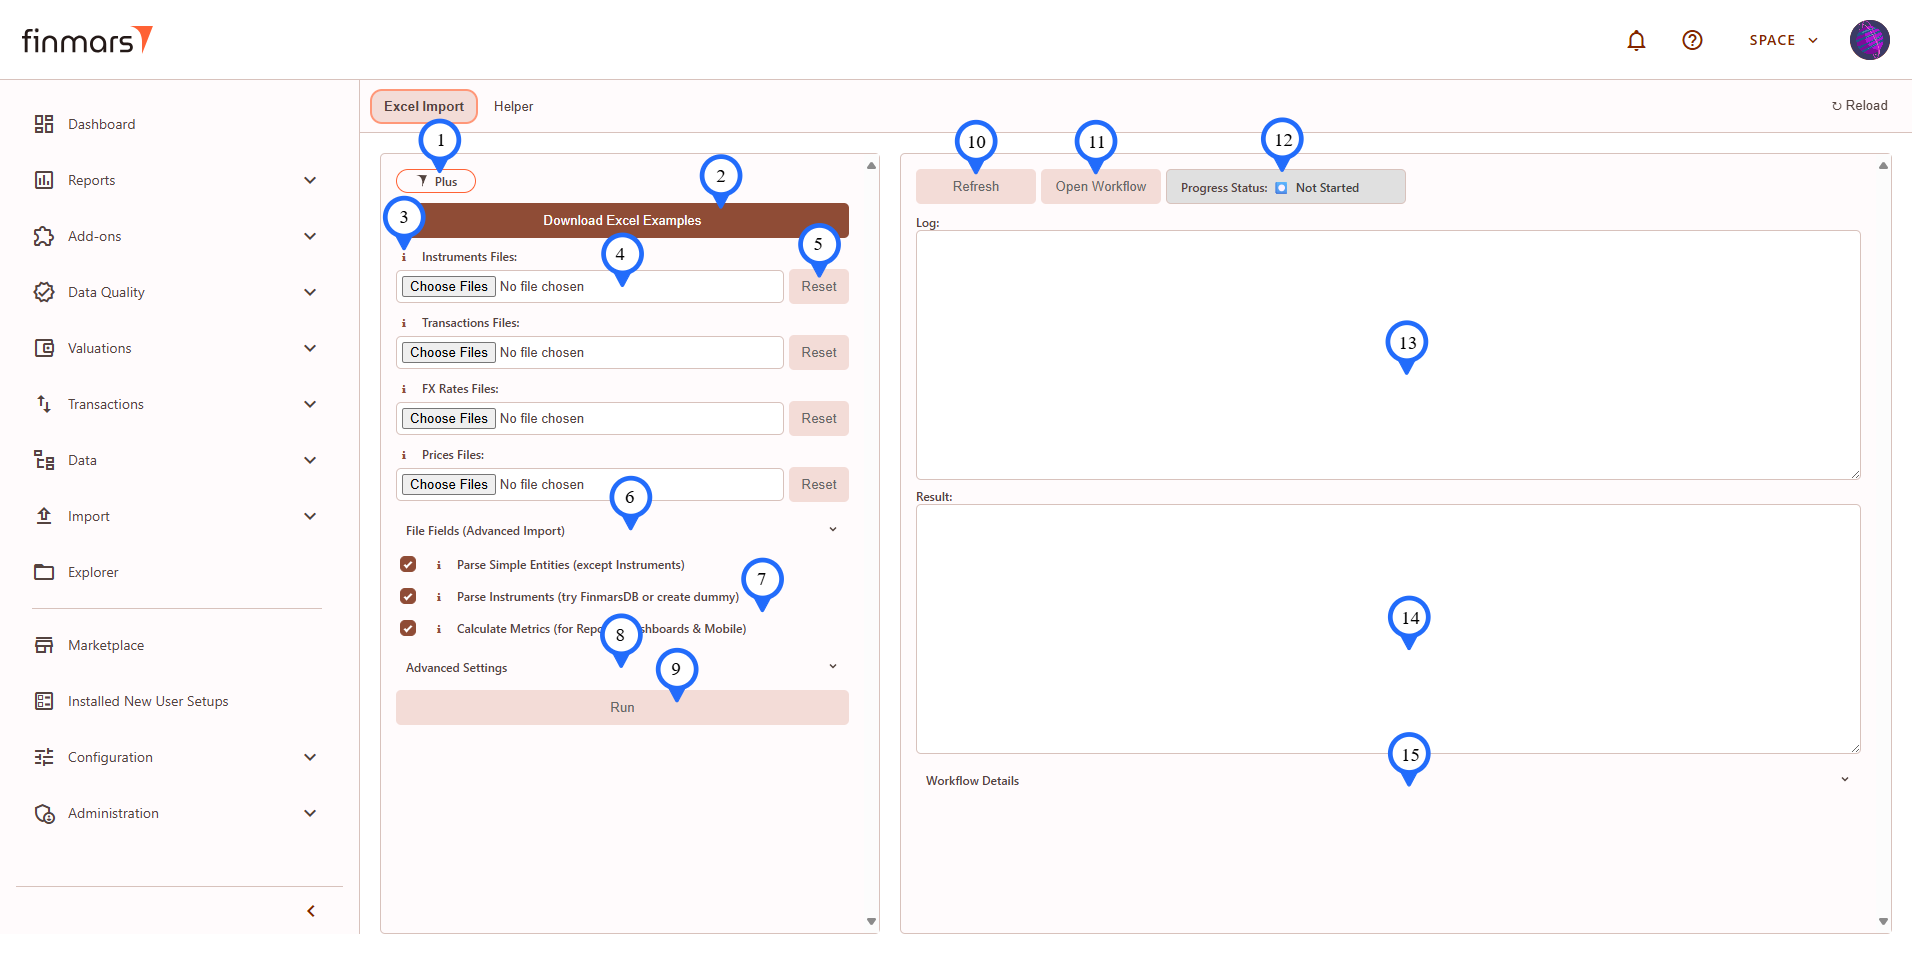
Overview of the elements on the Excel Import tab</summary>

1. **"Plus" badge** - indicator that you are using PMS Plus version. If you have PMS Core, there will be **"Core" badge** and **"Upgrade" button** that will link you to the PMS Plus add-on.
2. **"Download excel Example"** the button allows you to download Excel files for import, there are 2 set of them: 
    1. excel\_demo\_data - ready to import data that will allows you to check Finmars platform in action;
    2. excel\_import\_file\_templates - templates how to populate the excel file in Finmars format and you still can import them as well but they won't give you nice values in reports.
3. Next to some labels in file select, input or checkboxes elements you will see **Info icon** - click on it to see description of the element.
4. You will see **Multiple File Select** input and **Text Input** elements where your input required.
5. **"Reset" button** allows to reset selected files.
6. **"File Fields (Advanced Import)" section** is only for "PMS Plus" and contains Multiple File Select inputs for: 
    1. Simple entities (more control over creation): currencies, accounts, portfolios, counterparties, responsibles, strategies;
    2. Instruments: Factor and Accrual schedules;
    3. Positions: Daily (one day living snapshot), Initial (starting positions in case you can't import historical transactions).
7. **"Checkboxes"** inputs have similar structure as other inputs with info and label.
8. **"Advanced Settings" section** is optional and contains additional inputs for debug mode (show more logs info) and more flexible calculations.
9. **"Run" button** is active only when at least one file has been selected for import, when you click it you will see confirmation modal window with workflow user code and payload info.
10. **"Refresh" button** - click on it to refresh the right pane with execution info, update is manual.
11. **"Open Workflow" button** - you can go to the exact workflow running in the workflow service of the Finmars Platform.
12. **Status badge** will show current status of the workflow, it can be: Not Started, Queued, In Progress, Completed, Canceled, Failed, - if add-on encounter some other statuses it will show "Unknown status:" label with the exact status received.
13. **Log** - text area showing the logs of execution, don't forget to refresh data.
14. **Result** - text area showing the final result of execution ({} - is when no result received or empty result, check status).
15. **"Workflow Details" section** is additional technical information about workflow and its tasks.

</details>**Step 4:** To import Excel files you need to:

- [Prepare Your Data in Finmars Excel Format](https://docs.finmars.com/books/user-quick-start/page/prepare-data-in-finmars-excel-format)
- or use DEMO data from "Download Excel Examples" button -&gt; "Excel Import Templates and Excel Demo Data.zip" archive -&gt; "excel\_demo\_data"

Let's assume that you have the data ready, I will use DEMO data.

**Step 5:** Select corresponding files in the left pane:

1. *Core files*: Instruments, Transactions, FX Rates, Prices,
2. *Plus files in "File Fields (Advanced Import)" section*: Currencies, Accounts, Portfolios, Counterparties, Responsibles, Strategies, Instrument Factor Schedules, Instrument Accrual Schedules, Positions Daily, Positions Initial.

[![image.png](https://docs.finmars.com/uploads/images/gallery/2025-08/scaled-1680-/i8Gimage.png)](https://docs.finmars.com/uploads/images/gallery/2025-08/i8Gimage.png)

[![image.png](https://docs.finmars.com/uploads/images/gallery/2025-08/scaled-1680-/yQOimage.png)](https://docs.finmars.com/uploads/images/gallery/2025-08/yQOimage.png)

**Step 6:** Check checkboxes, it's recommended to keep ticked:

- *Parse Simple Entities* - if you didn't create/provided in files simple entities like currencies, accounts, ..., Responsibles, they will be created from provided data with user codes as names.
- *Parse Instruments* - if you didn't create/provided in files it will try to import data from FinmarsDB (not implemented as of 2025-08-20) or will create a Dummy instrument that you can edit later.
- *Calculate Metrics* - will run calculations for reports and dashboards based on the files you provided, you can override calculation setting in "*Advanced Settings"* section.

**Step 7:** Click "Run" button and you will see:

1. uploading progress window showing your selected files (it will disappear when finished uploading)
2. then confirmation window, you can check that everything is ok and click run button to start executing

[![image.png](https://docs.finmars.com/uploads/images/gallery/2025-08/scaled-1680-/UCFimage.png)](https://docs.finmars.com/uploads/images/gallery/2025-08/UCFimage.png)

[![image.png](https://docs.finmars.com/uploads/images/gallery/2025-08/scaled-1680-/18Bimage.png)](https://docs.finmars.com/uploads/images/gallery/2025-08/18Bimage.png)

**Step 8:** After clicking "Run" button if everything is ok, the first thing you will see is that status badge changed to "Queued" and "Refresh" and "Open Workflow" buttons are active now.

[![image.png](https://docs.finmars.com/uploads/images/gallery/2025-08/scaled-1680-/hWnimage.png)](https://docs.finmars.com/uploads/images/gallery/2025-08/hWnimage.png)

**Step 9:** Click Refresh button to see the progress. Logs will show what's going on.

[![image.png](https://docs.finmars.com/uploads/images/gallery/2025-08/scaled-1680-/qUPimage.png)](https://docs.finmars.com/uploads/images/gallery/2025-08/qUPimage.png)

**Step 10:** You need to wait for:

1. the **status change** from "In-progress" to the next transition **"Completed"** or "Error" (see label #1 below in the screenshot)
2. the **result text** area will give you summary of execution (see label #2 below in the screenshot)

**If you use DEMO data: you will need to wait around 40 minutes for a full pipeline.**

<details id="bkmrk-expected-steps-in-lo"><summary>Expected Steps in Log</summary>

1. <div><div>parse_import_currencies</div></div>
2. parse\_import\_accounts
3. parse\_import\_portfolios
4. parse\_import\_counterparties
5. parse\_import\_responsibles
6. parse\_import\_strategies1
7. parse\_import\_instruments
8. import\_instr\_factor\_schedules
9. import\_instr\_accrual\_schedules
10. import\_transactions
11. import\_positions\_initial
12. import\_positions\_daily
13. import\_fx\_rates
14. import\_prices
15. if you ticked "Calculate Metrics" checkbox 
    1. calculate\_price\_history
    2. calculate\_register\_records
    3. calculate\_portfolio\_price\_history
    4. calculate\_portfolio\_history

</details>[![image.png](https://docs.finmars.com/uploads/images/gallery/2025-08/scaled-1680-/Klsimage.png)](https://docs.finmars.com/uploads/images/gallery/2025-08/Klsimage.png)

**Step 11:** If you see status completed and no errors in Result or Log you can go check your data:

1. Go to **Dashboard**
2. Select **"PMS: 1 Overview"** layout
3. Set **"Date From"** according to your Data or for DEMO use "2022-12-01"
4. Set **"Report Date"** according to your Data or for DEMO use "2025-03-31"

To further explore your data and to learn how to use reports, start with: [How to Check Balance Report](https://docs.finmars.com/books/user-quick-start/page/check-balance-report) and continue with further guides.

[![image.png](https://docs.finmars.com/uploads/images/gallery/2025-08/scaled-1680-/u0dimage.png)](https://docs.finmars.com/uploads/images/gallery/2025-08/u0dimage.png)