User Quick Start
- Get Access to Finmars
- Link with Finmars ID
- Install PMS Core or PMS Plus add-on
- Import Files in PMS Core and PMS Plus
- Prepare Data in Finmars Excel Format
- Check Transaction Report
- Calculate YTM and Modified Duration
- Check Balance Report
- Check Profit and Loss Report
- Calculate Performance (Modified Dietz)
- Check Performance Report
- Calculate data for Mobile/Dashboards
- Check Standard Dashboards
- Use Mobile App [TO BE UPDATED]
- Duplicate the Layout
- Get License for add-on [TO BE UPDATED]
Get Access to Finmars
Prerequisites
No specific prerequisites are needed.
Getting Access to Finmars
Based on your desired deployment type you can get access to Finmars in following ways:
Link with Finmars ID
Prerequisites
We assume you have all prerequisites you may need, including:
- Get Access to Finmars
- You have the internet access
Linking with Finmars ID
Step 1: Go to marketplace

Step 2: Click on "Link with Finmars ID" button

Step 3: You will be redirected to FinmarsID sign-in/register page: you need to either sign-in or register in FinmarsID, depending on your choice you select what you need.
Step 4: After register/sign-in you will be redirected back to the marketplace page, refresh the page and you will see that instead of "Link with Finmars ID" button you now have "Linked with Finmars ID" label and "Unlink" button.
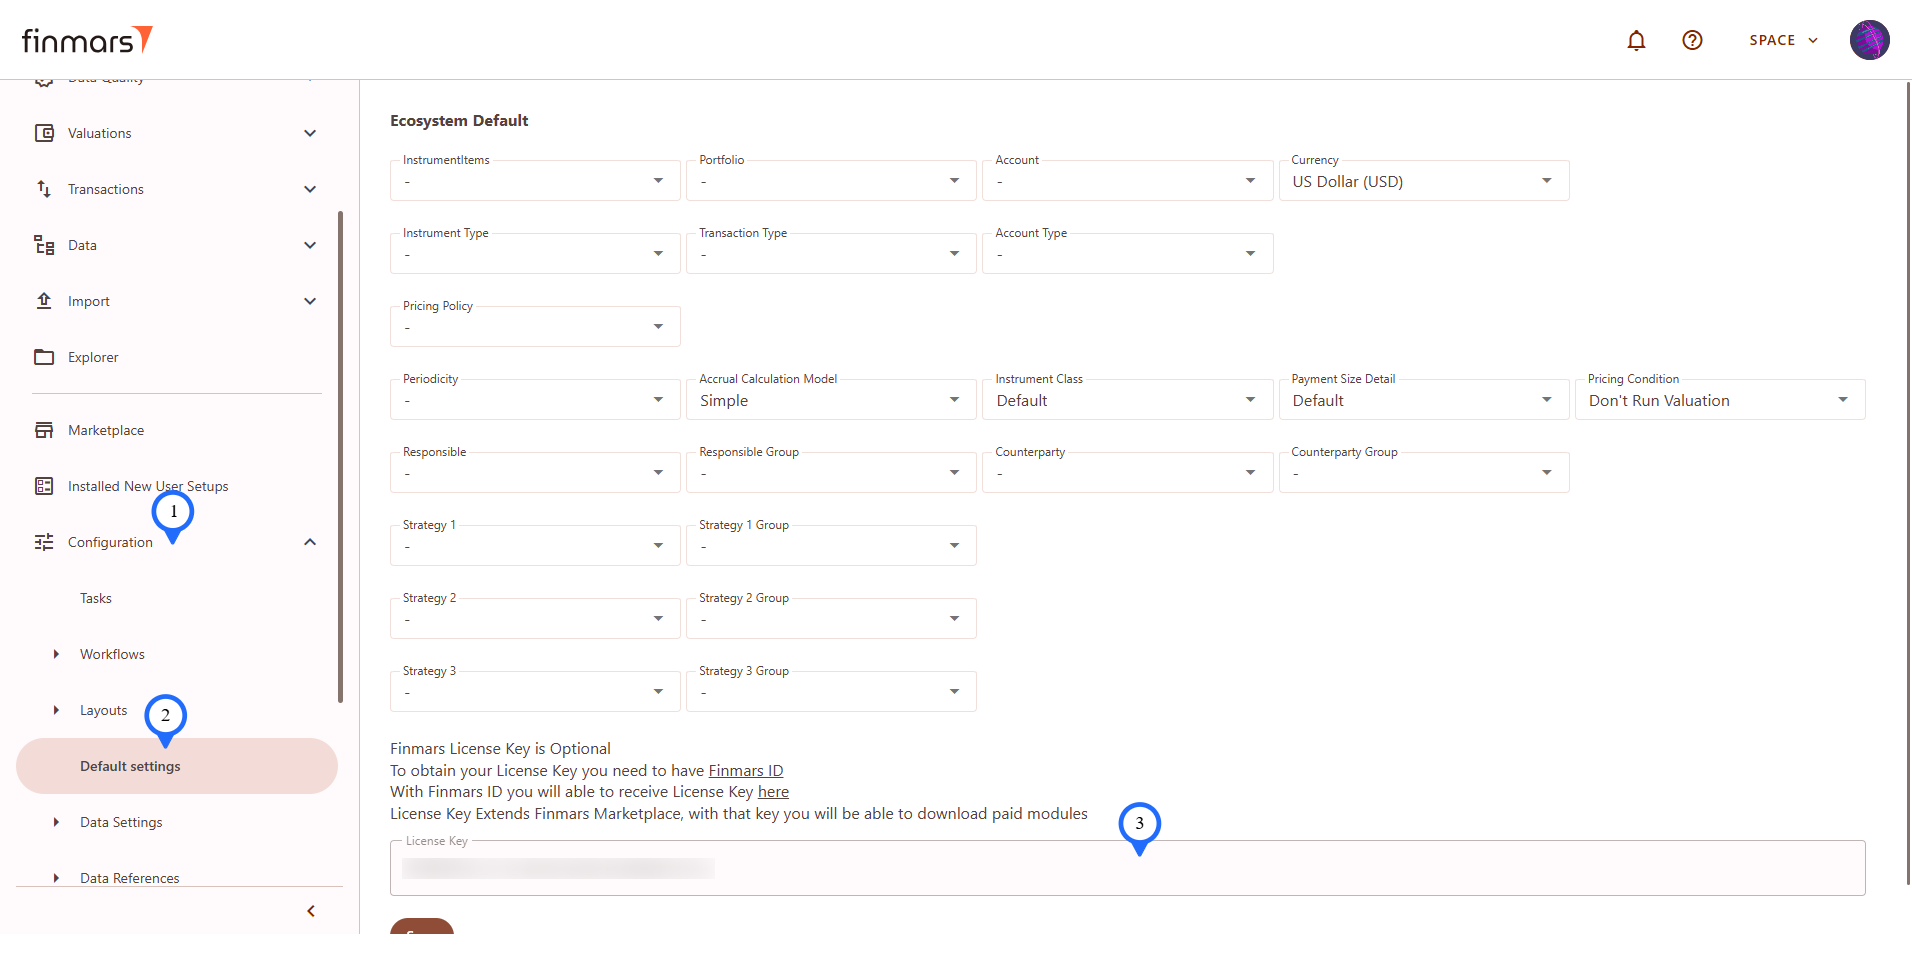
Step 5: Additionally you will have your License key added to the Default settings which will be used to unlock paid modules in the marketplace
Install PMS Core or PMS Plus add-on
Prerequisites
We assume you have all prerequisites you may need, including:
- Get Access to Finmars
- Link with Finmars ID
- You have the internet access
About PMS Core and PMS Plus add-ons
The Portfolio Management Solution (PMS) is a core Finmars add-on that enables asset managers, investors, and partners to manage, track, and analyze portfolios in one place.
It provides all essential tools for portfolio monitoring, transaction tracking, and performance reporting — available in a fully functional free version, with optional paid features for advanced analytics and automation.
For whom?
- Asset Managers finding insights for their portfolios
- Investors having control over their assets
- Partners developing and providing their solutions
What's Inside?
- Fully functional and Developer friendly FREE Version with Paid Advanced options
- Configurable reports Dashboards, Performance, PnL, Balance with drill down into Transactions
- Comprehensive Layouts for dashboards, reports and data view
- Smart Import data via Excel in Standard Format
- Helper functions to analyze gaps in valuation data and more
- Standard Transaction and Instrument Types support
- Extensive Python Functions for developers
For more technical details see: PMS Core and Plus
Installing PMS Core or PMS Plus add-on
After getting access to Finmars Space in the beginning you won't have any add-ons installed. As of now add-ons are distributed via Marketplace which requires the Internet access.
Go to the Marketplace page in the sidebar menu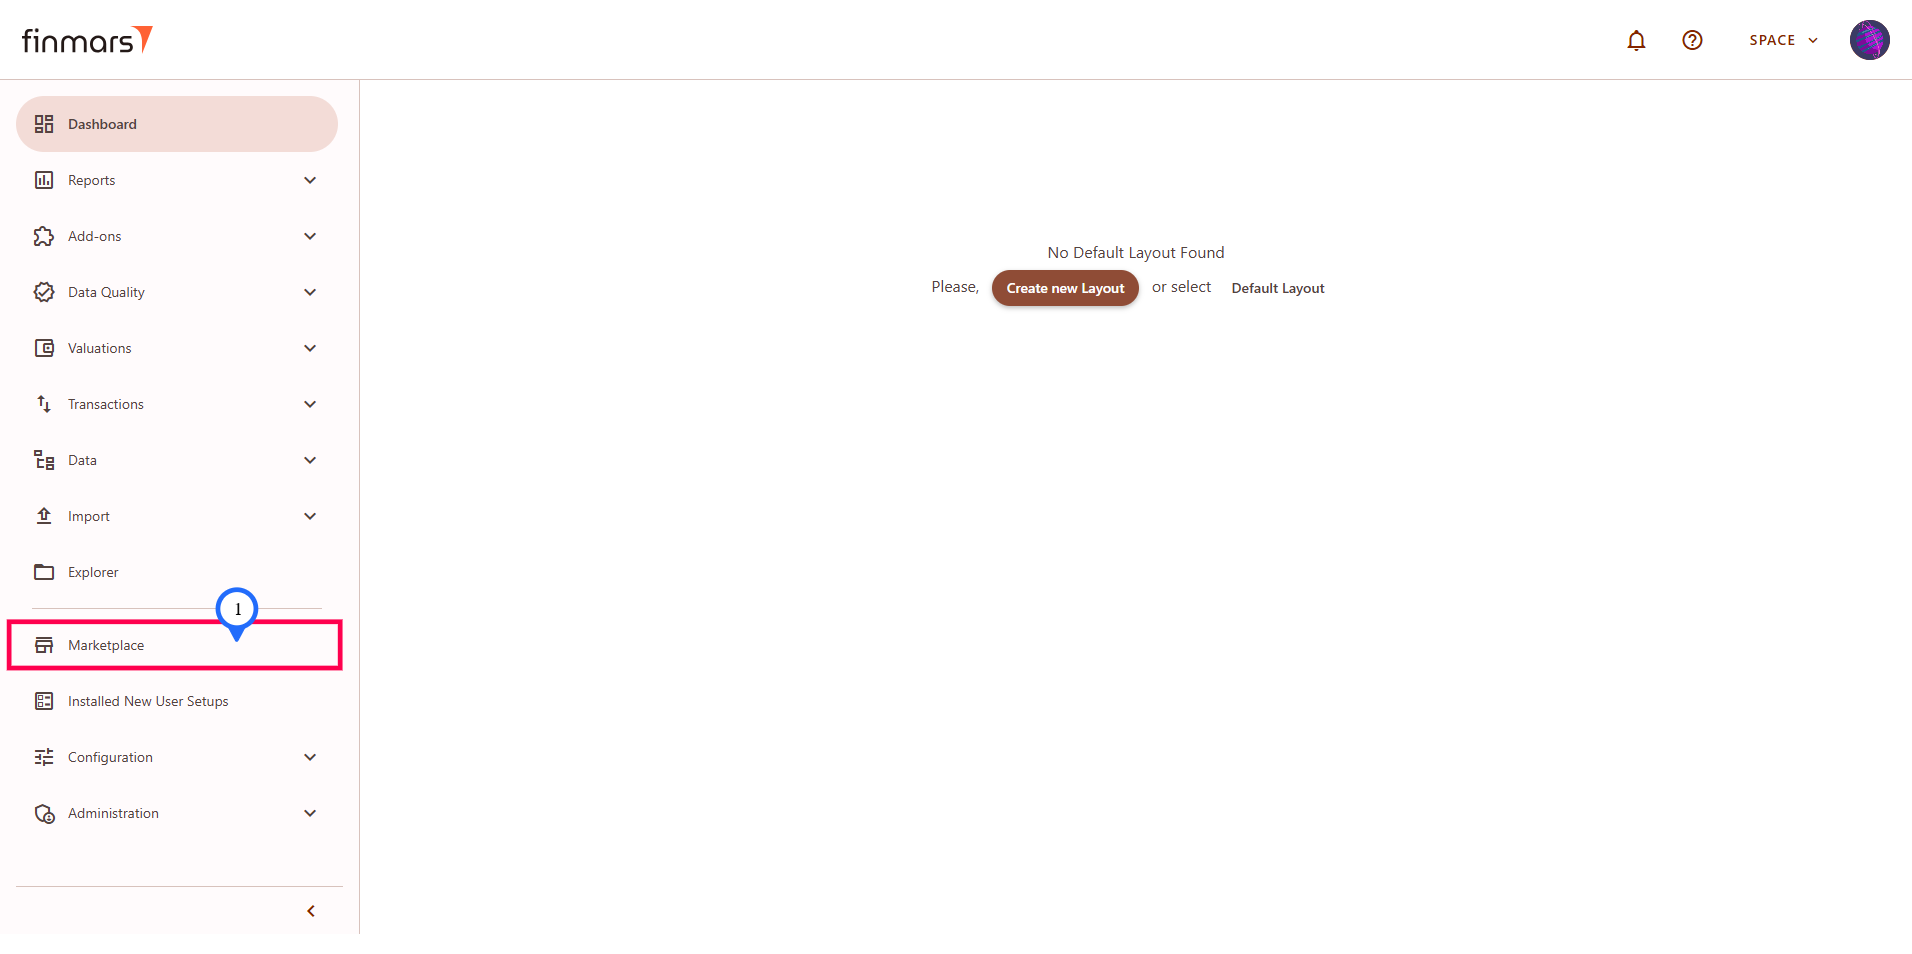
Then depending on your choice you can:
- Install PMS Core add-on
- Install PMS Plus add-on
Installing PMS Core add-on
To install Free PMS Core add-on: Search "PMS Core" in the search bar and you will see PMS Core - Fully functional and Developer friendly FREE version which is subset of PMS Plus
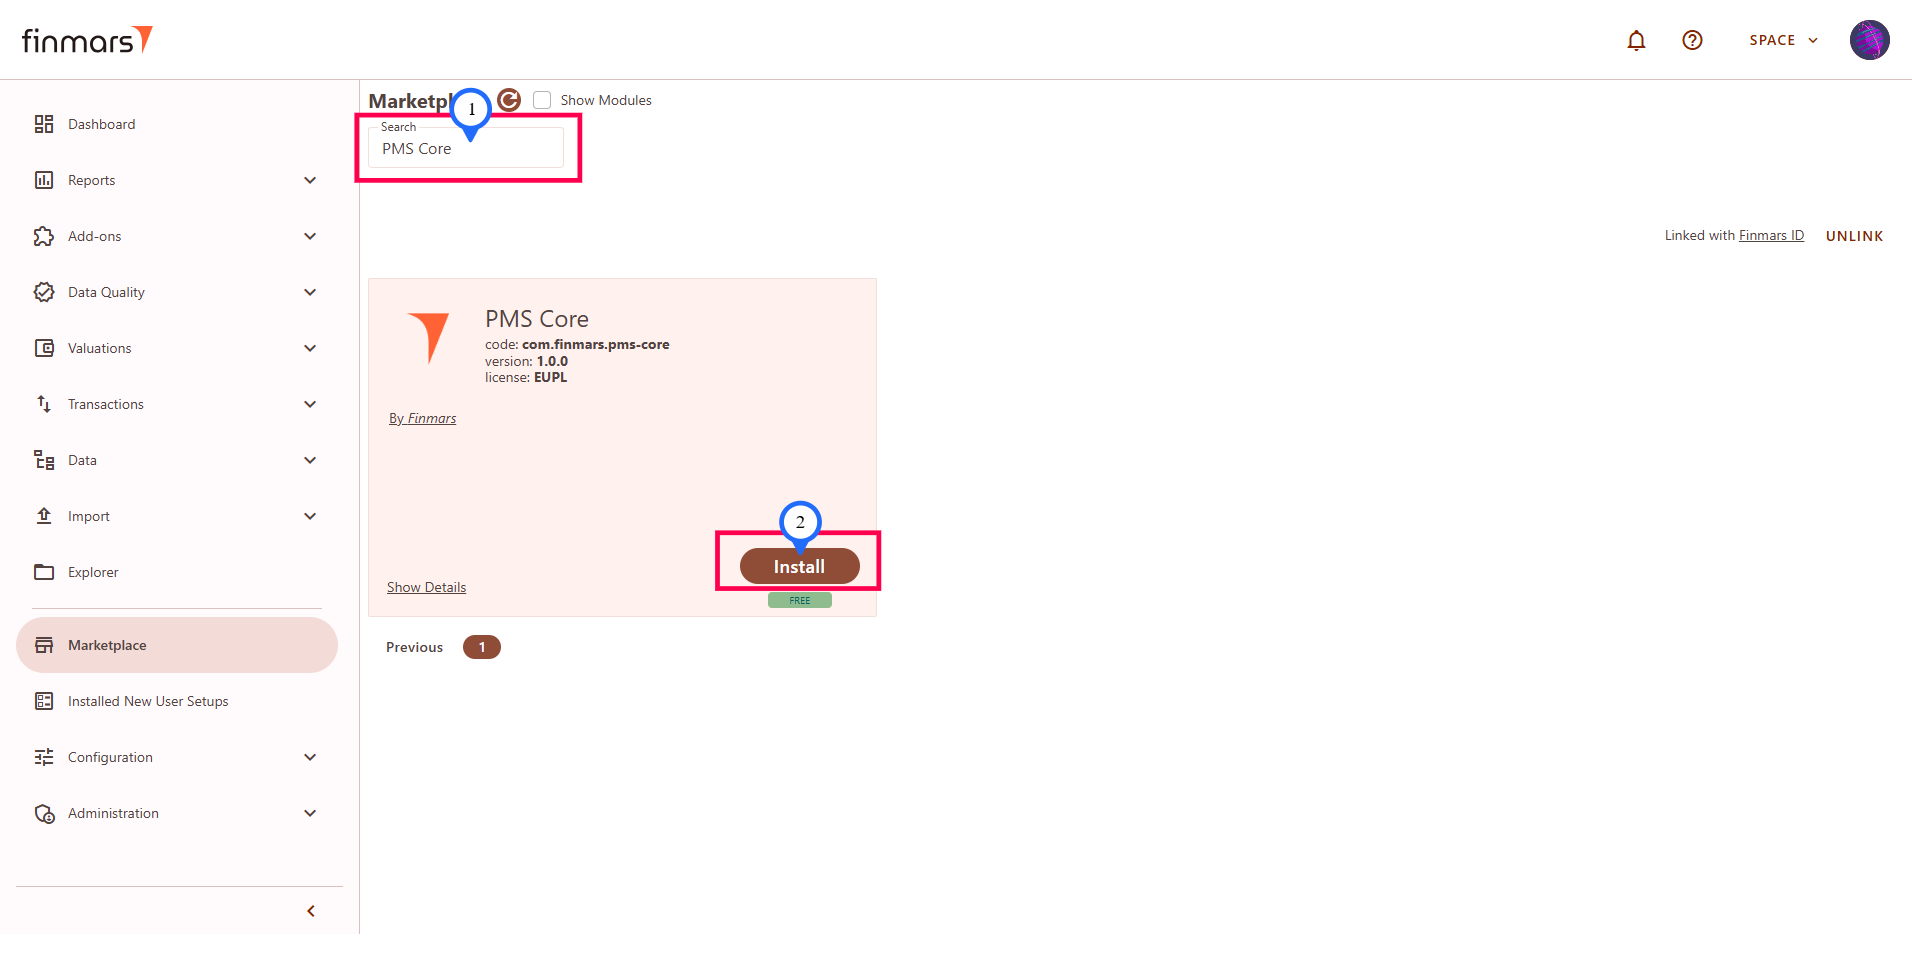
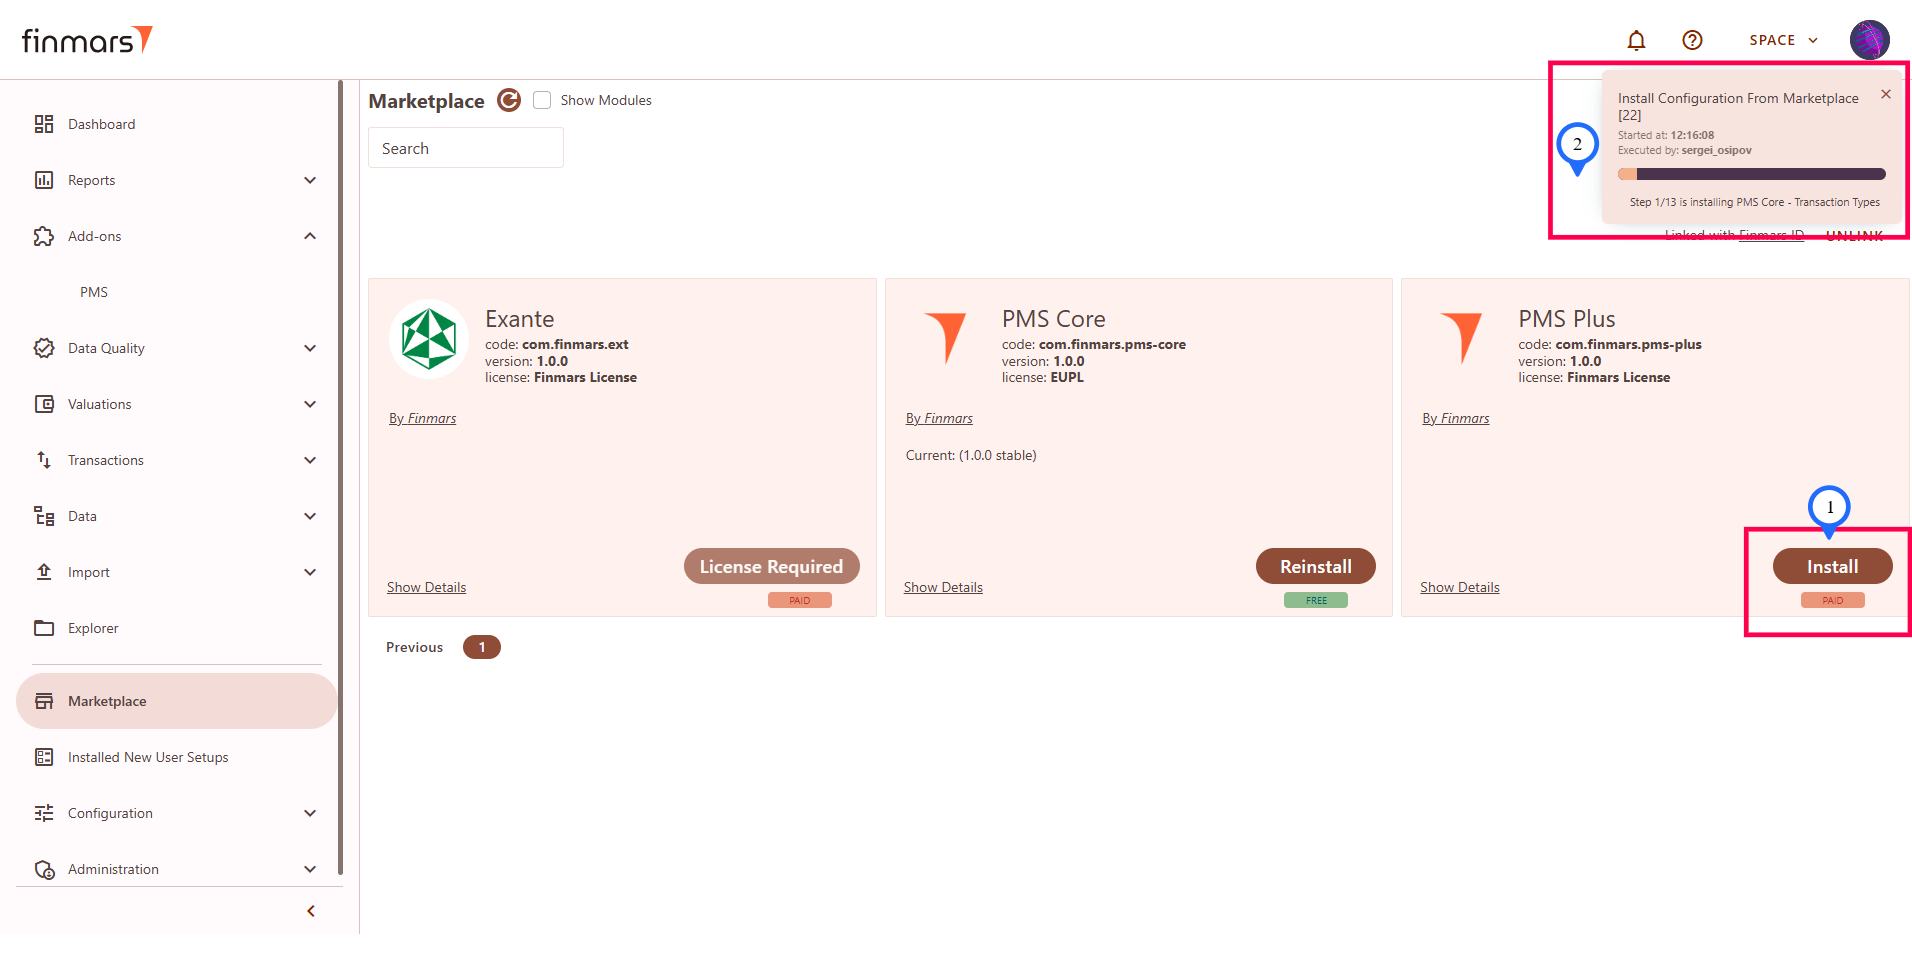
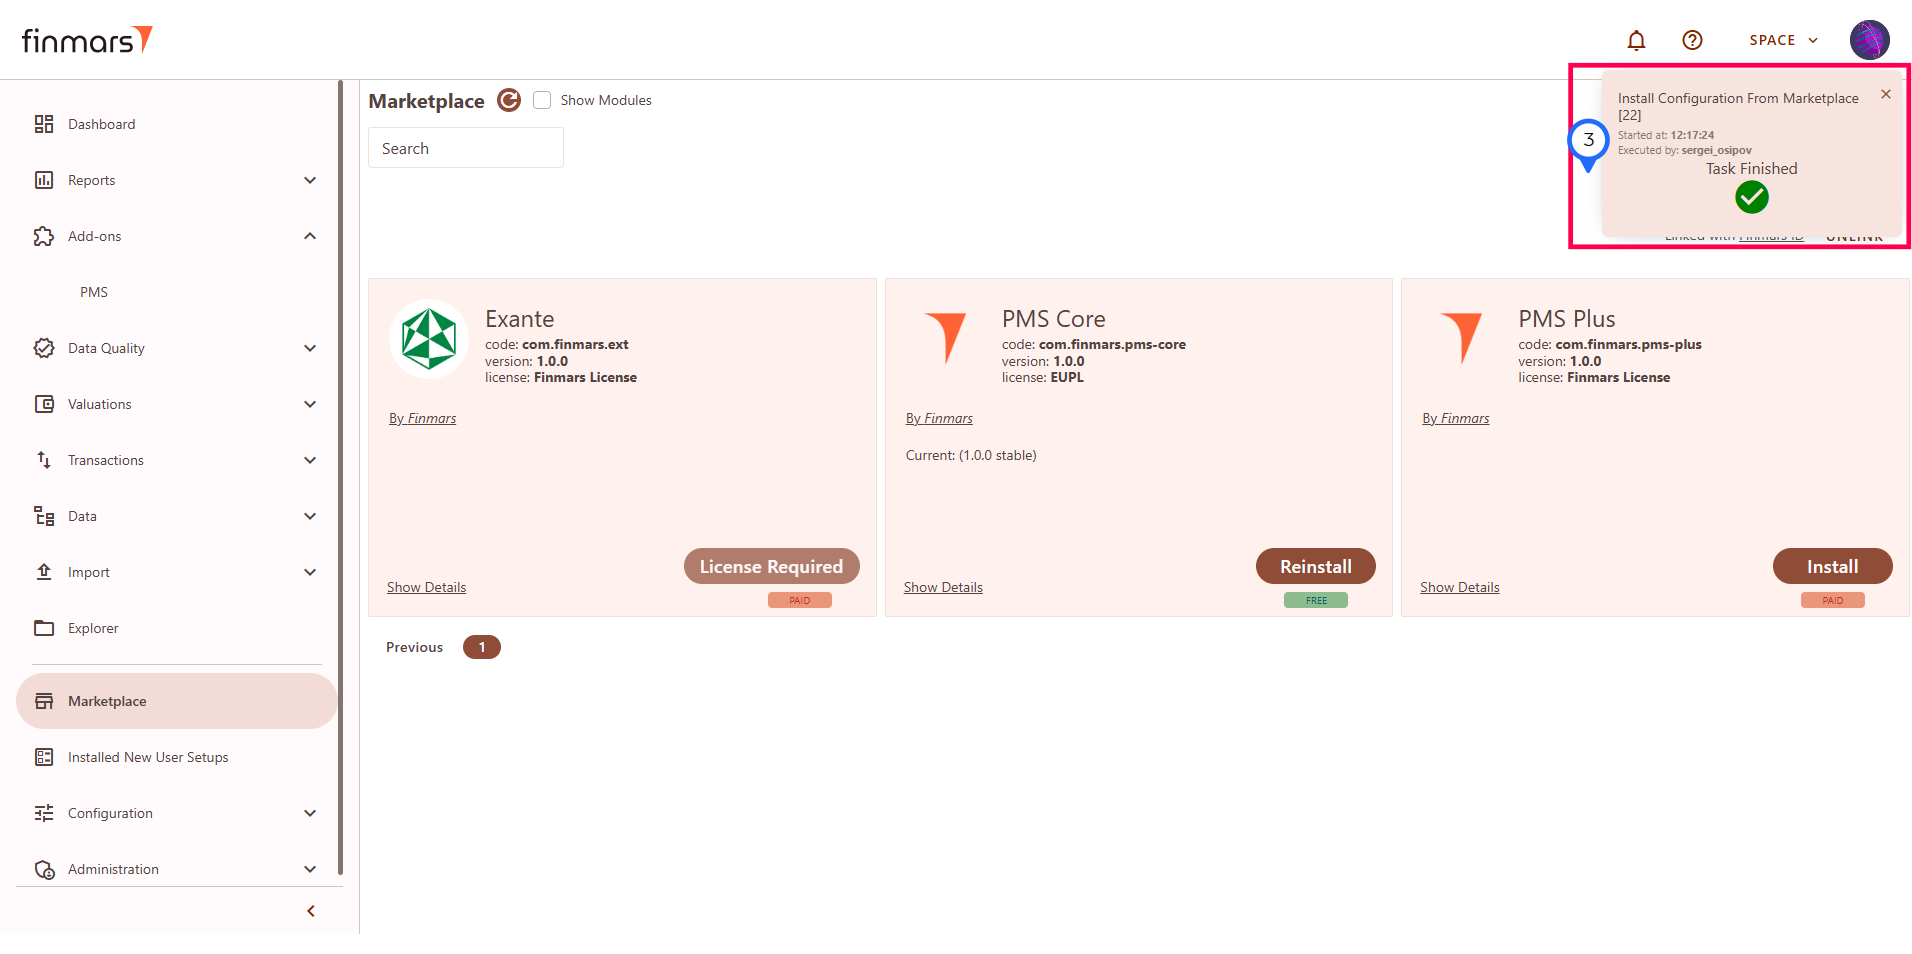
By clicking Install you will get the latest version of the PMS Core add-on. For details on the installation process follow How to Install/Update add-on from Marketplace.
You will get progress window which will show you the progress and finish:

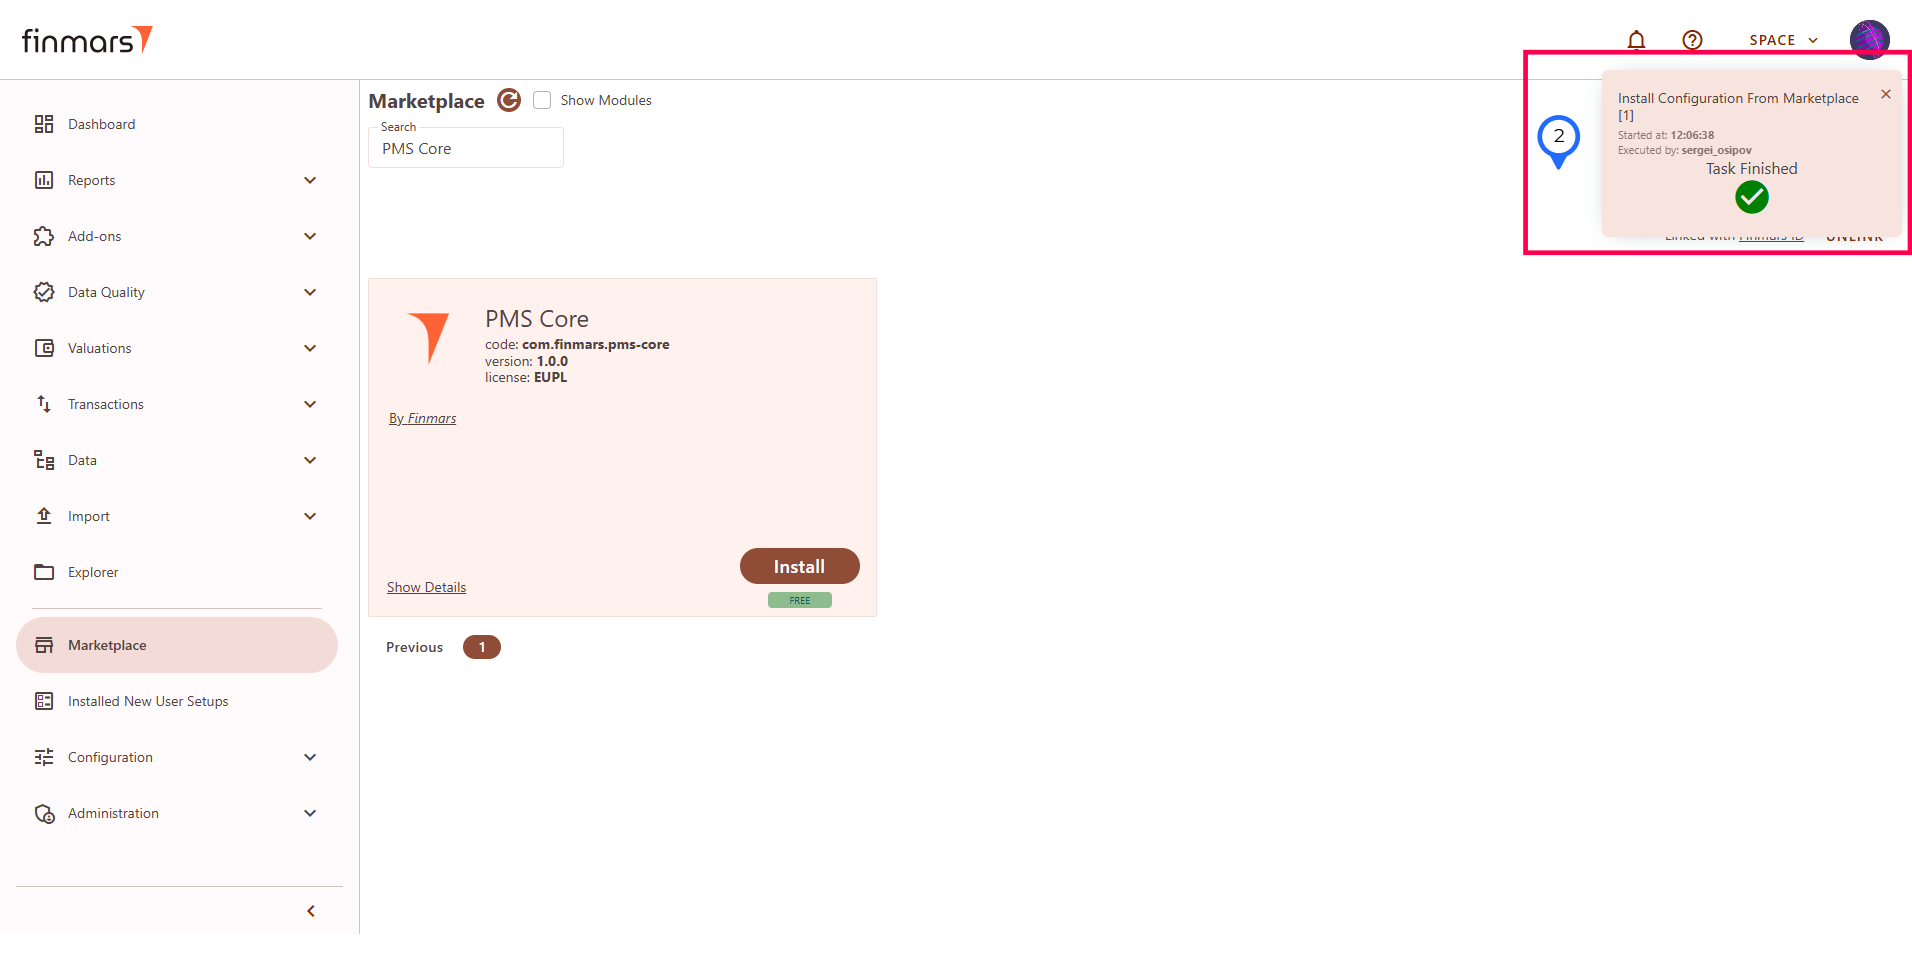
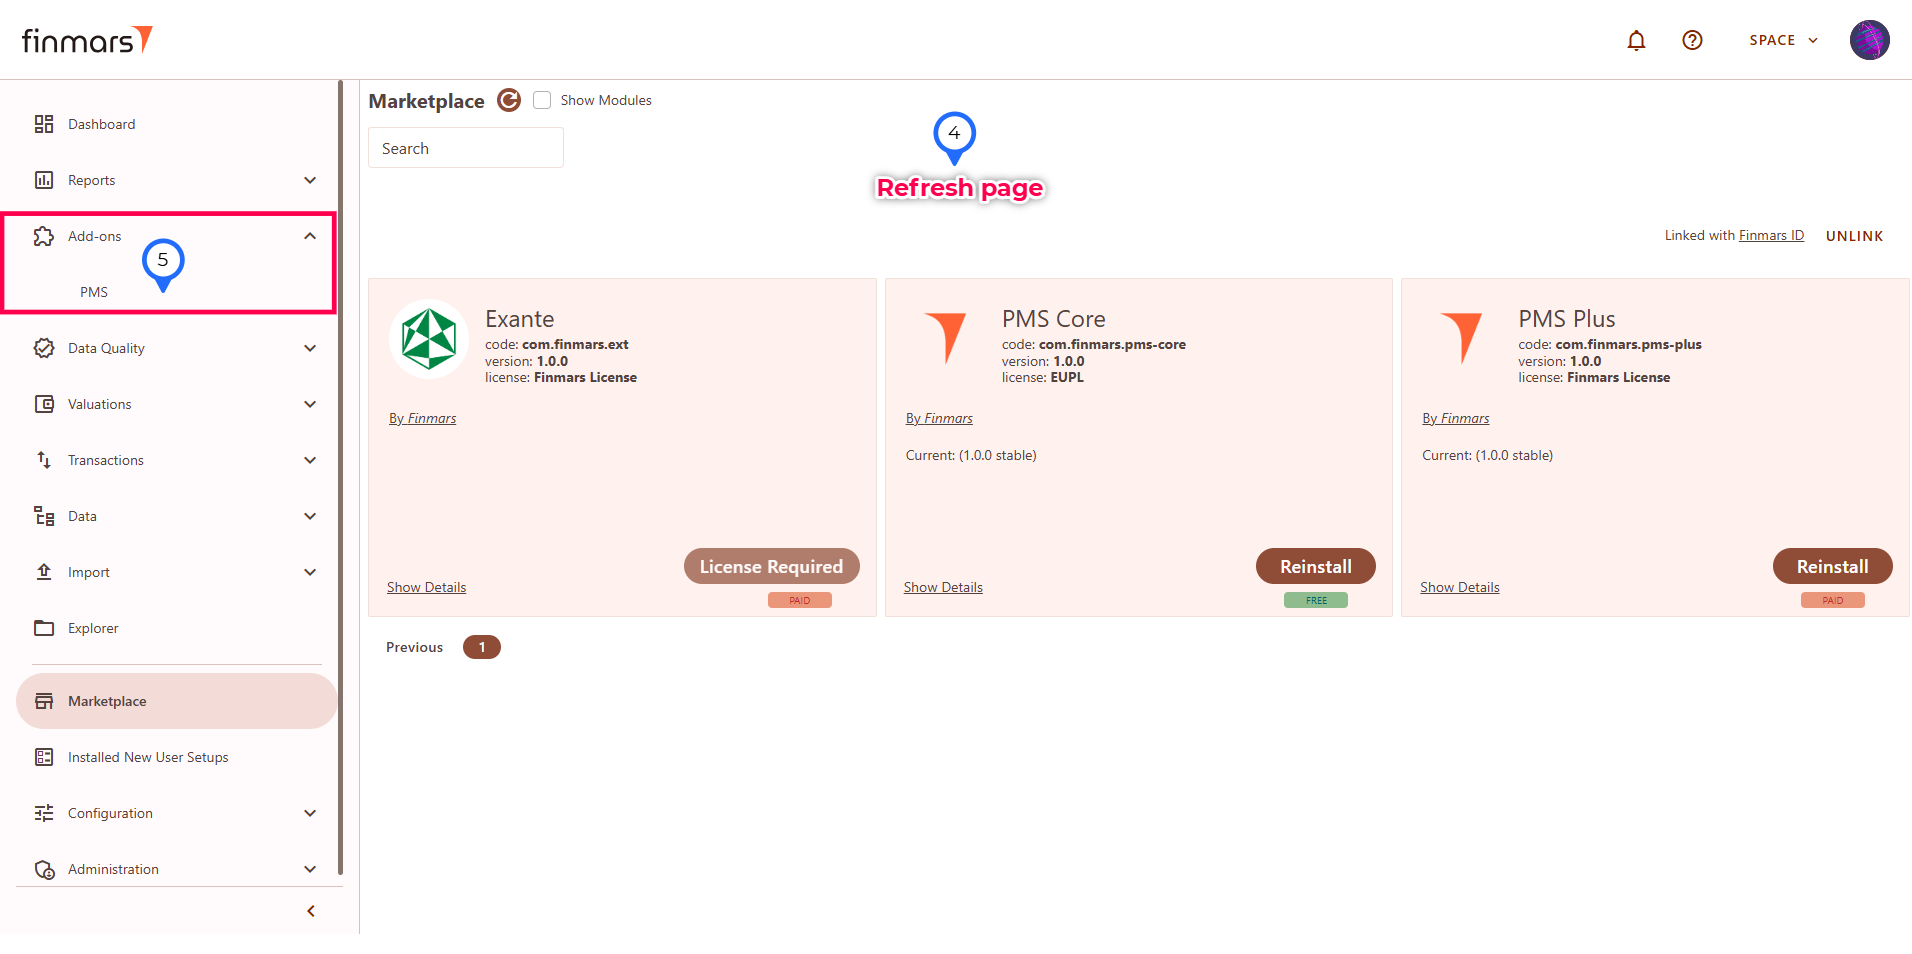
After the installation finished refresh the page and you can go to the sidebar menu Add-ons and see the "PMS" appeared in there.
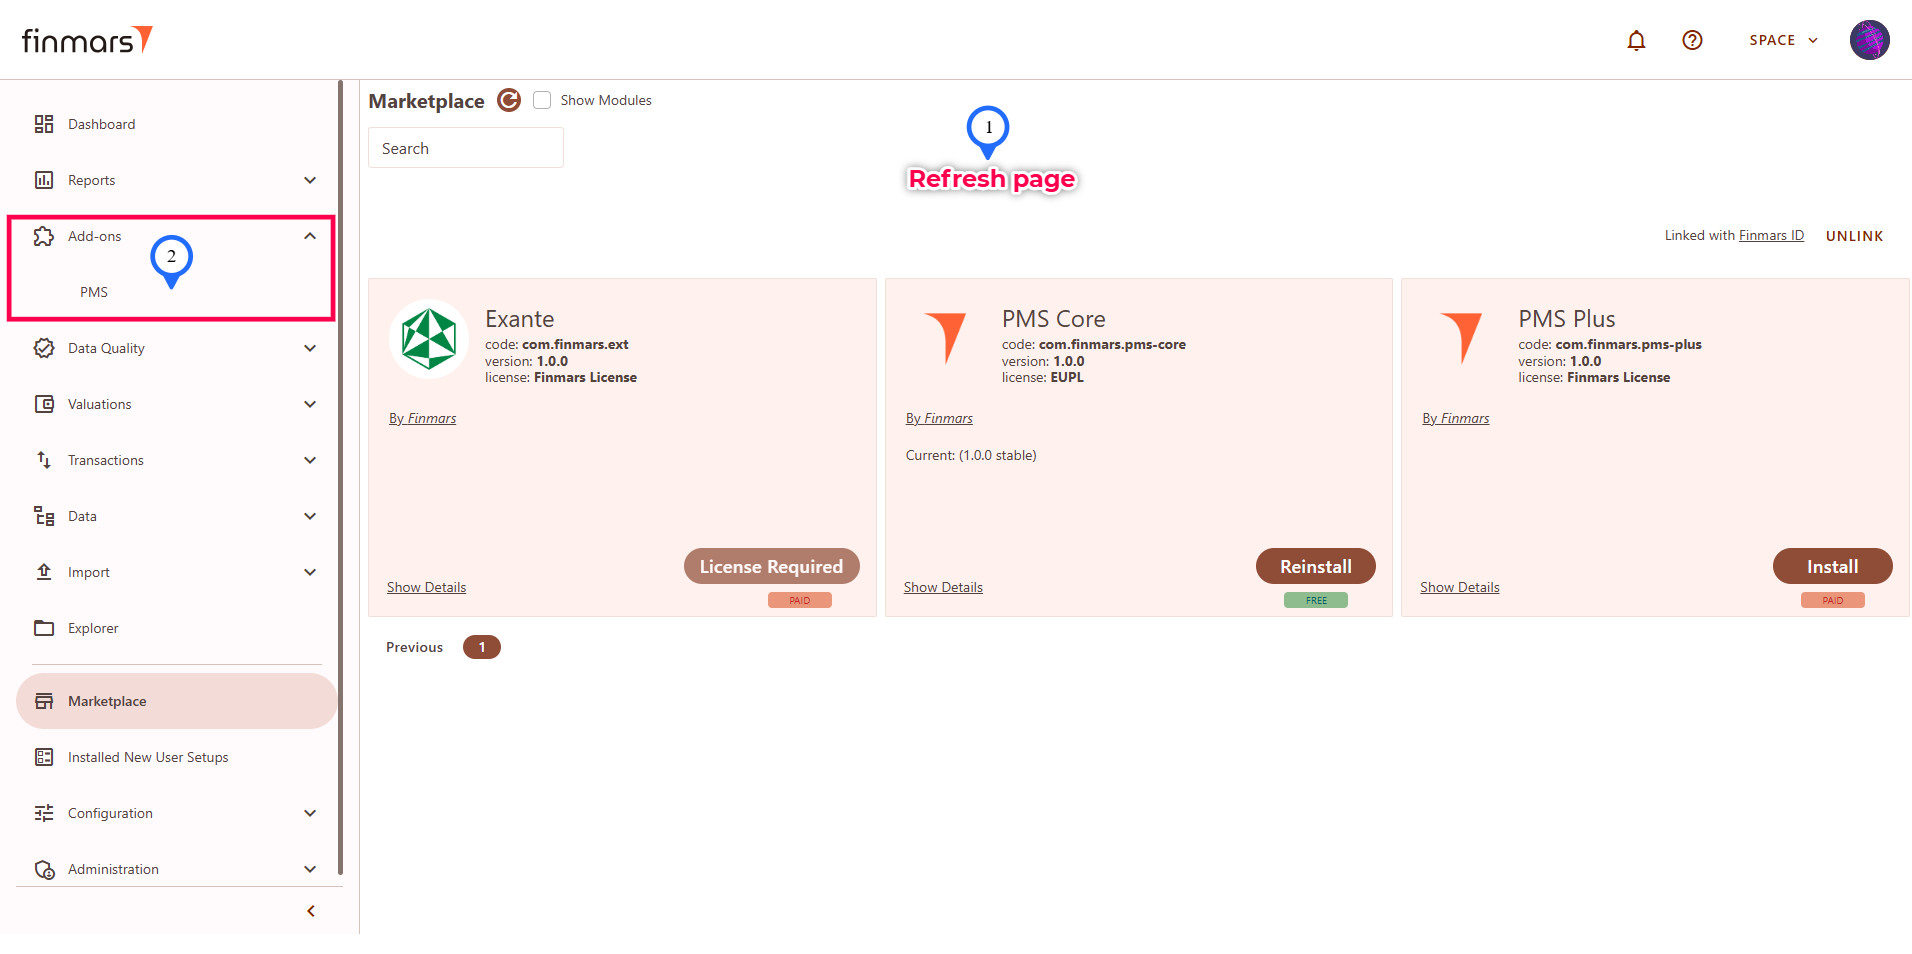
Installing PMS Plus add-on
PMS Plus add-on requires access by your license for installation. Without it for paid add-ons you will see "License Required" button instead of the active "Install" button. To obtain license: Get License for add-on.
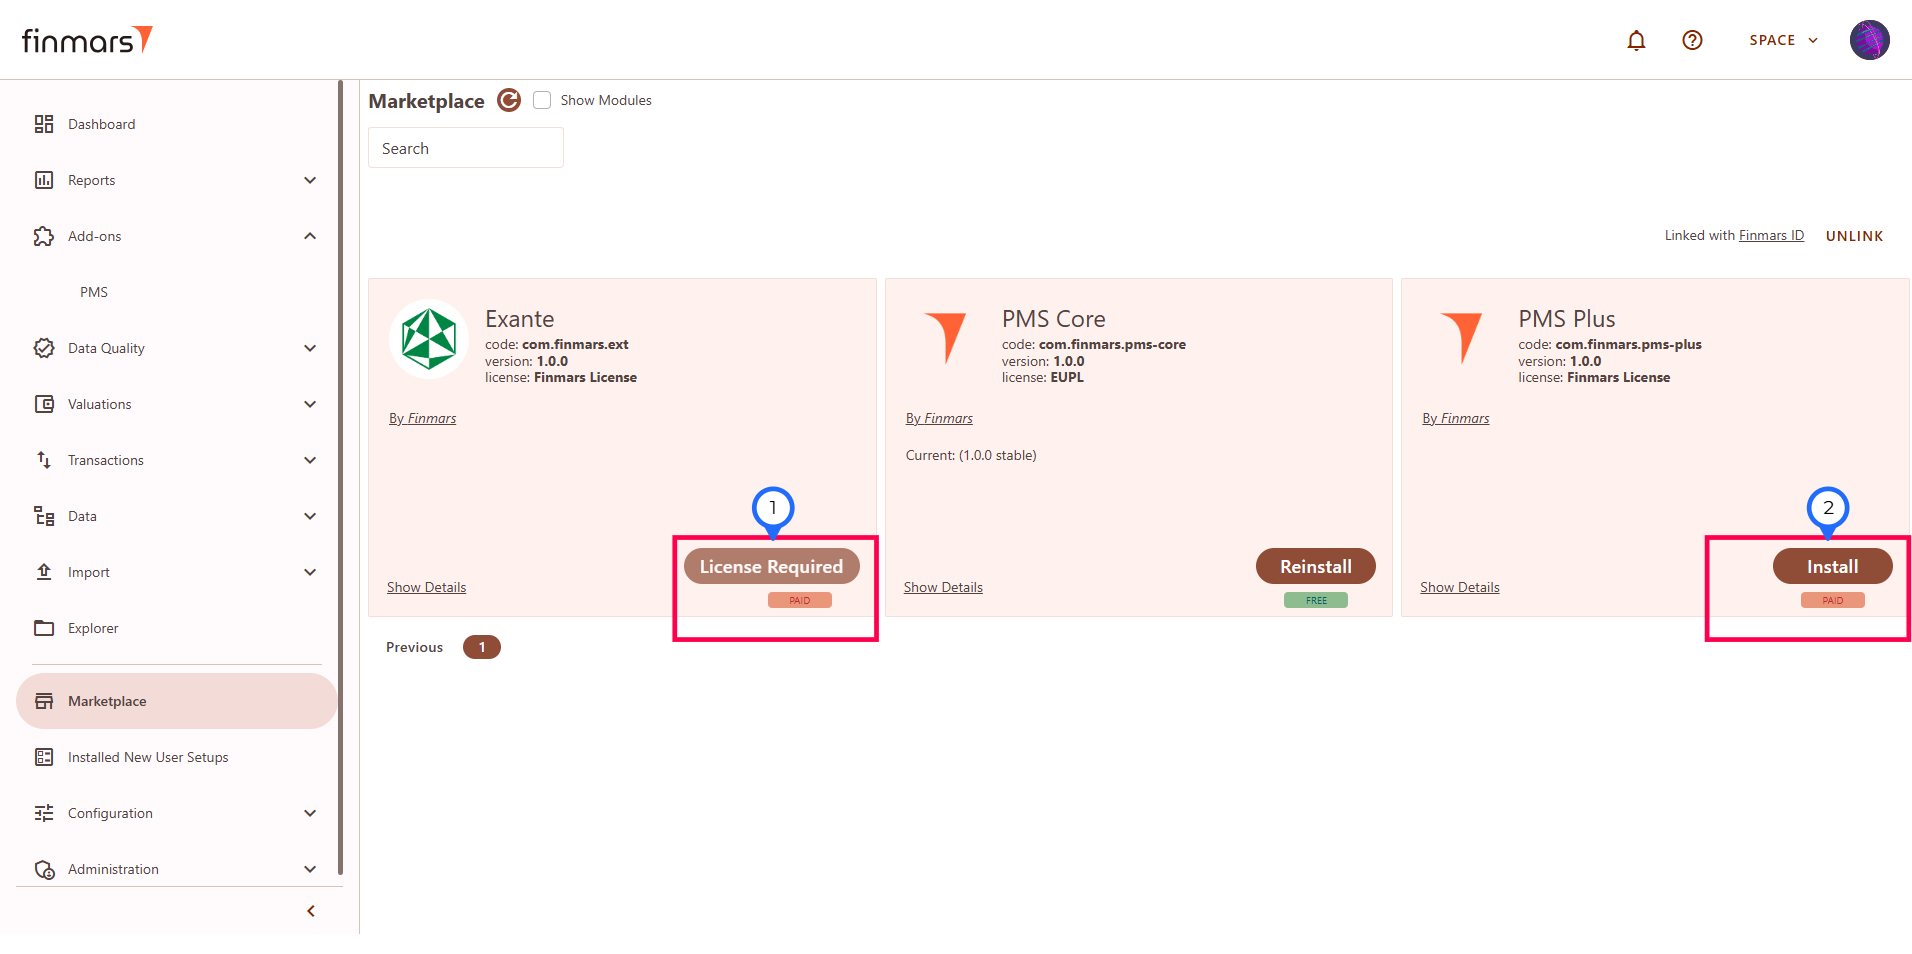
After you obtain the license for PMS Plus you can go to the marketplace page, search for "PMS Plus" and click Install button as usual. The installation process will be the same as for PMS Core. And you can install PMS Plus over existing PMS Core.
Import Files in PMS Core and PMS Plus
Prerequisites
We assume you have all prerequisites you may need, including:
Import Files in PMS Core and PMS Plus
In this guide we will demonstrate how to import excel files in PMS Plus add-on, while commenting what is available to PMS Plus only and absent in PMS Core (which is the subset of PMS Plus).
Step 1: Go to the sidebar menu Add-ons > PMS.

Step 2: You will see the PMS add-on page which provide the access to the Excel Import (1) interface and Helper (2) they both have similar structure of 2 panes: left pane - run page where you configure what to do, and right pane - execution info page where you can see logs and result.
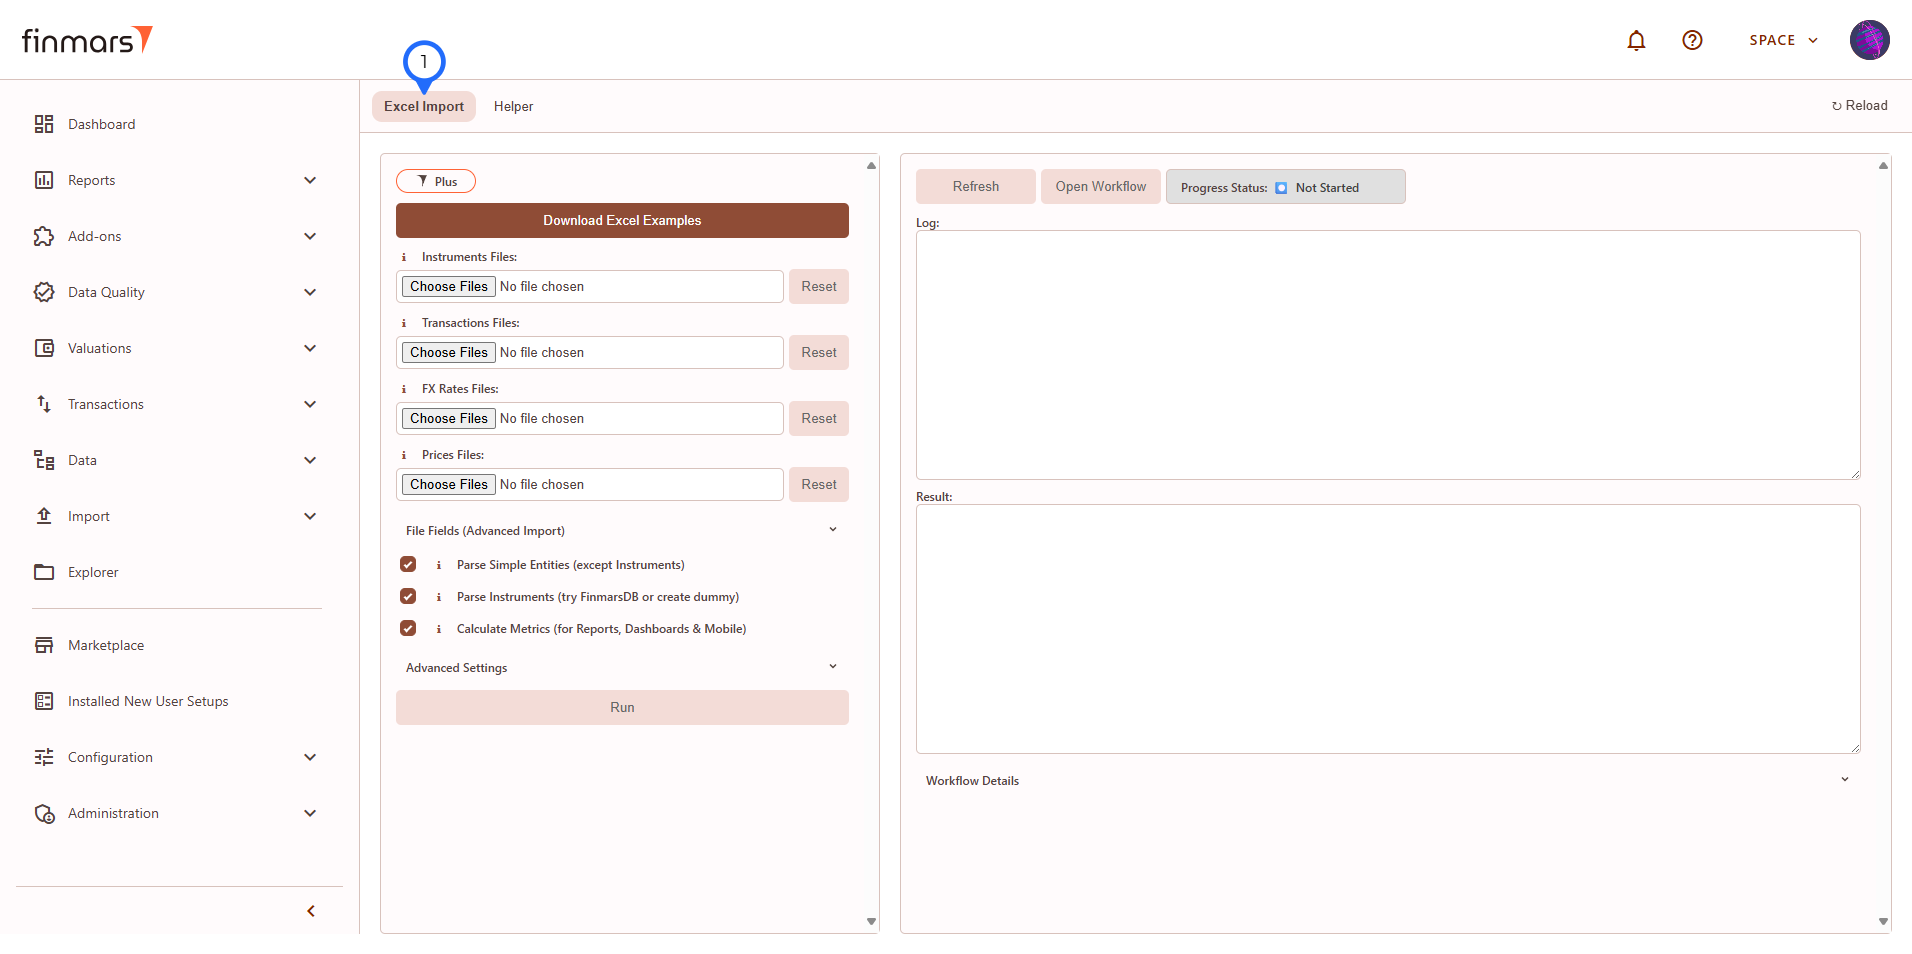
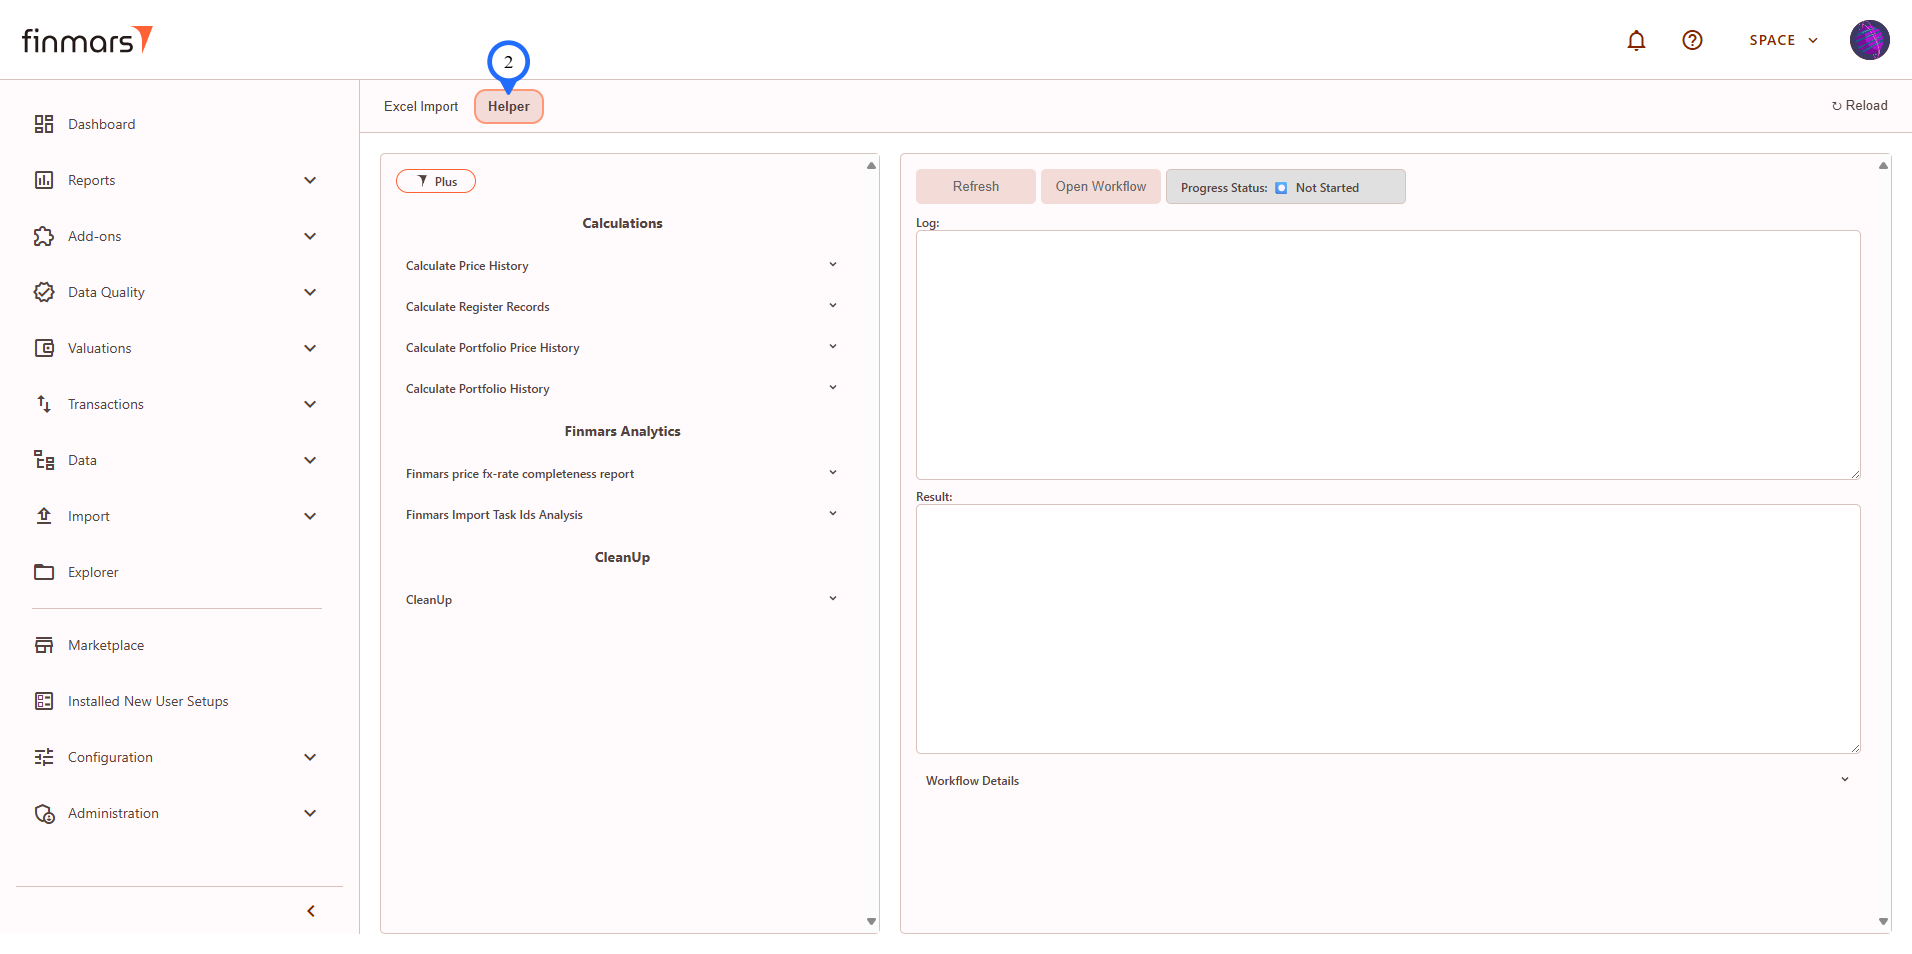
In this guide we will go through how to use Excel Import tab of PMS add-on.
Step 3: Go to Excel Import tab of PMS add-on.
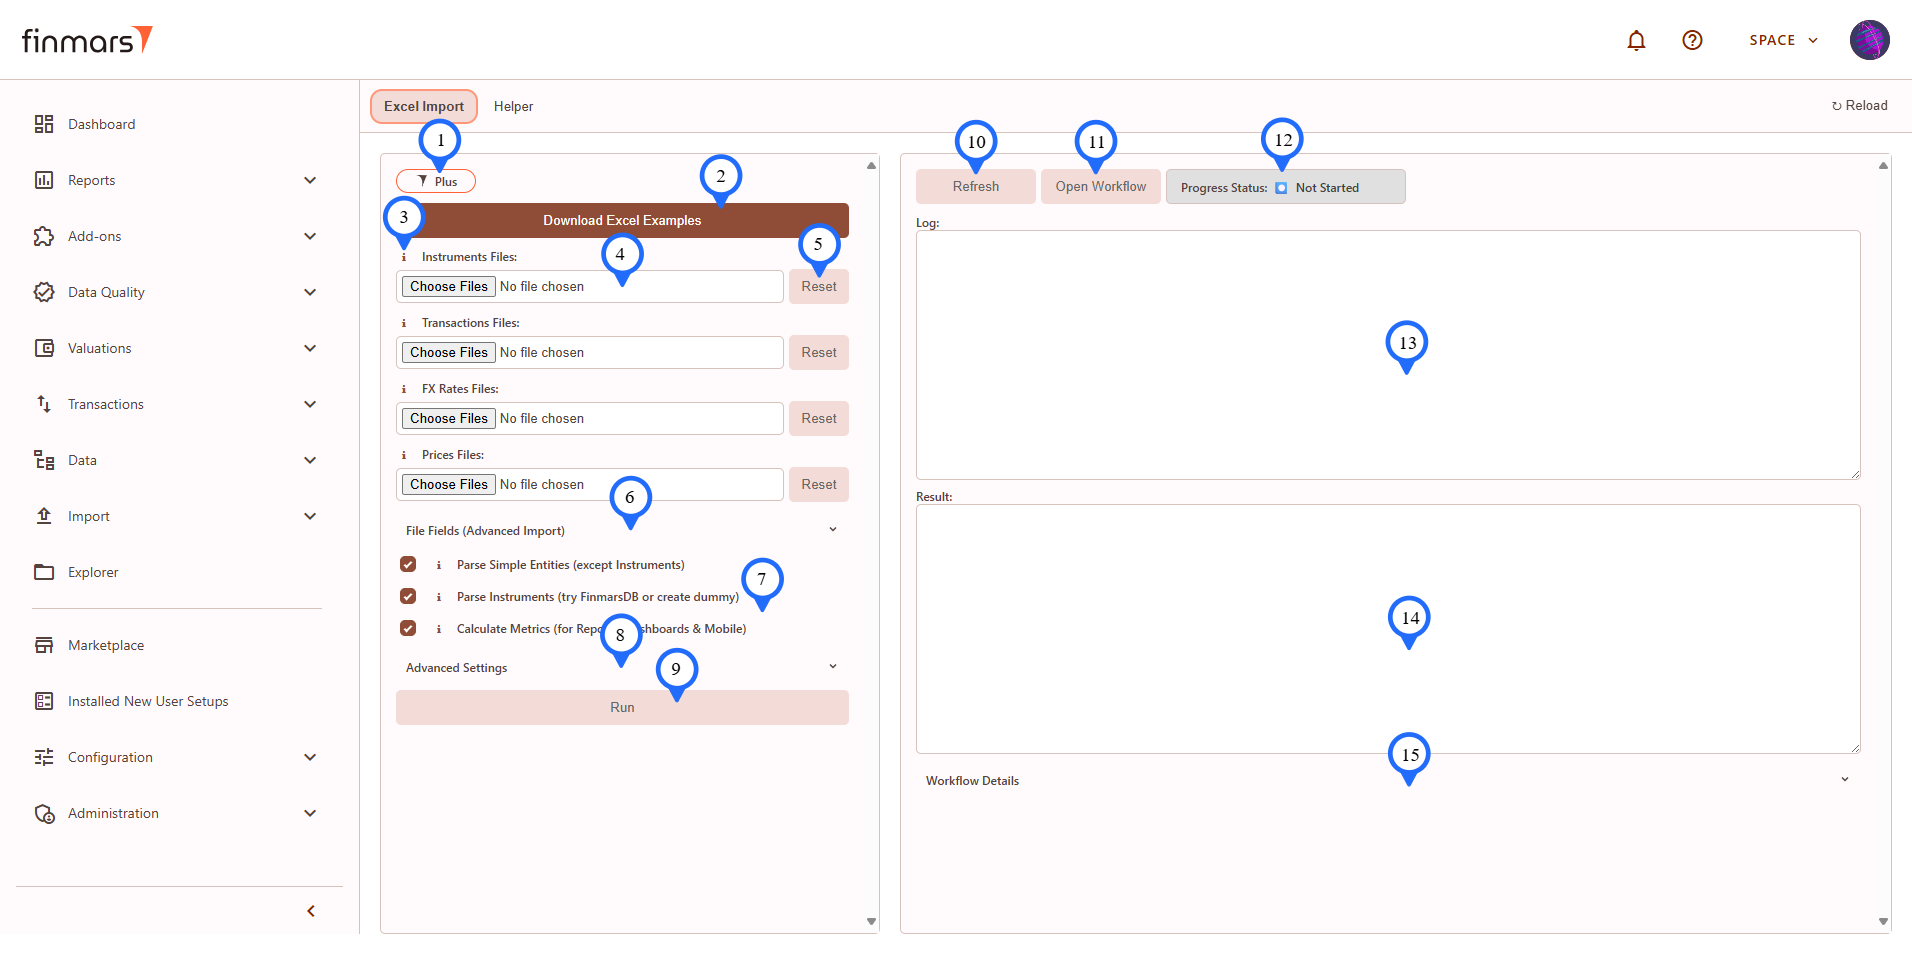
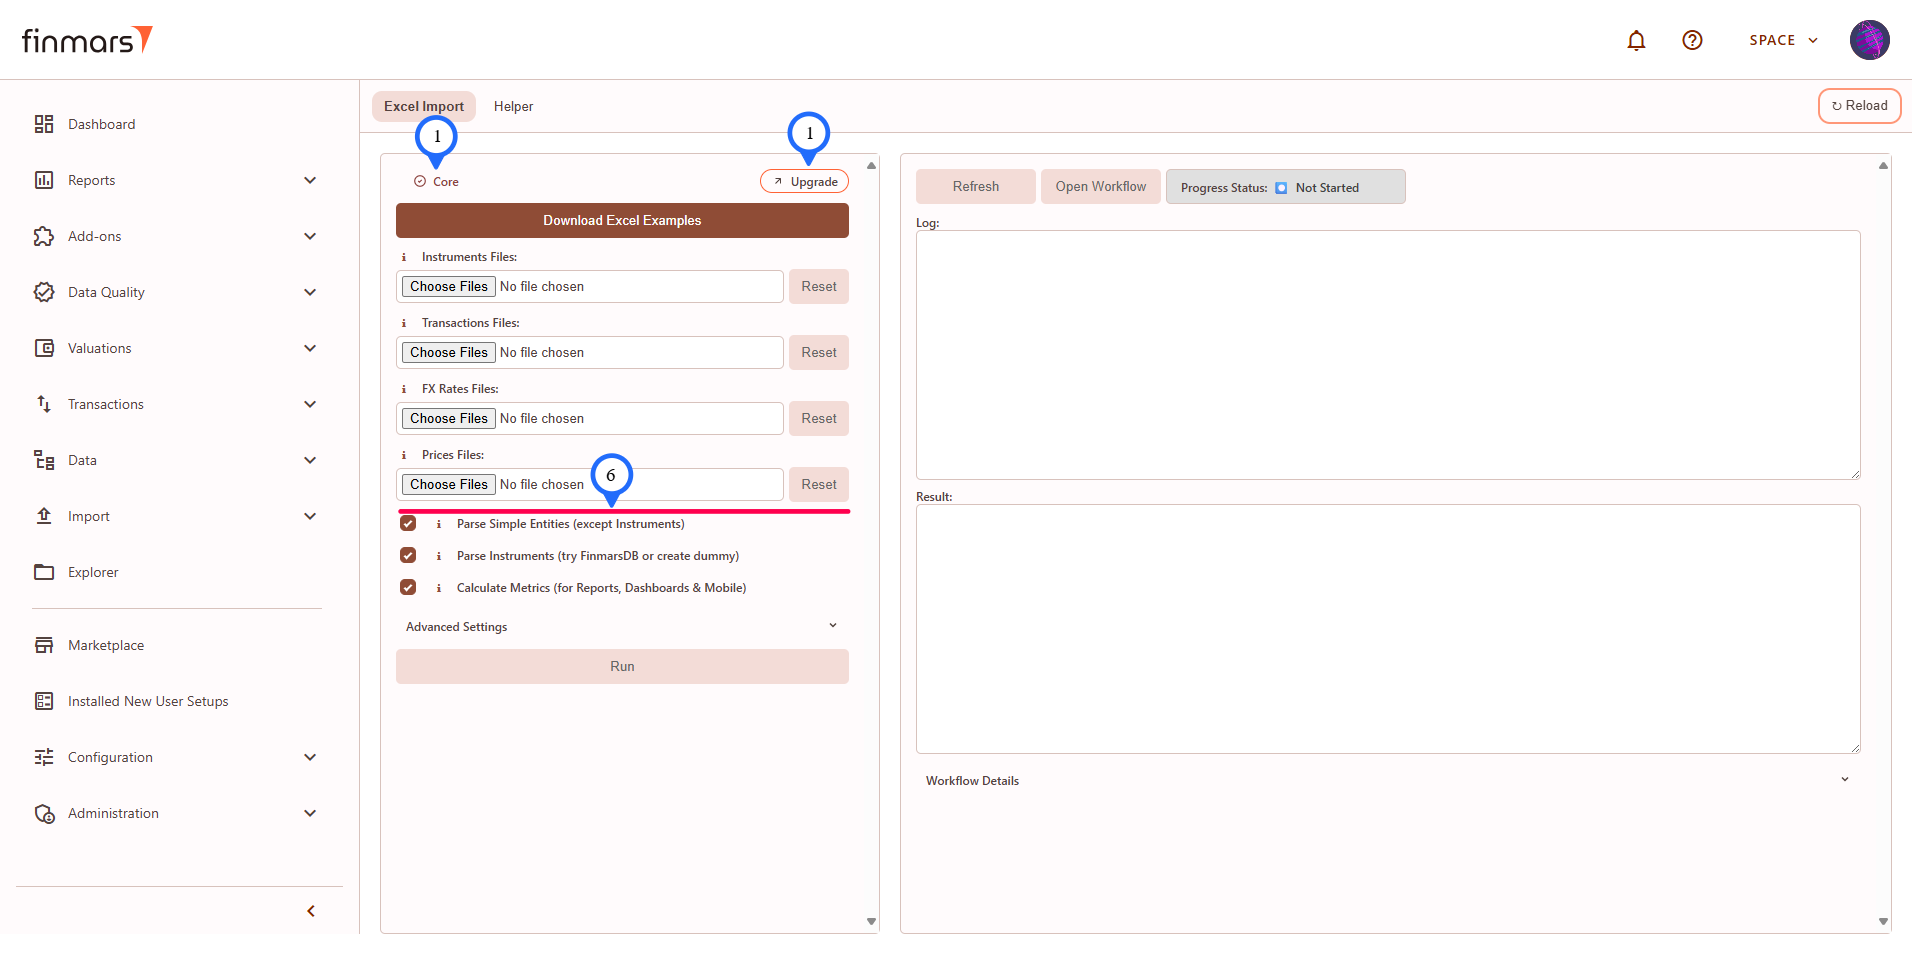
PMS Plus version
PMS Core version (marked differences)
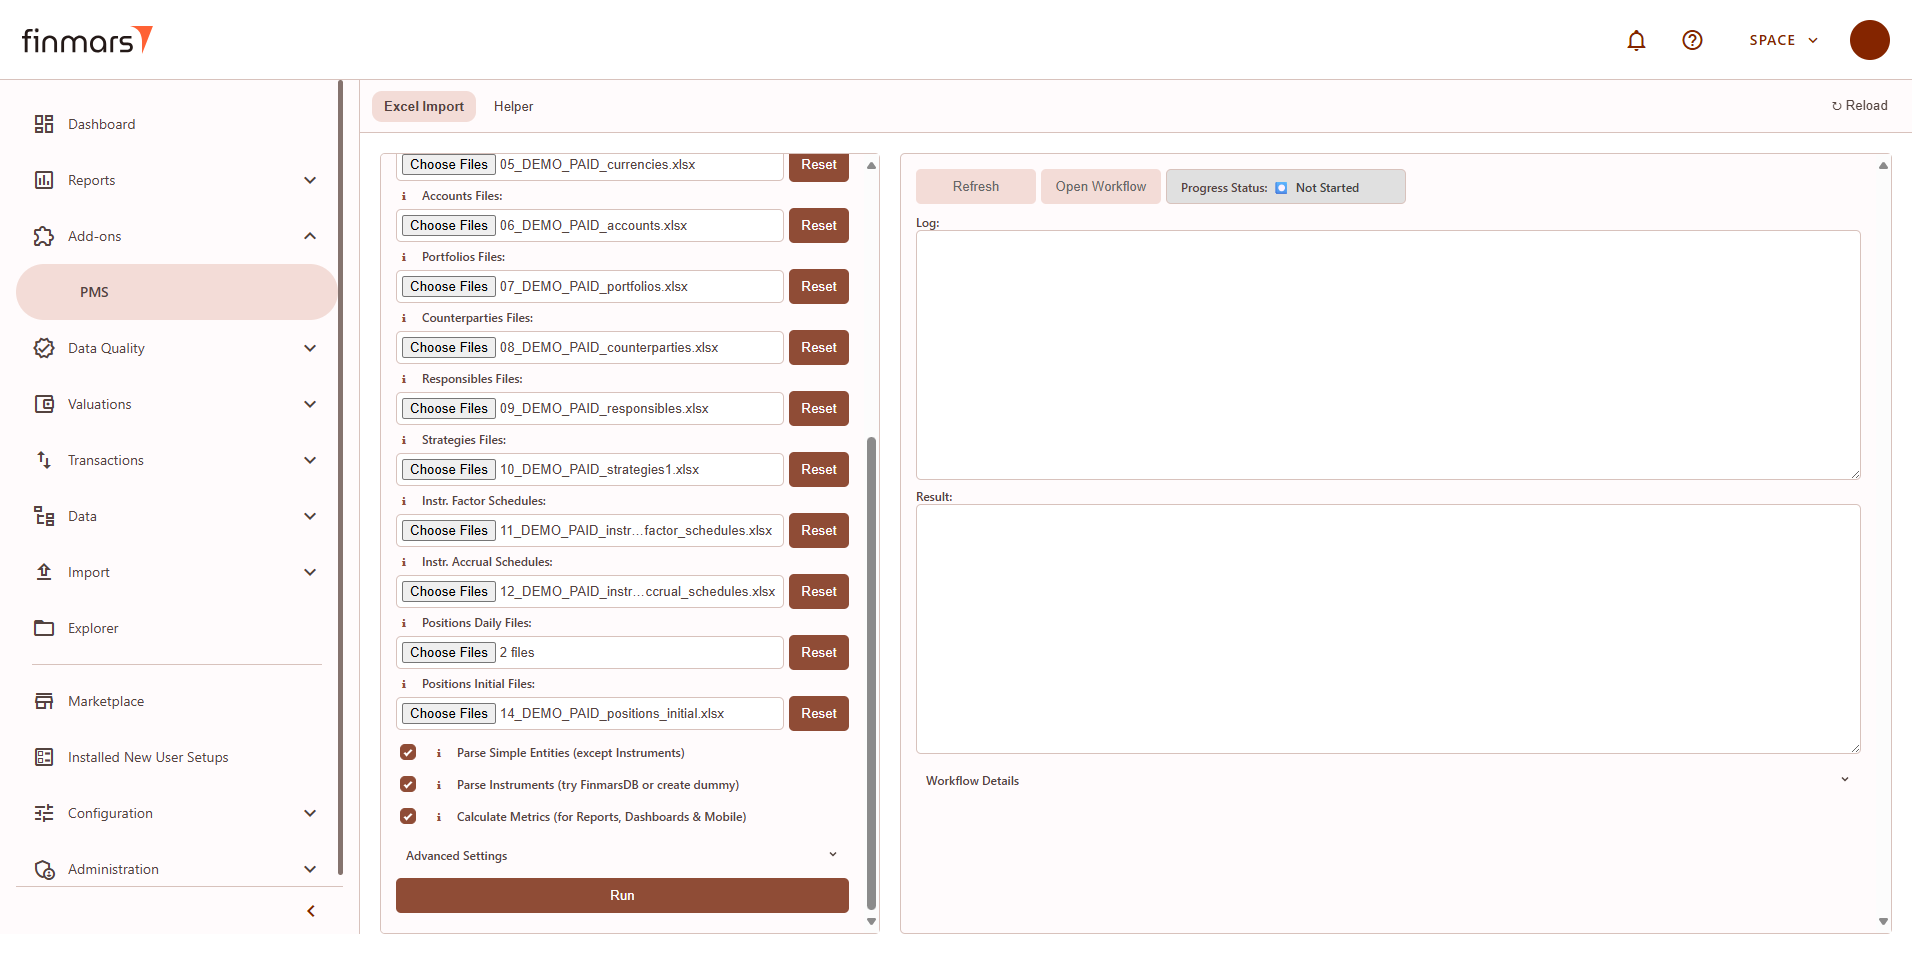
Overview of the elements on the Excel Import tab
- "Plus" badge - indicator that you are using PMS Plus version. If you have PMS Core, there will be "Core" badge and "Upgrade" button that will link you to the PMS Plus add-on.
- "Download excel Example" the button allows you to download Excel files for import, there are 2 set of them:
- excel_demo_data - ready to import data that will allows you to check Finmars platform in action;
- excel_import_file_templates - templates how to populate the excel file in Finmars format and you still can import them as well but they won't give you nice values in reports.
- Next to some labels in file select, input or checkboxes elements you will see Info icon - click on it to see description of the element.
- You will see Multiple File Select input and Text Input elements where your input required.
- "Reset" button allows to reset selected files.
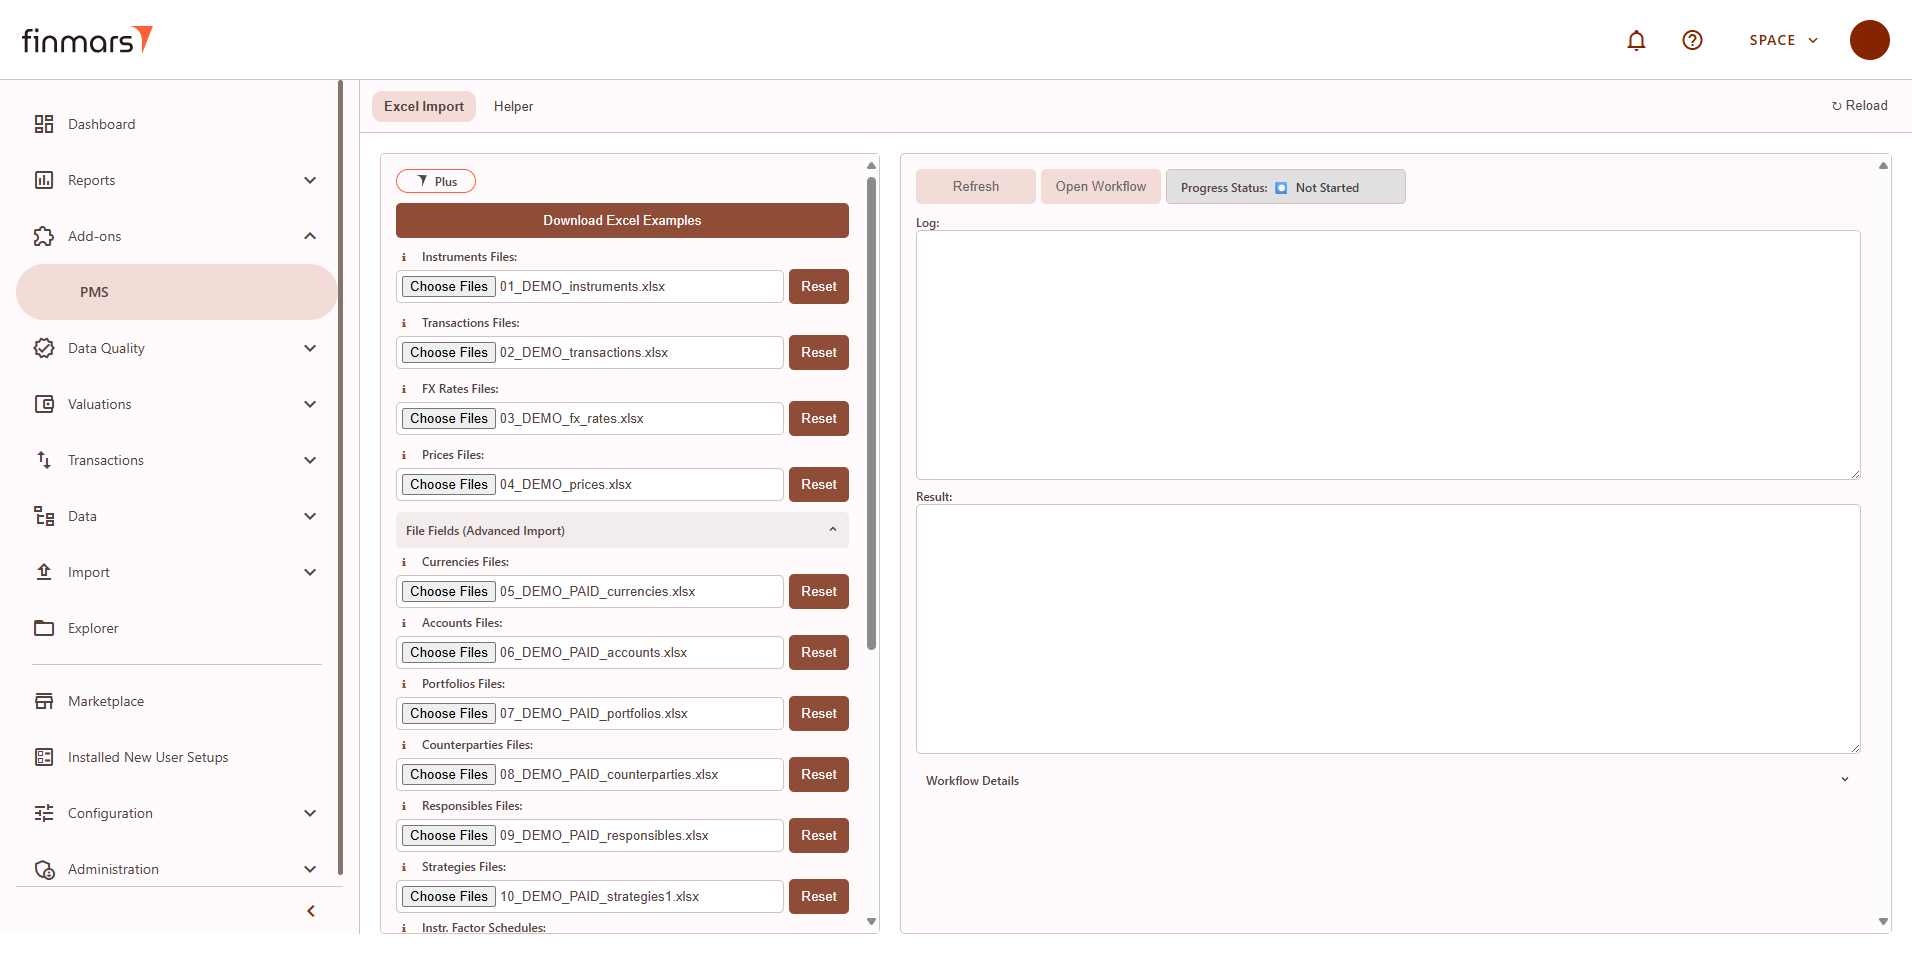
- "File Fields (Advanced Import)" section is only for "PMS Plus" and contains Multiple File Select inputs for:
- Simple entities (more control over creation): currencies, accounts, portfolios, counterparties, responsibles, strategies;
- Instruments: Factor and Accrual schedules;
- Positions: Daily (one day living snapshot), Initial (starting positions in case you can't import historical transactions).
- "Checkboxes" inputs have similar structure as other inputs with info and label.
- "Advanced Settings" section is optional and contains additional inputs for debug mode (show more logs info) and more flexible calculations.
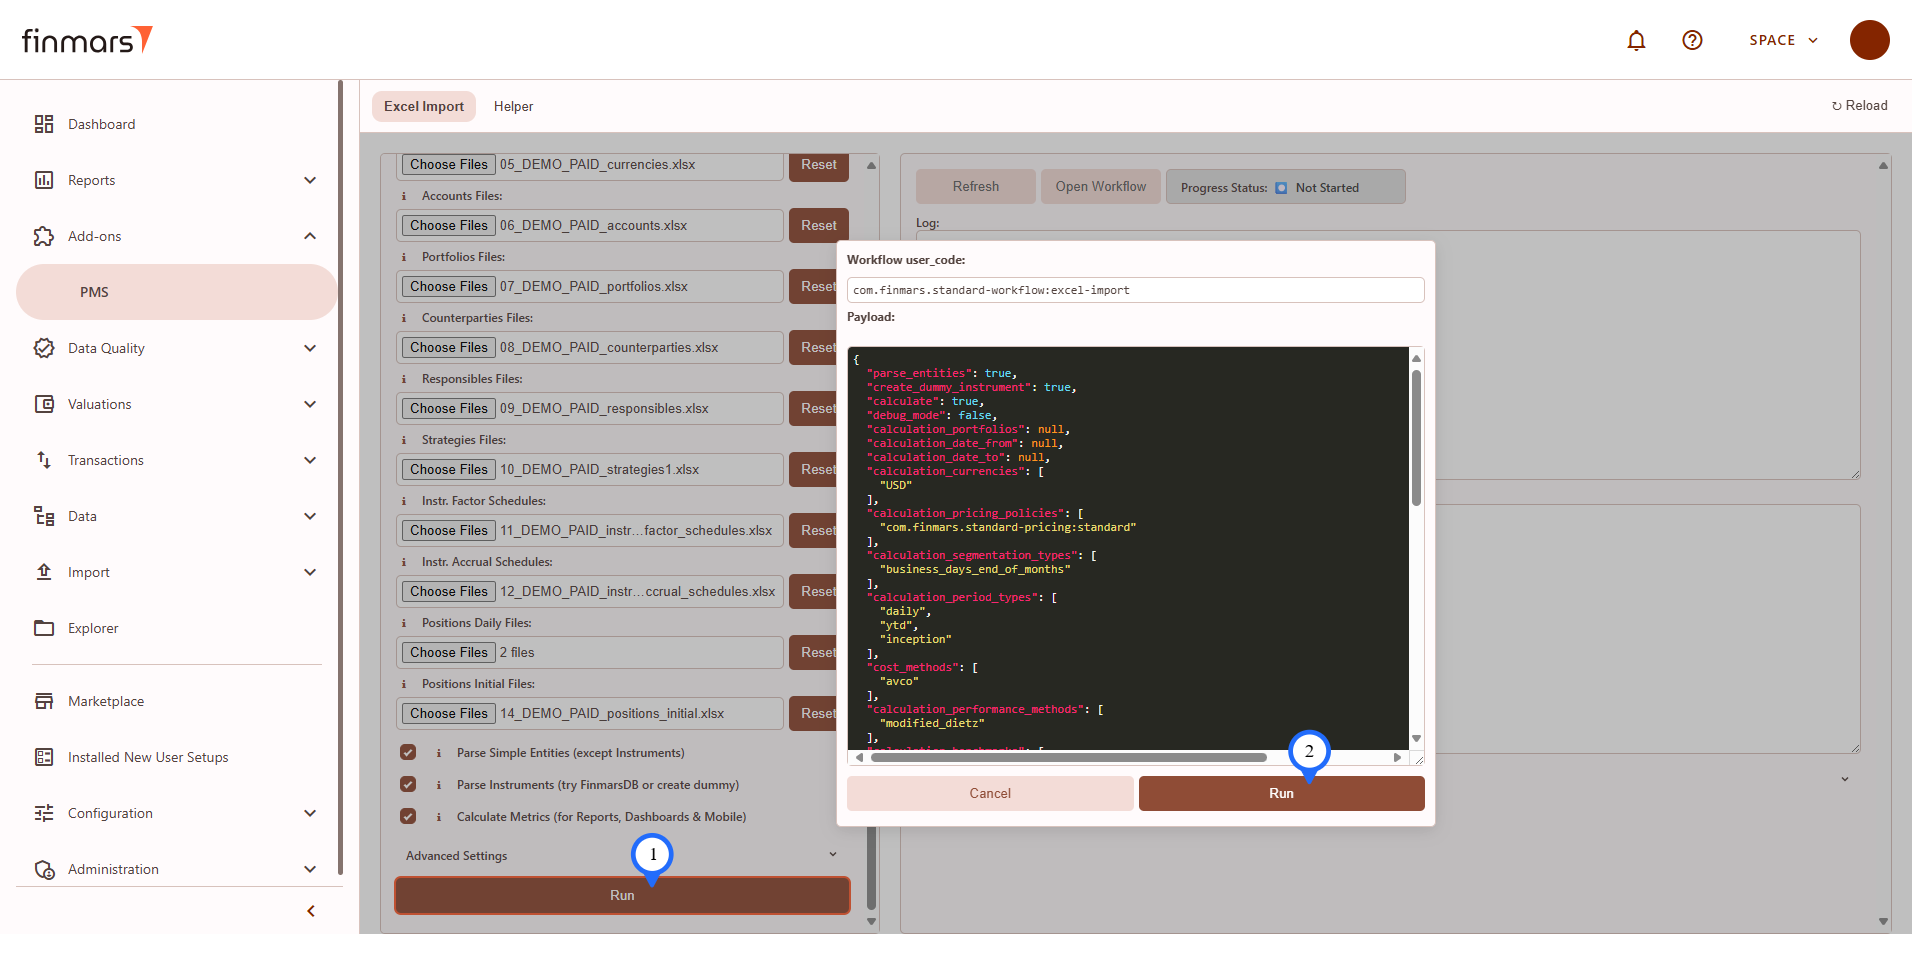
- "Run" button is active only when at least one file has been selected for import, when you click it you will see confirmation modal window with workflow user code and payload info.
- "Refresh" button - click on it to refresh the right pane with execution info, update is manual.
- "Open Workflow" button - you can go to the exact workflow running in the workflow service of the Finmars Platform.
- Status badge will show current status of the workflow, it can be: Not Started, Queued, In Progress, Completed, Canceled, Failed, - if add-on encounter some other statuses it will show "Unknown status:" label with the exact status received.
- Log - text area showing the logs of execution, don't forget to refresh data.
- Result - text area showing the final result of execution ({} - is when no result received or empty result, check status).
- "Workflow Details" section is additional technical information about workflow and its tasks.
Step 4: To import Excel files you need to:
- Prepare Your Data in Finmars Excel Format
- or use DEMO data from "Download Excel Examples" button -> "Excel Import Templates and Excel Demo Data.zip" archive -> "excel_demo_data"
Let's assume that you have the data ready, I will use DEMO data.
Step 5: Select corresponding files in the left pane:
- Core files: Instruments, Transactions, FX Rates, Prices,
- Plus files in "File Fields (Advanced Import)" section: Currencies, Accounts, Portfolios, Counterparties, Responsibles, Strategies, Instrument Factor Schedules, Instrument Accrual Schedules, Positions Daily, Positions Initial.
Step 6: Check checkboxes, it's recommended to keep ticked:
- Parse Simple Entities - if you didn't create/provided in files simple entities like currencies, accounts, ..., Responsibles, they will be created from provided data with user codes as names.
- Parse Instruments - if you didn't create/provided in files it will try to import data from FinmarsDB (not implemented as of 2025-08-20) or will create a Dummy instrument that you can edit later.
- Calculate Metrics - will run calculations for reports and dashboards based on the files you provided, you can override calculation setting in "Advanced Settings" section.
Step 7: Click "Run" button and you will see:
- uploading progress window showing your selected files (it will disappear when finished uploading)
- then confirmation window, you can check that everything is ok and click run button to start executing

Step 8: After clicking "Run" button if everything is ok, the first thing you will see is that status badge changed to "Queued" and "Refresh" and "Open Workflow" buttons are active now.
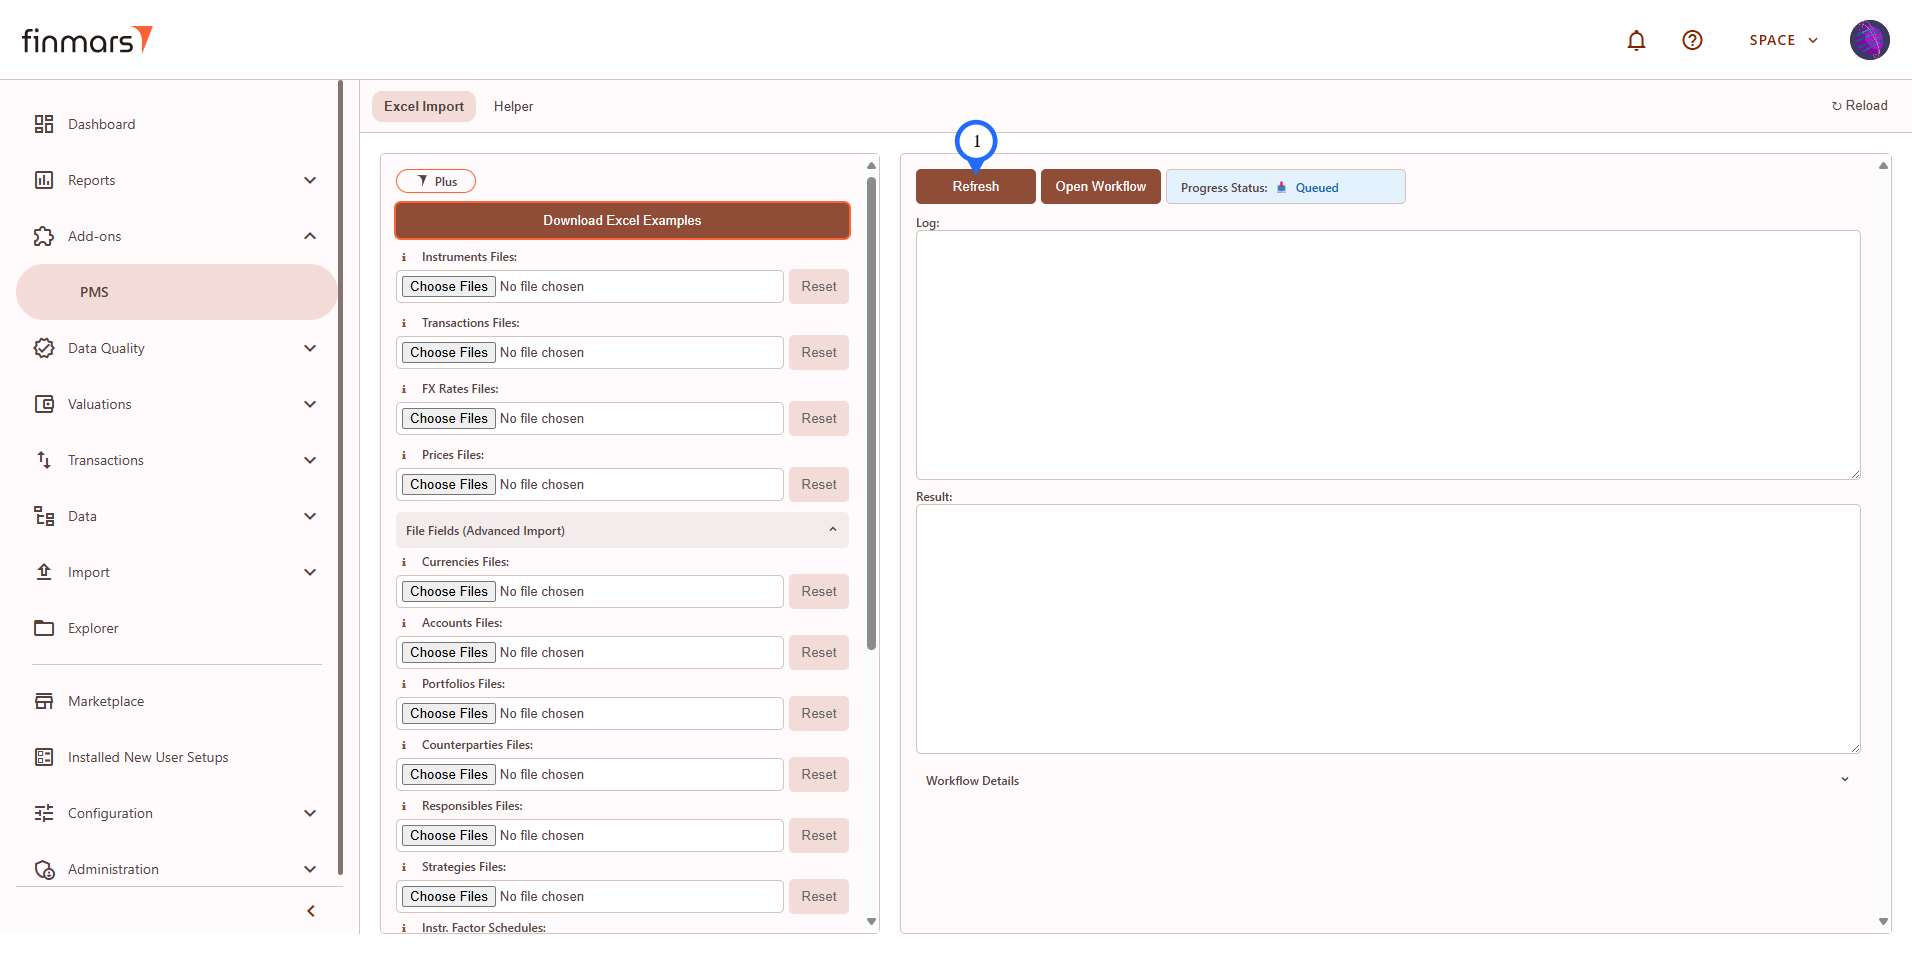
Step 9: Click Refresh button to see the progress. Logs will show what's going on.
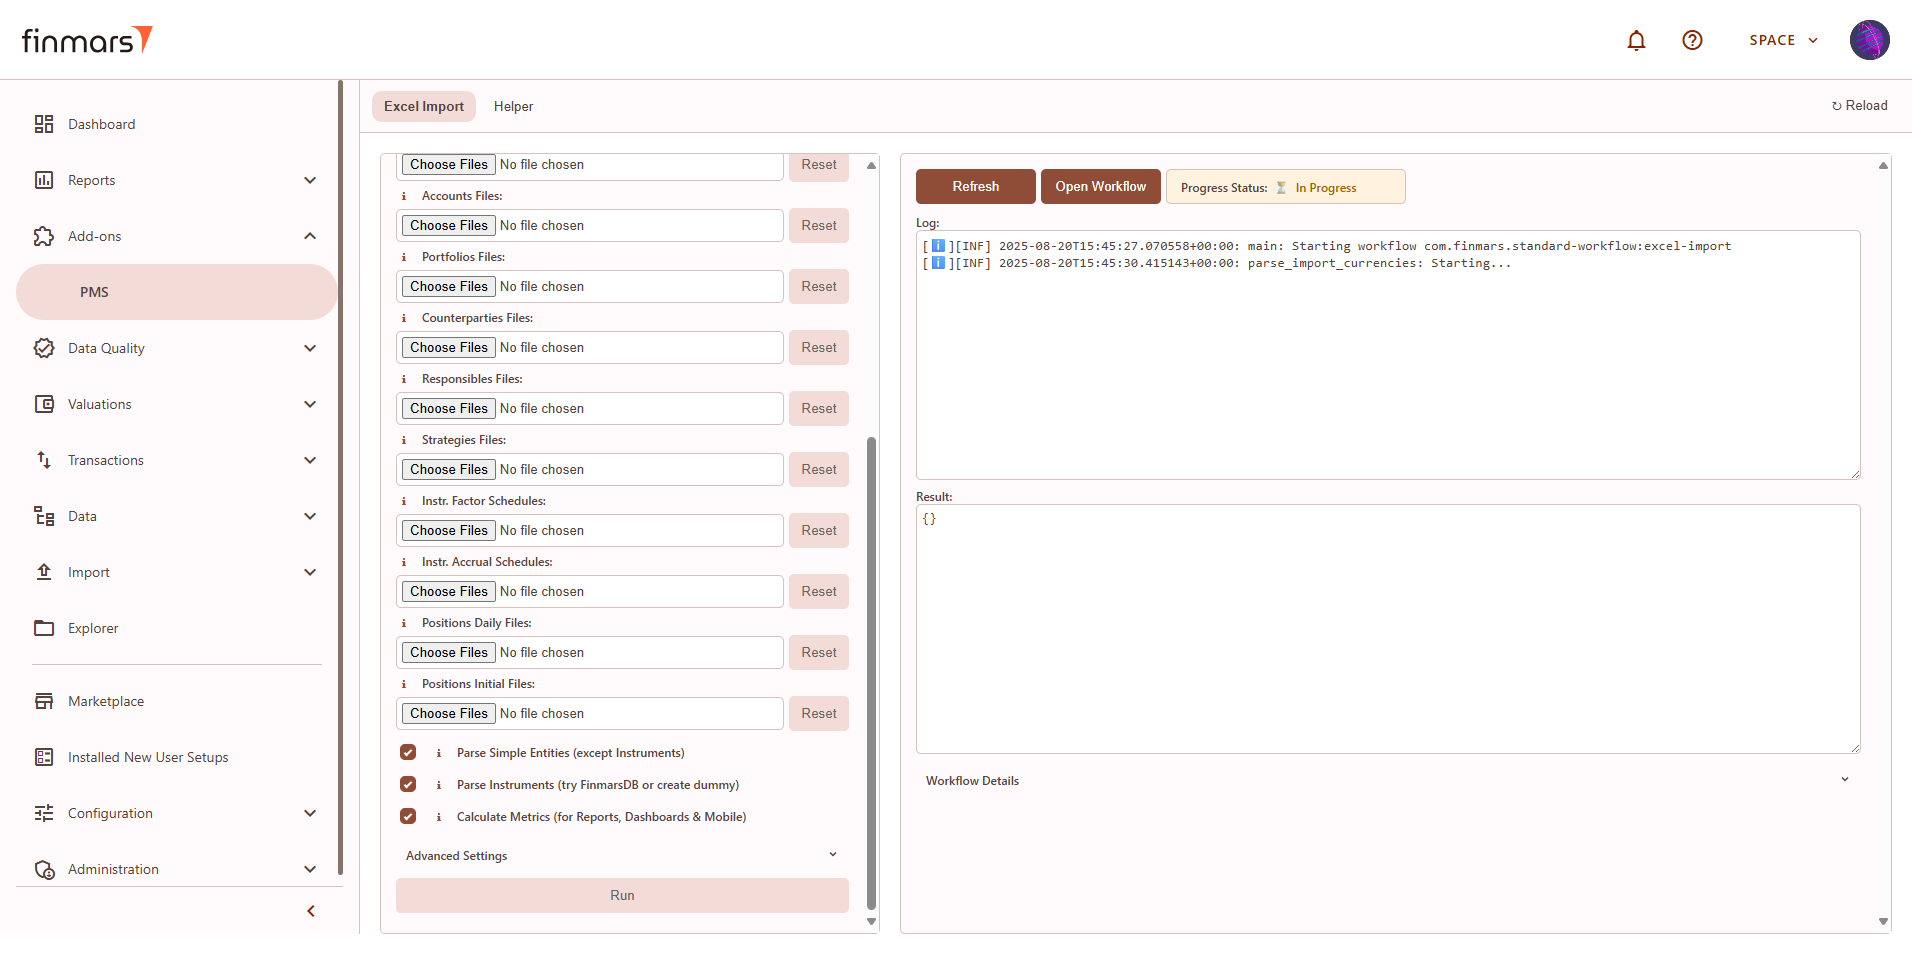
Step 10: You need to wait for:
- the status change from "In-progress" to the next transition "Completed" or "Error" (see label #1 below in the screenshot)
- the result text area will give you summary of execution (see label #2 below in the screenshot)
If you use DEMO data: you will need to wait around 40 minutes for a full pipeline.
Expected Steps in Log
-
parse_import_currencies
- parse_import_accounts
- parse_import_portfolios
- parse_import_counterparties
- parse_import_responsibles
- parse_import_strategies1
- parse_import_instruments
- import_instr_factor_schedules
- import_instr_accrual_schedules
- import_transactions
- import_positions_initial
- import_positions_daily
- import_fx_rates
- import_prices
- if you ticked "Calculate Metrics" checkbox
- calculate_price_history
- calculate_register_records
- calculate_portfolio_price_history
- calculate_portfolio_history
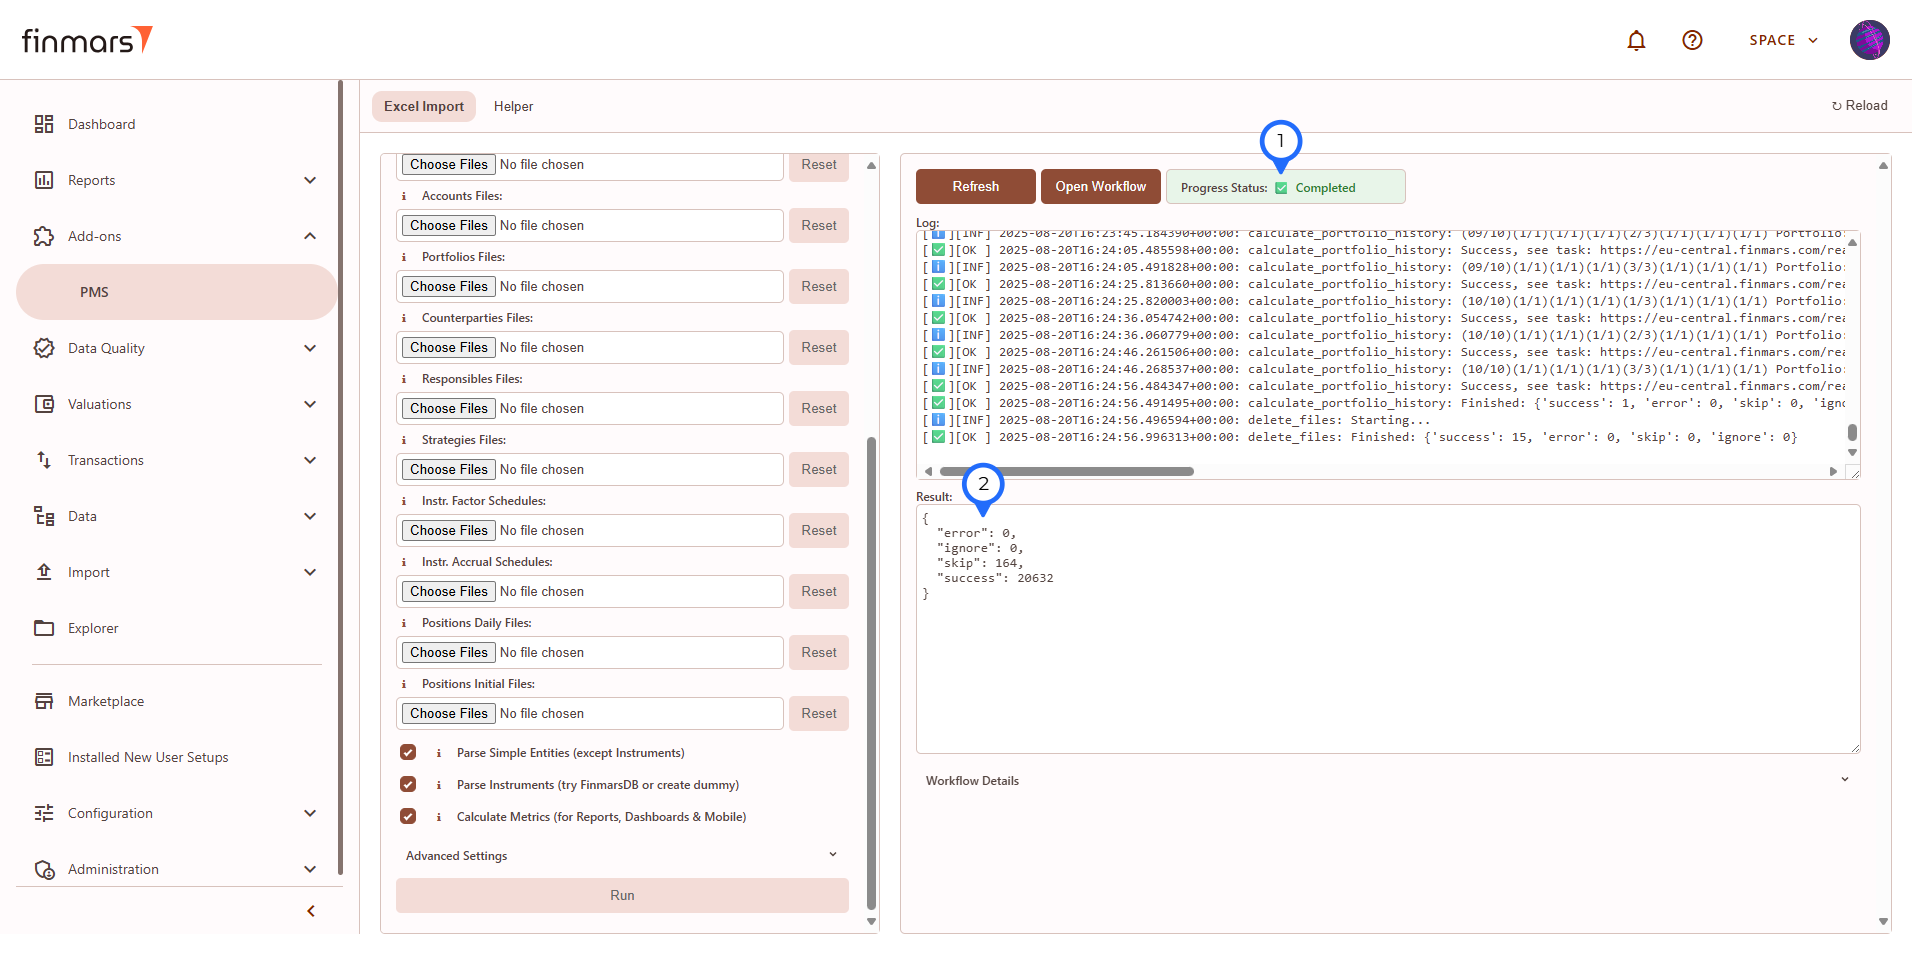
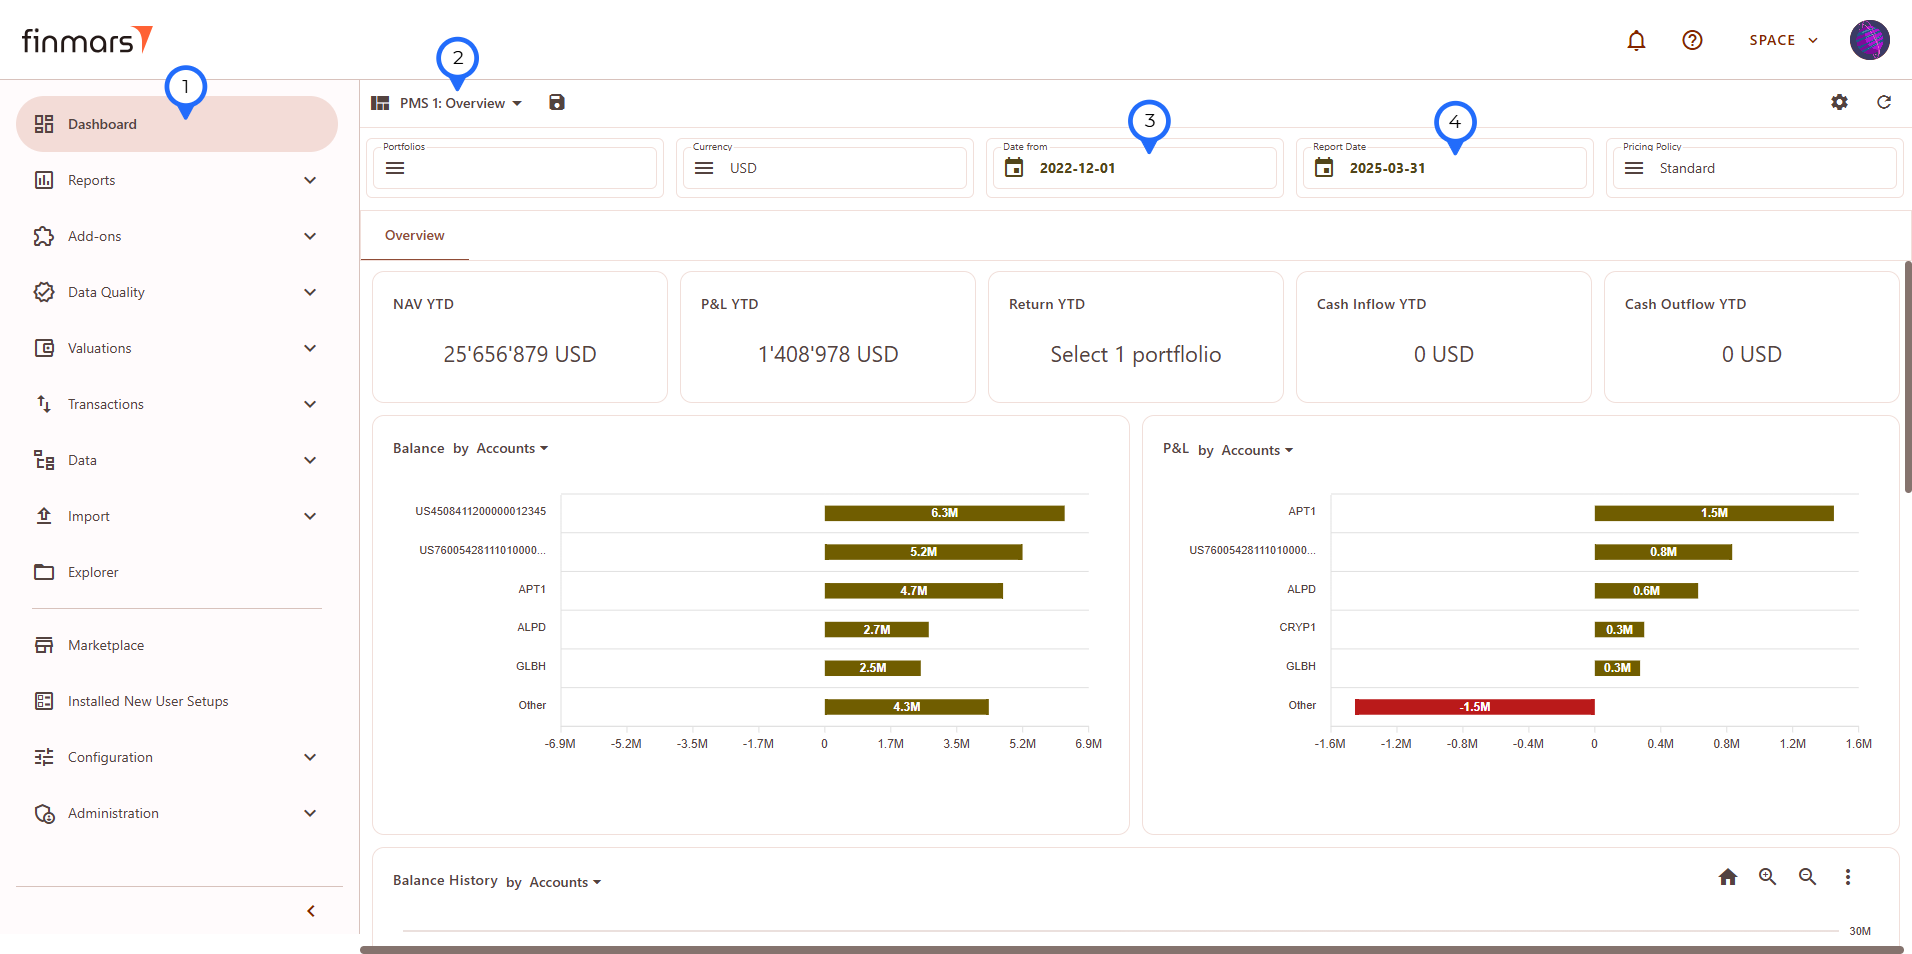
Step 11: If you see status completed and no errors in Result or Log you can go check your data:
- Go to Dashboard
- Select "PMS: 1 Overview" layout
- Set "Date From" according to your Data or for DEMO use "2022-12-01"
- Set "Report Date" according to your Data or for DEMO use "2025-03-31"
To further explore your data and to learn how to use reports, start with: How to Check Balance Report and continue with further guides.
Prepare Data in Finmars Excel Format
Prerequisites
We assume you have all prerequisites you may need, including:
Prepare Standard Template Files for Import
Standard Configuration supports importing from Excel files:
Currencies, Accounts, Portfolios, Instruments, Instruments Factor Schedules, Instruments Accrual Schedules, Counterparties, Responsibles, Strategies1, Transactions, Positions, Prices & FX Rates.
To import this files follow instruction: How to Import Files in PMS Core and PMS Plus
Below you can find instructions on how to fill in templates.
General Requirements:
 Files MUST be of ".xlsx" extension
-
Files MUST be structured in accordance with templates (same columns and formatting).
Transactions
-
To book a transaction in the system you can import it from a file.
-
One transaction is one row of data in the file.
-
You should enter a transaction in the file for import in accordance with the instructions below for supported standard transaction/position types.
- Supported Standard transaction types list (case-sensitive):
-
Transactions
-
Deposit -
Withdraw -
Expense (Non-instrument) -
Income (Non-instrument) -
Coupon -
Dividend -
Expense (Instrument) -
Other Income (Instrument) -
Buy -
Sell -
FX Trade -
FX Forward (Open) -
FX Forward (Expiration) -
Transfer Cash (In) Transfer Cash (Out)Transfer Instrument-
Transfer Instrument (In) Transfer Instrument (Out)SplitReverse Split
-
-
Deposit/Withdraw
-
Transaction ID
-
Text field. Case-sensitive.
-
A unique complex transaction identifier (only one in the workspace).
-
Transactions with repeated ID will be overwritten.
-
-
Transaction Type
-
Text field. Case-sensitive.
-
Type of a transaction.
-
Should be a value from Standard transaction types for Transactions.
-
For Deposit/Withdraw transactions values should be:
-
Deposit -
Withdraw
-
-
-
Reverse
-
Text field.
-
Indicator for a reverse transaction.
-
Valid values:
-
True -
False
-
-
This field has only indicative meaning and will NOT invert any signs in other fields.
-
-
Date (Accounting)
-
Date field.
-
A date on which a particular financial transaction was entered into the source system.
-
Format should be: “YYYY-MM-DD” (e.g. “
2000-12-31")
-
-
Date (Trade)
-
Date field.
-
A date on which a particular financial transaction is executed or agreed upon.
-
Format should be: “YYYY-MM-DD” (e.g. “
2000-12-31")
-
-
Date (Value)
-
Date field.
-
A date when cash or funds are expected to be received or paid as part of a financial transaction.
-
Format should be: “YYYY-MM-DD” (e.g. “
2000-12-31")
-
-
Portfolio
-
Text field. Case-sensitive.
-
A collection of financial assets or investments held by an individual or organization.
-
-
Account (Cash)
-
Text field. Case-sensitive.
-
An account that is specifically designated for managing and tracking cash transactions.
-
-
Currency (Settlement)
-
Text field. Case-sensitive.
-
A currency in which the payment or transfer of funds takes place to fulfil the terms of the transaction.
-
Must be an alphabetic code of a currency alphabetic code (e.g.
USD,EUR,CHF).
-
-
Cash Consideration
-
Numeric field.
-
A monetary value or payment made in the form of cash for a particular transaction or asset.
-
Must be in Settlement Currency.
-
A sign of the number:
-
“
+" (plus sign) is for income -
“
-" (minus sign) is for expenses
-
-
-
Amount (Charges)
-
Numeric field.
-
For Deposit/Withdraw transactions values should be “
0" (zero).
-
-
Account (Position)
-
Text field. Case-sensitive.
-
For Deposit/Withdraw transactions values should be “
-" (dash).
-
-
Instrument
-
Text field. Case-sensitive.
-
For Deposit/Withdraw transactions values should be “
-" (dash).
-
-
Allocation (PL)
-
Text field. Case-sensitive.
-
For Deposit/Withdraw transactions values should be “
-" (dash).
-
-
Position size
-
Numeric field.
-
For Deposit/Withdraw transactions values should be “
0" (zero).
-
-
Principal/Share price
-
Numeric field.
-
For Deposit/Withdraw transactions:
-
The share price of the open-end fund.
-
-
For Deposit/Withdraw transactions values should be “
0" (zero) for default. -
A sign of the number:
-
“
+" (plus sign) is for standard prices -
“
-" (minus sign) is for special prices (e.g. for exotic derivatives)
-
-
-
Amount (Carry)
-
Numeric field.
-
For Deposit/Withdraw transactions values should be “
0" (zero).
-
-
Notes
-
Text field.
-
Additional comments, instructions, or relevant information associated with a particular transaction.
-
If there are no notes enter “
-" (dash).
-
-
Payment Purpose (for Income/Expense)
-
Text field. Case-sensitive.
-
For Deposit/Withdraw transactions values should be “
-" (dash).
-
-
Reference transaction code
-
Text field. Case-sensitive.
-
A reference to related transactions' unique identifiers.
-
For reverse transaction you can specify a transaction ID of the reversed transaction.
-
-
Counterparty
-
Text field. Case-sensitive.
-
-
Responsible
-
Text field. Case-sensitive.
-
-
Strategy1
-
Text field. Case-sensitive.
-
-
Portfolio To
-
Text field. Case-sensitive.
-
For Deposit/Withdraw transactions values should be “
-" (dash).
-
-
Account To (Cash)
-
Text field. Case-sensitive.
-
For Deposit/Withdraw transactions values should be “
-" (dash).
-
-
Account To (Position)
-
Text field. Case-sensitive.
-
For Deposit/Withdraw transactions values should be “
-" (dash).
-
-
Position size New
-
Numeric field.
- For Deposit/Withdraw transactions values should be “
0" (zero).
-
-
Principal/Share price New
-
Numeric field.
- For Deposit/Withdraw transactions values should be “
0" (zero).
-
Expense/Income (Non-instrument)
-
Transaction ID
-
Text field. Case-sensitive.
-
A unique complex transaction identifier (only one in the workspace).
-
Transactions with repeated ID will be overwritten.
-
-
Transaction Type
-
Text field. Case-sensitive.
-
Type of a transaction.
-
Should be a value from Standard transaction types for Transactions.
-
For Income/Expense (Non-instrument) transactions values should be:
-
Income (Non-instrument) -
Expense (Non-instrument)
-
-
-
Reverse
-
Text field.
-
Indicator for a reverse transaction.
-
Valid values:
-
True -
False
-
-
This field has only indicative meaning and will NOT invert any signs in other fields.
-
-
Date (Accounting)
-
Date field.
-
A date on which a particular financial transaction was entered into the source system.
-
Format should be: “YYYY-MM-DD” (e.g. “
2000-12-31")
-
-
Date (Trade)
-
Date field.
-
A date on which a particular financial transaction is executed or agreed upon.
-
Format should be: “YYYY-MM-DD” (e.g. “
2000-12-31")
-
-
Date (Value)
-
Date field.
-
A date when cash or funds are expected to be received or paid as part of a financial transaction.
-
Format should be: “YYYY-MM-DD” (e.g. “
2000-12-31")
-
-
Portfolio
-
Text field. Case-sensitive.
-
A collection of financial assets or investments held by an individual or organization.
-
-
Account (Cash)
-
Text field. Case-sensitive.
-
An account that is specifically designated for managing and tracking cash transactions.
-
-
Currency (Settlement)
-
Text field. Case-sensitive.
-
A currency in which the payment or transfer of funds takes place to fulfil the terms of the transaction.
-
Must be an alphabetic code of a currency alphabetic code (e.g.
USD,EUR,CHF).
-
-
Cash Consideration
-
Numeric field.
-
A monetary value or payment made in the form of cash for a particular transaction or asset.
-
Must be in Settlement Currency.
-
A sign of the number:
-
“
+" (plus sign) is for income -
“
-" (minus sign) is for expenses
-
-
-
Amount (Charges)
-
Numeric field.
-
Costs or fees associated with a transaction.
-
Must be in Settlement Currency.
-
A sign of the number:
-
“
+" (plus sign) is for income -
“
-" (minus sign) is for expenses
-
-
-
Account (Position)
-
Text field. Case-sensitive.
-
For Income/Expense (Non-instrument) transactions values should be “
-" (dash).
-
-
Instrument
-
Text field. Case-sensitive.
-
For Income/Expense (Non-instrument) transactions values should be “
-" (dash).
-
-
Allocation (PL)
-
Text field. Case-sensitive.
-
For Income/Expense (Non-instrument) transactions values should be “
-" (dash).
-
-
Position size
-
Numeric field.
-
For Income/Expense (Non-instrument) transactions values should be “
0" (zero).
-
-
Principal/Share price
-
Numeric field.
-
For Income/Expense (Non-instrument) transactions values should be “
0" (zero).
-
-
Amount (Carry)
-
Numeric field.
-
An amount of an Income/Expense.
-
Must be in Settlement Currency.
-
A sign of the number:
-
“
+" (plus sign) is for income -
“
-" (minus sign) is for expenses
-
-
-
Notes
-
Text field.
-
Additional comments, instructions, or relevant information associated with a particular transaction.
-
If there are no notes enter “
-" (dash).
-
-
Payment Purpose (for Income/Expense)
-
Text field. Case-sensitive.
-
A type of Income/Expense associated with a transaction.
-
Used for grouping in reports for non-instrument transactions.
-
-
Reference transaction code
-
Text field. Case-sensitive.
-
A reference to related transactions' unique identifiers.
-
For reverse transaction you can specify a transaction ID of the reversed transaction.
-
-
Counterparty
-
Text field. Case-sensitive.
-
-
Responsible
-
Text field. Case-sensitive.
-
-
Strategy1
-
Text field. Case-sensitive.
-
-
Portfolio To
-
Text field. Case-sensitive.
-
For Expense/Income (Non-instrument) transactions values should be “
-" (dash).
-
-
Account To (Cash)
-
Text field. Case-sensitive.
-
For Expense/Income (Non-instrument) transactions values should be “
-" (dash).
-
-
Account To (Position)
-
Text field. Case-sensitive.
-
For Expense/Income (Non-instrument) transactions values should be “
-" (dash).
-
-
Position size New
-
Numeric field.
- For Expense/Income (Non-instrument) transactions values should be “
0" (zero).
-
-
Principal/Share price New
-
Numeric field.
- For Expense/Income (Non-instrument) transactions values should be “
0" (zero).
-
Coupon/Dividend
-
Transaction ID
-
Text field. Case-sensitive.
-
A unique complex transaction identifier (only one in the workspace).
-
Transactions with repeated ID will be overwritten.
-
-
Transaction Type
-
Text field. Case-sensitive.
-
Type of a transaction.
-
Should be a value from Standard transaction types for Transactions.
-
For Coupon/Dividend transactions values should be:
-
Coupon -
Dividend
-
-
-
Reverse
-
Text field.
-
Indicator for a reverse transaction.
-
Valid values:
-
True -
False
-
-
This field has only indicative meaning and will NOT invert any signs in other fields.
-
-
Date (Accounting)
-
Date field.
-
A date on which a particular financial transaction was entered into the source system.
-
Format should be: “YYYY-MM-DD” (e.g. “
2000-12-31")
-
-
Date (Trade)
-
Date field.
-
A date on which a particular financial transaction is executed or agreed upon.
-
Format should be: “YYYY-MM-DD” (e.g. “
2000-12-31")
-
-
Date (Value)
-
Date field.
-
A date when cash or funds are expected to be received or paid as part of a financial transaction.
-
Format should be: “YYYY-MM-DD” (e.g. “
2000-12-31")
-
-
Portfolio
-
Text field. Case-sensitive.
-
A collection of financial assets or investments held by an individual or organization.
-
-
Account (Cash)
-
Text field. Case-sensitive.
-
An account that is specifically designated for managing and tracking cash transactions.
-
-
Currency (Settlement)
-
Text field.
-
A currency in which the payment or transfer of funds takes place to fulfil the terms of the transaction.
-
Must be an alphabetic code of a currency alphabetic code (e.g.
USD,EUR,CHF).
-
-
Cash Consideration
-
Numeric field.
-
A monetary value or payment made in the form of cash for a particular transaction or asset.
-
Must be in Settlement Currency.
-
A sign of the number:
-
“
+" (plus sign) is for income -
“
-" (minus sign) is for expenses
-
-
-
Amount (Charges)
-
Numeric field.
-
Costs or fees associated with a transaction.
-
Must be in Settlement Currency.
-
A sign of the number:
-
“
+" (plus sign) is for income -
“
-" (minus sign) is for expenses
-
-
-
Account (Position)
-
Text field. Case-sensitive.
-
An account that tracks and records the positions or holdings of assets.
-
-
Instrument
-
Text field. Case-sensitive.
-
A financial asset or security involved in a transaction.
-
Value must be:
-
ISIN (e.g.
GB00BFZNLB60) to import Instrument from Finmars Database -
user_code - for instruments without ISIN or already created instruments.
-
-
-
Allocation (PL)
-
Text field. Case-sensitive.
-
An instrument to which the financial outcome of a transaction is attributed or allocated.
-
Value must be:
-
ISIN (e.g.
GB00BFZNLB60) to import Instrument from Finmars Database -
user_code - for instruments without ISIN or already created instruments.
-
-
-
Position size
-
Numeric field.
-
For Coupon/Dividend transactions values should be “
0" (zero).
-
-
Principal/Share price
-
Numeric field.
-
For Coupon/Dividend transactions values should be “
0" (zero).
-
-
Amount (Carry)
-
Numeric field.
-
An amount of a Coupon/Dividend.
-
Must be in Settlement Currency.
-
A sign of the number:
-
“
+" (plus sign) is for income -
“
-" (minus sign) is for expenses
-
-
-
Notes
-
Text field.
-
Additional comments, instructions, or relevant information associated with a particular transaction.
-
If there are no notes enter “
-" (dash).
-
-
Payment Purpose (for Income/Expense)
-
Text field. Case-sensitive.
-
For Coupon/Dividend transactions values should be “
-" (dash).
-
-
Reference transaction code
-
Text field. Case-sensitive.
-
A reference to related transactions' unique identifiers.
-
For reverse transaction you can specify a transaction ID of the reversed transaction.
-
-
Counterparty
-
Text field. Case-sensitive.
-
-
Responsible
-
Text field. Case-sensitive.
-
-
Strategy1
-
Text field. Case-sensitive.
-
-
Portfolio To
-
Text field. Case-sensitive.
-
For Coupon/Dividend transactions values should be “
-" (dash).
-
-
Account To (Cash)
-
Text field. Case-sensitive.
-
For Coupon/Dividend transactions values should be “
-" (dash).
-
-
Account To (Position)
-
Text field. Case-sensitive.
-
For Coupon/Dividend transactions values should be “
-" (dash).
-
-
Position size New
-
Numeric field.
- For Coupon/Dividend transactions values should be “
0" (zero).
-
-
Principal/Share price New
-
Numeric field.
- For Coupon/Dividend transactions values should be “
0" (zero).
-
Expense/Other Income (Instrument)
-
Transaction ID
-
Text field. Case-sensitive.
-
A unique complex transaction identifier (only one in the workspace).
-
Transactions with repeated ID will be overwritten.
-
-
Transaction Type
-
Text field. Case-sensitive.
-
Type of a transaction.
-
Should be a value from Standard transaction types for Transactions.
-
For Other Income/Expense (Instrument) transactions values should be:
-
Other Income (Instrument) -
Expense (Instrument)
-
-
-
Reverse
-
Text field.
-
Indicator for a reverse transaction.
-
Valid values:
-
True -
False
-
-
This field has only indicative meaning and will NOT invert any signs in other fields.
-
-
Date (Accounting)
-
Date field.
-
A date on which a particular financial transaction was entered into the source system.
-
Format should be: “YYYY-MM-DD” (e.g. “
2000-12-31")
-
-
Date (Trade)
-
Date field.
-
A date on which a particular financial transaction is executed or agreed upon.
-
Format should be: “YYYY-MM-DD” (e.g. “
2000-12-31")
-
-
Date (Value)
-
Date field.
-
A date when cash or funds are expected to be received or paid as part of a financial transaction.
-
Format should be: “YYYY-MM-DD” (e.g. “
2000-12-31")
-
-
Portfolio
-
Text field.
-
A collection of financial assets or investments held by an individual or organization.
-
-
Account (Cash)
-
Text field. Case-sensitive.
-
An account that is specifically designated for managing and tracking cash transactions.
-
-
Currency (Settlement)
-
Text field. Case-sensitive.
-
A currency in which the payment or transfer of funds takes place to fulfil the terms of the transaction.
-
Must be an alphabetic code of a currency alphabetic code (e.g.
USD,EUR,CHF).
-
-
Cash Consideration
-
Numeric field.
-
A monetary value or payment made in the form of cash for a particular transaction or asset.
-
Must be in Settlement Currency.
-
A sign of the number:
-
“
+" (plus sign) is for income -
“
-" (minus sign) is for expenses
-
-
-
Amount (Charges)
-
Numeric field.
-
Costs or fees associated with a transaction.
-
Must be in Settlement Currency.
-
A sign of the number:
-
“
+" (plus sign) is for income -
“
-" (minus sign) is for expenses
-
-
-
Account (Position)
-
Text field. Case-sensitive.
-
An account that tracks and records the positions or holdings of assets.
-
-
Instrument
-
Text field. Case-sensitive.
-
A financial asset or security involved in a transaction.
-
Value must be:
-
ISIN (e.g.
GB00BFZNLB60) to import Instrument from Finmars Database -
user_code - for instruments without ISIN or already created instruments.
-
-
-
Allocation (PL)
-
Text field. Case-sensitive.
-
An instrument to which the financial outcome of a transaction is attributed or allocated.
-
Value must be:
-
ISIN (e.g.
GB00BFZNLB60) to import Instrument from Finmars Database -
user_code - for instruments without ISIN or already created instruments.
-
-
-
Position size
-
Numeric field.
-
For Other Income/Expense (Instrument) transactions values should be “
0" (zero).
-
-
Principal/Share price
-
Numeric field.
-
For Other Income/Expense (Instrument) transactions values should be “
0" (zero).
-
-
Amount (Carry)
-
Numeric field.
-
An amount of an Income/Expense.
-
Must be in Settlement Currency.
-
A sign of the number:
-
“
+" (plus sign) is for income -
“
-" (minus sign) is for expenses
-
-
-
Notes
-
Text field.
-
Additional comments, instructions, or relevant information associated with a particular transaction.
-
If there are no notes enter “
-" (dash).
-
-
Payment Purpose (for Income/Expense)
-
Text field. Case-sensitive.
-
A type of Income/Expense associated with a transaction.
-
Used for grouping in reports for non-instrument transactions.
-
-
Reference transaction code
-
Text field. Case-sensitive.
-
A reference to related transactions' unique identifiers.
-
For reverse transaction you can specify a transaction ID of the reversed transaction.
-
-
Counterparty
-
Text field. Case-sensitive.
-
-
Responsible
-
Text field. Case-sensitive.
-
-
Strategy1
-
Text field. Case-sensitive.
-
-
Portfolio To
-
Text field. Case-sensitive.
-
For Expense/Other Income (Instrument) transactions values should be “
-" (dash).
-
-
Account To (Cash)
-
Text field. Case-sensitive.
-
For Expense/Other Income (Instrument) transactions values should be “
-" (dash).
-
-
Account To (Position)
-
Text field. Case-sensitive.
-
For Expense/Other Income (Instrument) transactions values should be “
-" (dash).
-
-
Position size New
-
Numeric field.
- For Expense/Other Income (Instrument) transactions values should be “
0" (zero).
-
-
Principal/Share price New
-
Numeric field.
- For Expense/Other Income (Instrument) transactions values should be “
0" (zero).
-
Buy/Sell
-
Transaction ID
-
Text field. Case-sensitive.
-
A unique complex transaction identifier (only one in the workspace).
-
Transactions with repeated ID will be overwritten.
-
-
Transaction Type
-
Text field. Case-sensitive.
-
Type of a transaction.
- Should be a value from Standard transaction types for Transactions.
-
For Buy/Sell transactions values should be:
-
Buy -
Sell
-
-
-
Reverse
-
Text field.
-
Indicator for a reverse transaction.
-
Valid values:
-
True -
False
-
-
This field has only indicative meaning and will NOT invert any signs in other fields.
-
-
Date (Accounting)
-
Date field.
-
A date on which a particular financial transaction was entered into the source system.
-
Format should be: “YYYY-MM-DD” (e.g. “
2000-12-31")
-
-
Date (Trade)
-
Date field.
-
A date on which a particular financial transaction is executed or agreed upon.
-
Format should be: “YYYY-MM-DD” (e.g. “
2000-12-31")
-
-
Date (Value)
-
Date field.
-
A date when cash or funds are expected to be received or paid as part of a financial transaction.
-
Format should be: “YYYY-MM-DD” (e.g. “
2000-12-31")
-
-
Portfolio
-
Text field. Case-sensitive.
-
A collection of financial assets or investments held by an individual or organization.
-
-
Account (Cash)
-
Text field. Case-sensitive.
-
An account that is specifically designated for managing and tracking cash transactions.
-
-
Currency (Settlement)
-
Text field. Case-sensitive.
-
A currency in which the payment or transfer of funds takes place to fulfil the terms of the transaction.
-
Must be an alphabetic code of a currency alphabetic code (e.g.
USD,EUR,CHF).
-
-
Cash Consideration
-
Numeric field.
- A monetary value or payment made in the form of cash for a particular transaction or asset.
-
Must be in Settlement Currency.
-
A sign of the number:
-
“
+" (plus sign) is for income -
“
-" (minus sign) is for expenses
-
-
-
Amount (Charges)
-
Numeric field.
-
Costs or fees associated with a transaction.
-
Must be in Settlement Currency.
-
A sign of the number:
-
“
+" (plus sign) is for income -
“
-" (minus sign) is for expenses
-
-
-
Account (Position)
-
Text field. Case-sensitive.
-
An account that tracks and records the positions or holdings of assets.
-
- Instrument
-
Text field. Case-sensitive.
-
A financial asset or security involved in a transaction.
-
Value must be:
-
ISIN (e.g.
GB00BFZNLB60) to import Instrument from Finmars Database -
user_code - for instruments without ISIN or already created instruments.
-
-
-
Allocation (PL)
-
Text field. Case-sensitive.
-
An instrument to which the financial outcome of a transaction is attributed or allocated.
-
Value must be:
-
ISIN (e.g.
GB00BFZNLB60) to import Instrument from Finmars Database -
user_code - for instruments without ISIN or already created instruments.
-
-
-
Position size
-
Numeric field.
- An adjusted position of the asset after all alterations or corrections (e.g. adjusted for a factor).
-
A sign of the number:
-
“
+" (plus sign) is for position increase -
“
-" (minus sign) is for position decrease
-
-
-
Principal/Share price
-
Numeric field.
-
For Buy/Sell transactions this field is a Principal price:
-
A unit price or value of a financial instrument, excluding any accrued interest or additional earnings.
-
-
Must be in Settlement Currency.
-
Multipliers will be applied automatically in accordance with an instrument of the transaction.
-
A sign of the number:
-
“
+" (plus sign) is for standard prices -
“
-" (minus sign) is for special prices (e.g. for exotic derivatives)
-
-
-
Amount (Carry)
-
Numeric field.
-
An amount or expense that has been incurred but not yet paid or settled.
-
Must be in Settlement Currency.
-
A sign of the number:
-
“
+" (plus sign) is for income -
“
-" (minus sign) is for expenses
-
-
-
Notes
-
Text field.
-
Additional comments, instructions, or relevant information associated with a particular transaction.
-
If there are no notes enter “-” (dash).
-
-
Payment Purpose (for Income/Expense)
-
Text field. Case-sensitive.
-
For Buy/Sell transactions values should be “-" (dash).
-
-
Reference transaction code
-
Text field. Case-sensitive.
-
A reference to related transactions' unique identifiers.
-
For reverse transaction you can specify a transaction ID of the reversed transaction.
-
-
Counterparty
-
Text field. Case-sensitive.
-
-
Responsible
-
Text field. Case-sensitive.
-
-
Strategy1
-
Text field. Case-sensitive.
-
-
Portfolio To
-
Text field. Case-sensitive.
-
For Buy/Sell transactions values should be “
-" (dash).
-
-
Account To (Cash)
-
Text field. Case-sensitive.
-
For Buy/Sell transactions values should be “
-" (dash).
-
-
Account To (Position)
-
Text field. Case-sensitive.
-
For Buy/Sell transactions values should be “
-" (dash).
-
-
Position size New
-
Numeric field.
- For Buy/Sell transactions values should be “
0" (zero).
-
-
Principal/Share price New
-
Numeric field.
- For Buy/Sell transactions values should be “
0" (zero).
-
FX Trade
-
Transaction ID
-
Text field. Case-sensitive.
-
A unique complex transaction identifier (only one in the workspace).
-
Transactions with repeated ID will be overwritten.
-
-
Transaction Type
-
Text field. Case-sensitive.
-
Type of a transaction.
-
Should be a value from Standard transaction types for Transactions.
-
For FX Trade transactions values should be:
FX Trade
-
-
Reverse
-
Text field.
-
Indicator for a reverse transaction.
-
Valid values:
-
True -
False
-
-
This field has only indicative meaning and will NOT invert any signs in other fields.
-
-
Date (Accounting)
-
Date field.
-
A date on which a particular financial transaction was entered into the source system.
-
Format should be: “YYYY-MM-DD” (e.g. “
2000-12-31")
-
-
Date (Trade)
-
Date field.
-
A date on which a particular financial transaction is executed or agreed upon.
-
Format should be: “YYYY-MM-DD” (e.g. “
2000-12-31")
-
-
Date (Value)
-
Date field.
-
A date when cash or funds are expected to be received or paid as part of a financial transaction.
-
Format should be: “YYYY-MM-DD” (e.g. “
2000-12-31")
-
-
Portfolio
-
Text field. Case-sensitive.
-
A collection of financial assets or investments held by an individual or organization.
-
-
Account (Cash)
-
Text field. Case-sensitive.
-
An account that is specifically designated for managing and tracking cash transactions.
-
For FX Trade transactions:
-
An account for the quote currency in a foreign exchange transaction (BaseCCY/QuoteCCY).
-
-
-
Currency (Settlement)
-
Text field. Case-sensitive.
-
For FX Trade transactions:
-
A quote currency in a foreign exchange transaction (BaseCCY/QuoteCCY).
-
-
Must be an alphabetic code of a currency alphabetic code (e.g.
USD,EUR,CHF).
-
-
Cash Consideration
-
Numeric field.
-
For FX Trade transactions:
-
An amount of a quote currency in a foreign exchange transaction (BaseCCY/QuoteCCY).
-
-
A sign of the number:
-
“+” (plus sign) is for position increase
-
“-” (minus sign) is for position decrease
-
-
-
Amount (Charges)
-
Numeric field.
-
For FX Trade transactions values should be “
0" (zero).
-
-
Account (Position)
-
Text field. Case-sensitive.
-
An account that is specifically designated for managing and tracking cash transactions.
-
For FX Trade transactions:
-
An account for the base currency in a foreign exchange transaction (BaseCCY/QuoteCCY).
-
-
-
Instrument
-
Text field.
-
For FX Trade transactions:
-
A base currency in a foreign exchange transaction (BaseCCY/QuoteCCY).
-
-
Must be an alphabetic code of a currency alphabetic code (e.g.
USD,EUR,CHF).
-
-
Allocation (PL)
-
Text field. Case-sensitive.
-
An instrument to which the financial outcome of a transaction is attributed or allocated.
-
Value must be:
-
ISIN (e.g.
GB00BFZNLB60) to import Instrument from Finmars Database -
user_code - for instruments without ISIN or already created instruments.
-
-
-
Position size
-
Numeric field.
-
For FX Trade transactions:
- An amount of a base currency in a foreign exchange transaction (BaseCCY/QuoteCCY).
-
A sign of the number:
-
“
+" (plus sign) is for position increase -
“
-" (minus sign) is for position decrease
-
-
-
Principal/Share price
-
Numeric field.
-
For FX Trade transactions:
-
An exchange rate used for a contract’s foreign exchange transaction, where Sell currency is the Quote currency and Buy currency is the Base currency (e.g. we sell 110 USD and buy 100 EUR, then the field’s value should be 1.1 EUR/USD).
-
-
A sign of the number:
-
“
+" (plus sign) is for standard prices -
“
-" (minus sign) is for special prices (e.g. for exotic derivatives)
-
-
-
Amount (Carry)
-
Numeric field.
-
For FX Trade transactions values should be “
0" (zero).
-
-
Notes
-
Text field.
-
Additional comments, instructions, or relevant information associated with a particular transaction.
-
If there are no notes enter “
-" (dash).
-
-
Payment Purpose (for Income/Expense)
-
Text field. Case-sensitive.
-
For FX Trade transactions values should be “
-" (dash).
-
-
Reference transaction code
-
Text field. Case-sensitive.
-
A reference to related transactions' unique identifiers.
-
For reverse transaction you can specify a transaction ID of the reversed transaction.
-
-
Counterparty
-
Text field. Case-sensitive.
-
-
Responsible
-
Text field. Case-sensitive.
-
-
Strategy1
-
Text field. Case-sensitive.
-
-
Portfolio To
-
Text field. Case-sensitive.
-
For FX Trade transactions values should be “
-" (dash).
-
-
Account To (Cash)
-
Text field. Case-sensitive.
-
For FX Trade transactions values should be “
-" (dash).
-
-
Account To (Position)
-
Text field. Case-sensitive.
-
For FX Trade transactions values should be “
-" (dash).
-
-
Position size New
-
Numeric field.
- For FX Trade transactions values should be “
0" (zero).
-
-
Principal/Share price New
-
Numeric field.
- For FX Trade transactions values should be “
0" (zero).
-
Transfer Cash
-
Transaction ID
-
Text field. Case-sensitive.
-
A unique complex transaction identifier (only one in the workspace).
-
Transactions with repeated ID will be overwritten.
-
-
Transaction Type
-
Text field. Case-sensitive.
-
Type of a transaction.
-
Should be a value from Standard transaction types for Transactions.
-
For Transfer Cash transactions values should be:
-
Transfer Cash
-
-
-
Reverse
-
Text field.
-
Indicator for a reverse transaction.
-
Valid values:
-
True -
False
-
-
This field has only indicative meaning and will NOT invert any signs in other fields.
-
-
Date (Accounting)
-
Date field.
-
A date on which a particular financial transaction was entered into the source system.
-
Format should be: “YYYY-MM-DD” (e.g. “
2000-12-31")
-
-
Date (Trade)
-
Date field.
-
A date on which a particular financial transaction is executed or agreed upon.
-
Format should be: “YYYY-MM-DD” (e.g. “
2000-12-31")
-
-
Date (Value)
-
Date field.
-
A date when cash or funds are expected to be received or paid as part of a financial transaction.
-
Format should be: “YYYY-MM-DD” (e.g. “
2000-12-31")
-
-
Portfolio
-
Text field. Case-sensitive.
-
A collection of financial assets or investments held by an individual or organization.
-
-
Account (Cash)
-
Text field. Case-sensitive.
-
An account that is specifically designated for managing and tracking cash transactions.
-
-
Currency (Settlement)
-
Text field. Case-sensitive.
-
A currency in which the payment or transfer of funds takes place to fulfil the terms of the transaction.
-
Must be an alphabetic code of a currency alphabetic code (e.g.
USD,EUR,CHF).
-
-
Cash Consideration
-
Numeric field.
-
A monetary value or payment made in the form of cash for a particular transaction or asset.
-
Must be in Settlement Currency.
-
A sign of the number:
-
“
+" (plus sign) is for income -
“
-" (minus sign) is for expenses
-
-
-
Amount (Charges)
-
Numeric field.
-
For Transfer Cash transactions values should be “
0" (zero).
-
-
Account (Position)
-
Text field. Case-sensitive.
-
For Transfer Cash transactions values should be “
-" (dash).
-
-
Instrument
-
Text field. Case-sensitive.
-
For Transfer Cash transactions values should be “
-" (dash).
-
-
Allocation (PL)
-
Text field. Case-sensitive.
-
For Transfer Cash transactions values should be “
-" (dash).
-
-
Position size
-
Numeric field.
-
For Transfer Cash transactions values should be “
0" (zero).
-
-
Principal/Share price
-
Numeric field.
-
For Transfer Cash transactions values should be “
0" (zero) for default. -
A sign of the number:
-
“
+" (plus sign) is for standard prices -
“
-" (minus sign) is for special prices (e.g. for exotic derivatives)
-
-
-
Amount (Carry)
-
Numeric field.
-
For Transfer Cash transactions values should be “
0" (zero).
-
-
Notes
-
Text field.
-
Additional comments, instructions, or relevant information associated with a particular transaction.
-
If there are no notes enter “
-" (dash).
-
-
Payment Purpose (for Income/Expense)
-
Text field. Case-sensitive.
-
For Transfer Cash transactions values should be “
-" (dash).
-
-
Reference transaction code
-
Text field. Case-sensitive.
-
A reference to related transactions' unique identifiers.
-
For reverse transaction you can specify a transaction ID of the reversed transaction.
-
-
Counterparty
-
Text field. Case-sensitive.
-
-
Responsible
-
Text field. Case-sensitive.
-
-
Strategy1
-
Text field. Case-sensitive.
-
-
Portfolio To
-
Text field. Case-sensitive.
-
A collection of financial assets or investments held by an individual or organization where the transaction transfer to.
-
-
Account To (Cash)
-
Text field. Case-sensitive.
-
An account that is specifically designated for managing and tracking cash transactions where the transaction transfer to.
-
-
Account To (Position)
-
Text field. Case-sensitive.
-
For Transfer Cash transactions values should be “
-" (dash).
-
-
Position size New
-
Numeric field.
- For Transfer Cash transactions values should be “
0" (zero).
-
-
Principal/Share price New
-
Numeric field.
- For Transfer Cash transactions values should be “
0" (zero).
-
Transfer Cash (In/Out)
-
Transaction ID
-
Text field. Case-sensitive.
-
A unique complex transaction identifier (only one in the workspace).
-
Transactions with repeated ID will be overwritten.
-
-
Transaction Type
-
Text field. Case-sensitive.
-
Type of a transaction.
-
Should be a value from Standard transaction types for Transactions.
-
For Transfer Cash (In/Out) transactions values should be:
-
Transfer Cash (In) Transfer Cash (Out)
-
-
-
Reverse
-
Text field.
-
Indicator for a reverse transaction.
-
Valid values:
-
True -
False
-
-
This field has only indicative meaning and will NOT invert any signs in other fields.
-
-
Date (Accounting)
-
Date field.
-
A date on which a particular financial transaction was entered into the source system.
-
Format should be: “YYYY-MM-DD” (e.g. “
2000-12-31")
-
-
Date (Trade)
-
Date field.
-
A date on which a particular financial transaction is executed or agreed upon.
-
Format should be: “YYYY-MM-DD” (e.g. “
2000-12-31")
-
-
Date (Value)
-
Date field.
-
A date when cash or funds are expected to be received or paid as part of a financial transaction.
-
Format should be: “YYYY-MM-DD” (e.g. “
2000-12-31")
-
-
Portfolio
-
Text field. Case-sensitive.
-
A collection of financial assets or investments held by an individual or organization.
-
-
Account (Cash)
-
Text field. Case-sensitive.
-
An account that is specifically designated for managing and tracking cash transactions.
-
-
Currency (Settlement)
-
Text field. Case-sensitive.
-
A currency in which the payment or transfer of funds takes place to fulfil the terms of the transaction.
-
Must be an alphabetic code of a currency alphabetic code (e.g.
USD,EUR,CHF).
-
-
Cash Consideration
-
Numeric field.
-
A monetary value or payment made in the form of cash for a particular transaction or asset.
-
Must be in Settlement Currency.
-
A sign of the number:
-
“
+" (plus sign) is for income -
“
-" (minus sign) is for expenses
-
-
-
Amount (Charges)
-
Numeric field.
-
For Transfer Cash (In/Out) transactions values should be “
0" (zero).
-
-
Account (Position)
-
Text field. Case-sensitive.
-
For Transfer Cash (In/Out) transactions values should be “
-" (dash).
-
-
Instrument
-
Text field. Case-sensitive.
-
For Transfer Cash (In/Out) transactions values should be “
-" (dash).
-
-
Allocation (PL)
-
Text field. Case-sensitive.
-
For Transfer Cash (In/Out) transactions values should be “
-" (dash).
-
-
Position size
-
Numeric field.
-
For Transfer Cash (In/Out) transactions values should be “
0" (zero).
-
-
Principal/Share price
-
Numeric field.
-
For Transfer Cash (In/Out) transactions values should be “
0" (zero) for default. -
A sign of the number:
-
“
+" (plus sign) is for standard prices -
“
-" (minus sign) is for special prices (e.g. for exotic derivatives)
-
-
-
Amount (Carry)
-
Numeric field.
-
For Transfer Cash (In/Out) transactions values should be “
0" (zero).
-
-
Notes
-
Text field.
-
Additional comments, instructions, or relevant information associated with a particular transaction.
-
If there are no notes enter “
-" (dash).
-
-
Payment Purpose (for Income/Expense)
-
Text field. Case-sensitive.
-
For Transfer Cash (In/Out) transactions values should be “
-" (dash).
-
-
Reference transaction code
-
Text field. Case-sensitive.
-
A reference to related transactions' unique identifiers.
-
For reverse transaction you can specify a transaction ID of the reversed transaction.
-
-
Counterparty
-
Text field. Case-sensitive.
-
-
Responsible
-
Text field. Case-sensitive.
-
-
Strategy1
-
Text field. Case-sensitive.
-
-
Portfolio To
-
Text field. Case-sensitive.
- For Transfer Cash (In/Out) transactions values should be “
-" (dash).
-
-
Account To (Cash)
-
Text field. Case-sensitive.
- For Transfer Cash (In/Out) transactions values should be “
-" (dash).
-
-
Account To (Position)
-
Text field. Case-sensitive.
-
For Transfer Cash (In/Out) transactions values should be “
-" (dash).
-
-
Position size New
-
Numeric field.
- For Transfer Cash (In/Out) transactions values should be “
0" (zero).
-
-
Principal/Share price New
-
Numeric field.
- For Transfer Cash (In/Out) transactions values should be “
0" (zero).
-
Transfer Instrument
-
Transaction ID
-
Text field. Case-sensitive.
-
A unique complex transaction identifier (only one in the workspace).
-
Transactions with repeated ID will be overwritten.
-
-
Transaction Type
-
Text field. Case-sensitive.
-
Type of a transaction.
- Should be a value from Standard transaction types for Transactions.
-
For Transfer Instrument transactions values should be:
-
Transfer Instrument
-
-
-
Reverse
-
Text field.
-
Indicator for a reverse transaction.
-
Valid values:
-
True -
False
-
-
This field has only indicative meaning and will NOT invert any signs in other fields.
-
-
Date (Accounting)
-
Date field.
-
A date on which a particular financial transaction was entered into the source system.
-
Format should be: “YYYY-MM-DD” (e.g. “
2000-12-31")
-
-
Date (Trade)
-
Date field.
-
A date on which a particular financial transaction is executed or agreed upon.
-
Format should be: “YYYY-MM-DD” (e.g. “
2000-12-31")
-
-
Date (Value)
-
Date field.
-
A date when cash or funds are expected to be received or paid as part of a financial transaction.
-
Format should be: “YYYY-MM-DD” (e.g. “
2000-12-31")
-
-
Portfolio
-
Text field. Case-sensitive.
-
A collection of financial assets or investments held by an individual or organization.
-
-
Account (Cash)
-
Text field. Case-sensitive.
-
An account that is specifically designated for managing and tracking cash transactions.
-
-
Currency (Settlement)
-
Text field. Case-sensitive.
-
A currency in which the payment or transfer of funds takes place to fulfil the terms of the transaction.
-
Must be an alphabetic code of a currency alphabetic code (e.g.
USD,EUR,CHF).
-
-
Cash Consideration
-
Numeric field.
-
A monetary value or payment made in the form of cash for a particular transaction or asset.
-
Must be in Settlement Currency.
-
A sign of the number:
-
“
+" (plus sign) is for income -
“
-" (minus sign) is for expenses
-
-
-
Amount (Charges)
-
Numeric field.
-
Costs or fees associated with a transaction.
-
Must be in Settlement Currency.
-
A sign of the number:
-
“
+" (plus sign) is for income -
“
-" (minus sign) is for expenses
-
-
-
Account (Position)
-
Text field. Case-sensitive.
-
An account that tracks and records the positions or holdings of assets.
-
- Instrument
-
Text field. Case-sensitive.
-
A financial asset or security involved in a transaction.
-
Value must be:
-
ISIN (e.g.
GB00BFZNLB60) to import Instrument from Finmars Database -
user_code - for instruments without ISIN or already created instruments.
-
-
-
Allocation (PL)
-
Text field. Case-sensitive.
-
For Transfer Instrument transactions values should be “
-" (dash).
-
-
Position size
-
Numeric field.
- An adjusted position of the asset after all alterations or corrections (e.g. adjusted for a factor).
-
A sign of the number:
-
“
+" (plus sign) is for position increase -
“
-" (minus sign) is for position decrease
-
-
-
Principal/Share price
-
Numeric field.
-
For Transfer Instrument transactions this field is a Principal price:
-
A unit price or value of a financial instrument, excluding any accrued interest or additional earnings.
-
-
Must be in Settlement Currency.
-
Multipliers will be applied automatically in accordance with an instrument of the transaction.
-
A sign of the number:
-
“
+" (plus sign) is for standard prices -
“
-" (minus sign) is for special prices (e.g. for exotic derivatives)
-
-
-
Amount (Carry)
-
Numeric field.
-
An amount or expense that has been incurred but not yet paid or settled.
-
Must be in Settlement Currency.
-
A sign of the number:
-
“
+" (plus sign) is for income -
“
-" (minus sign) is for expenses
-
-
-
Notes
-
Text field.
-
Additional comments, instructions, or relevant information associated with a particular transaction.
-
If there are no notes enter “-” (dash).
-
-
Payment Purpose (for Income/Expense)
-
Text field. Case-sensitive.
-
For Transfer Instrument transactions values should be “-" (dash).
-
-
Reference transaction code
-
Text field. Case-sensitive.
-
A reference to related transactions' unique identifiers.
-
For reverse transaction you can specify a transaction ID of the reversed transaction.
-
-
Counterparty
-
Text field. Case-sensitive.
-
-
Responsible
-
Text field. Case-sensitive.
-
-
Strategy1
-
Text field. Case-sensitive.
-
-
Portfolio To
-
Text field. Case-sensitive.
-
A collection of financial assets or investments held by an individual or organization where the transaction transfer to.
-
-
Account To (Cash)
-
Text field. Case-sensitive.
-
For Transfer Instrument transactions values should be “
-" (dash).
-
-
Account To (Position)
-
Text field. Case-sensitive.
-
An account that tracks and records the positions or holdings of assets where the transaction transfer to.
-
-
Position size New
-
Numeric field.
- For Transfer Instrument transactions values should be “
0" (zero).
-
-
Principal/Share price New
-
Numeric field.
- For Transfer Instrument transactions values should be “
0" (zero).
-
Transfer Instrument (In/Out)
-
Transaction ID
-
Text field. Case-sensitive.
-
A unique complex transaction identifier (only one in the workspace).
-
Transactions with repeated ID will be overwritten.
-
-
Transaction Type
-
Text field. Case-sensitive.
-
Type of a transaction.
- Should be a value from Standard transaction types for Transactions.
-
For Transfer Instrument (In/Out) transactions values should be:
-
Transfer Instrument (In) Transfer Instrument (Out)
-
-
-
Reverse
-
Text field.
-
Indicator for a reverse transaction.
-
Valid values:
-
True -
False
-
-
This field has only indicative meaning and will NOT invert any signs in other fields.
-
-
Date (Accounting)
-
Date field.
-
A date on which a particular financial transaction was entered into the source system.
-
Format should be: “YYYY-MM-DD” (e.g. “
2000-12-31")
-
-
Date (Trade)
-
Date field.
-
A date on which a particular financial transaction is executed or agreed upon.
-
Format should be: “YYYY-MM-DD” (e.g. “
2000-12-31")
-
-
Date (Value)
-
Date field.
-
A date when cash or funds are expected to be received or paid as part of a financial transaction.
-
Format should be: “YYYY-MM-DD” (e.g. “
2000-12-31")
-
-
Portfolio
-
Text field. Case-sensitive.
-
A collection of financial assets or investments held by an individual or organization.
-
-
Account (Cash)
-
Text field. Case-sensitive.
-
An account that is specifically designated for managing and tracking cash transactions.
-
-
Currency (Settlement)
-
Text field. Case-sensitive.
-
A currency in which the payment or transfer of funds takes place to fulfil the terms of the transaction.
-
Must be an alphabetic code of a currency alphabetic code (e.g.
USD,EUR,CHF).
-
-
Cash Consideration
-
Numeric field.
-
A monetary value or payment made in the form of cash for a particular transaction or asset.
-
Must be in Settlement Currency.
-
A sign of the number:
-
“
+" (plus sign) is for income -
“
-" (minus sign) is for expenses
-
-
-
Amount (Charges)
-
Numeric field.
-
Costs or fees associated with a transaction.
-
Must be in Settlement Currency.
-
A sign of the number:
-
“
+" (plus sign) is for income -
“
-" (minus sign) is for expenses
-
-
-
Account (Position)
-
Text field. Case-sensitive.
-
An account that tracks and records the positions or holdings of assets.
-
- Instrument
-
Text field. Case-sensitive.
-
A financial asset or security involved in a transaction.
-
Value must be:
-
ISIN (e.g.
GB00BFZNLB60) to import Instrument from Finmars Database -
user_code - for instruments without ISIN or already created instruments.
-
-
-
Allocation (PL)
-
Text field. Case-sensitive.
-
For Transfer Instrument (In/Out) transactions values should be “
-" (dash).
-
-
Position size
-
Numeric field.
- An adjusted position of the asset after all alterations or corrections (e.g. adjusted for a factor).
-
A sign of the number:
-
“
+" (plus sign) is for position increase -
“
-" (minus sign) is for position decrease
-
-
-
Principal/Share price
-
Numeric field.
-
For Transfer Instrument (In/Out) transactions this field is a Principal price:
-
A unit price or value of a financial instrument, excluding any accrued interest or additional earnings.
-
-
Must be in Settlement Currency.
-
Multipliers will be applied automatically in accordance with an instrument of the transaction.
-
A sign of the number:
-
“
+" (plus sign) is for standard prices -
“
-" (minus sign) is for special prices (e.g. for exotic derivatives)
-
-
-
Amount (Carry)
-
Numeric field.
-
An amount or expense that has been incurred but not yet paid or settled.
-
Must be in Settlement Currency.
-
A sign of the number:
-
“
+" (plus sign) is for income -
“
-" (minus sign) is for expenses
-
-
-
Notes
-
Text field.
-
Additional comments, instructions, or relevant information associated with a particular transaction.
-
If there are no notes enter “-” (dash).
-
-
Payment Purpose (for Income/Expense)
-
Text field. Case-sensitive.
-
For Transfer Instrument (In/Out) transactions values should be “-" (dash).
-
-
Reference transaction code
-
Text field. Case-sensitive.
-
A reference to related transactions' unique identifiers.
-
For reverse transaction you can specify a transaction ID of the reversed transaction.
-
-
Counterparty
-
Text field. Case-sensitive.
-
-
Responsible
-
Text field. Case-sensitive.
-
-
Strategy1
-
Text field. Case-sensitive.
-
-
Portfolio To
-
Text field. Case-sensitive.
- For Transfer Instrument (In/Out) transactions values should be “
-" (dash).
-
-
Account To (Cash)
-
Text field. Case-sensitive.
-
For Transfer Instrument (In/Out) transactions values should be “
-" (dash).
-
-
Account To (Position)
-
Text field. Case-sensitive.
- For Transfer Instrument (In/Out) transactions values should be “
-" (dash).
-
-
Position size New
-
Numeric field.
- For Transfer Instrument (In/Out) transactions values should be “
0" (zero).
-
-
Principal/Share price New
-
Numeric field.
- For Transfer Instrument (In/Out) transactions values should be “
0" (zero).
-
FX Forward (Open)/FX Forward (Expiration)
-
Transaction ID
-
Text field. Case-sensitive.
-
A unique complex transaction identifier (only one in the workspace).
-
Transactions with repeated ID will be overwritten.
-
-
Transaction Type
-
Text field. Case-sensitive.
-
Type of a transaction.
-
Should be a value from Standard transaction types for Transactions.
-
For FX Forward (Open)/FX Forward (Expiration) transactions values should be:
FX Forward (Open)-
FX Forward (Expiration)
-
-
Reverse
-
Text field.
-
Indicator for a reverse transaction.
-
Valid values:
-
True -
False
-
-
This field has only indicative meaning and will NOT invert any signs in other fields.
-
-
Date (Accounting)
-
Date field.
-
A date on which a particular financial transaction was entered into the source system.
-
Format should be: “YYYY-MM-DD” (e.g. “
2000-12-31")
-
-
Date (Trade)
-
Date field.
-
A date on which a particular financial transaction is executed or agreed upon.
-
Format should be: “YYYY-MM-DD” (e.g. “
2000-12-31")
-
-
Date (Value)
-
Date field.
-
A date when cash or funds are expected to be received or paid as part of a financial transaction.
-
Format should be: “YYYY-MM-DD” (e.g. “
2000-12-31")
-
-
Portfolio
-
Text field. Case-sensitive.
-
A collection of financial assets or investments held by an individual or organization.
-
-
Account (Cash)
-
Text field. Case-sensitive.
-
An account that is specifically designated for managing and tracking cash transactions.
-
For FX Forward (Open)/FX Forward (Expiration) transactions:
-
An account for the quote currency in a foreign exchange transaction (BaseCCY/QuoteCCY).
-
-
-
Currency (Settlement)
-
Text field. Case-sensitive.
-
For FX Forward (Open)/FX Forward (Expiration) transactions:
-
A quote currency in a foreign exchange transaction (BaseCCY/QuoteCCY).
-
-
Must be an alphabetic code of a currency alphabetic code (e.g.
USD,EUR,CHF).
-
-
Cash Consideration
-
Numeric field.
-
For FX Forward (Open)/FX Forward (Expiration) transactions:
-
An amount of a quote currency in a foreign exchange transaction (BaseCCY/QuoteCCY).
-
-
A sign of the number:
-
“+” (plus sign) is for position increase
-
“-” (minus sign) is for position decrease
-
-
-
Amount (Charges)
-
Numeric field.
-
For FX Forward (Open)/FX Forward (Expiration) transactions values should be “
0" (zero).
-
-
Account (Position)
-
Text field. Case-sensitive.
-
An account that is specifically designated for managing and tracking cash transactions.
-
For FX Forward (Open)/FX Forward (Expiration) transactions:
-
An account for the base currency in a foreign exchange transaction (BaseCCY/QuoteCCY).
-
-
-
Instrument
-
Text field.
-
For FX Forward (Open)/FX Forward (Expiration) transactions:
-
A base currency in a foreign exchange transaction (BaseCCY/QuoteCCY).
-
-
Must be an alphabetic code of a currency alphabetic code (e.g.
USD,EUR,CHF).
-
-
Allocation (PL)
-
Text field. Case-sensitive.
-
An instrument to which the financial outcome of a transaction is attributed or allocated.
-
Value must be:
-
ISIN (e.g.
GB00BFZNLB60) to import Instrument from Finmars Database -
user_code - for instruments without ISIN or already created instruments.
-
-
-
Position size
-
Numeric field.
-
For FX Forward (Open)/FX Forward (Expiration) transactions:
- An amount of a base currency in a foreign exchange transaction (BaseCCY/QuoteCCY).
-
A sign of the number:
-
“
+" (plus sign) is for position increase -
“
-" (minus sign) is for position decrease
-
-
-
Principal/Share price
-
Numeric field.
-
For FX Forward (Open)/FX Forward (Expiration) transactions:
-
An exchange rate used for a contract’s foreign exchange transaction, where Sell currency is the Quote currency and Buy currency is the Base currency (e.g. we sell 110 USD and buy 100 EUR, then the field’s value should be 1.1 EUR/USD).
-
-
A sign of the number:
-
“
+" (plus sign) is for standard prices -
“
-" (minus sign) is for special prices (e.g. for exotic derivatives)
-
-
-
Amount (Carry)
-
Numeric field.
-
For FX Forward (Open)/FX Forward (Expiration) transactions values should be “
0" (zero).
-
-
Notes
-
Text field.
-
Additional comments, instructions, or relevant information associated with a particular transaction.
-
If there are no notes enter “
-" (dash).
-
-
Payment Purpose (for Income/Expense)
-
Text field. Case-sensitive.
-
For FX Forward (Open)/FX Forward (Expiration) transactions values should be “
-" (dash).
-
-
Reference transaction code
-
Text field. Case-sensitive.
-
A reference to related transactions' unique identifiers.
-
For reverse transaction you can specify a transaction ID of the reversed transaction.
-
-
Counterparty
-
Text field. Case-sensitive.
-
-
Responsible
-
Text field. Case-sensitive.
-
-
Strategy1
-
Text field. Case-sensitive.
-
-
Portfolio To
-
Text field. Case-sensitive.
-
For FX Forward (Open)/FX Forward (Expiration) transactions values should be “
-" (dash).
-
-
Account To (Cash)
-
Text field. Case-sensitive.
-
For FX Forward (Open)/FX Forward (Expiration) transactions values should be “
-" (dash).
-
-
Account To (Position)
-
Text field. Case-sensitive.
-
For FX Forward (Open)/FX Forward (Expiration) transactions values should be “
-" (dash).
-
-
Position size New
-
Numeric field.
- For FX Forward (Open)/FX Forward (Expiration) transactions values should be “
0" (zero).
-
-
Principal/Share price New
-
Numeric field.
- For FX Forward (Open)/FX Forward (Expiration) transactions values should be “
0" (zero).
-
Split/Reverse Split
-
Transaction ID
-
Text field. Case-sensitive.
-
A unique complex transaction identifier (only one in the workspace).
-
Transactions with repeated ID will be overwritten.
-
-
Transaction Type
-
Text field. Case-sensitive.
-
Type of a transaction.
- Should be a value from Standard transaction types for Transactions.
-
For Split/Reverse Split transactions values should be:
-
Split -
Reverse Split
-
-
-
Reverse
-
Text field.
-
Indicator for a reverse transaction.
-
Valid values:
-
True -
False
-
-
This field has only indicative meaning and will NOT invert any signs in other fields.
-
-
Date (Accounting)
-
Date field.
-
A date on which a particular financial transaction was entered into the source system.
-
Format should be: “YYYY-MM-DD” (e.g. “
2000-12-31")
-
-
Date (Trade)
-
Date field.
-
A date on which a particular financial transaction is executed or agreed upon.
-
Format should be: “YYYY-MM-DD” (e.g. “
2000-12-31")
-
-
Date (Value)
-
Date field.
-
A date when cash or funds are expected to be received or paid as part of a financial transaction.
-
Format should be: “YYYY-MM-DD” (e.g. “
2000-12-31")
-
-
Portfolio
-
Text field. Case-sensitive.
-
A collection of financial assets or investments held by an individual or organization.
-
-
Account (Cash)
-
Text field. Case-sensitive.
-
An account that is specifically designated for managing and tracking cash transactions.
-
-
Currency (Settlement)
-
Text field. Case-sensitive.
-
A currency in which the payment or transfer of funds takes place to fulfil the terms of the transaction.
-
Must be an alphabetic code of a currency alphabetic code (e.g.
USD,EUR,CHF).
-
-
Cash Consideration
-
Numeric field.
- A monetary value or payment made in the form of cash for a particular transaction or asset.
-
Must be in Settlement Currency.
-
A sign of the number:
-
“
+" (plus sign) is for income -
“
-" (minus sign) is for expenses
-
-
-
Amount (Charges)
-
Numeric field.
-
Costs or fees associated with a transaction.
-
Must be in Settlement Currency.
-
A sign of the number:
-
“
+" (plus sign) is for income -
“
-" (minus sign) is for expenses
-
-
-
Account (Position)
-
Text field. Case-sensitive.
-
An account that tracks and records the positions or holdings of assets.
-
- Instrument
-
Text field. Case-sensitive.
-
A financial asset or security involved in a transaction.
-
Value must be:
-
ISIN (e.g.
GB00BFZNLB60) to import Instrument from Finmars Database -
user_code - for instruments without ISIN or already created instruments.
-
-
-
Allocation (PL)
-
Text field. Case-sensitive.
-
An instrument to which the financial outcome of a transaction is attributed or allocated.
-
Value must be:
-
ISIN (e.g.
GB00BFZNLB60) to import Instrument from Finmars Database -
user_code - for instruments without ISIN or already created instruments.
-
-
-
Position size
-
Numeric field.
- An adjusted position of the asset after all alterations or corrections (e.g. adjusted for a factor).
-
A sign of the number:
-
“
+" (plus sign) is for position increase -
“
-" (minus sign) is for position decrease
-
-
-
Principal/Share price
-
Numeric field.
-
For Split/Reverse Split transactions this field is a Principal price:
-
A unit price or value of a financial instrument, excluding any accrued interest or additional earnings.
-
-
Must be in Settlement Currency.
-
Multipliers will be applied automatically in accordance with an instrument of the transaction.
-
A sign of the number:
-
“
+" (plus sign) is for standard prices -
“
-" (minus sign) is for special prices (e.g. for exotic derivatives)
-
-
-
Amount (Carry)
-
Numeric field.
-
An amount or expense that has been incurred but not yet paid or settled.
-
Must be in Settlement Currency.
-
A sign of the number:
-
“
+" (plus sign) is for income -
“
-" (minus sign) is for expenses
-
-
-
Notes
-
Text field.
-
Additional comments, instructions, or relevant information associated with a particular transaction.
-
If there are no notes enter “-” (dash).
-
-
Payment Purpose (for Income/Expense)
-
Text field. Case-sensitive.
-
For Split/Reverse Split transactions values should be “-" (dash).
-
-
Reference transaction code
-
Text field. Case-sensitive.
-
A reference to related transactions' unique identifiers.
-
For reverse transaction you can specify a transaction ID of the reversed transaction.
-
-
Counterparty
-
Text field. Case-sensitive.
-
-
Responsible
-
Text field. Case-sensitive.
-
-
Strategy1
-
Text field. Case-sensitive.
-
-
Portfolio To
-
Text field. Case-sensitive.
-
For Split/Reverse Split transactions values should be “
-" (dash).
-
-
Account To (Cash)
-
Text field. Case-sensitive.
-
For Split/Reverse Split transactions values should be “
-" (dash).
-
-
Account To (Position)
-
Text field. Case-sensitive.
-
For Split/Reverse Split transactions values should be “
-" (dash).
-
-
Position size New
-
Numeric field.
- A new (e.g. after Corporate Action) quantity or size of an asset or instrument after any changes or corrections made to the nominal position. With sign of instrument movement (+ is for increase, - is for decrese).
-
A sign of the number:
-
“
+" (plus sign) is for position increase -
“
-" (minus sign) is for position decrease
-
-
-
Principal/Share price New
-
Numeric field.
-
For Split/Reverse Split transactions this field is a Principal price:
-
A new (e.g. after Corporate Action) unit price or value of a financial instrument, excluding any accrued interest or additional earnings.
-
-
Must be in Settlement Currency.
-
Multipliers will be applied automatically in accordance with an instrument of the transaction.
-
A sign of the number:
-
“
+" (plus sign) is for standard prices -
“
-" (minus sign) is for special prices (e.g. for exotic derivatives)
-
-
Positions Initial/Daily
-
To book a position in the system you can import it from a file, what differentiate Initial from Daily is Import Schemes, use corresponding.
-
One position is one row of data in the file.
-
You should enter a position in the file for import in accordance with the instructions below for supported standard transaction types.
- Supported Standard transaction types for Positions Initial/Daily list (case-sensitive):
-
Positions Initial/Daily (different schemes use the same selectors):
-
Position Cash -
Position Instrument -
Position FX Forward
-
-
Position Cash
Daily transaction type is valid only on the trade date then position will be nullified.
-
Transaction ID
-
Text field. Case-sensitive.
-
A unique complex transaction identifier (only one in the workspace).
-
Transactions with repeated ID will be overwritten.
-
-
Transaction Type
-
Text field. Case-sensitive.
-
Type of a transaction.
- Should be a value from Standard transaction types for Positions.
-
For Position Cash transactions values should be:
-
Position Cash
-
-
-
Date (Accounting)
-
Date field.
-
A date on which a particular financial transaction was entered into the source system.
-
Format should be: “YYYY-MM-DD” (e.g. “
2000-12-31")
-
-
Date (Trade)
-
Date field.
-
A date on which a particular financial transaction is executed or agreed upon.
-
Format should be: “YYYY-MM-DD” (e.g. “
2000-12-31")
-
-
Date (Value)
-
Date field.
-
A date when cash or funds are expected to be received or paid as part of a financial transaction.
-
Format should be: “YYYY-MM-DD” (e.g. “
2000-12-31") -
For Position Cash transactions:
-
Date (Value)should be equal toDate (Trade)
-
-
-
Portfolio
-
Text field. Case-sensitive.
-
A collection of financial assets or investments held by an individual or organization.
-
-
Account (Cash)
-
Text field. Case-sensitive.
-
An account that is specifically designated for managing and tracking cash transactions.
-
-
Currency (Settlement)
-
Text field. Case-sensitive.
-
A currency in which the payment or transfer of funds takes place to fulfil the terms of the transaction.
-
Must be an alphabetic code of a currency alphabetic code (e.g.
USD,EUR,CHF).
-
-
Cash Consideration
-
Numeric field.
-
A monetary value or payment made in the form of cash for a particular transaction or asset.
-
Must be in Settlement Currency.
-
A sign of the number:
-
“
+" (plus sign) is for income -
“
-" (minus sign) is for expenses
-
-
-
Account (Position)
-
Text field. Case-sensitive.
-
For Position Cash transactions values should be “
-" (dash).
-
-
Instrument
-
Text field. Case-sensitive.
-
For Position Cash transactions values should be “
-" (dash).
-
-
Position size
-
Numeric field.
-
For Position Cash transactions values should be “
0" (zero).
-
-
Principal/Share price
-
Numeric field.
-
For Position Cash transactions:
-
The share price of the open-end fund.
-
-
For Position Cash transactions values should be “
0" (zero) for default. -
A sign of the number:
-
“
+" (plus sign) is for standard prices -
“
-" (minus sign) is for special prices (e.g. for exotic derivatives)
-
-
-
Amount (Carry)
-
Numeric field.
-
For Position Cash transactions values should be “
0" (zero).
-
-
Notes
-
Text field.
-
Additional comments, instructions, or relevant information associated with a particular transaction.
-
If there are no notes enter “
-" (dash).
-
Position Instrument
Daily transaction type is valid only on the trade date then position will be nullified.
-
Transaction ID
-
Text field. Case-sensitive.
-
A unique complex transaction identifier (only one in the workspace).
-
Transactions with repeated ID will be overwritten.
-
-
Transaction Type
-
Text field. Case-sensitive.
-
Type of a transaction.
- Should be a value from Standard transaction types for Positions.
-
For Position Instrument transactions values should be:
-
Position Instrument
-
-
-
Date (Accounting)
-
Date field.
-
A date on which a particular financial transaction was entered into the source system.
-
Format should be: “YYYY-MM-DD” (e.g. “
2000-12-31")
-
-
Date (Trade)
-
Date field.
-
A date on which a particular financial transaction is executed or agreed upon.
-
Format should be: “YYYY-MM-DD” (e.g. “
2000-12-31")
-
-
Date (Value)
-
Date field.
-
A date when cash or funds are expected to be received or paid as part of a financial transaction.
-
Format should be: “YYYY-MM-DD” (e.g. “
2000-12-31") -
For Position Instrument transactions:
-
Date (Value)should be equal toDate (Trade)
-
-
-
Portfolio
-
Text field. Case-sensitive.
-
A collection of financial assets or investments held by an individual or organization.
-
-
Account (Cash)
-
Text field. Case-sensitive.
-
An account that is specifically designated for managing and tracking cash transactions.
-
-
Currency (Settlement)
-
Text field. Case-sensitive.
-
A currency in which the payment or transfer of funds takes place to fulfil the terms of the transaction.
-
Must be an alphabetic code of a currency alphabetic code (e.g.
USD,EUR,CHF).
-
-
Cash Consideration
-
Numeric field.
-
A monetary value or payment made in the form of cash for a particular transaction or asset.
-
Must be in Settlement Currency.
-
A sign of the number:
-
“
+" (plus sign) is for income -
“
-" (minus sign) is for expenses
-
-
-
Account (Position)
-
Text field. Case-sensitive.
-
An account that tracks and records the positions or holdings of assets.
-
- Instrument
-
Text field. Case-sensitive.
-
A financial asset or security involved in a transaction.
-
Value must be:
-
ISIN (e.g.
GB00BFZNLB60) to import Instrument from Finmars Database -
user_code - for instruments without ISIN or already created instruments.
-
-
-
Position size
-
Numeric field.
- An adjusted position of the asset after all alterations or corrections (e.g. adjusted for a factor).
-
A sign of the number:
-
“
+" (plus sign) is for position increase -
“
-" (minus sign) is for position decrease
-
-
-
Principal/Share price
-
Numeric field.
-
For Position Instrument transactions this field is a Principal price:
-
A unit price or value of a financial instrument, excluding any accrued interest or additional earnings.
-
-
Must be in Settlement Currency.
-
Multipliers will be applied automatically in accordance with an instrument of the transaction.
-
A sign of the number:
-
“
+" (plus sign) is for standard prices -
“
-" (minus sign) is for special prices (e.g. for exotic derivatives)
-
-
-
Amount (Carry)
-
Numeric field.
-
An amount or expense that has been incurred but not yet paid or settled.
-
Must be in Settlement Currency.
-
A sign of the number:
-
“
+" (plus sign) is for income -
“
-" (minus sign) is for expenses
-
-
-
Notes
-
Text field.
-
Additional comments, instructions, or relevant information associated with a particular transaction.
-
If there are no notes enter “-” (dash).
-
Position FX Forward
-
Transaction ID
-
Text field. Case-sensitive.
-
A unique complex transaction identifier (only one in the workspace).
-
Transactions with repeated ID will be overwritten.
-
-
Transaction Type
-
Text field. Case-sensitive.
-
Type of a transaction.
- Should be a value from Standard transaction types for Positions.
-
For Position FX Forward transactions values should be:
-
Position FX Forward
-
-
-
Date (Accounting)
-
Date field.
-
A date on which a particular financial transaction was entered into the source system.
-
Format should be: “YYYY-MM-DD” (e.g. “
2000-12-31")
-
-
Date (Trade)
-
Date field.
-
A date on which a particular financial transaction is executed or agreed upon.
-
Format should be: “YYYY-MM-DD” (e.g. “
2000-12-31")
-
-
Date (Value)
-
Date field.
-
A date when cash or funds are expected to be received or paid as part of a financial transaction.
-
Format should be: “YYYY-MM-DD” (e.g. “
2000-12-31")
-
-
Portfolio
-
Text field. Case-sensitive.
-
A collection of financial assets or investments held by an individual or organization.
-
-
Account (Cash)
-
Text field. Case-sensitive.
-
An account that is specifically designated for managing and tracking cash transactions.
-
For Position FX Forward transactions:
-
An account for the quote currency in a foreign exchange transaction (BaseCCY/QuoteCCY).
-
-
-
Currency (Settlement)
-
Text field. Case-sensitive.
-
For Position FX Forward transactions:
-
A quote currency in a foreign exchange transaction (BaseCCY/QuoteCCY).
-
-
Must be an alphabetic code of a currency alphabetic code (e.g.
USD,EUR,CHF).
-
-
Cash Consideration
-
Numeric field.
-
For Position FX Forward transactions:
-
An amount of a quote currency in a foreign exchange transaction (BaseCCY/QuoteCCY).
-
-
A sign of the number:
-
“+” (plus sign) is for position increase
-
“-” (minus sign) is for position decrease
-
-
-
Account (Position)
-
Text field. Case-sensitive.
-
An account that is specifically designated for managing and tracking cash transactions.
-
For Position FX Forward transactions:
-
An account for the base currency in a foreign exchange transaction (BaseCCY/QuoteCCY).
-
-
-
Instrument
-
Text field.
-
For Position FX Forward transactions:
-
A base currency in a foreign exchange transaction (BaseCCY/QuoteCCY).
-
-
Must be an alphabetic code of a currency alphabetic code (e.g.
USD,EUR,CHF).
-
-
Position size
-
Numeric field.
-
For Position FX Forward transactions:
- An amount of a base currency in a foreign exchange transaction (BaseCCY/QuoteCCY).
-
A sign of the number:
-
“
+" (plus sign) is for position increase -
“
-" (minus sign) is for position decrease
-
-
-
Principal/Share price
-
Numeric field.
-
For Position FX Forward transactions:
-
An exchange rate used for a contract’s foreign exchange transaction, where Sell currency is the Quote currency and Buy currency is the Base currency (e.g. we sell 110 USD and buy 100 EUR, then the field’s value should be 1.1 EUR/USD).
-
-
A sign of the number:
-
“
+" (plus sign) is for standard prices -
“
-" (minus sign) is for special prices (e.g. for exotic derivatives)
-
-
-
Amount (Carry)
-
Numeric field.
-
For Position FX Forward transactions values should be “
0" (zero).
-
-
Notes
-
Text field.
-
Additional comments, instructions, or relevant information associated with a particular transaction.
-
If there are no notes enter “
-" (dash).
-
Instruments
Instruments
-
Instrument ID
-
Text field. Case-sensitive.
-
A unique user_code for a financial asset or security involved in a transaction.
-
-
ISIN
-
Text field. Case-sensitive.
-
An identification code assigned to a financial instrument (e.g.
GB00BFZNLB60).
-
-
Pricing Currency
-
Text field. Case-sensitive.
-
A currency in which the valuation or pricing of a financial instrument is expressed.
-
Must be an alphabetic code of a currency alphabetic code (e.g.
USD,EUR,CHF).
-
- Instrument Type
-
Text field. Case-sensitive.
-
A user-friendly name for a instrument type of financial asset or security involved in a transaction (may influence view forms).
-
Valid values:
BondCDSCFDDepositDerivativeForwardFX Forward LegLoanOptionOtherPortfolioStockT-Bill
-
-
Asset Type
-
Text field. Case-sensitive.
-
A user-friendly name for an asset type financial asset or security involved in a transaction.
-
Valid values:
-
Alternative Investments -
Cash & Equivalents -
Commodities -
Crypto -
Debt -
Derivatives -
Equipment -
Equity -
Other -
Real Estate -
Transport
-
-
-
Name
-
Text field. Case-sensitive.
-
A name of the entity.
-
-
Short Name
-
Text field. Case-sensitive.
-
A short name of the entity.
-
-
Public Name
-
Text field. Case-sensitive.
-
A public name of the entity. Will be shown instead of Name if user has no right to see this entity.
-
- Description
-
Text field. Case-sensitive.
-
Additional comments, instructions, or relevant information associated with a particular instrument.
-
If there are no notes enter “
-" (dash).
-
-
Country
-
Text field. Case-sensitive.
-
A country of a financial instrument.
-
Must be iso 3 symbols country alphabetic code (e.g.
LUX,GBR,USA).
-
-
Price Multiplier
-
Numeric field.
-
A factor applied to adjust the nominal value of certain assets. For example, in the context of bonds, a price multiplier of 0.01 is used to convert the quoted price to its actual value.
-
-
Maturity Date
-
Date field.
-
A date on which a financial instrument (e.g. bond or certificate of deposit) reaches the end of its term.
-
Format should be: “YYYY-MM-DD” (e.g. “
2000-12-31")
-
- Maturity Price
-
Numeric field.
-
A unit price or value of a financial instrument, excluding any accrued interest or additional earnings effective after and including Maturity Date.
-
Must be in instrument Pricing Currency.
-
Multipliers will be applied automatically in accordance with an instrument of the transaction.
-
A sign of the number:
-
“
+" (plus sign) is for standard prices -
“
-" (minus sign) is for special prices (e.g. for exotic derivatives)
-
-
-
FIGI (ex. BBGID)
-
Text field. Case-sensitive.
-
An identification code assigned to a financial instrument (e.g.
BBG000C6K6G9).
-
-
CUSIP
-
Text field. Case-sensitive.
-
An identification code assigned to a financial instrument (e.g.
02079K107).
-
-
SEDOL
-
Text field. Case-sensitive.
-
An identification code assigned to a financial instrument (e.g.
0540528).
-
-
ISIN 144A
-
Text field. Case-sensitive.
-
An identification code assigned to a financial instrument (e.g.
US89855VAA89).
-
-
Accrued Currency
-
Text field. Case-sensitive.
-
A currency in which the accrued of a financial instrument is expressed.
-
Must be an alphabetic code of a currency alphabetic code (e.g.
USD,EUR,CHF).
-
-
Accrued Multiplier
-
Numeric field.
-
A factor applied to adjust the nominal accrued value of certain assets. For example, in the context of bonds, an accrued multiplier of 0.01 is used to convert the quoted accrued price to its actual value.
-
-
Exposure Currency (Codirectional)
- Not implemented.
-
Text field. Case-sensitive.
-
A currency in which the codirectional exposure of a financial instrument is expressed.
-
Must be an alphabetic code of a currency alphabetic code (e.g.
USD,EUR,CHF).
-
Exposure Currency (Counterdirectional)
- Not implemented.
-
Text field. Case-sensitive.
-
A currency in which the counterdirectional exposure of a financial instrument is expressed.
-
Must be an alphabetic code of a currency alphabetic code (e.g.
USD,EUR,CHF).
- Default Price
-
Numeric field.
-
A unit price or value of a financial instrument, excluding any accrued interest or additional earnings which is used for creating Price History entity for this instrument if the price is not specified (None).
-
Must be in instrument Pricing Currency.
-
Multipliers will be applied automatically in accordance with an instrument of the transaction.
-
A sign of the number:
-
“
+" (plus sign) is for standard prices -
“
-" (minus sign) is for special prices (e.g. for exotic derivatives)
-
-
-
Last Update Date
-
Date field.
-
A date on which was a financial instrument's last update.
-
Format should be: “YYYY-MM-DD” (e.g. “
2000-12-31")
-
Instruments Accrual Schedules
-
Instrument ID
-
Text field. Case-sensitive.
-
A unique user_code for a financial asset or security involved in a transaction.
-
-
Accrual ID
-
Text field. Case-sensitive.
-
ID of accrual schedule entries (unique in one Instrument, may repeat for different instruments).
-
-
Accrual Start Date
-
Date field.
-
A date on which a financial instrument starts accrual.
-
Format should be: “YYYY-MM-DD” (e.g. “
2000-12-31")
-
-
First Payment Date
-
Date field.
-
A date on which a financial instrument has its first accrual payment.
-
Format should be: “YYYY-MM-DD” (e.g. “
2000-12-31")
-
-
Accrual Calculation Model
-
Text field. Case-sensitive.
-
A user code of the Day Count Convention a.k.a. Accrual Calculation Model (drop-down valid values in Excel).
-
Valid values (as per 2024-07-19 see reference in Finmars API like https://ADDRESS/REALM_CODE/SPACE_CODE/api/v1/instruments/accrual-calculation-model/):
-
DAY_COUNT_30_360_ISDA -
DAY_COUNT_30_360_ISMA -
DAY_COUNT_30_360_GERMAN -
DAY_COUNT_30_360_US -
DAY_COUNT_30_365 -
DAY_COUNT_30E_PLUS_360 -
DAY_COUNT_30E_360 -
DAY_COUNT_ACT_360 -
DAY_COUNT_ACT_364 -
DAY_COUNT_ACT_365 -
DAY_COUNT_ACT_365A -
DAY_COUNT_ACT_365_FIXED -
DAY_COUNT_ACT_365L -
DAY_COUNT_ACT_366 -
DAY_COUNT_ACT_ACT_AFB -
DAY_COUNT_ACT_ACT_ICMA -
DAY_COUNT_ACT_ACT_ISDA -
DAY_COUNT_BD_252 -
DAY_COUNT_NL_365 -
NONE -
DAY_COUNT_SIMPLE
-
-
NONEis only applicable for Periodicity with defined N for example:-
Periodicity=N_DAYandPeriodicity N=35
-
-
-
Periodicity
-
Text field. Case-sensitive.
-
A user code of the Periodicity (drop-down valid values in Excel).
-
Valid values (as per 2024-07-19 see reference in Finmars API like https://ADDRESS/REALM_CODE/SPACE_CODE/api/v1/instruments/periodicity/):
-
- -
ANNUALLY -
BIMONTHLY -
MONTHLY -
N_DAY -
N_MONTH_EOM -
N_MONTH_SAME_DAY -
N_WEEK_EOBW -
N_YEAR_EOY -
N_YEAR_SAME_DAY -
QUARTERLY -
SEMI_ANNUALLY -
WEEKLY
-
-
-
Periodicity N
-
Numeric field.
-
Only applicable for Periodicity with defined N, for example:
-
Accrual Calculation Model=N_DAYandPeriodicity N=35.
-
-
-
Accrual Size, %
-
Numeric field.
-
Accrual size is in %, so that you need to input 5 for 5% and NOT 0.05.
-
-
End of Month
-
Text field.
-
Indicator for a payment in the End of Month.
-
Valid values:
-
True -
False
-
-
-
Notes
-
Text field.
-
Additional comments, instructions, or relevant information.
-
If there are no notes enter “
-" (dash).
-
Instruments Factor Schedules
-
Instrument ID
-
Text field. Case-sensitive.
-
A unique user_code for a financial asset or security involved in a transaction.
-
-
Factor ID
-
Text field. Case-sensitive.
-
ID of factor schedule entries (unique in one Instrument, may repeat for different instruments).
-
-
Date
-
Date field.
-
A date on which a financial instrument set the factor.
-
Format should be: “YYYY-MM-DD” (e.g. “
2000-12-31")
-
-
Factor
-
Numeric field.
-
Factor size is of float type, so that you need to input 0.5 for 50% and NOT 50.
-
Prices
-
Date
-
Date field.
-
A date of valuation.
-
Format should be: “YYYY-MM-DD” (e.g. “
2000-12-31")
-
-
Instrument ID
-
Text field. Case-sensitive.
-
A unique user_code for a financial asset or security involved in a transaction.
-
-
Principal Price
-
Numeric field.
-
A unit price or value of a financial instrument, excluding any accrued interest or additional earnings.
-
Must be in instrument Pricing Currency.
-
Multipliers will be applied automatically in accordance with an instrument of the transaction.
-
A sign of the number:
-
“
+" (plus sign) is for standard prices -
“
-" (minus sign) is for special prices (e.g. for exotic derivatives)
-
-
-
Accrued Price
-
Numeric field.
-
A unit price or value of accrued interest or other earnings of a financial instrument.
-
Must be in accrued currency.
-
Multipliers will be applied automatically in accordance with an instrument of the transaction.
-
A sign of the number:
-
“
+" (plus sign) is for standard prices -
“
-" (minus sign) is for special prices (e.g. for exotic derivatives)
-
-
-
Factor
-
Numeric field.
-
A multiplicative factor applied to the nominal or face value of a security, such as bonds or other financial instruments to adjust its value for various purposes.
-
Must NOT be negative.
-
-
YTM
-
Numeric field.
-
Yield to maturity.
-
-
Modified Duration
-
Numeric field.
-
-
Pricing Policy
-
Text field. Case-sensitive.
-
A unique user_code for a container which determines what set of prices and fx rates to use for valuation.
-
- is_temporary_price
-
Text field.
-
Indicator for a modified price (e.g. or auto populated by rolling).
-
Valid values:
-
True -
False
-
-
-
long_delta
- Not implemented.
-
short_delta
- Not implemented.
FX Rates
-
Date
-
Date field.
-
A date of valuation.
-
Format should be: “YYYY-MM-DD” (e.g. “
2000-12-31")
-
-
Currency ID
-
Text field. Case-sensitive.
-
A currency that is being purchased in a foreign exchange transaction.
-
Must be an alphabetic code of a currency alphabetic code (e.g.
USD,EUR,CHF).
-
-
FX Rate
-
Numeric field.
-
An exchange rate used for a foreign exchange transaction.
-
Must be in USD (USD must be quoted currency).
-
Must NOT be negative.
-
-
Pricing Policy
-
Text field. Case-sensitive.
-
A unique user_code for a container which determines what set of prices and fx rates to use for valuation.
-
Other Entities
Currencies
-
Currency ID
-
Text field. Case-sensitive.
- Unique user code of the entity.
- Entities with repeated ID will be overwritten.
- Must be an alphabetic code of a currency alphabetic code (e.g.
USD,EUR,CHF).
-
-
Name
-
Text field. Case-sensitive.
-
A name of the entity.
-
-
Short Name
-
Text field. Case-sensitive.
-
A short name of the entity.
-
-
Public Name
-
Text field. Case-sensitive.
-
A public name of the entity. Will be shown instead of Name if user has no right to see this entity.
-
-
Country
-
Text field. Case-sensitive.
-
A currency's country of origin.
-
Must be iso 3 symbols country alphabetic code (e.g.
LUX,GBR,USA).
-
-
Notes
-
Text field.
-
Additional comments, instructions, or relevant information.
-
If there are no notes enter “
-" (dash).
-
-
Pricing Reference
- Not implemented.
-
Pricing Condition
- Not implemented.
- Default FX Rate
-
Numeric field.
-
A unit fx rate or value of a currency which is used for creating Currency History entity for this currency if the fx rate is not specified (None).
- Must be in USD (USD must be quoted currency).
- Must NOT be negative.
-
Accounts
-
Account ID
-
Text field. Case-sensitive.
- Unique user code of the entity.
- Entities with repeated ID will be overwritten.
-
-
Name
-
Text field. Case-sensitive.
-
A name of the entity.
-
-
Short Name
-
Text field. Case-sensitive.
-
A short name of the entity.
-
-
Public Name
-
Text field. Case-sensitive.
-
A public name of the entity. Will be shown instead of Name if user has no right to see this entity.
-
-
Notes
-
Text field.
-
Additional comments, instructions, or relevant information.
-
If there are no notes enter “
-" (dash).
-
-
Account Type ID
-
Text field. Case-sensitive.
- Unique user code of the entity's type which is used for aggregation, no functional impact.
-
Portfolios
-
Portfolio ID
-
Text field. Case-sensitive.
- Unique user code of the entity.
- Entities with repeated ID will be overwritten.
-
-
Name
-
Text field. Case-sensitive.
-
A name of the entity.
-
-
Short Name
-
Text field. Case-sensitive.
-
A short name of the entity.
-
-
Public Name
-
Text field. Case-sensitive.
-
A public name of the entity. Will be shown instead of Name if user has no right to see this entity.
-
-
Notes
-
Text field.
-
Additional comments, instructions, or relevant information.
-
If there are no notes enter “
-" (dash).
-
-
Portfolio Type ID
-
Text field. Case-sensitive.
- Unique user code of the entity's type which is used to classify portfolios between:
- General (
com.finmars.standard-other:portfolios.portfoliotype:general) - Manual (
com.finmars.standard-other:portfolios.portfoliotype:manual) - Positional (
com.finmars.standard-other:portfolios.portfoliotype:position)
- General (
-
-
Register Pricing Policy
-
Text field. Case-sensitive.
-
A unique user_code for a container which determines what set of prices and fx rates to use for valuation.
-
-
Register Currency
-
Text field. Case-sensitive.
-
A user code of a currency that is being used in portfolio valuation.
-
- Register Instrument Type
-
Text field. Case-sensitive.
-
A user code for an instrument type of a register.
-
Recommended and default is:
com.finmars.standard-instrument-type:portfolio.
-
Counterparties
-
Counterparty ID
-
Text field. Case-sensitive.
- Unique user code of the entity.
- Entities with repeated ID will be overwritten.
-
-
Name
-
Text field. Case-sensitive.
-
A name of the entity.
-
-
Short Name
-
Text field. Case-sensitive.
-
A short name of the entity.
-
-
Public Name
-
Text field. Case-sensitive.
-
A public name of the entity. Will be shown instead of Name if user has no right to see this entity.
-
-
Notes
-
Text field.
-
Additional comments, instructions, or relevant information.
-
If there are no notes enter “
-" (dash).
-
-
Counterparty Type ID
-
Text field. Case-sensitive.
- Unique user code of the entity's type which is used for aggregation, no functional impact.
-
Responsibles
-
Responsible ID
-
Text field. Case-sensitive.
- Unique user code of the entity.
- Entities with repeated ID will be overwritten.
-
-
Name
-
Text field. Case-sensitive.
-
A name of the entity.
-
-
Short Name
-
Text field. Case-sensitive.
-
A short name of the entity.
-
-
Public Name
-
Text field. Case-sensitive.
-
A public name of the entity. Will be shown instead of Name if user has no right to see this entity.
-
-
Notes
-
Text field.
-
Additional comments, instructions, or relevant information.
-
If there are no notes enter “
-" (dash).
-
-
Responsible Type ID
-
Text field. Case-sensitive.
- Unique user code of the entity's type which is used for aggregation, no functional impact.
-
Strategies
-
Strategy ID
-
Text field. Case-sensitive.
- Unique user code of the entity.
- Entities with repeated ID will be overwritten.
-
-
Name
-
Text field. Case-sensitive.
-
A name of the entity.
-
-
Short Name
-
Text field. Case-sensitive.
-
A short name of the entity.
-
-
Public Name
-
Text field. Case-sensitive.
-
A public name of the entity. Will be shown instead of Name if user has no right to see this entity.
-
-
Notes
-
Text field.
-
Additional comments, instructions, or relevant information.
-
If there are no notes enter “
-" (dash).
-
-
Strategy Type ID
-
Text field. Case-sensitive.
- Unique user code of the entity's type which is used for aggregation, no functional impact.
-
Check Transaction Report
Prerequisites
We assume you have all prerequisites you may need, including:
- Get Access to Finmars
- Link with Finmars ID
- Install PMS Core or PMS Plus add-on
- How to Import Files in PMS Core and PMS Plus
Check Transaction Report
- Go to the left sidebar. Locate and select the Report section and click on Transaction. Ensure that the correct layout is selected from the dropdown in the upper-left corner. If the wrong layout is selected, change it before proceeding.

- Once on the Transaction page, ensure the Report Date is set correctly. You can select predefined periods like YTD, MTD, QTD, or choose a custom date range for more precise reporting. The system displays data as of the end of the selected day. After choosing click Save.

- If you want to configure more detailed report settings, click on the gear icon in the top-right corner to open the settings panel.

- In the Report Settings, you can configure is:
- Report Date - defines the date range for the report. Users can select a specific date range or predefined periods (e.g., YTD, MTD). The system displays the transactions on the end of the selected day.
- Table Font Size - adjusts the text size within the report (Small, Medium, Large).
- Expression Iterations Count - defines how many times the system applies calculations for custom columns in the report. Set to "1" for most reports. Increase only if your report data has dependencies between diferent custom columns, and is not calculated with one iteration.
- Date Field - lets users choose which date type to apply in the report (e.g., Transaction Date, Accounting Date, Cash Date, etc.)
- Custom Fields - this option allows users to enable additional user-defined fields (with expression formulas) in the report for more detailed or specific reporting needs. Not recommended to use due its high resource consumption.
- Depth Level - defines the level of detail in the report, with options:
- Complex Transaction - shows the transaction as a whole, without breaking it down into internal actions or money movements. Best for a quick overview of operations.
- Base Transaction - shows the internal actions within the transaction (for example, different steps of execution), but without splitting it into cash or position movements.
- Entry - shows the most detailed view with all accounting records. Here the transaction is fully broken down into cash flows and position changes.
- Filters – Allows users to refine the displayed data by using multi-selectors for Portfolios, Accounts, and Strategies.

- After adjusting these settings, confirm by clicking OK.

- To apply the selected settings and view the updated report, simply refresh the page. Once refreshed, the report will be displayed with the updated parameters, reflecting the selected configurations.

- Once the report has been prepared, verify the displayed information to ensure that the Grand Total and individual portfolio data are correct. If mistakes are discovered, review the imported data to ensure that all relevant files were included through the import process. If changes are required, return to the Report Settings, alter the settings, and reload the page to update the report.
- After verifying the report, you can either save it within the system for future reference or export it for external use. To do this, locate the Save button, which is positioned in the upper-left corner of the report interface. Clicking this button will store the current report layout and data for future access. It’s important to use the standard settings whenever possible to maintain consistency. If changes are needed, create a duplicate of the layout (see How to Duplicate the Layout) and save it locally to avoid potential data loss during updates or reinstallation of marketplace modules.

- The Export option is located in the top-right corner, providing multiple formats for downloading the report. You can choose to Export to PDF, Export to CSV, or Export to Excel, depending on the preferred format for further analysis.

- Additionally, there are options to Copy all to buffer or Copy selected to buffer, allowing you to quickly copy report data for use in other applications. Ensure that the exported or copied data accurately reflects the report before using it for financial reporting or analysis.

- In case of any errors or missing data warnings, check that the required Import has been successfully completed. Ensure that all necessary financial and transactional data has been imported into the system before running the Transaction Report. If issues persist, contact the administrator for further assistance.

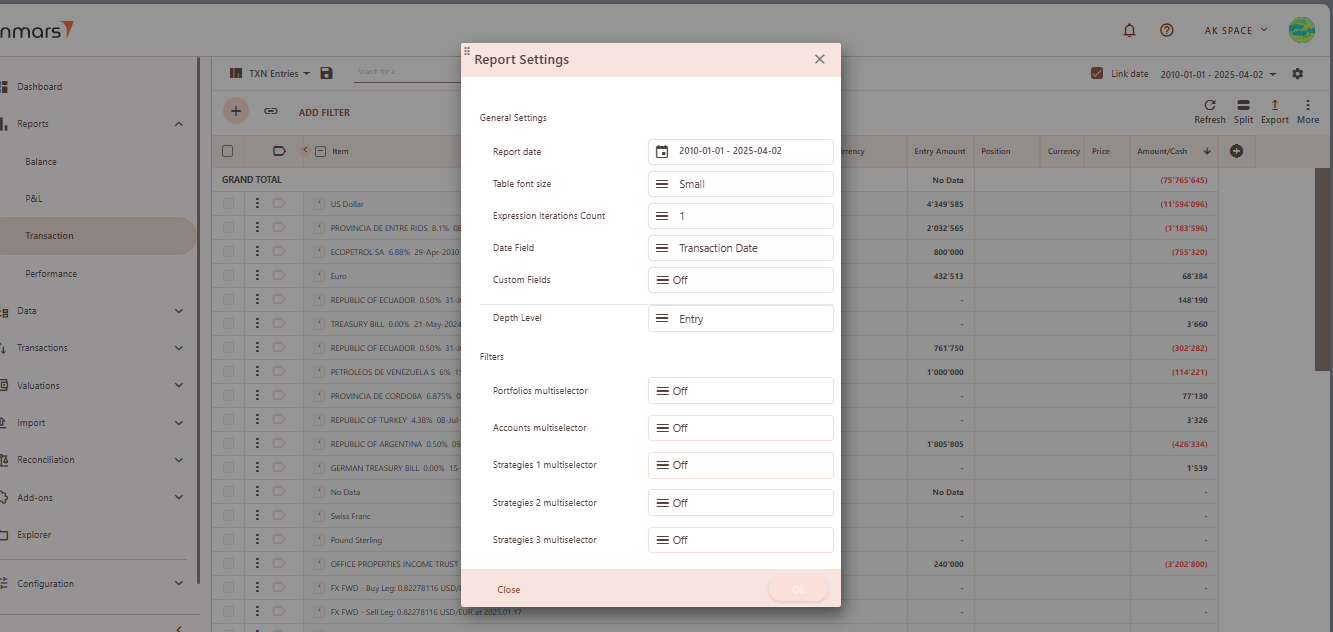
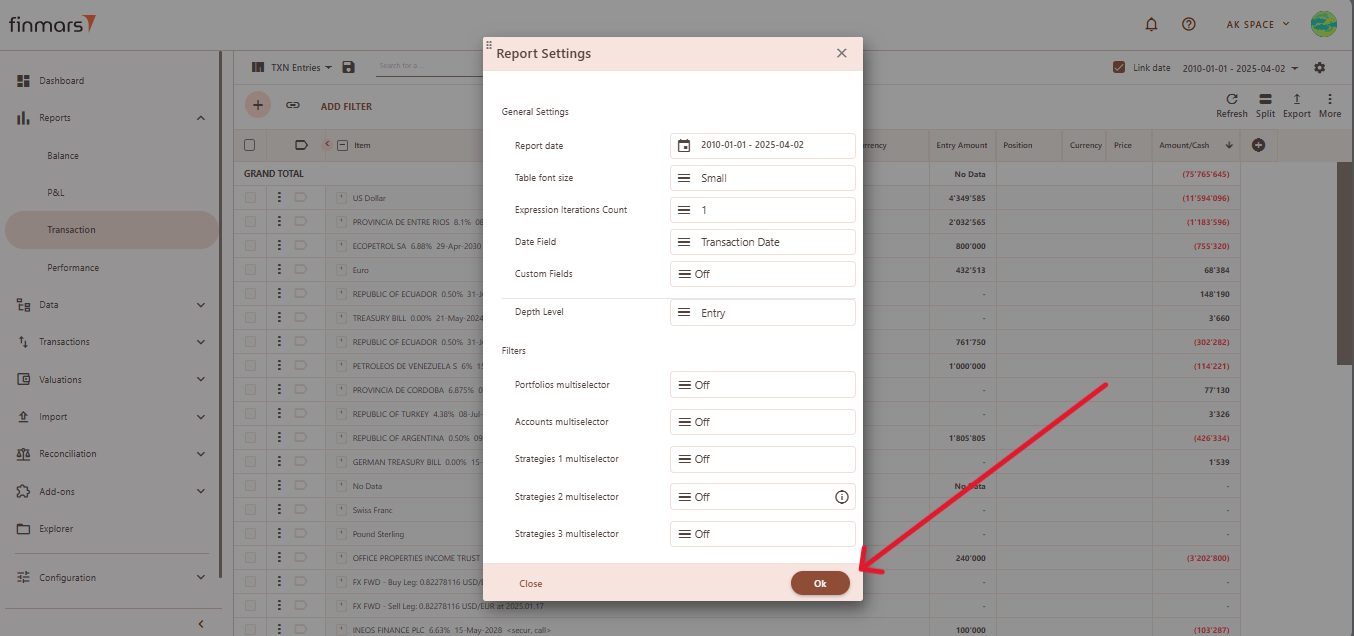
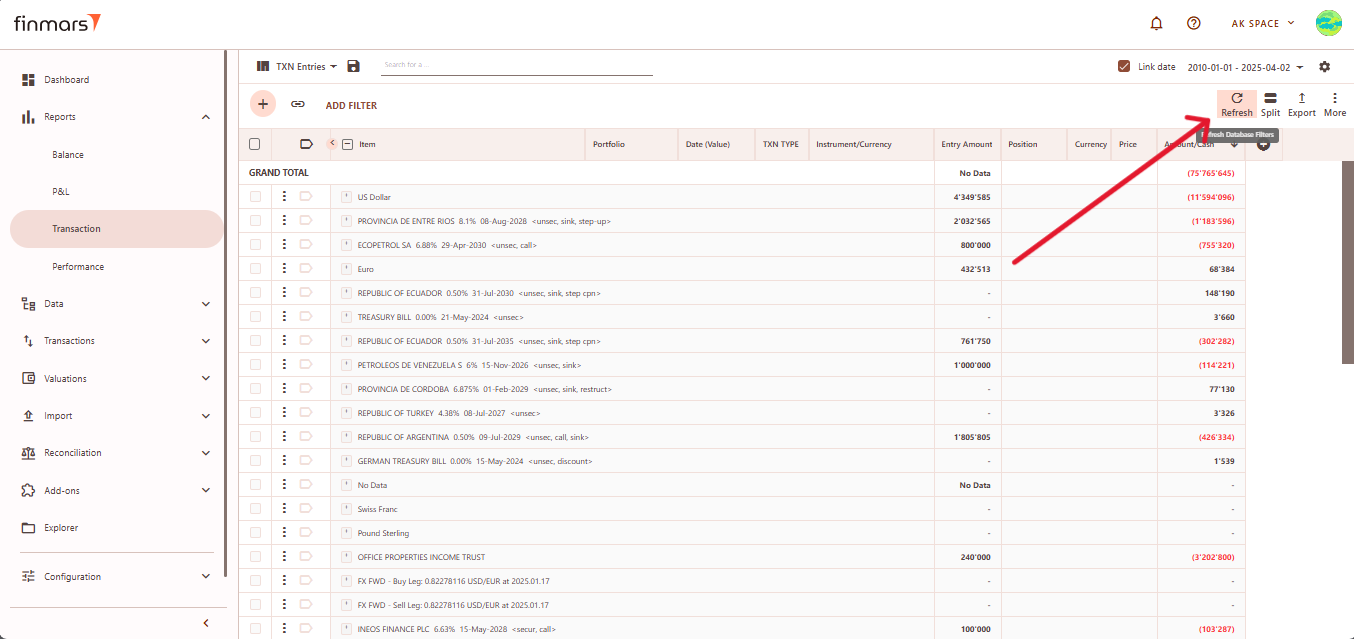
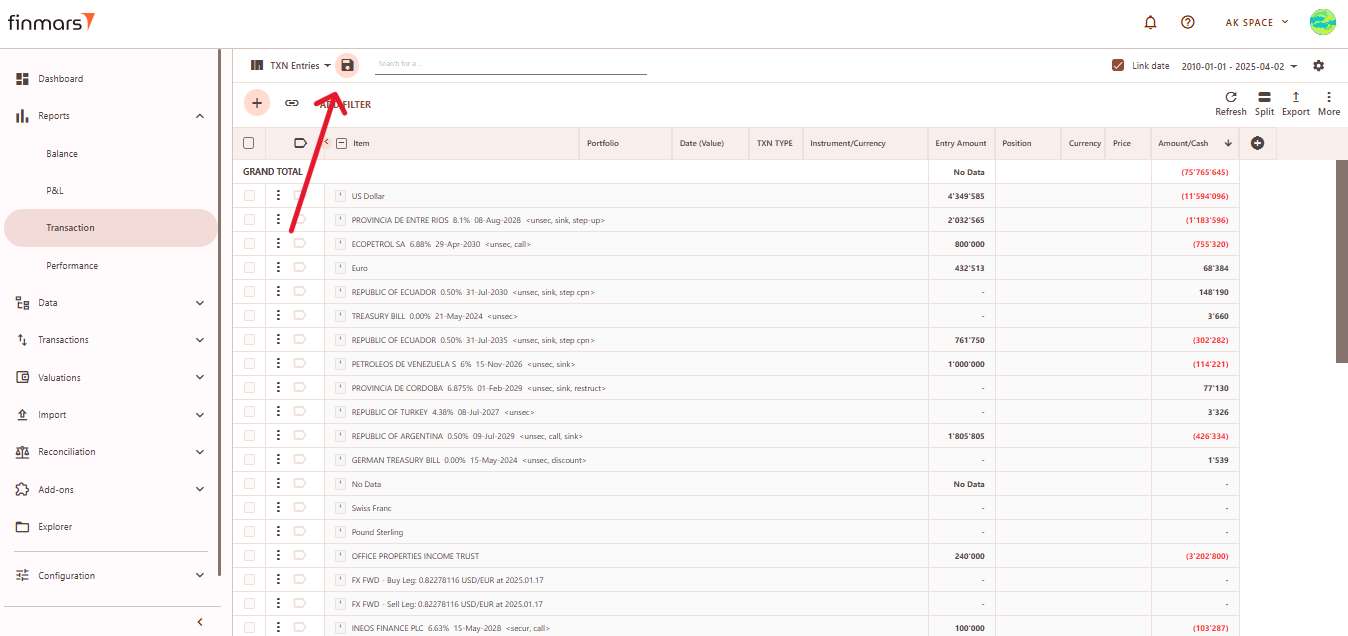
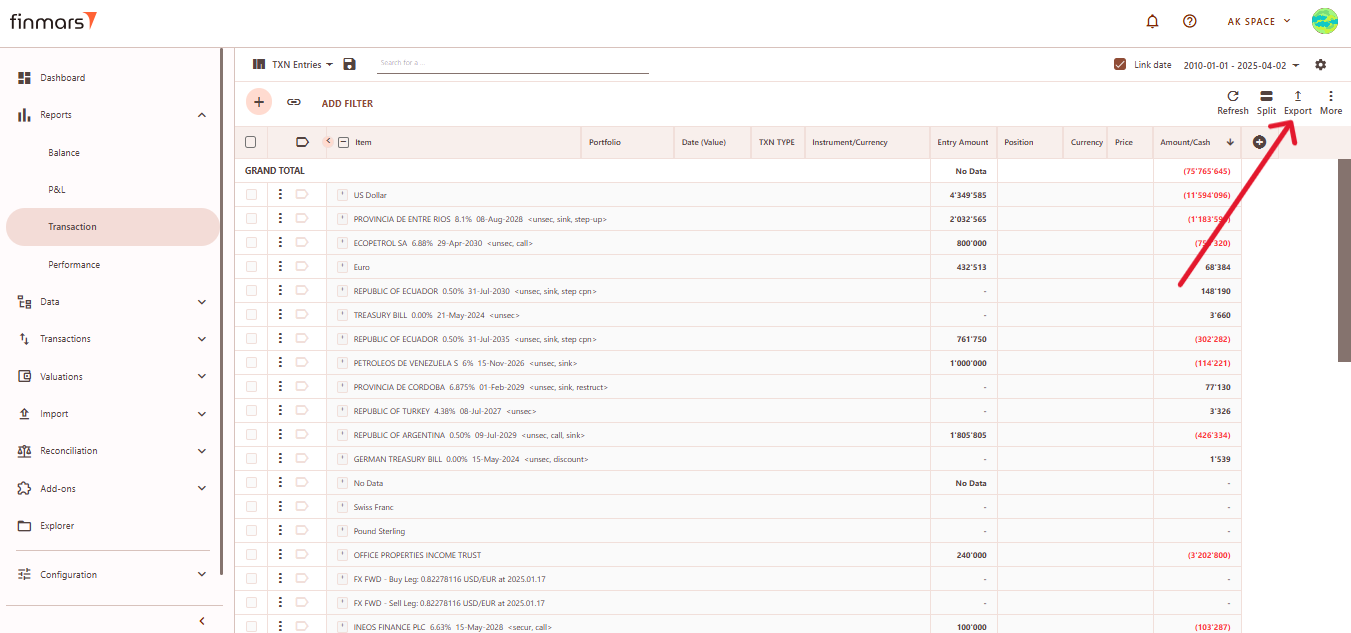
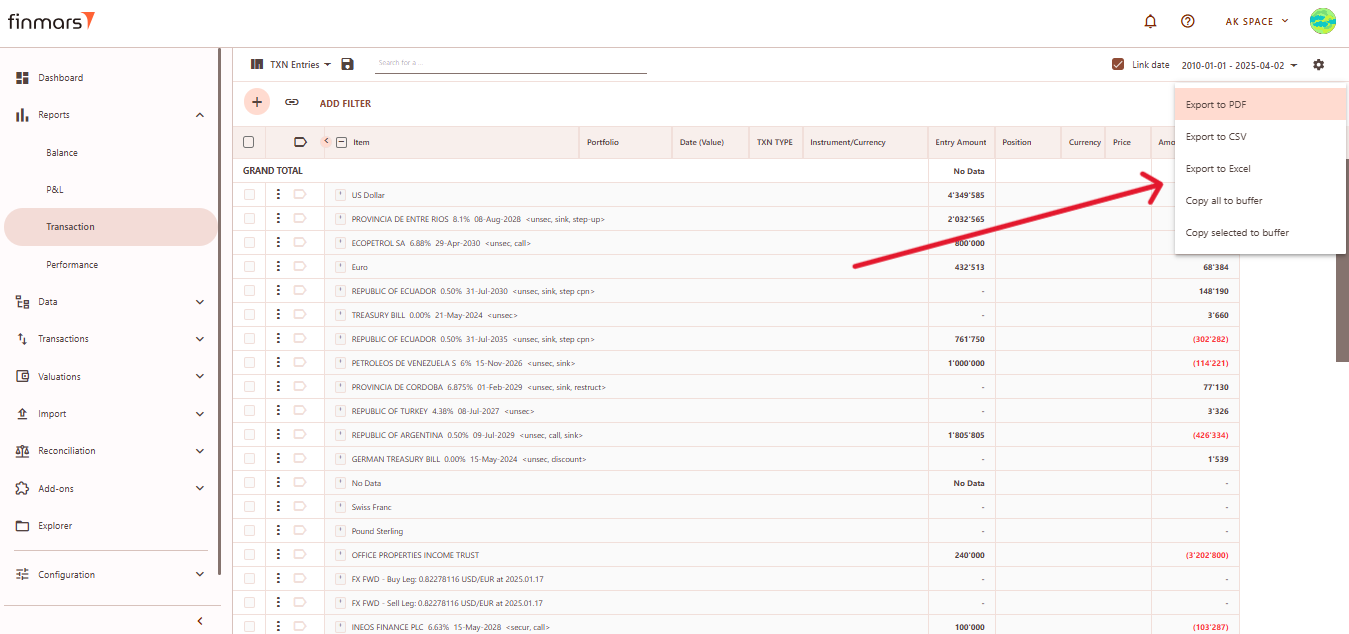
Calculate YTM and Modified Duration
Prerequisites
We assume you have all prerequisites you may need, including:
- Get Access to Finmars
- Link with Finmars ID
- Install PMS Core or PMS Plus add-on
- How to Import Files in PMS Core and PMS Plus
When to use
It's expected that all calculations are run by respected workflows and or pipelines, but sometimes there is a time you need to run it manually, the most frequent cases are:
- You made manual edits in the data that will affect YTM and Modified Duration - this WILL NOT be automatically recalculated;
- You unchecked calculation options in the PMS Core/PMS Plus and/or other add-ons and/or pipelines;
Calculate YTM and Modified Duration
- Go to Add-ons -> PMS here go to the Helper tab and open Calculate Price History section.

- Fill in parameters according to their info ("i" icon close to the parameter's name).
- Click Run.
- Confirm parameters and click Run again.

- In the right frame you will have execution info, click Refresh to get updates.

- Refresh and read Log and wait for Result. See successful run example below:

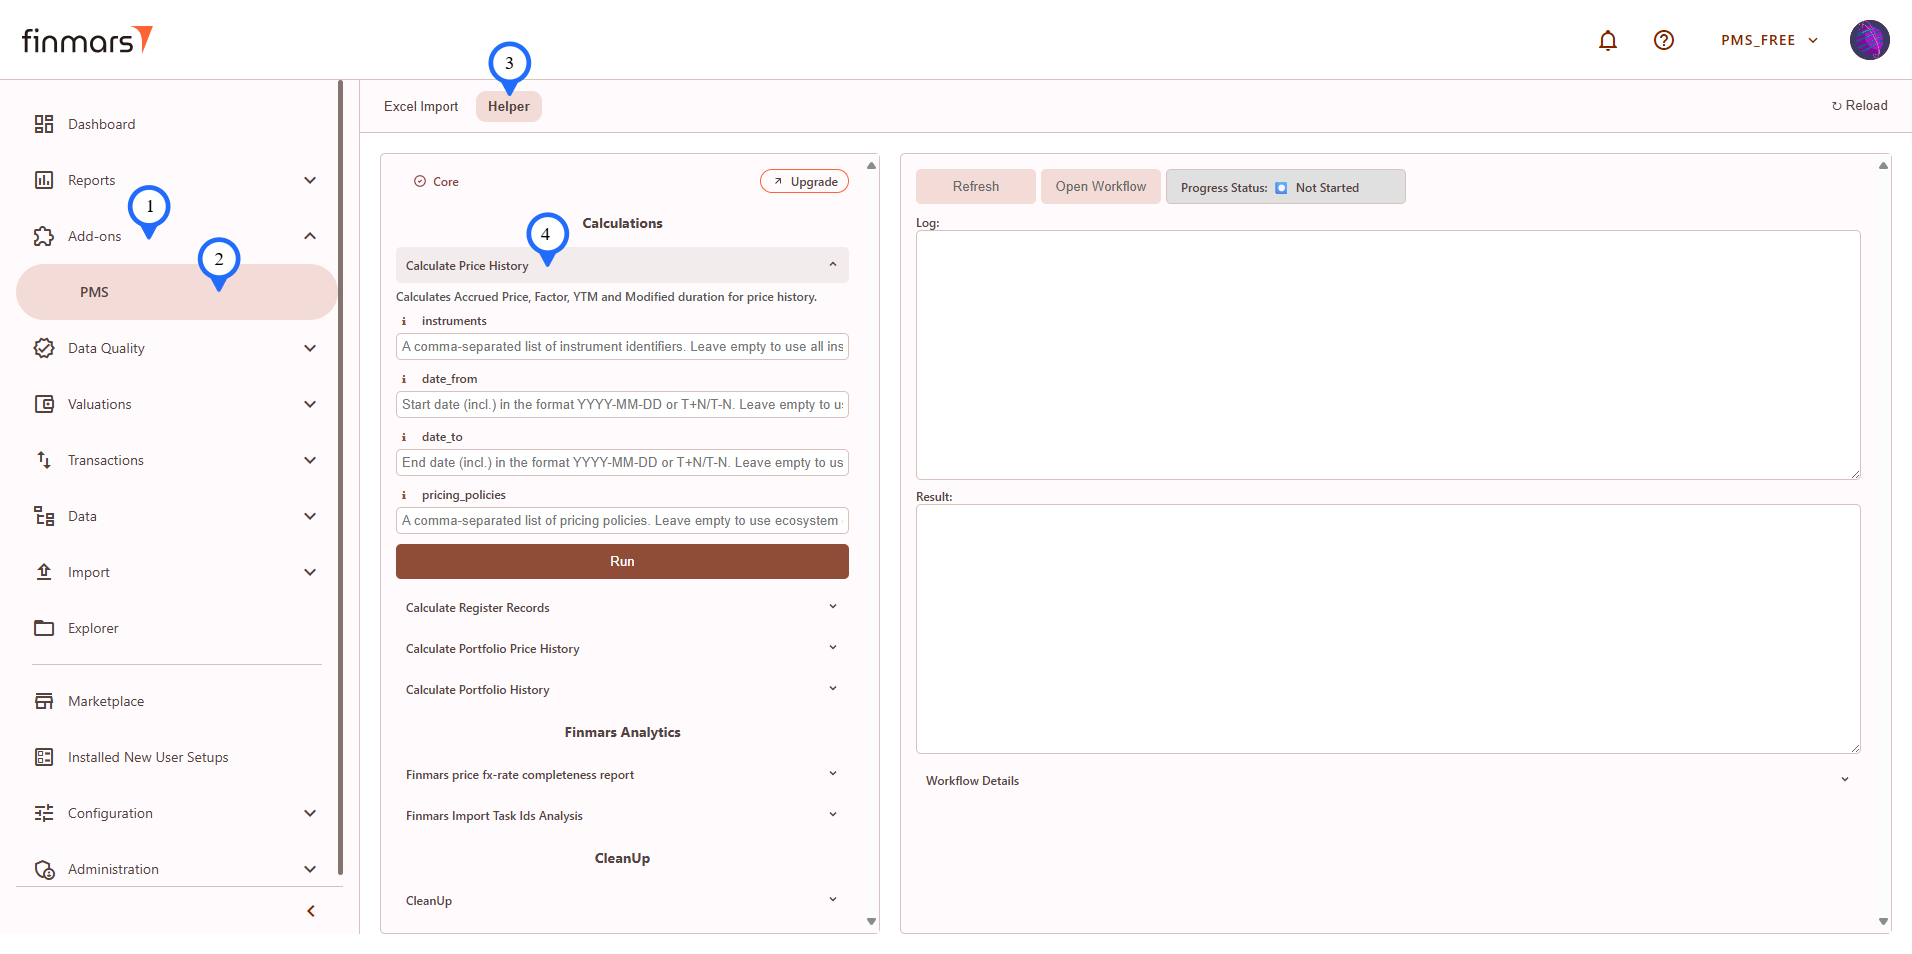
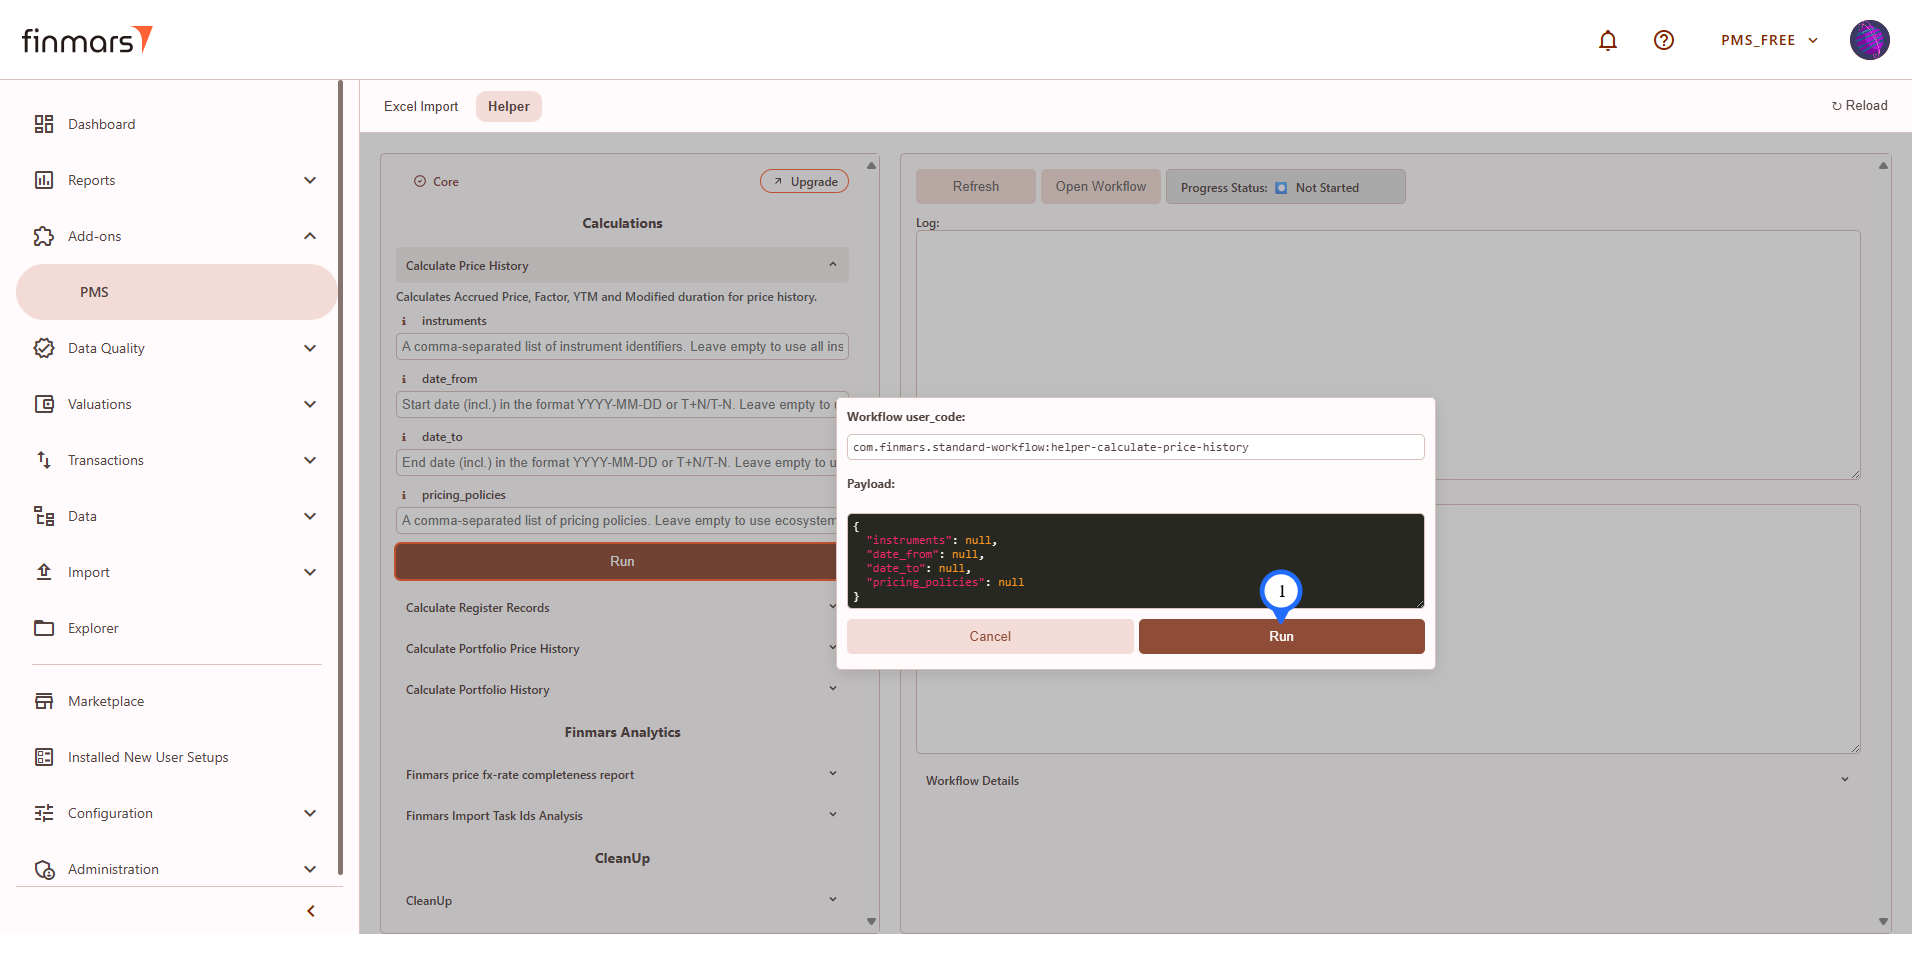
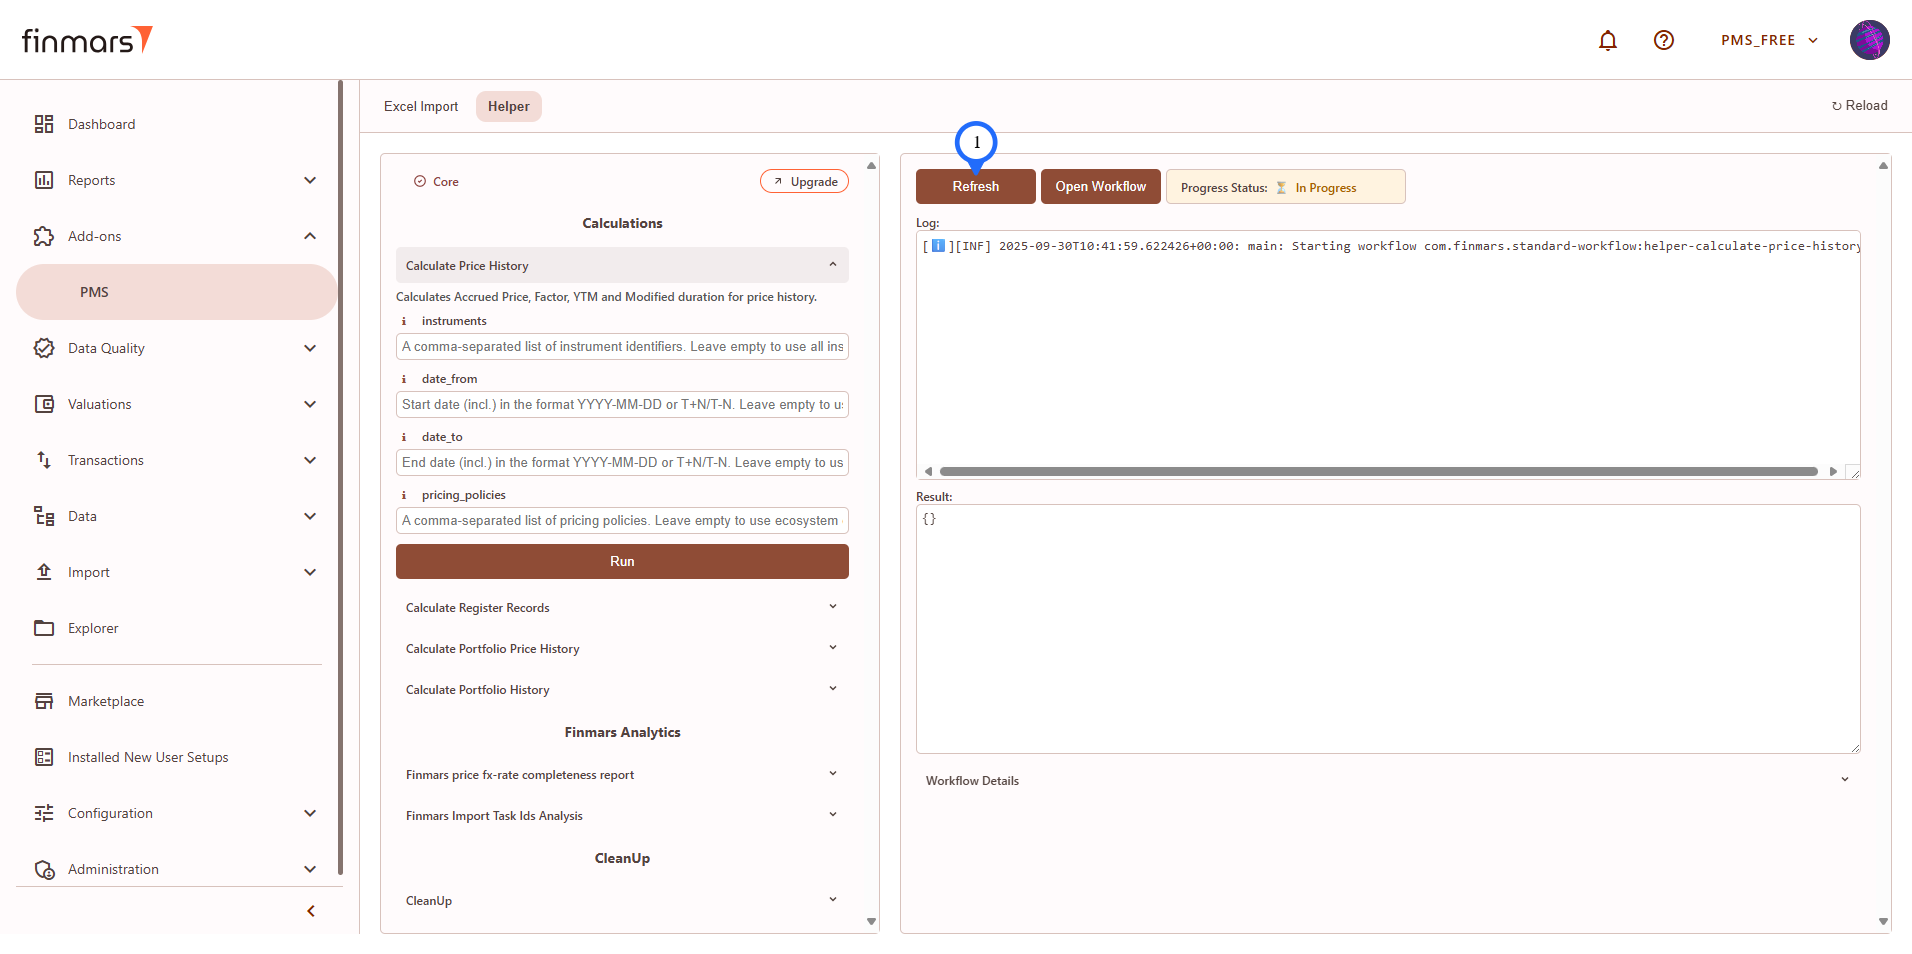
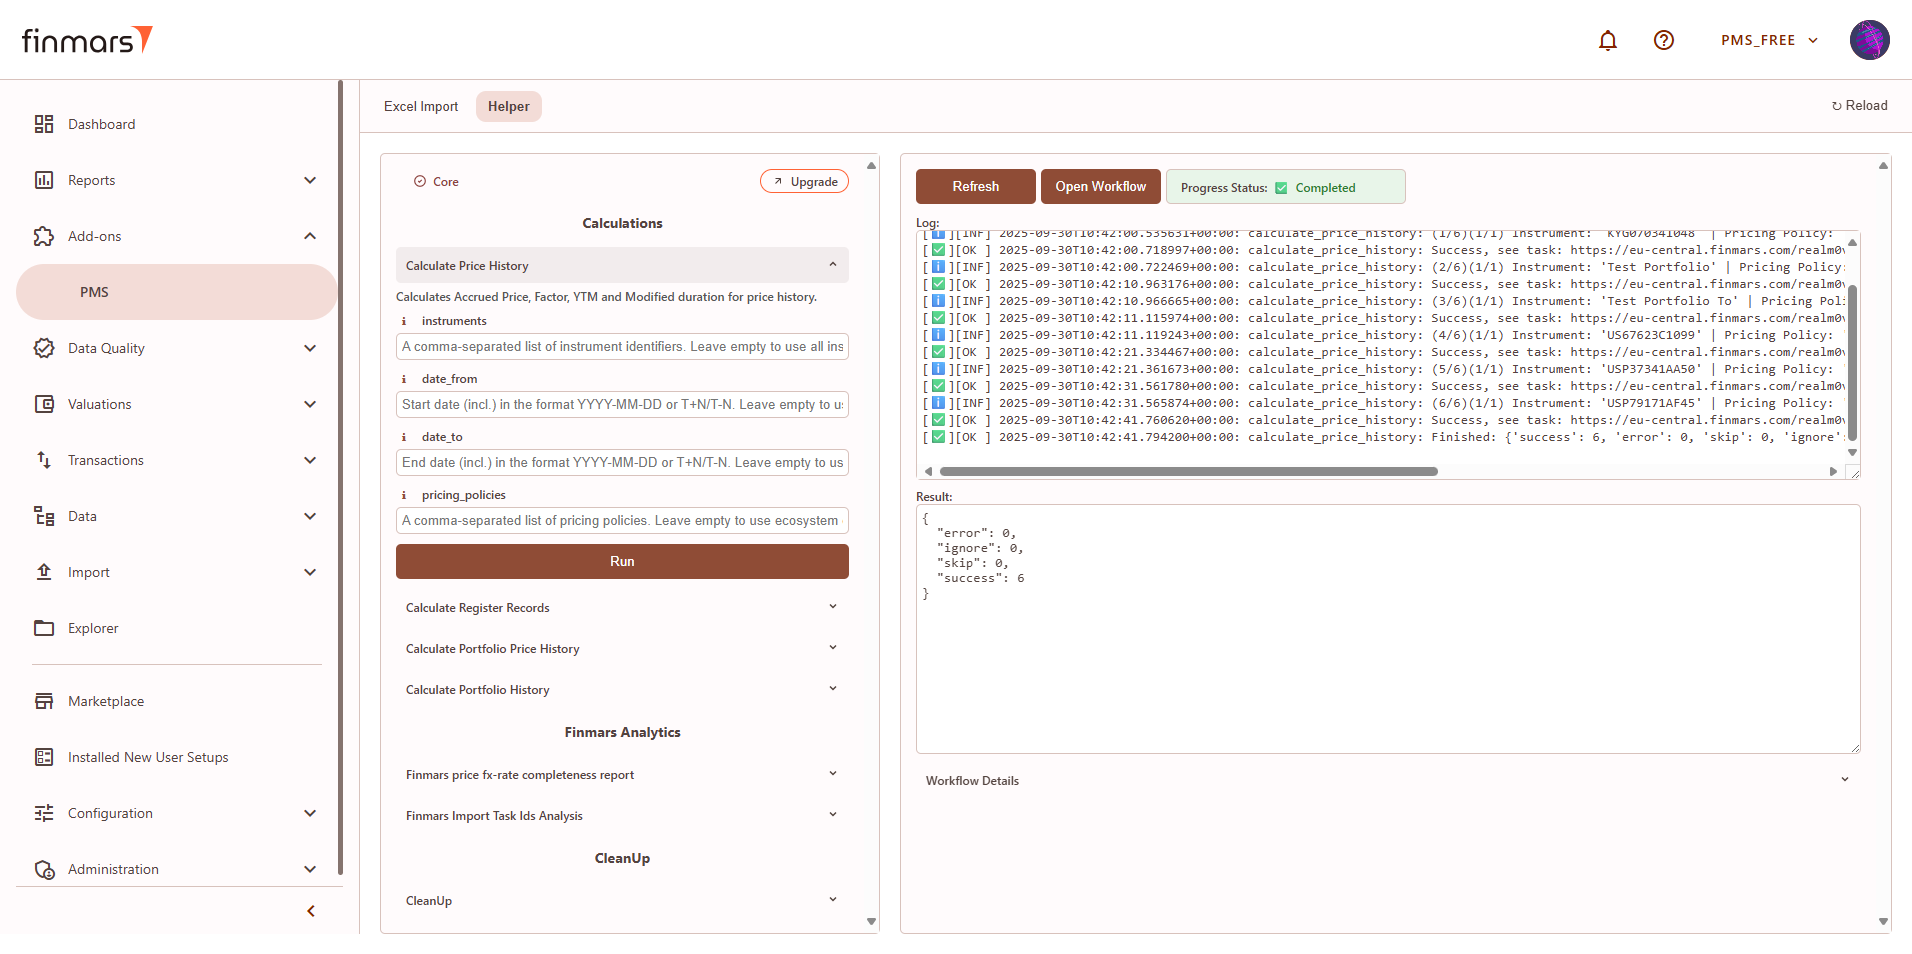
Check Balance Report
Prerequisites
We assume you have all prerequisites you may need, including:
- Get Access to Finmars
- Link with Finmars ID
- Install PMS Core or PMS Plus add-on
- How to Import Files in PMS Core and PMS Plus
- How to Do Calculations for YTM and Modified Duration (if you need YTM & Modified Duration)
Check Balance Report
- Go to the left sidebar. Locate and select the Report section and click on Balance. Ensure that the correct layout is selected from the dropdown in the upper-left corner. If the wrong layout is selected, change it before proceeding.

- Once on the Balance page, adjust the settings according to your reporting needs. Сonfirm the Calculation method, Pricing policy, and Currency in the top panel. Also, verify that the Report Date is set correctly. The system displays the balance as of the end of the selected day. This setting should always be used to reflect accurate financial data.

- If you want to configure more detailed report settings, click on the gear icon in the top-right corner to open the settings panel.

- In detailed report settings you can set the Report Date, Currency, and Cost Method (such as AVCO or FIFO) as well.
- Define the Pricing Policy to determine how asset values are calculated (When selecting the Pricing Policy, you are choosing the set of prices and exchange rates to be used.)

- Configure Portfolio Mode and Account Mode to define how data is displayed.
- Independent – Shows separate entries for each portfolio or account for a detailed view.
- Ignore – Aggregates data into a consolidated report without portfolio or account distinctions.
For Example: If Portfolio Mode is set to Ignore, all portfolios will be merged into a single row. However, if Account Mode is set to Independent, accounts will still be displayed as separate rows.
- After adjusting these settings, confirm by clicking OK.

- To apply the selected settings and view the updated report, simply refresh the page. Once refreshed, the report will be displayed with the updated parameters, reflecting the selected configurations.

- Once the report has been prepared, verify the displayed information to ensure that the Grand Total and individual portfolio data are correct. If mistakes are discovered, review the imported data to ensure that all relevant files were included through the import process. If changes are required, return to the Report Settings, alter the settings, and reload the page to update the report.
- After verifying the report, you can either save it within the system for future reference or export it for external use. To do this, locate the Save button, which is positioned in the upper-left corner of the report interface. Clicking this button will store the current report layout and data for future access. It’s important to use the standard settings whenever possible to maintain consistency. If changes are needed, create a duplicate of the layout (see How to Duplicate the Layout) and save it locally to avoid potential data loss during updates or reinstallation of marketplace modules.

- The Export option is located in the top-right corner, providing multiple formats for downloading the report. You can choose to Export to PDF, Export to CSV, or Export to Excel, depending on the preferred format for further analysis.

- Additionally, there are options to Copy all to buffer or Copy selected to buffer, allowing you to quickly copy report data for use in other applications. Ensure that the exported or copied data accurately reflects the report before using it for financial reporting or analysis.

- In case of any errors or missing data warnings, check that the required Import has been successfully completed. Ensure that all necessary financial and transactional data has been imported into the system before running the Balance Report. If issues persist, contact the administrator for further assistance.
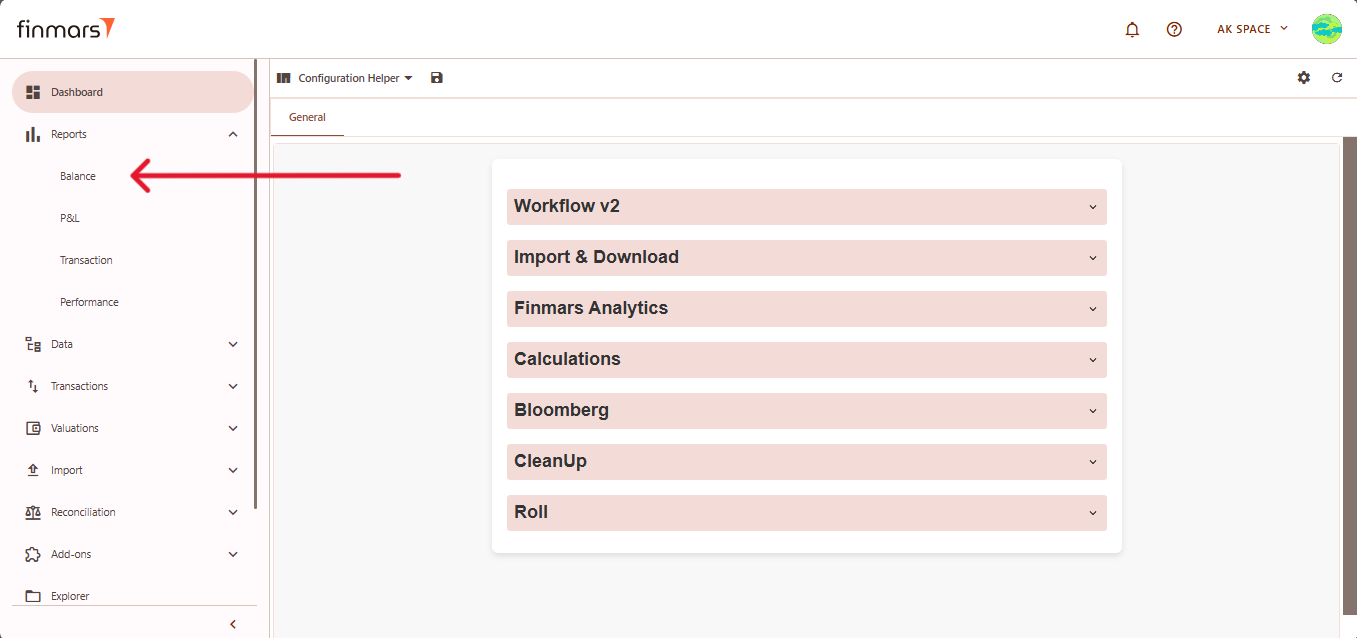
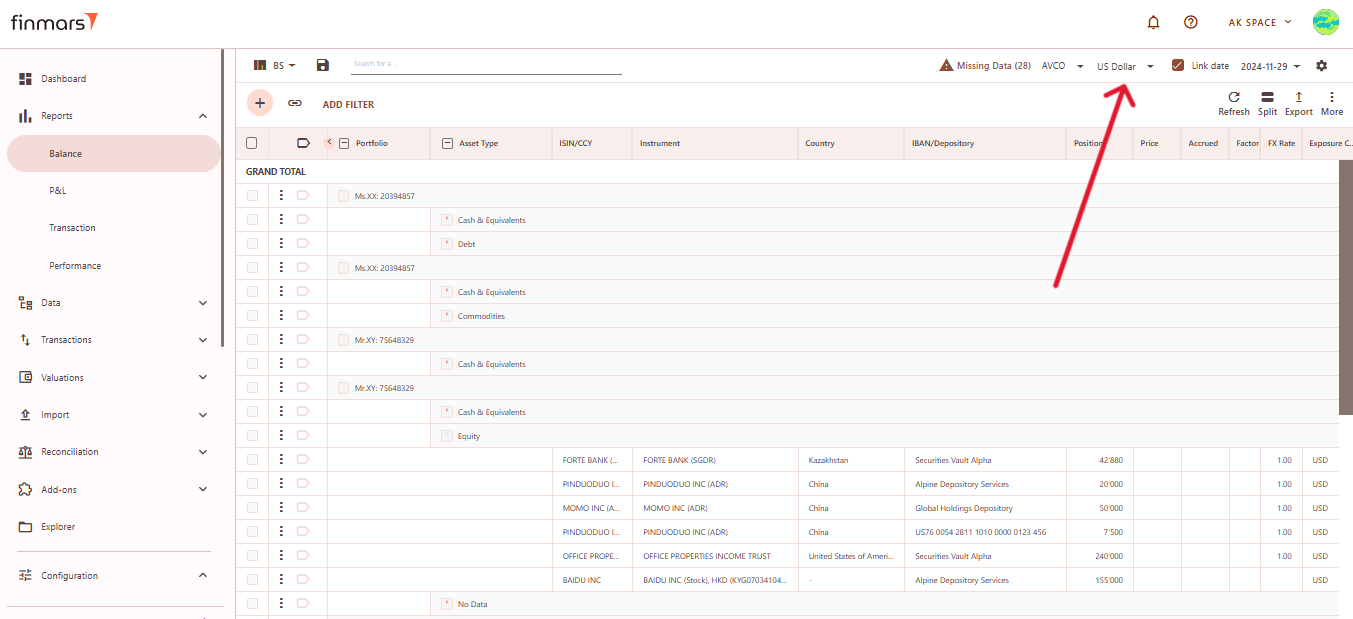
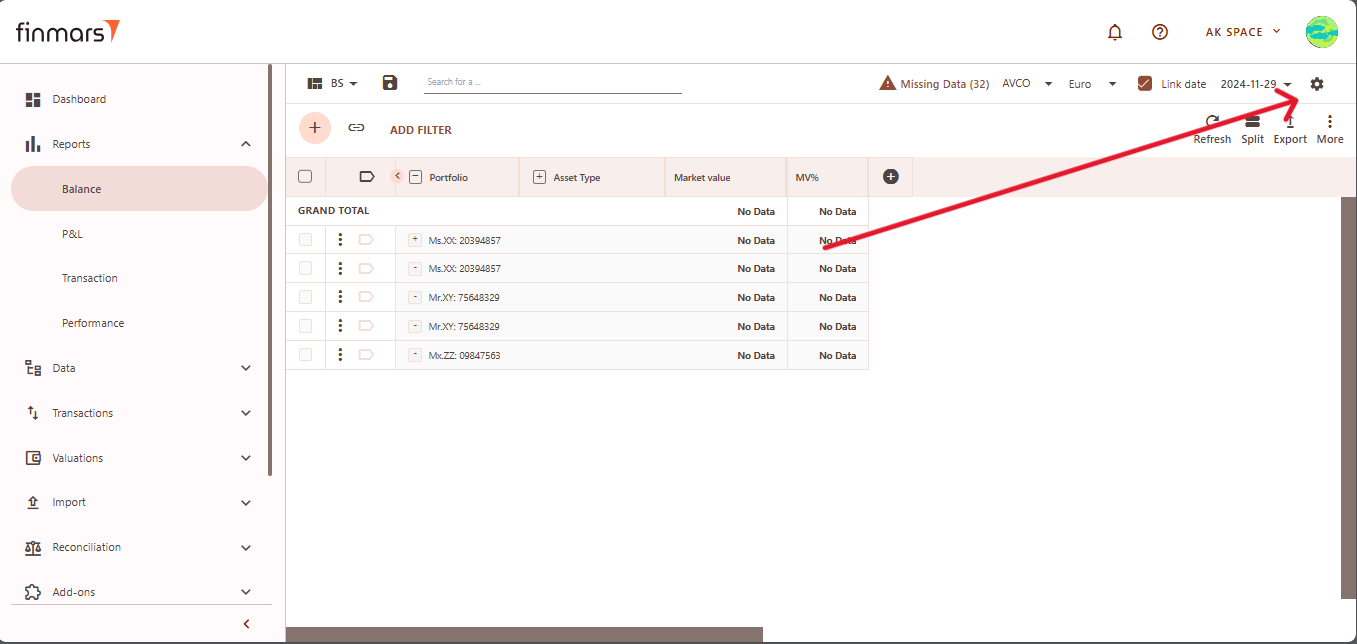
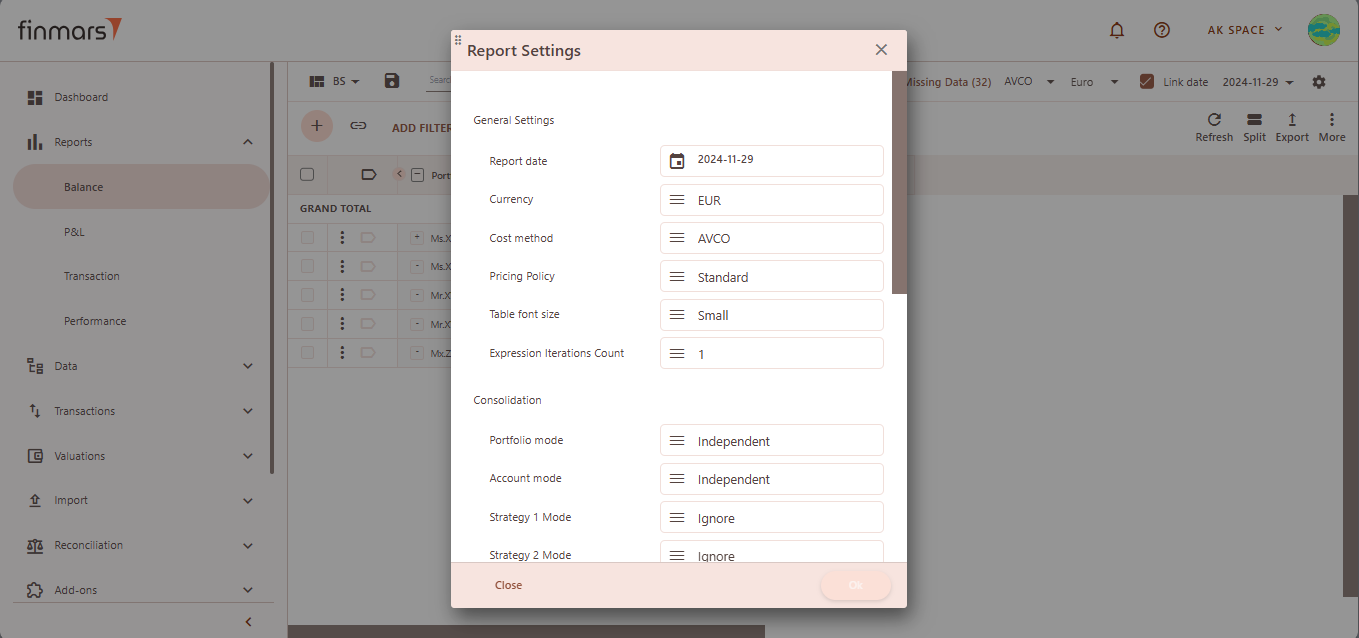
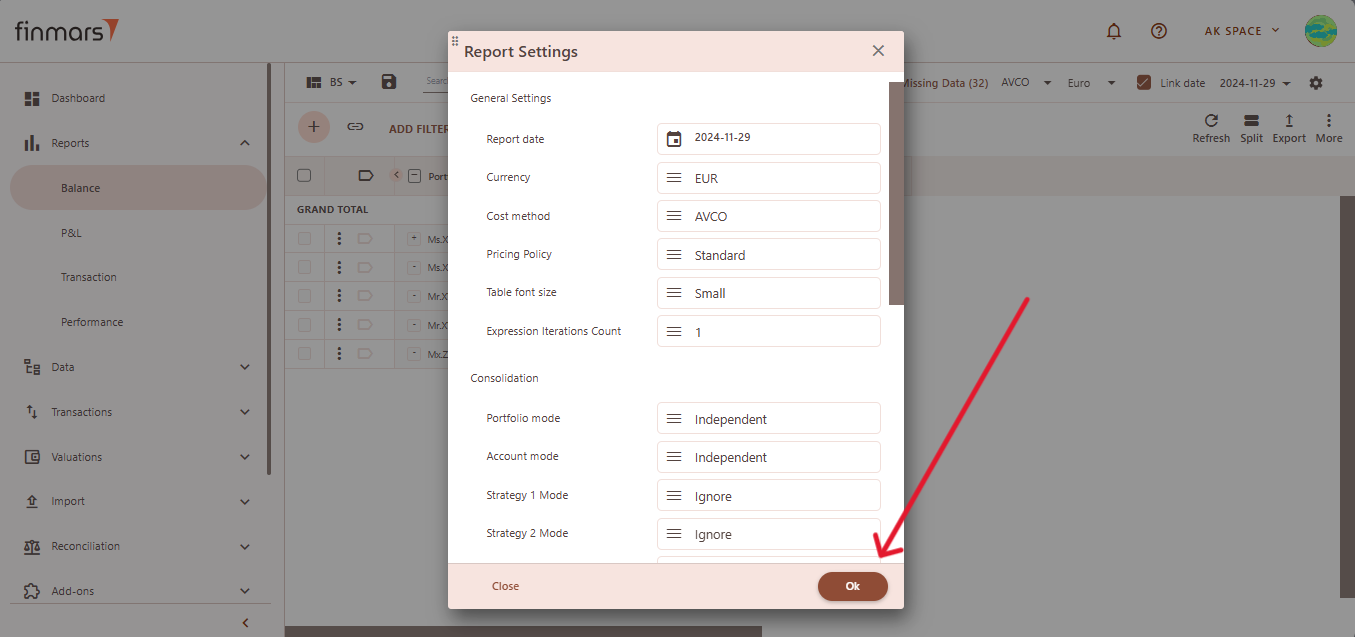
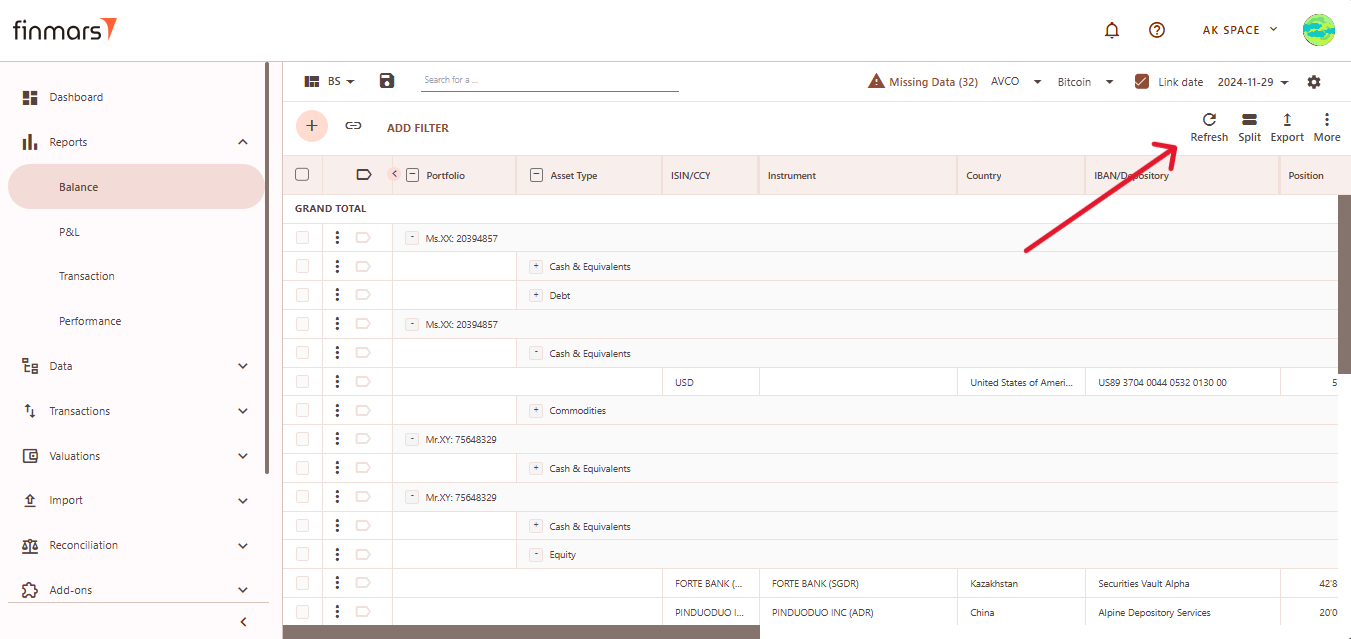
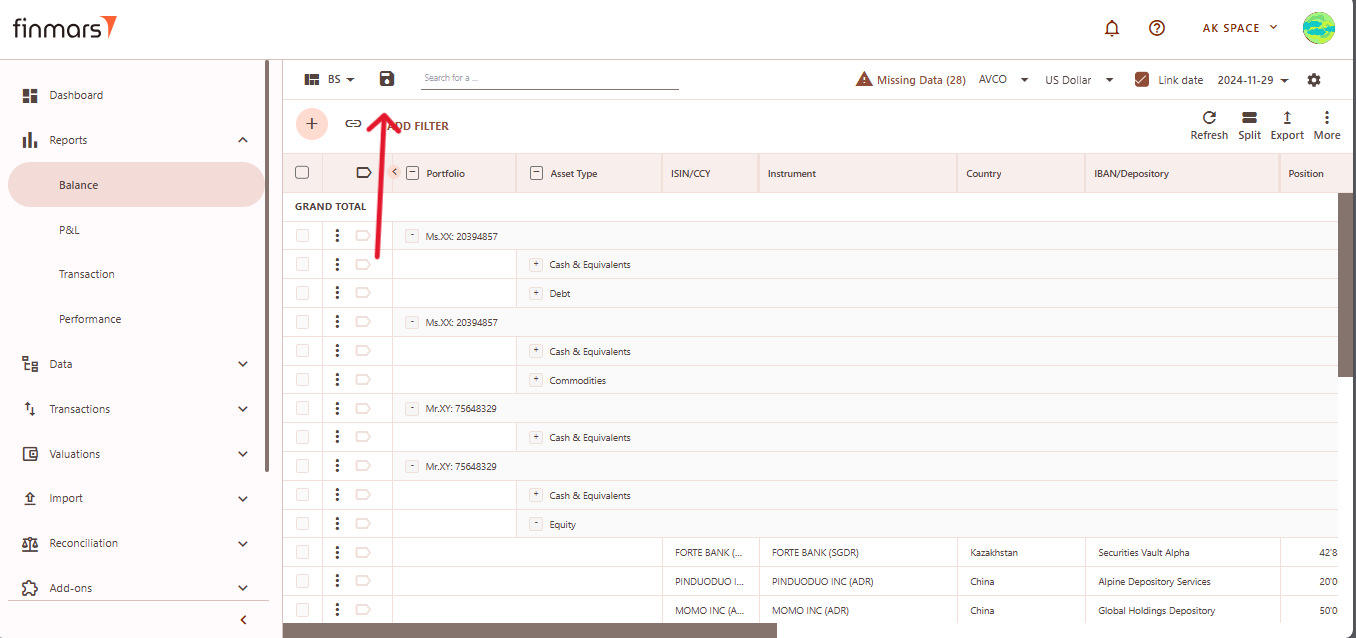

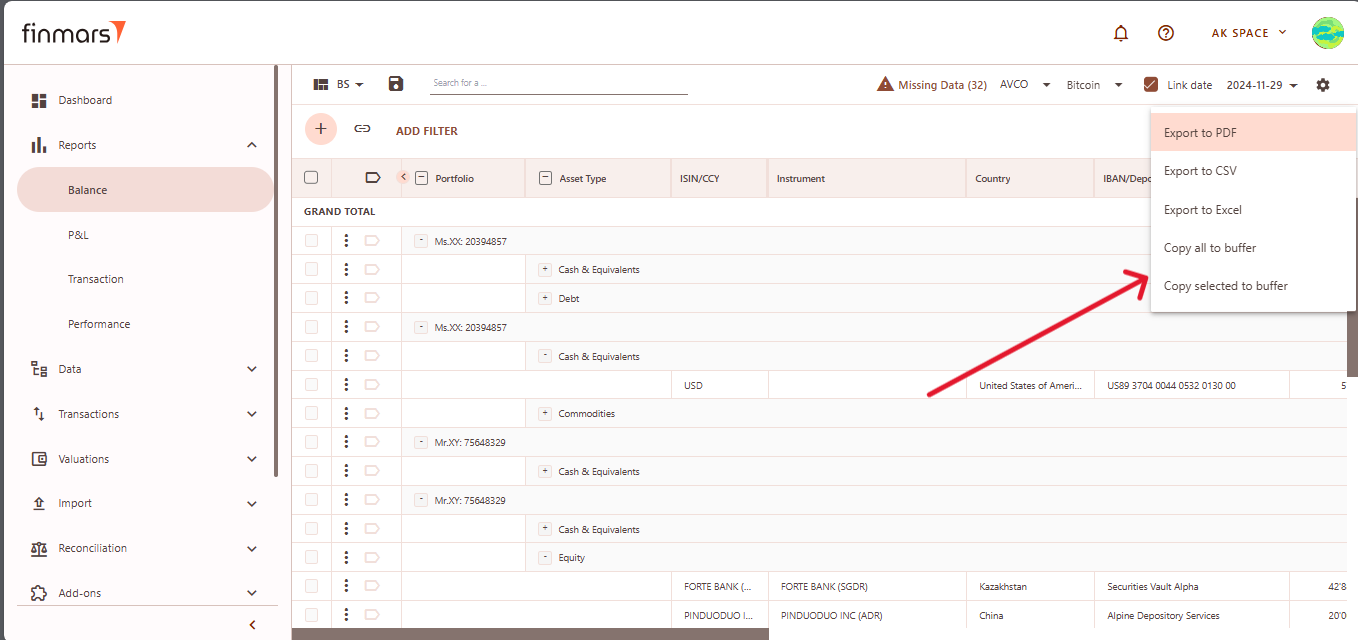
Check Profit and Loss Report
Prerequisites
We assume you have all prerequisites you may need, including:
- Get Access to Finmars
- Link with Finmars ID
- Install PMS Core or PMS Plus add-on
- Import Files in PMS Core and PMS Plus
- How to Do Calculations for YTM and Modified Duration (if you need YTM & Modified Duration)
Check the Profit and Loss Report
- Go to the left sidebar. Locate and select the Report section and click on P&L. Ensure that the correct layout is selected from the dropdown in the upper-left corner. If the wrong layout is selected, change it before proceeding.

- Once on the P&L page, adjust the settings according to your reporting needs. Сonfirm the Calculation method, Pricing policy, and Currency in the top panel. Also, verify that the Report Date is set correctly.
The system displays the balance as of the end of the selected day. This setting should always be used to reflect accurate financial data.
For example if you want to get P&L report for Week To Date you need to select Report Date: Previous Week End -> This Week End. It means that you need to select date range FROM the END of the PREVIOUS period to the END of the CURRENT period.
- If you want to configure more detailed report settings, click on the gear icon in the top-right corner to open the settings panel.

- In detailed report settings set the Report Date, Currency, and Cost Method (such as AVCO or FIFO) and define the Pricing Policy to determine how asset values are calculated (When selecting the Pricing Policy, you are choosing the set of prices and exchange rates to be applied.)
- Configure Portfolio Mode and Account Mode to define how data is displayed.
- Independent – Shows separate entries for each portfolio or account for a detailed view.
- Ignore – Aggregates data into a consolidated report without portfolio or account distinctions.
For Example: If Portfolio Mode is set to Ignore, all portfolios will be merged into a single row. However, if Account Mode is set to Independent, accounts will still be displayed as separate rows.
- Click OK to apply the settings once all the necessary parameters are selected.

-
To apply the selected settings and view the updated report, simply refresh the page. Once refreshed, the report will be displayed with the updated parameters, reflecting the selected configurations.

- If the data has changed, simply refreshing the page is not enough. You need to use the Recalculate Report (Clear Cache) option, found in the three-dot menu at the top-right corner next to the export icon. If the data hasn’t changed, clearing the cache is not required.

- Once the report has been prepared, verify the displayed information to ensure that the Grand Total and individual portfolio data are correct. If mistakes are discovered, review the imported data to ensure that all relevant files were included through the import process. If changes are required, return to the Report Settings, alter the settings, and reload the page to update the report.
- After verifying the report, you can either save it within the system for future reference or export it for external use. To do this, locate the Save button, which is positioned in the upper-left corner of the report interface. Clicking this button will store the current report layout and data for future access. It’s important to use the standard settings whenever possible to maintain consistency. If changes are needed, create a duplicate of the layout (see How to Duplicate the Layout) and save it locally to avoid potential data loss during updates or reinstallation of marketplace modules.

- The Export option is located in the top-right corner, providing multiple formats for downloading the report. You can choose to Export to PDF, Export to CSV, or Export to Excel, depending on the preferred format for further analysis. Additionally, there are options to Copy all to buffer or Copy selected to buffer, allowing you to quickly copy report data for use in other applications. Ensure that the exported or copied data accurately reflects the report before using it for financial reporting or analysis.

- In case of any errors or missing data warnings, check that the required Import has been successfully completed. Ensure that all necessary financial and transactional data has been imported into the system before running the P&L Report. If issues persist, contact the administrator for further assistance.
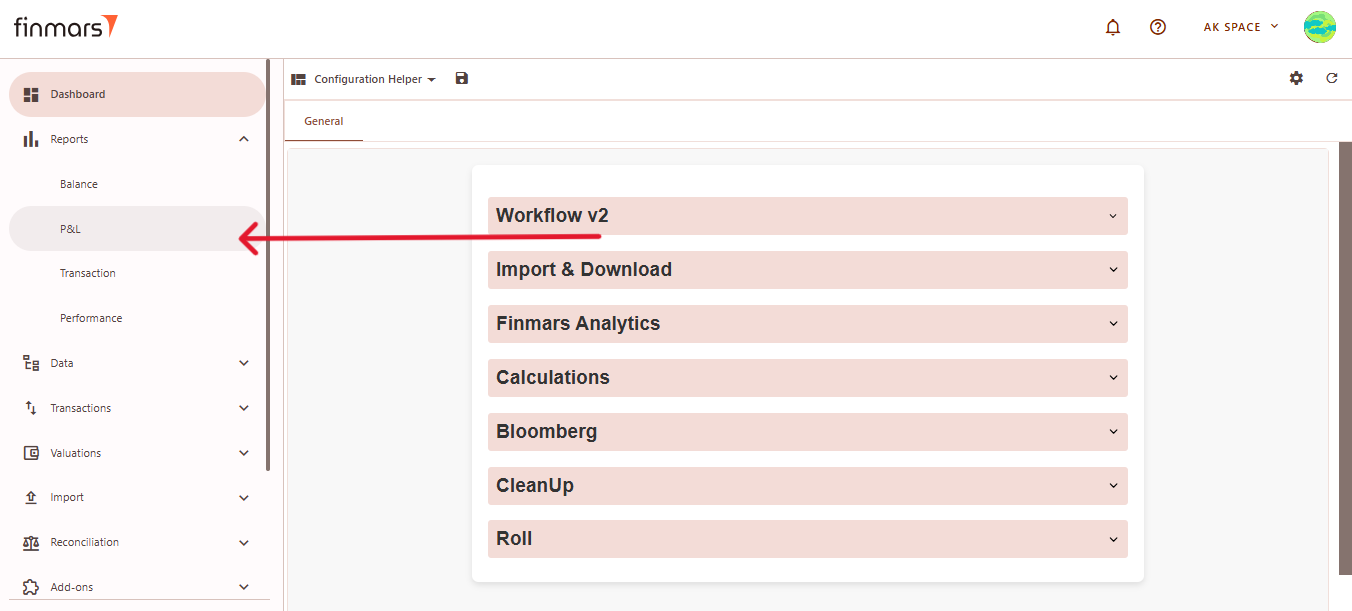
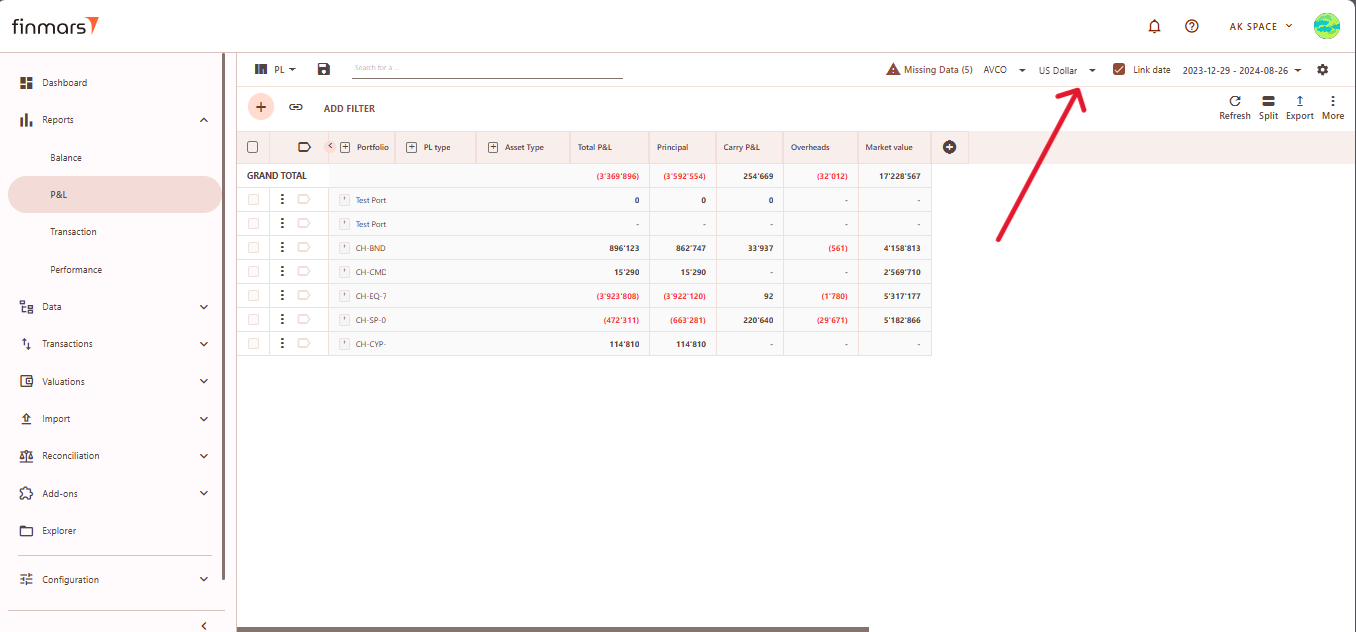

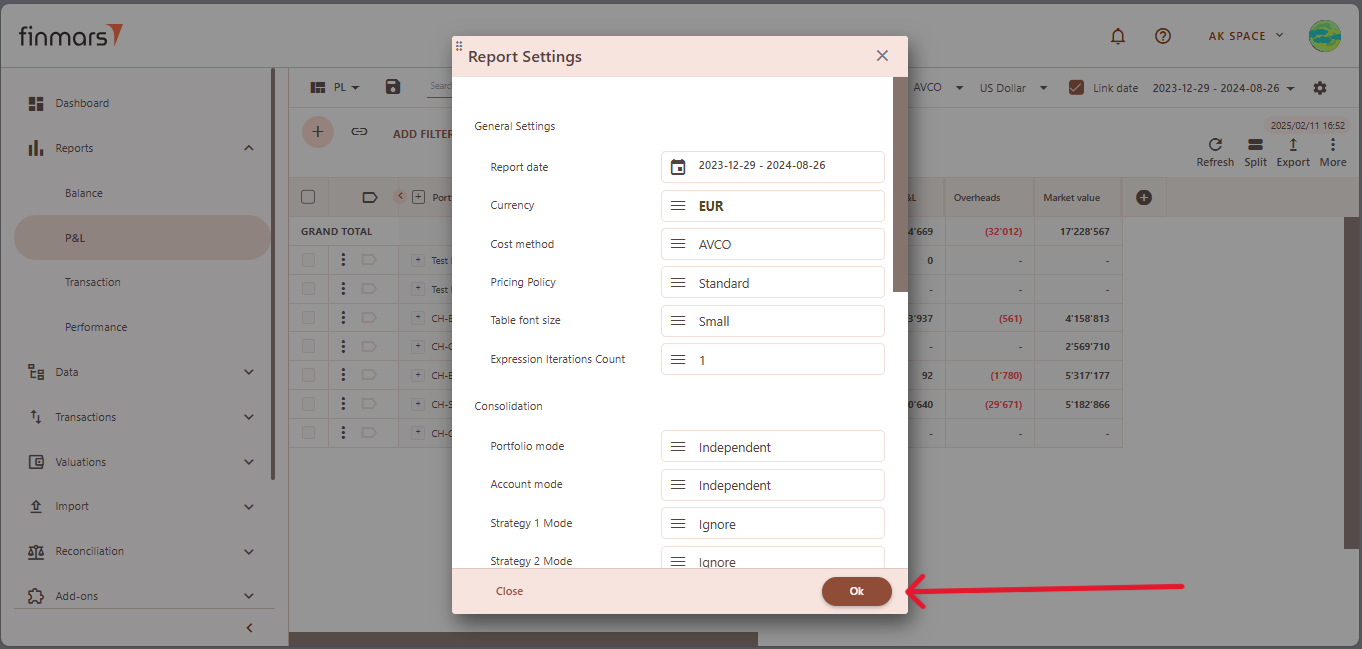
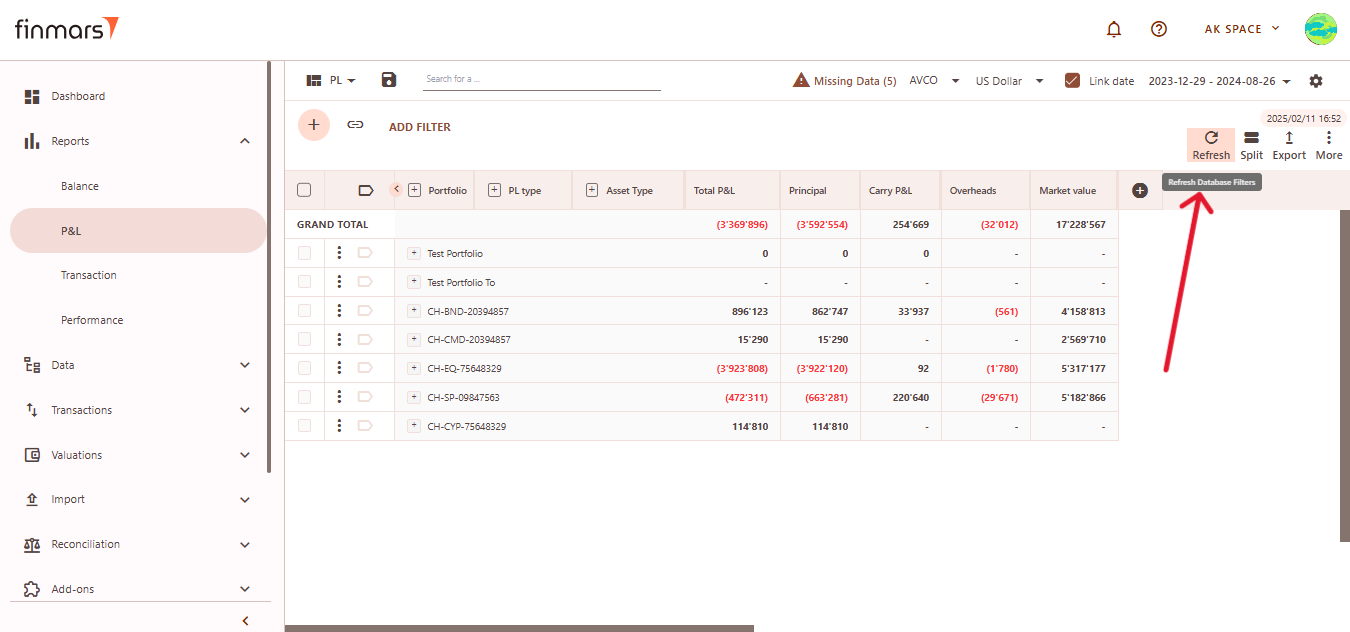
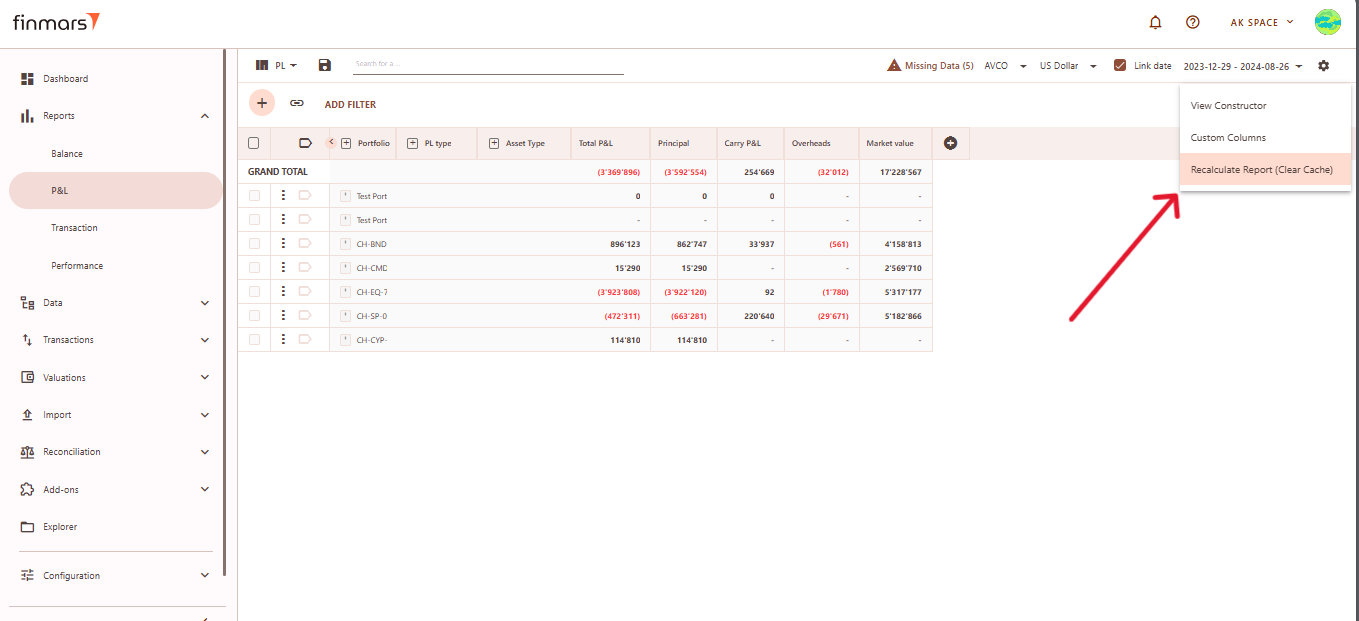
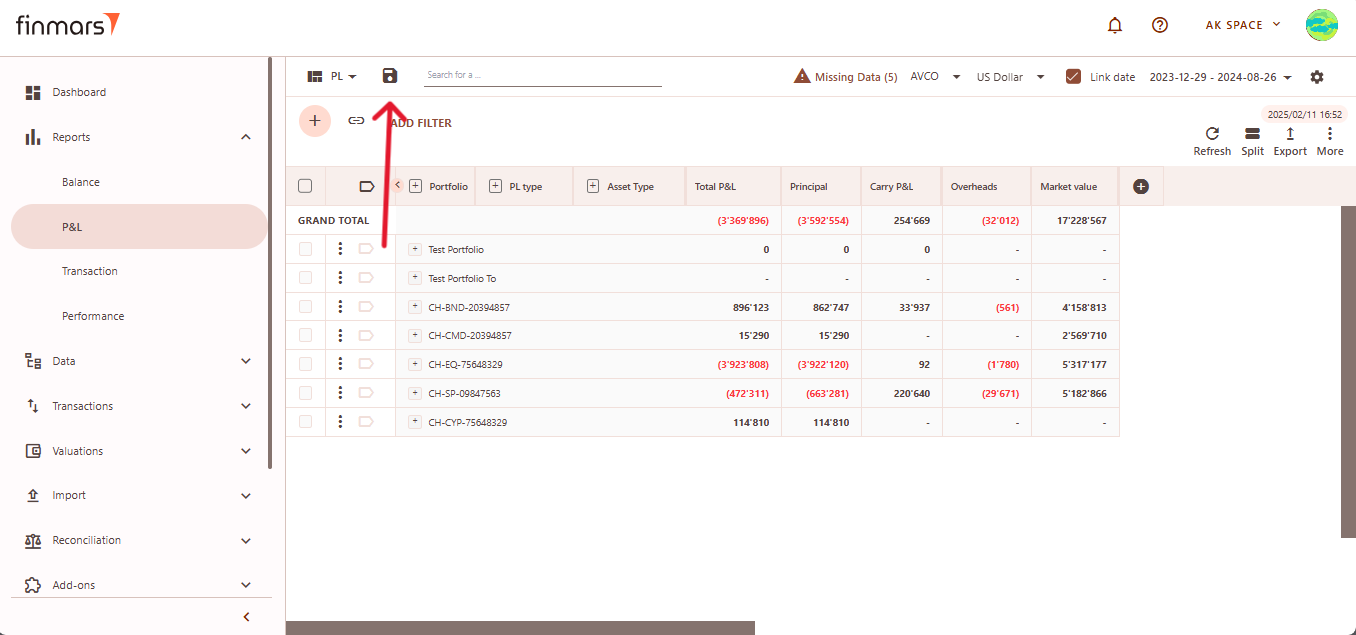
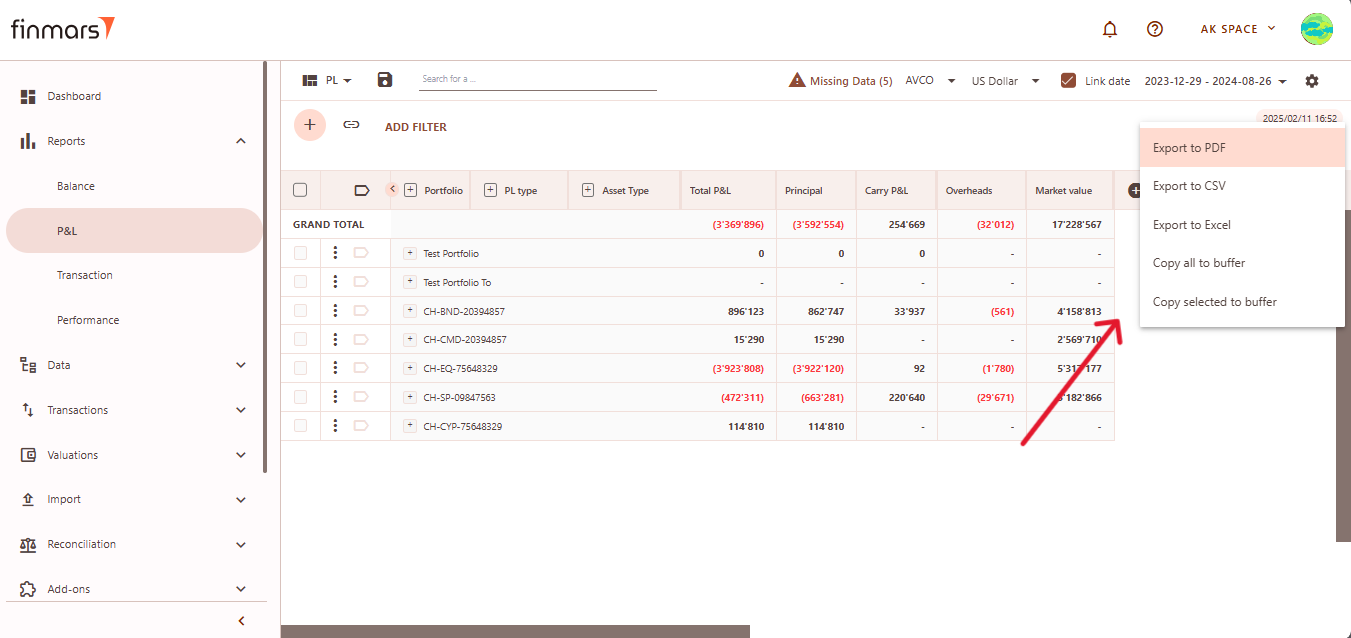
Calculate Performance (Modified Dietz)
Prerequisites
We assume you have all prerequisites you may need, including:
- Get Access to Finmars
- Link with Finmars ID
- Install PMS Core or PMS Plus add-on
- How to Import Files in PMS Core and PMS Plus
When to use
It's expected that all calculations are run by respected workflows and or pipelines, but sometimes there is a time you need to run it manually, the most frequent cases are:
- You made manual edits in the data that will affect performance - this WILL NOT be automatically recalculated;
- You unchecked calculation options in the PMS Core/PMS Plus and/or other add-ons and/or pipelines;
Calculations for Performance
- Go to Add-ons -> PMS here go to the Helper tab and open Calculate Register Records section.

- Fill in parameters according to their info ("i" icon close to the parameter's name).
- Click Run.
- Confirm parameters and click Run again.

- In the right frame you will have execution info, click Refresh to get updates.

- Refresh and read Log and wait for Result. See successful run example below:

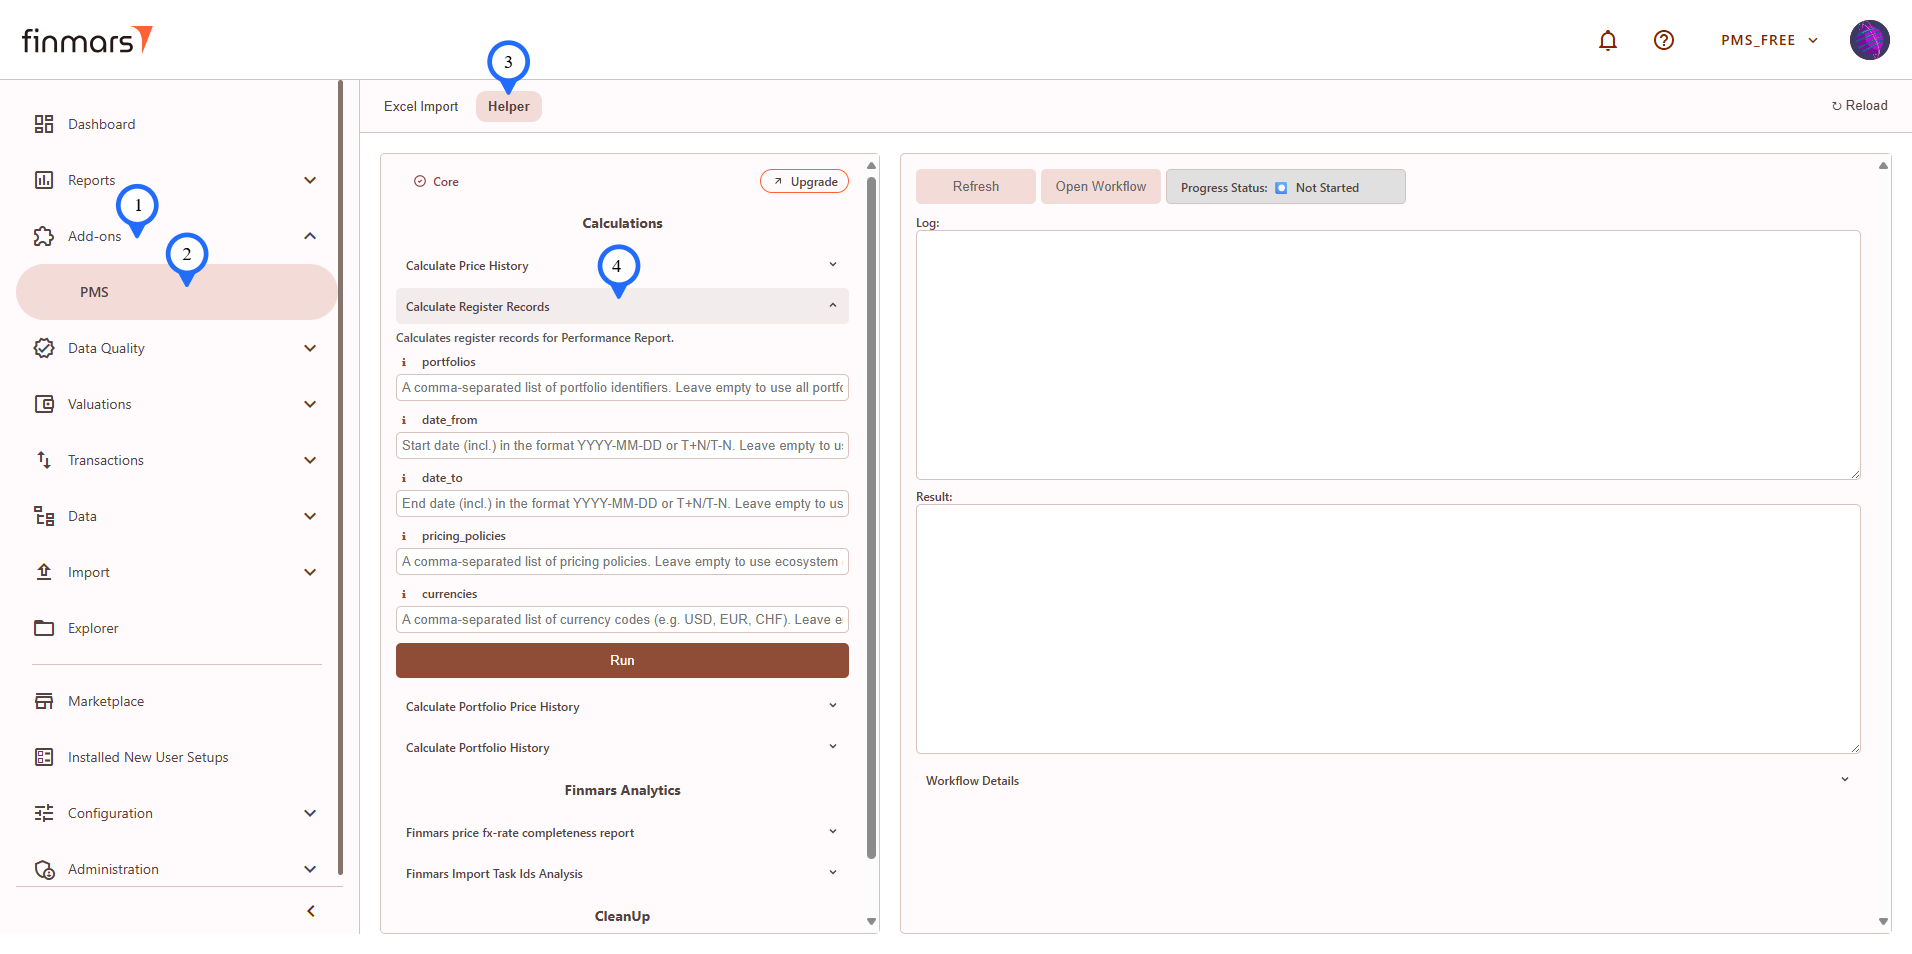
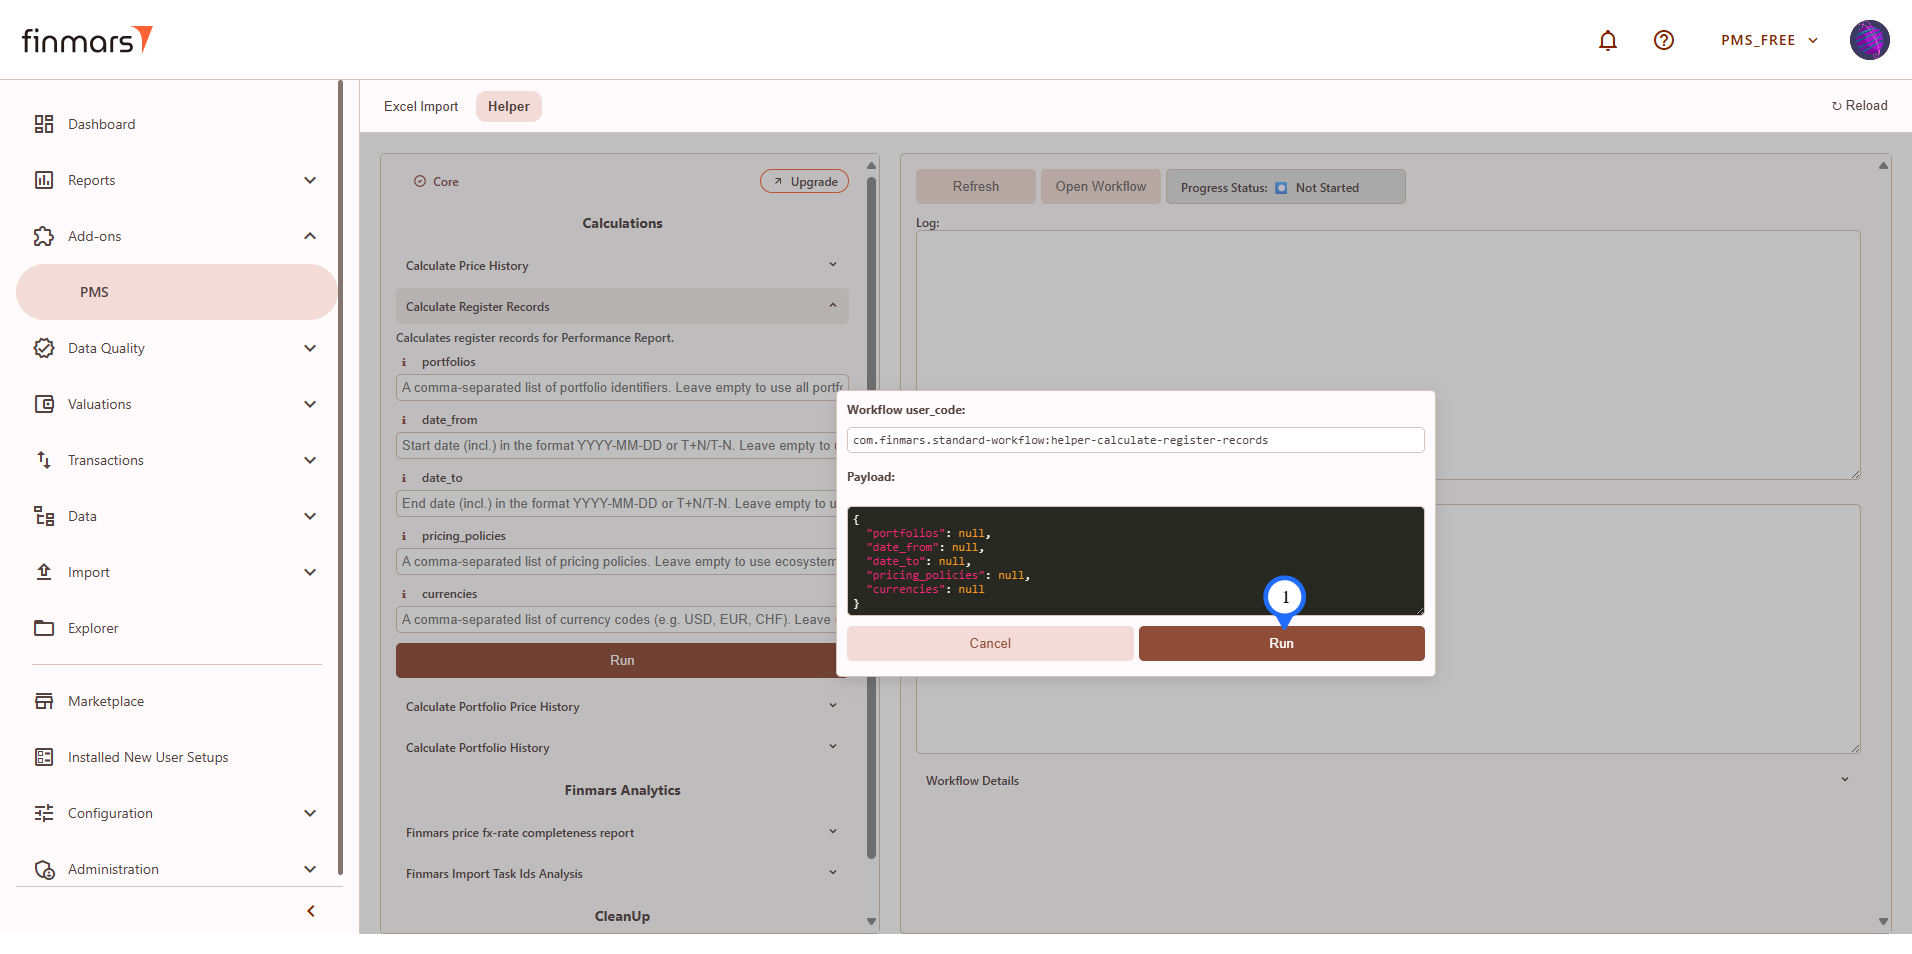
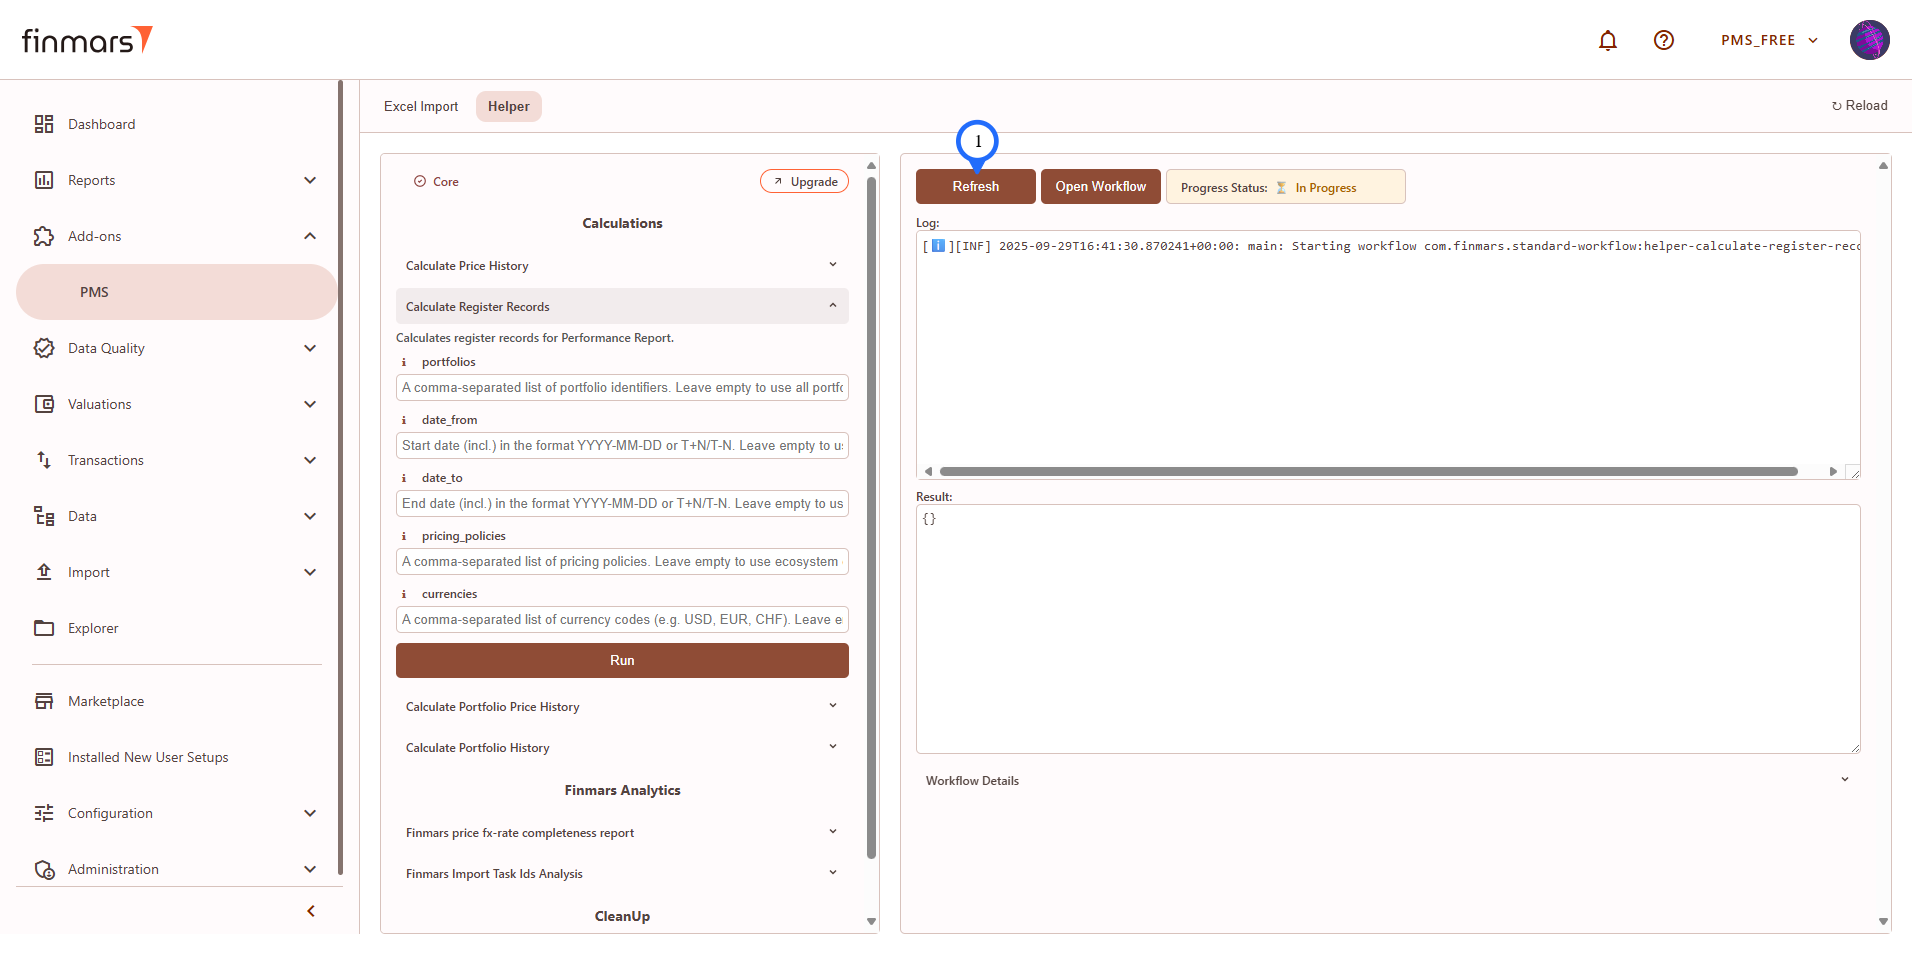
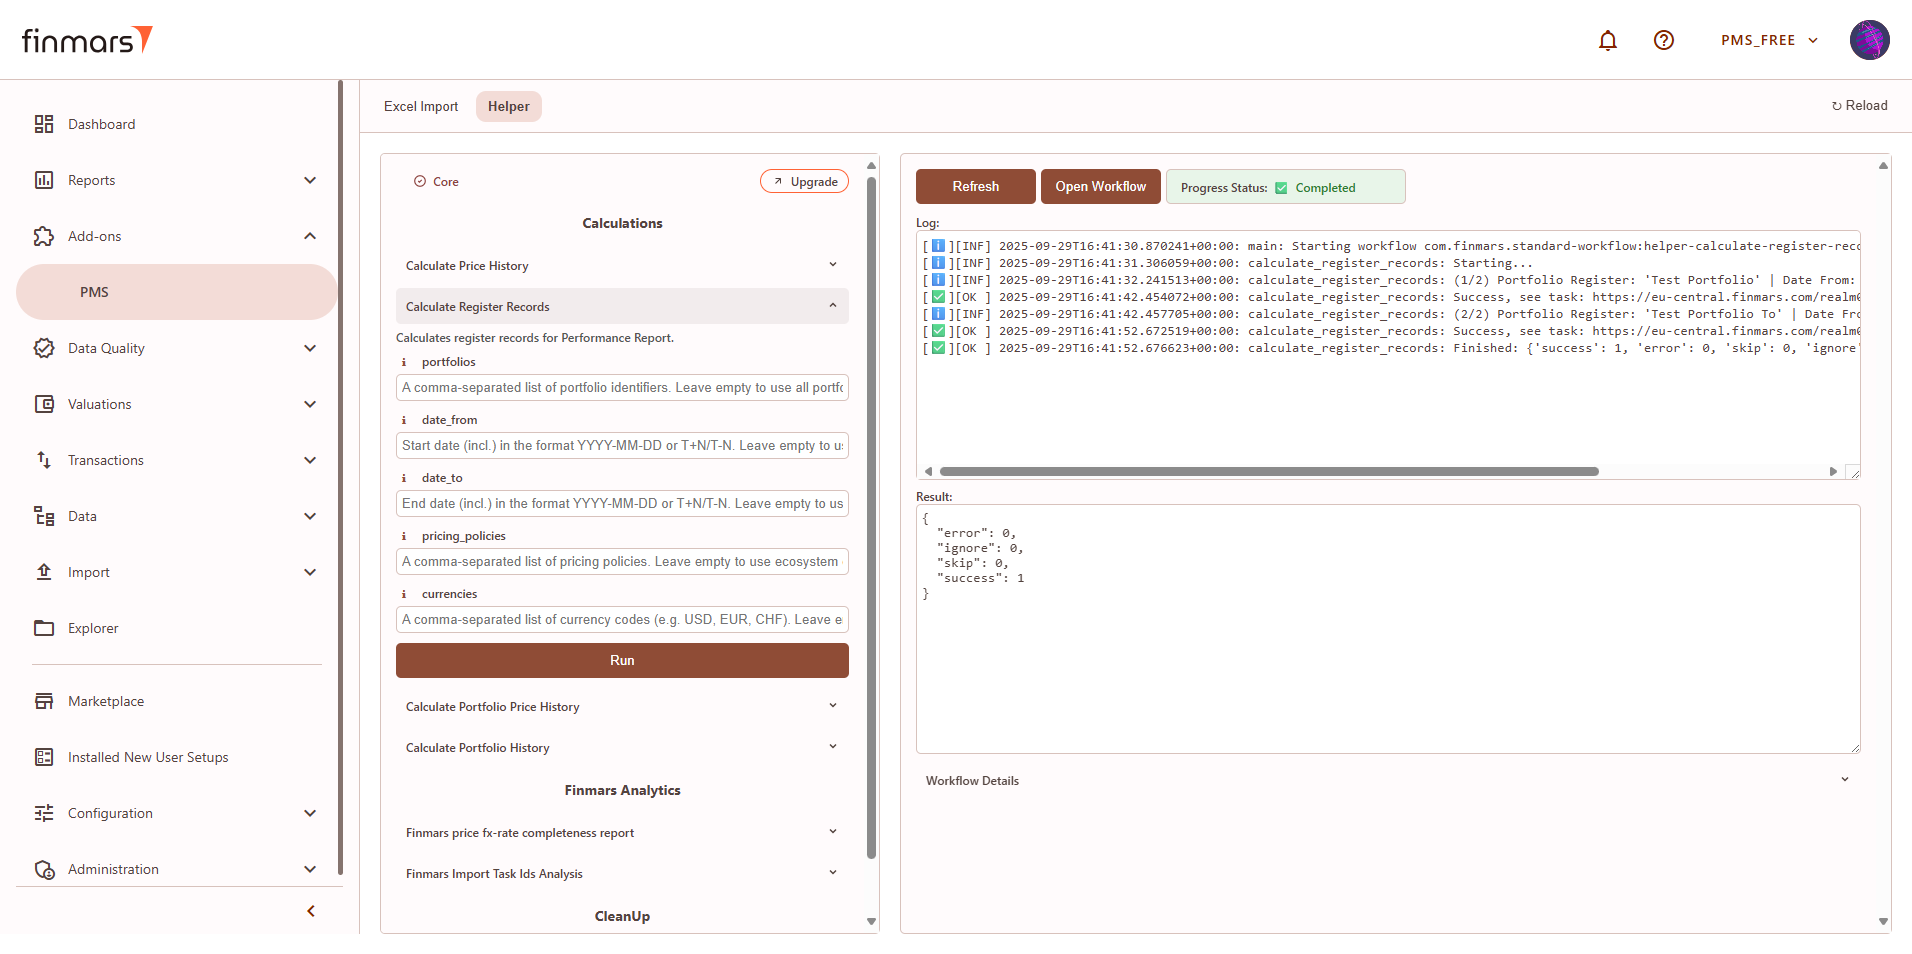
Check Performance Report
Prerequisites
We assume you have all prerequisites you may need, including:
- Get Access to Finmars
- Link with Finmars ID
- Install PMS Core or PMS Plus add-on
- How to Import Files in PMS Core and PMS Plus
- How to Do Calculations for YTM and Modified Duration (if you need YTM & Modified Duration)
- How to Do Calculations for Performance (Modified Dietz)
Check Performance Report
- Go to the left sidebar. Locate and select the Report section and click on Performance. Ensure that the correct layout is selected from the dropdown in the upper-left corner. If the wrong layout is selected, change it before proceeding.

- Once on the Performance page, adjust the settings according to your reporting needs. Сonfirm the Currency in the top panel. Also, verify that the Report Date is set correctly. The system displays the balance as of the end of the selected day. This setting should always be used to reflect accurate financial data.

- If you want to configure more detailed report settings, click on the gear icon in the top-right corner to open the settings panel.

- Set the Cost Method (such as AVCO or FIFO).
- Define the Pricing Policy to determine how asset values are calculated (When selecting the Pricing Policy, you are choosing the set of prices and exchange rates to be applied.)
- In the Performance Unit, select whether you want the report to display performance in Percent or Absolute terms.
- Choose the method for return calculations by selecting Modified Dietz.
- Set the Time grain to define the period for performance calculations, such as daily or monthly.
- If you need to filter the report to specific portfolios or bundles, click on the Portfolios and Bundles field and select the relevant items.
- In the Sections area, select the components you want to include in the report, such as:
- Period Returns ( Displays performance returns for different periods such as Daily, MTD, QTD, YTD, and historical years),
- Monthly Returns (Breaks down performance data into monthly periods for more granular analysis.).
- Graphs (Enables visual representation of performance).
- After adjusting these settings, confirm by clicking OK.

- To apply the selected settings and view the updated report, simply refresh the page. Once refreshed, the report will be displayed with the updated parameters, reflecting the selected configurations.

- After verifying the report, you can either save it within the system for future reference. To do this, locate the Save button, which is positioned in the upper-left corner of the report interface. Clicking this button will store the current report layout and data for future access. It’s important to use the standard settings whenever possible to maintain consistency. If changes are needed, create a duplicate of the layout and save it locally to avoid potential data loss during updates or reinstallation of marketplace modules.

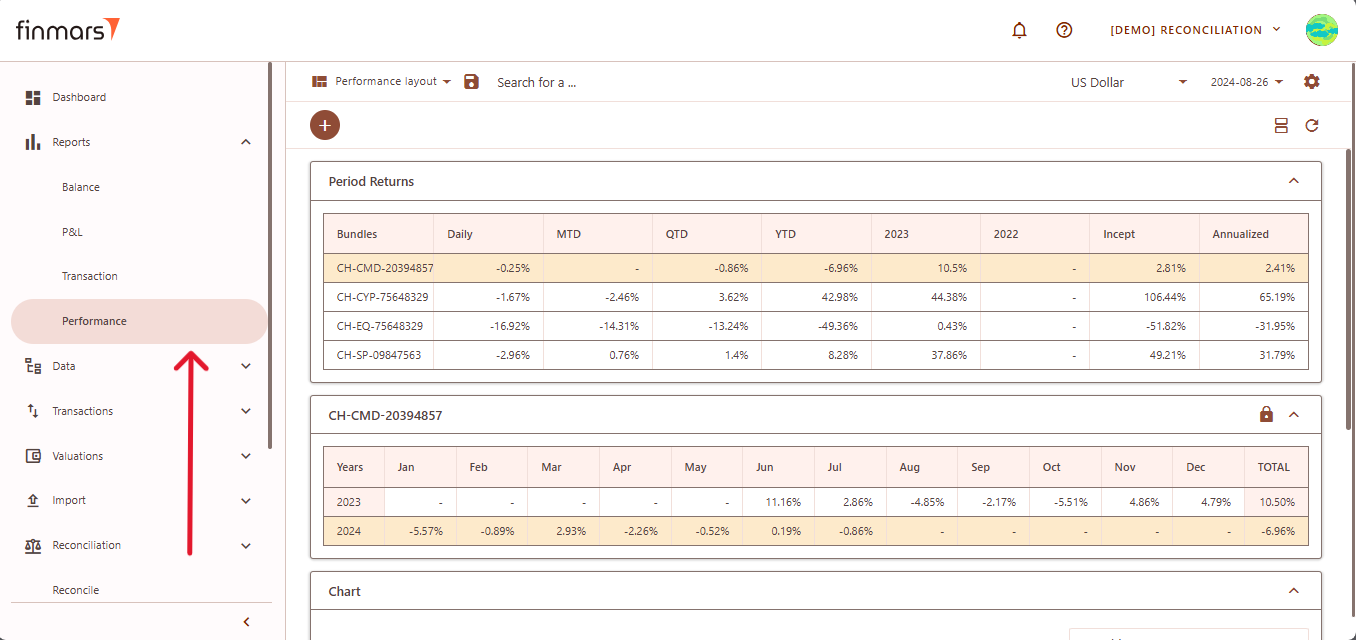

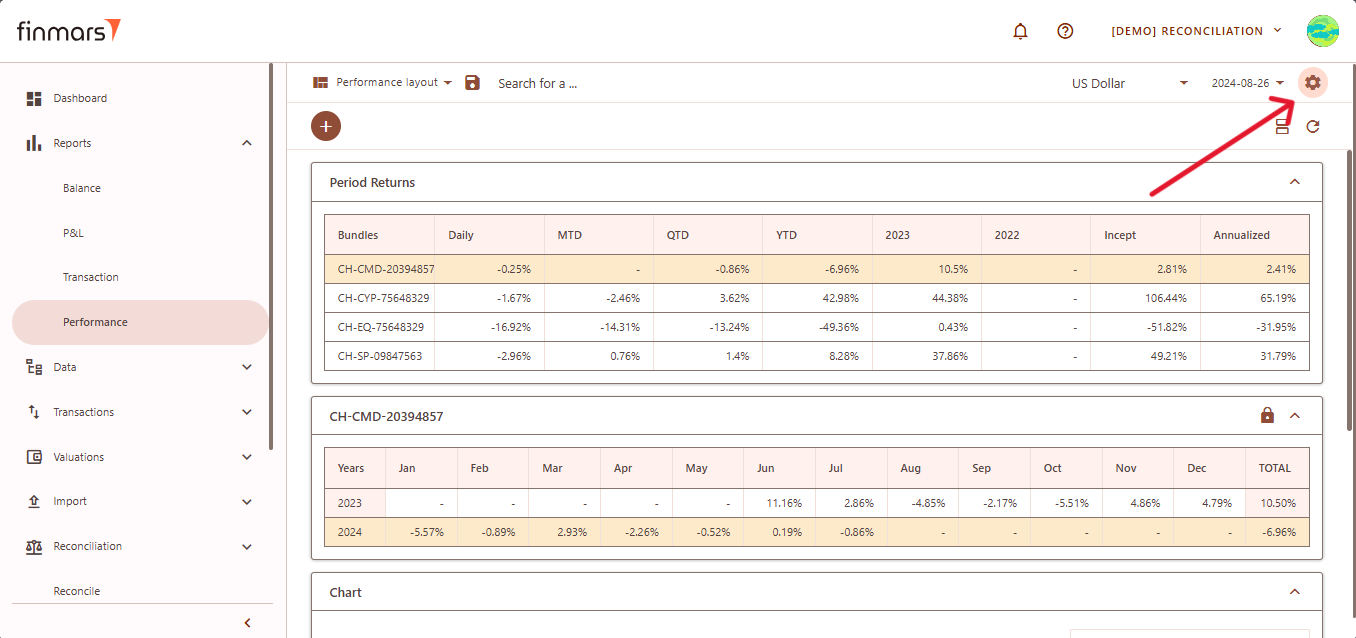
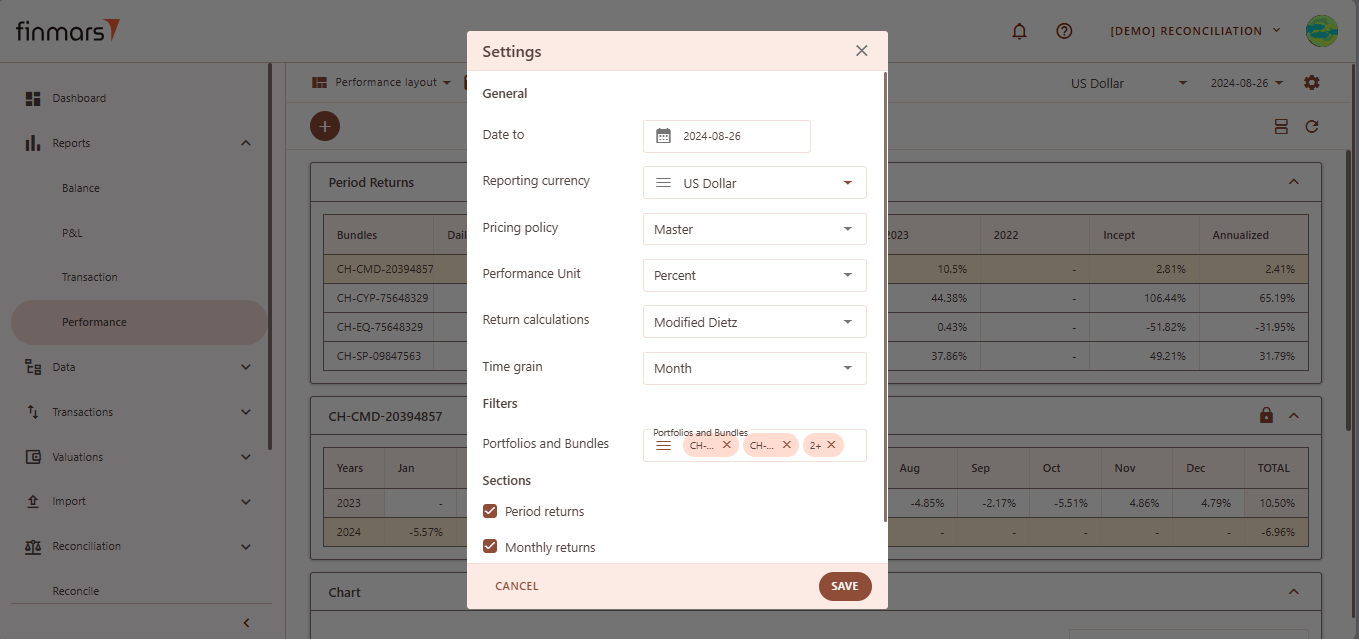
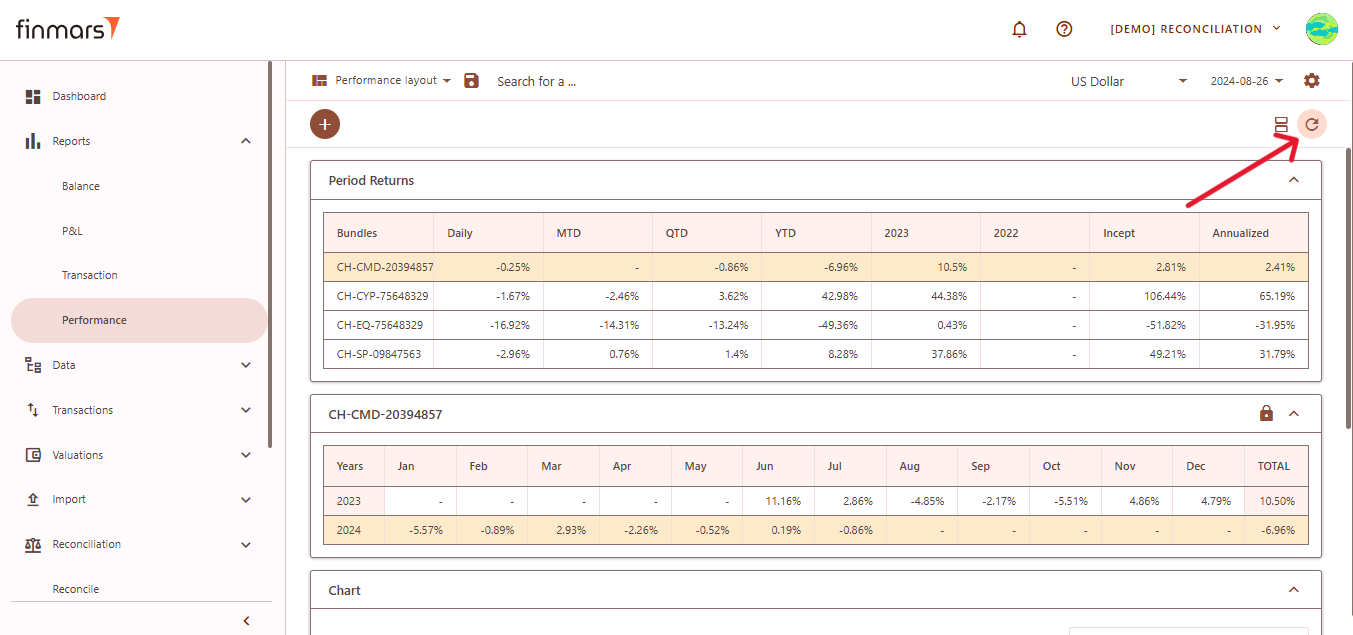
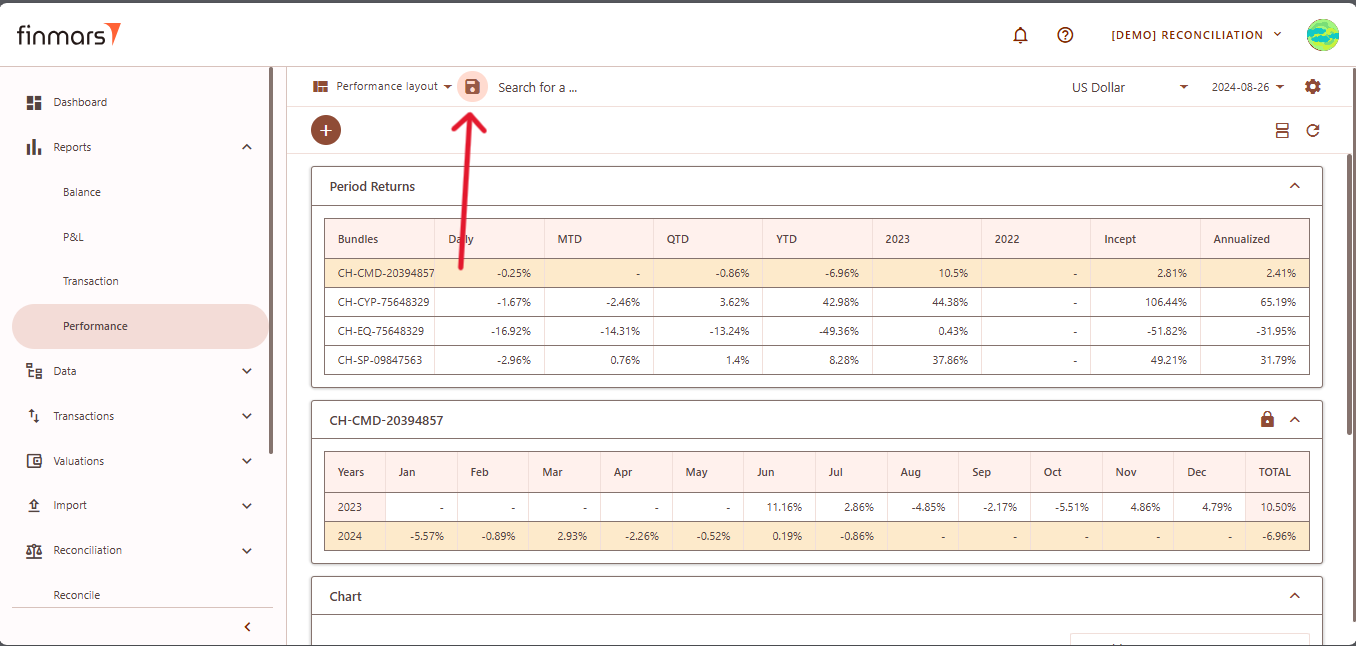
Calculate data for Mobile/Dashboards
Prerequisites
We assume you have all prerequisites you may need, including:
- Get Access to Finmars
- Link with Finmars ID
- Install PMS Core or PMS Plus add-on
- How to Import Files in PMS Core and PMS Plus
- How to Do Calculations for YTM and Modified Duration
- How to Do Calculations for Performance (Modified Dietz)
When to use
It's expected that all calculations are run by respected workflows and or pipelines, but sometimes there is a time you need to run it manually, the most frequent cases are:
- You made manual edits in the data - this WILL NOT be automatically recalculated;
- You unchecked calculation options in the PMS Core/PMS Plus and/or other add-ons and/or pipelines;
Calculate data for Mobile/Dashboards
- Go to Add-ons -> PMS here go to the Helper tab and open Calculate Portfolio History section.

- Fill in parameters according to their info ("i" icon close to the parameter's name).
- Click Run.
- Confirm parameters and click Run again.

- In the right frame you will have execution info, click Refresh to get updates.

- Refresh and read Log and wait for Result. See successful run example below:


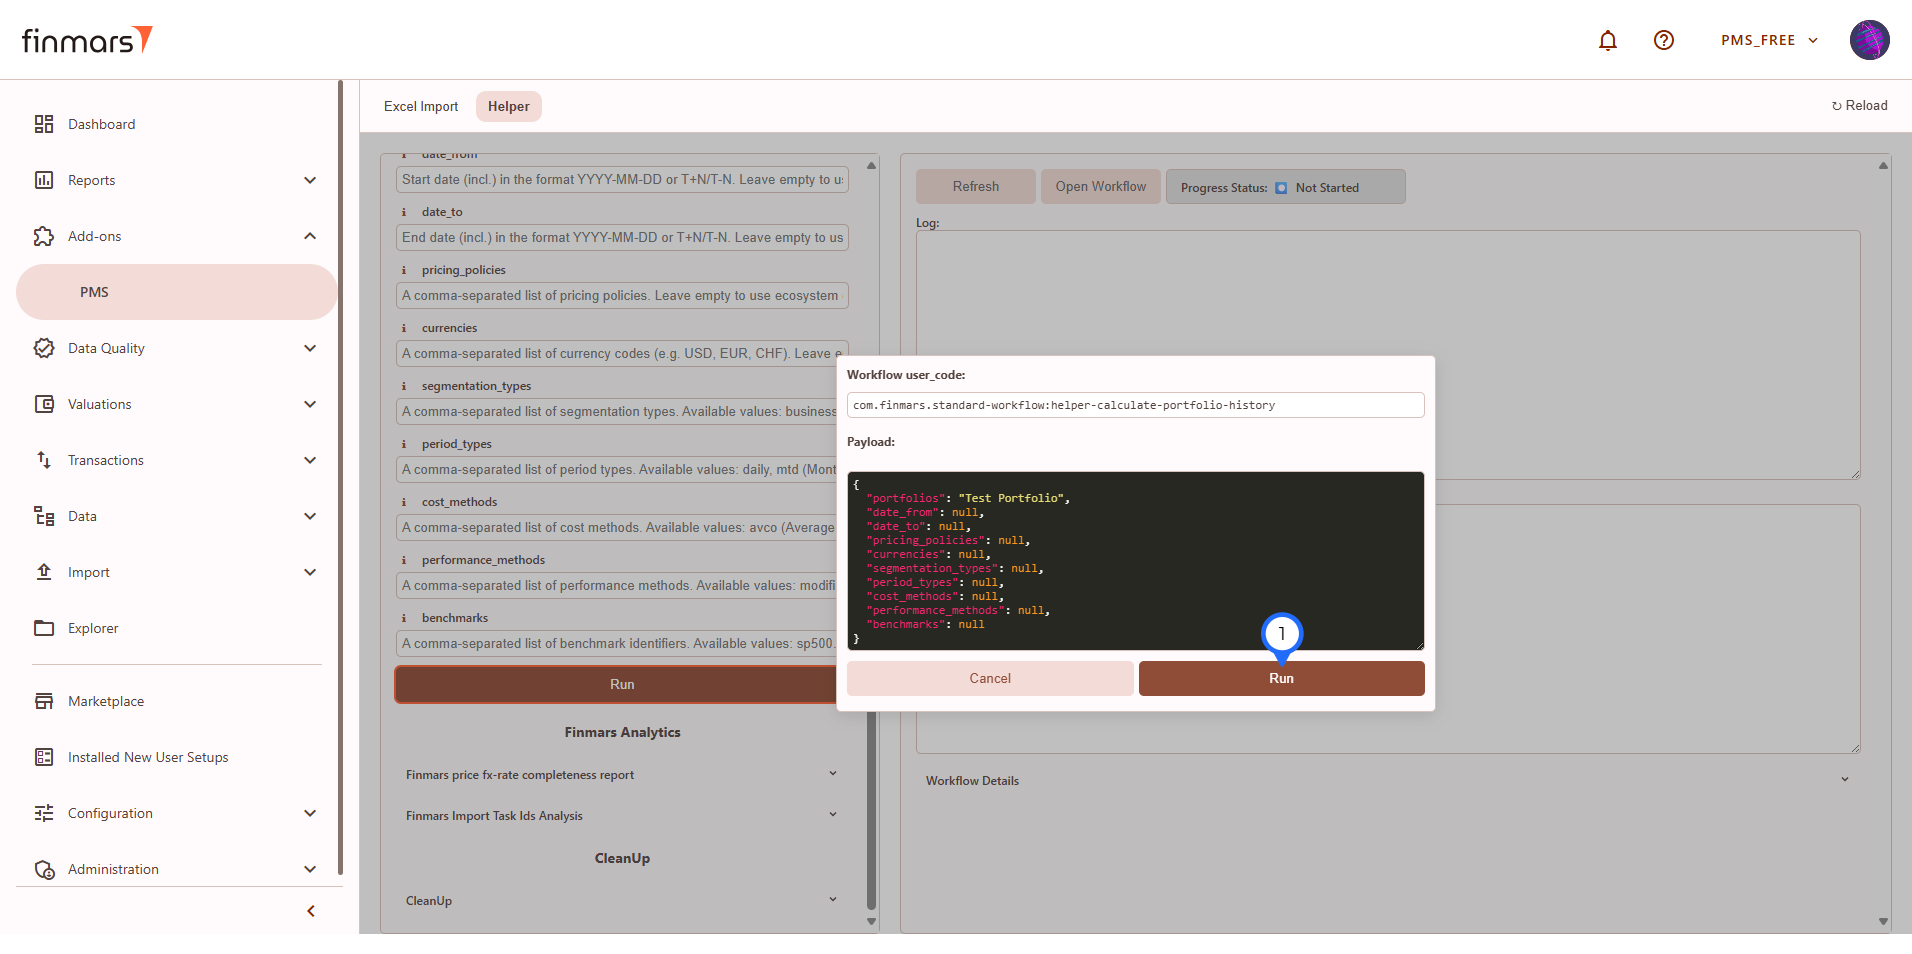
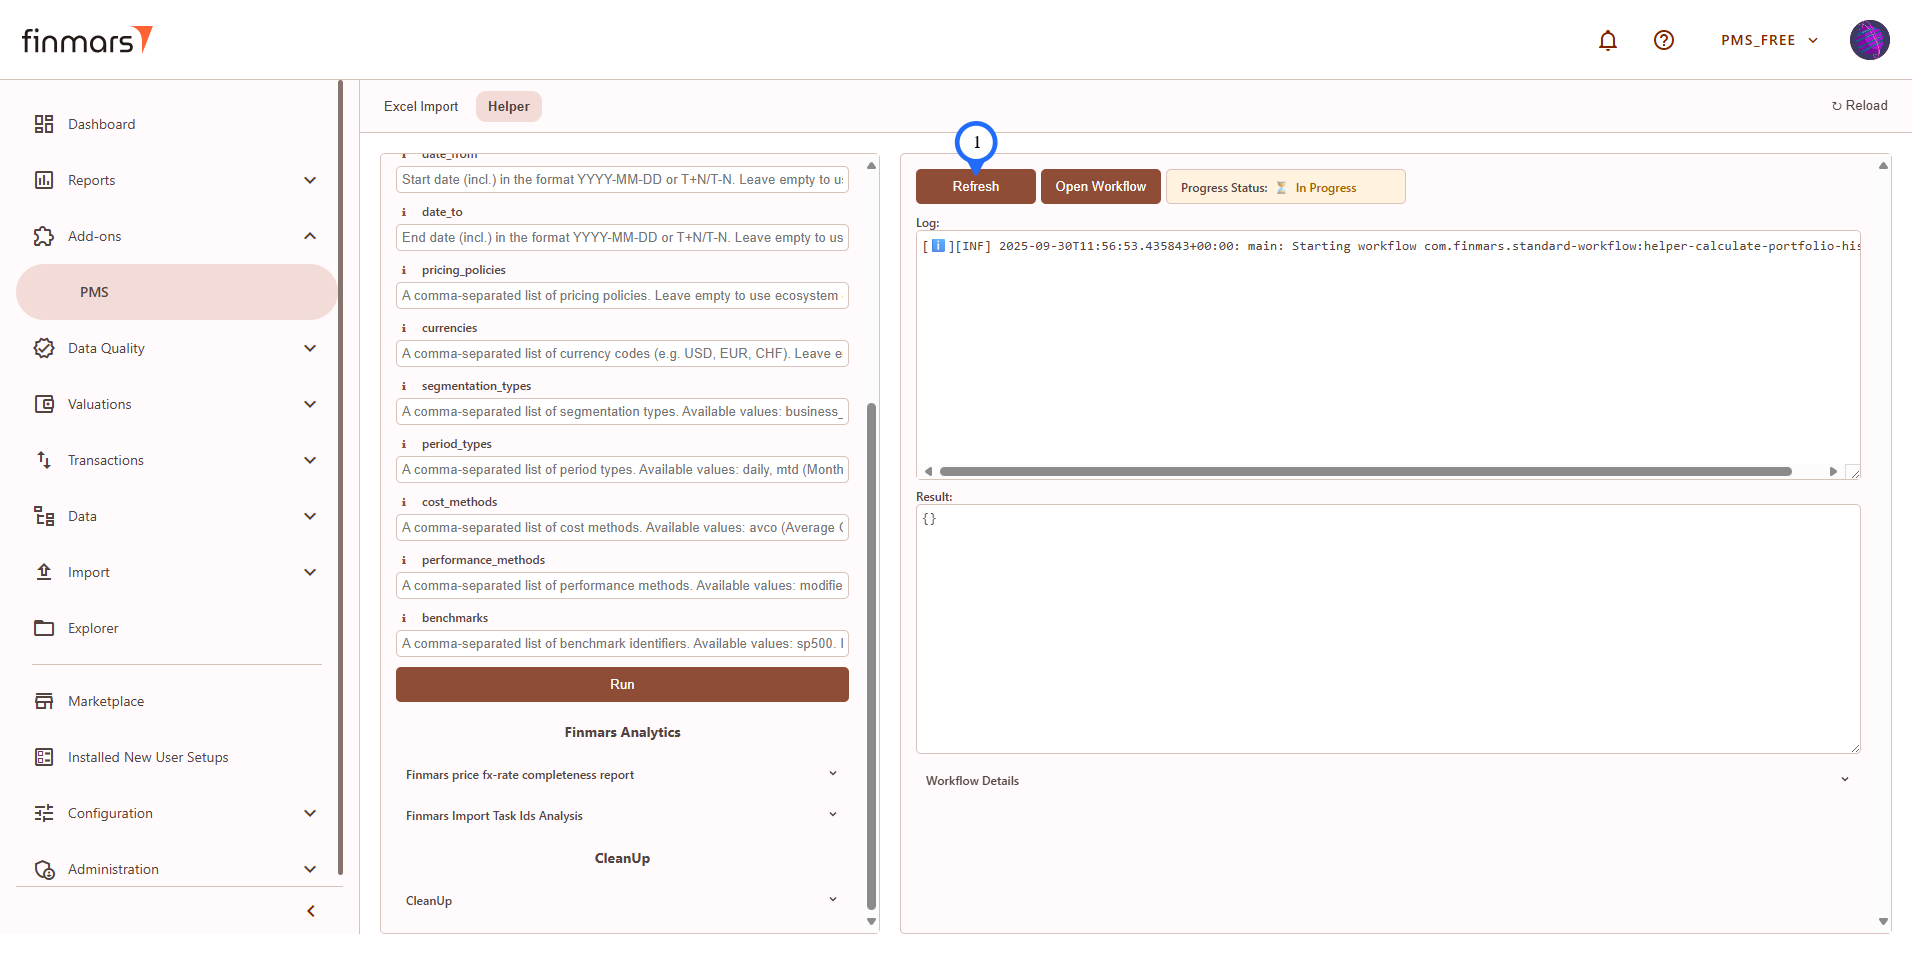
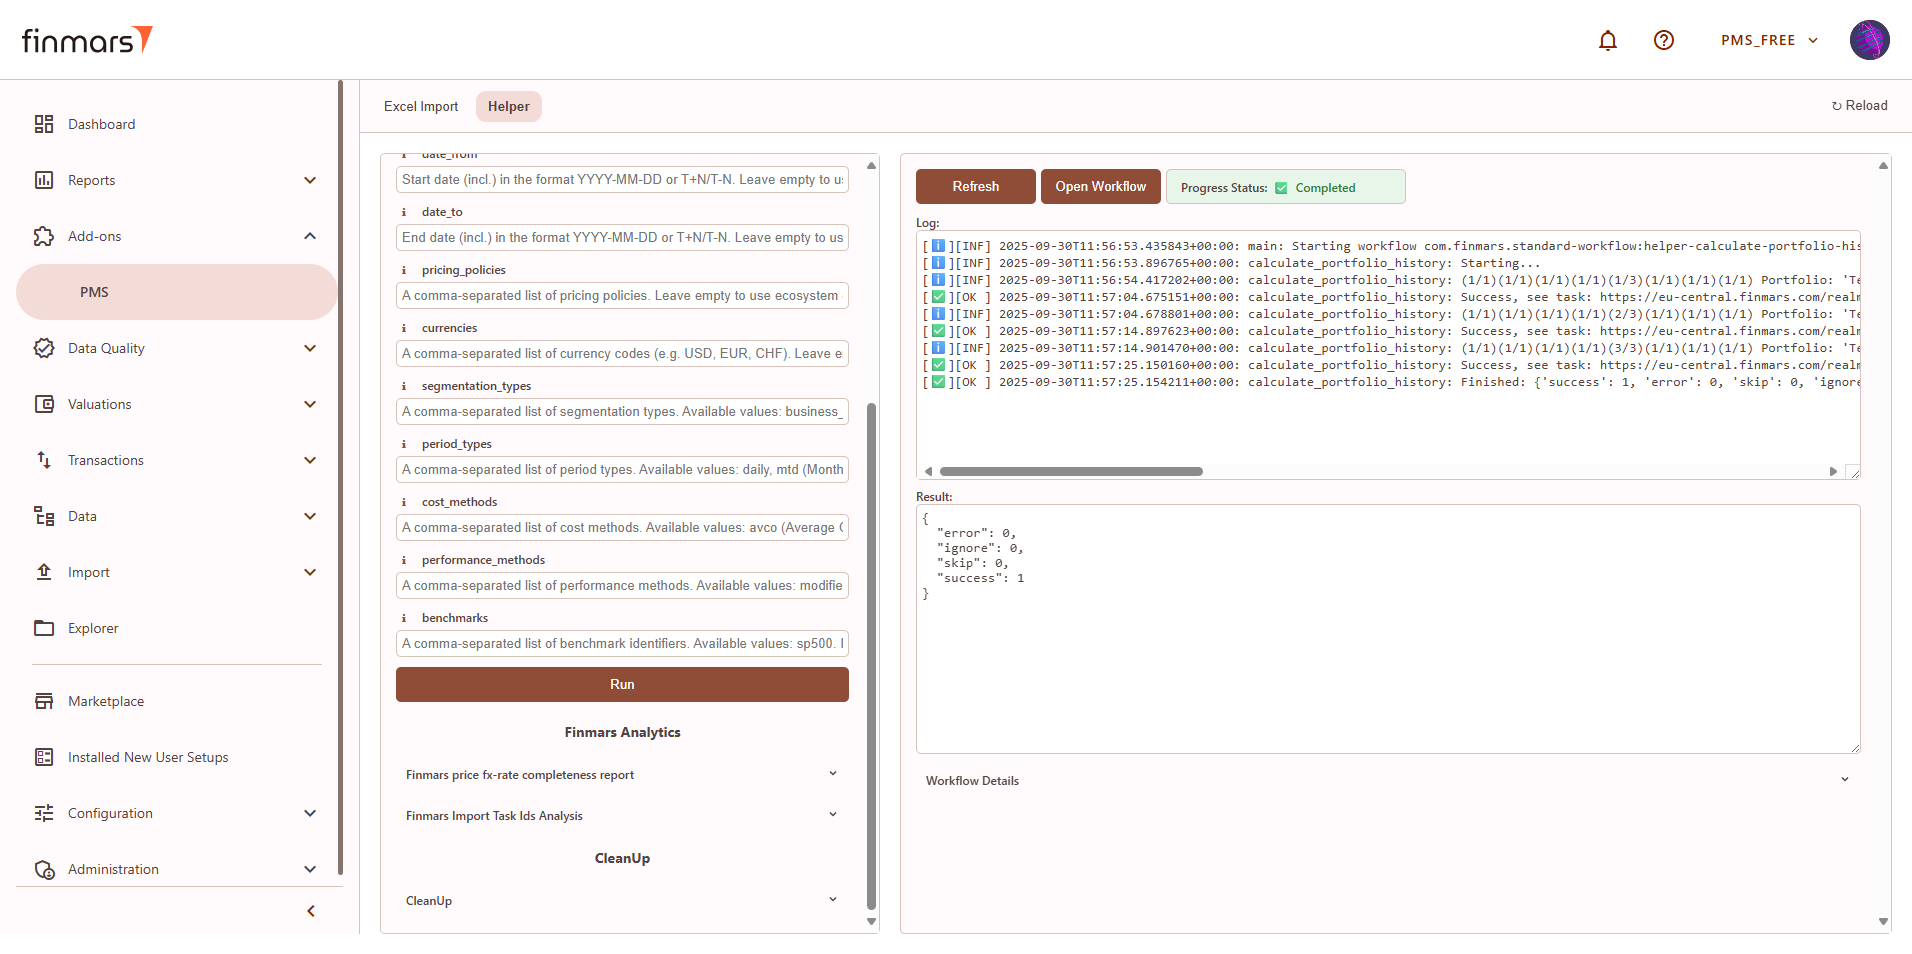
Check Standard Dashboards
Prerequisites
We assume you have all prerequisites you may need, including:
- Get Access to Finmars
- Link with Finmars ID
- Install PMS Core or PMS Plus add-on
- How to Import Files in PMS Core and PMS Plus
- How to Do Calculations for YTM and Modified Duration
- How to Do Calculations for Performance (Modified Dietz)
- Calculate data for Mobile/Dashboards
Check Standard Dashboards
- Go to the Dashboard tab in the left-side menu.

- At the top of the page (next to the save icon), you will see the current dashboard layout name (it can differ from user settings). Click on this name to open the dropdown menu listing all available layouts.

- From this dropdown, select the standard dashboard you want to check.

- Below you can find an overview of Standard Dashboard Layouts
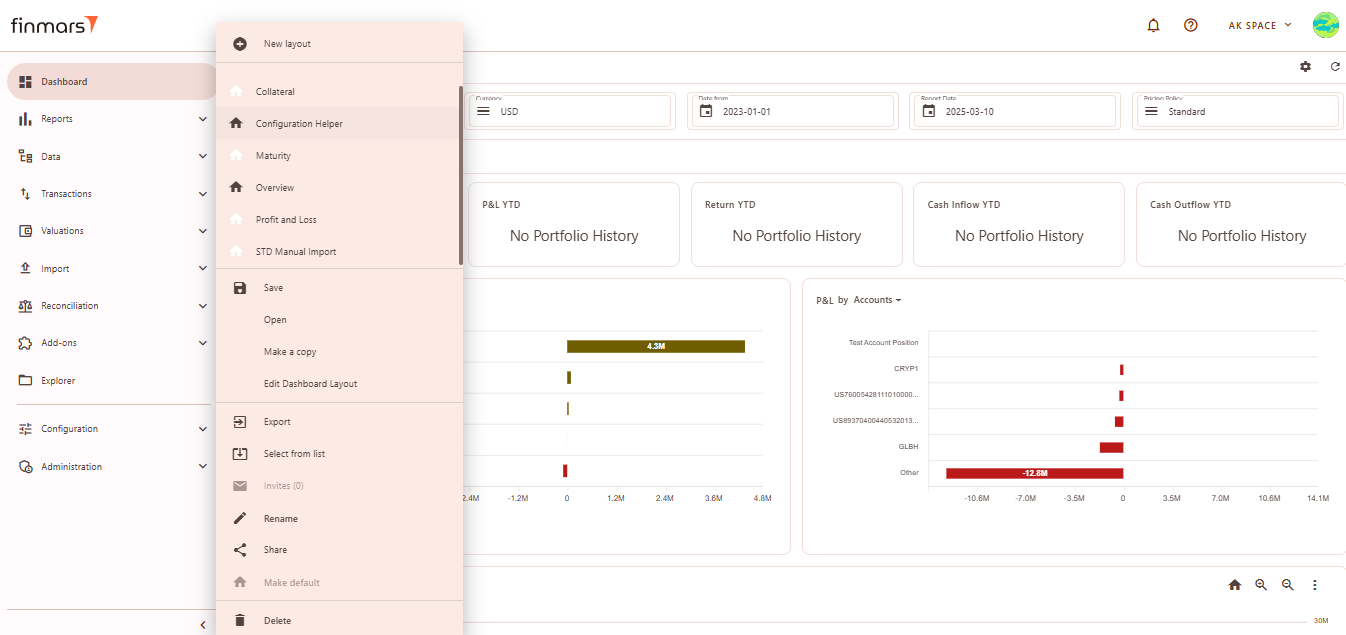
Overview Layout
Overview – Displays a high-level summary of key financial metrics like NAV, P&L, cash flows, and balance trends
Filter Panel
At the top of the Overview layout, you'll find the filter panel where you can adjust key parameters:
- Portfolios – Select which portfolios to display data for.
- Currency – Choose the reporting currency.
- Date From / Report Date – Define the time period for analysis. The Report Date will always display the balance as of the end of the selected day.
- Pricing Policy – Set the method for asset valuation.
Below the filter panel, there is a summary section displaying key financial metrics: NAV YTD, P&L YTD, Return YTD, Cash Inflow/Outflow YTD
Cards
Cards values are based on calculated Portfolio History for selected parameters in Filter Panel.
Balance by Category
Displays a bar chart of the portfolio's asset balances by account.
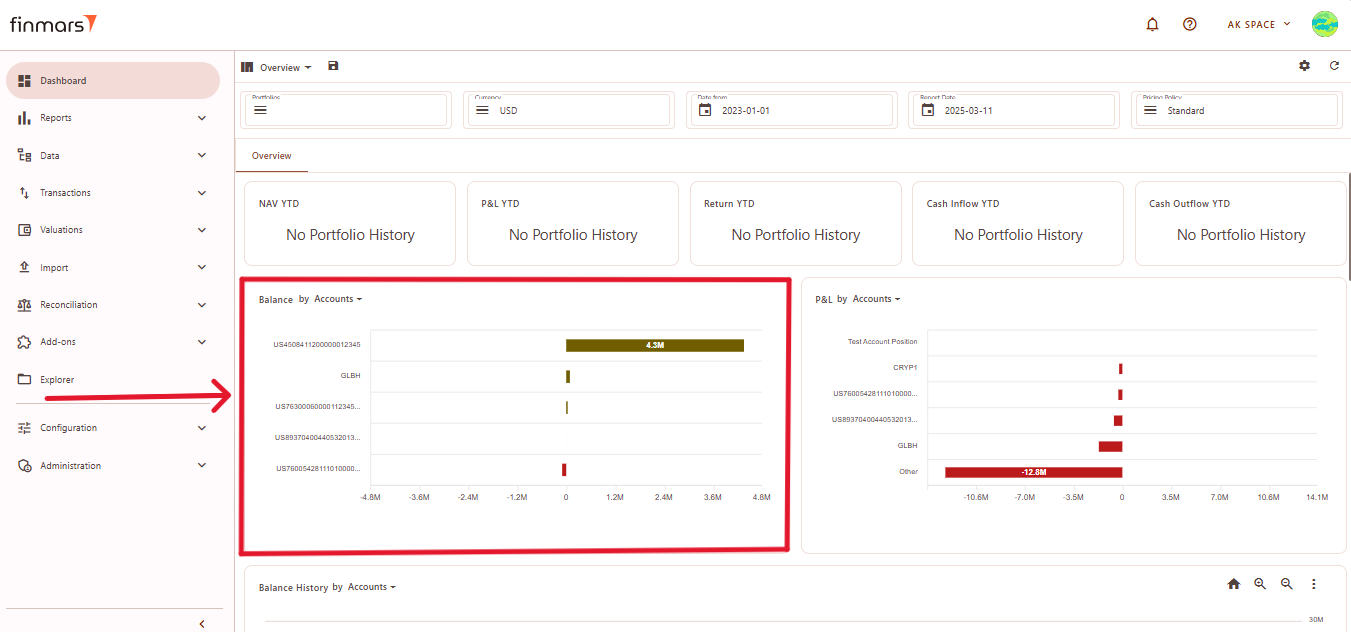
You can change the category of data displayed in the chart by clicking on the dropdown menu next to the window title. Select the desired option (e.g., Currencies, Instrument Types, Portfolios, Accounts, Countries) depending on how you want the data to be shown.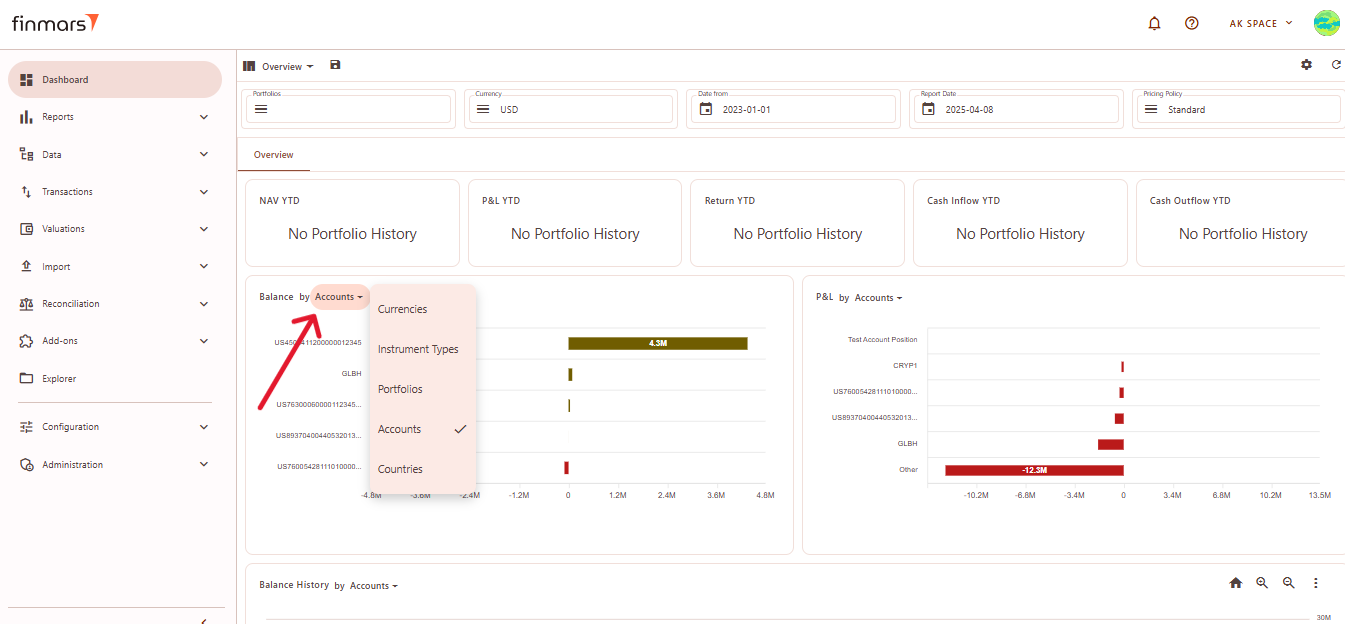
Elements:
The chart always displays up to six values. If there are more than six positions, the chart will show the top five values, and the sixth value will be labeled "Other", which aggregates all remaining positions beyond the first five.
The X-axis always represents numerical values, typically amounts or prices, while the Y-axis represents elements.
P&L by Category
Displays a bar chart showing the profit and loss distribution across different accounts.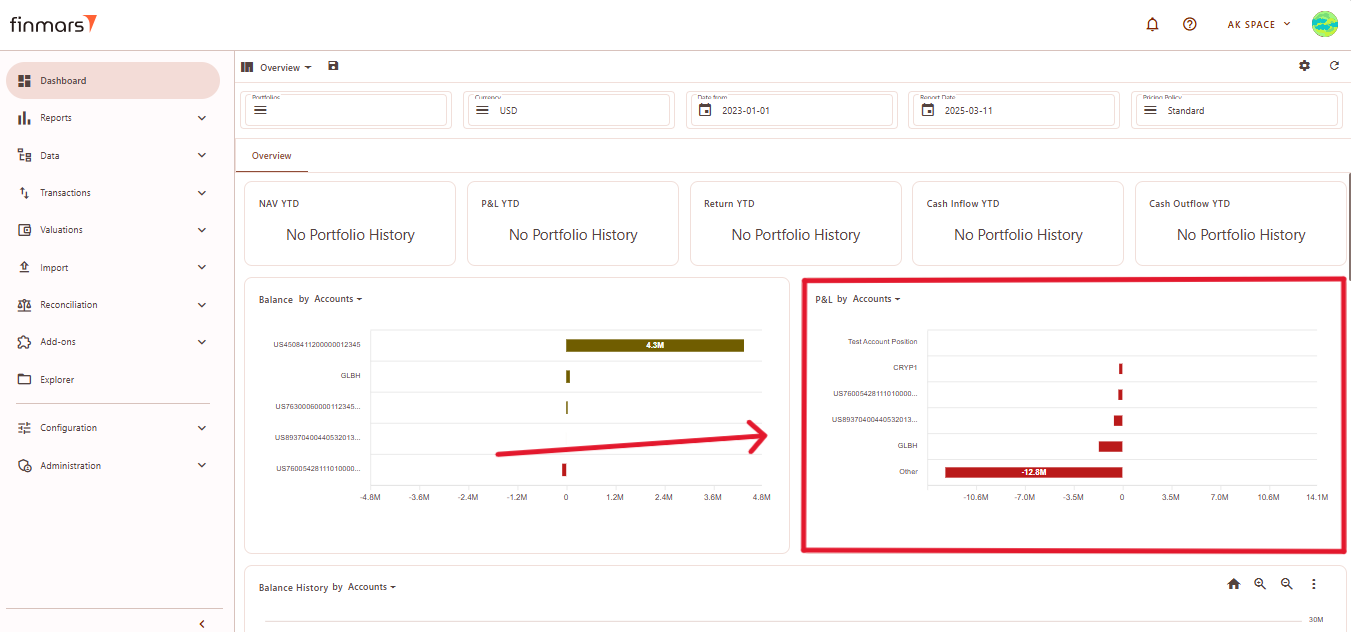
You can change the category of data displayed in the chart by clicking on the dropdown menu next to the window title. Select the desired option (e.g., Currencies, Instrument Types, Portfolios, Accounts, Countries) depending on how you want the data to be shown.
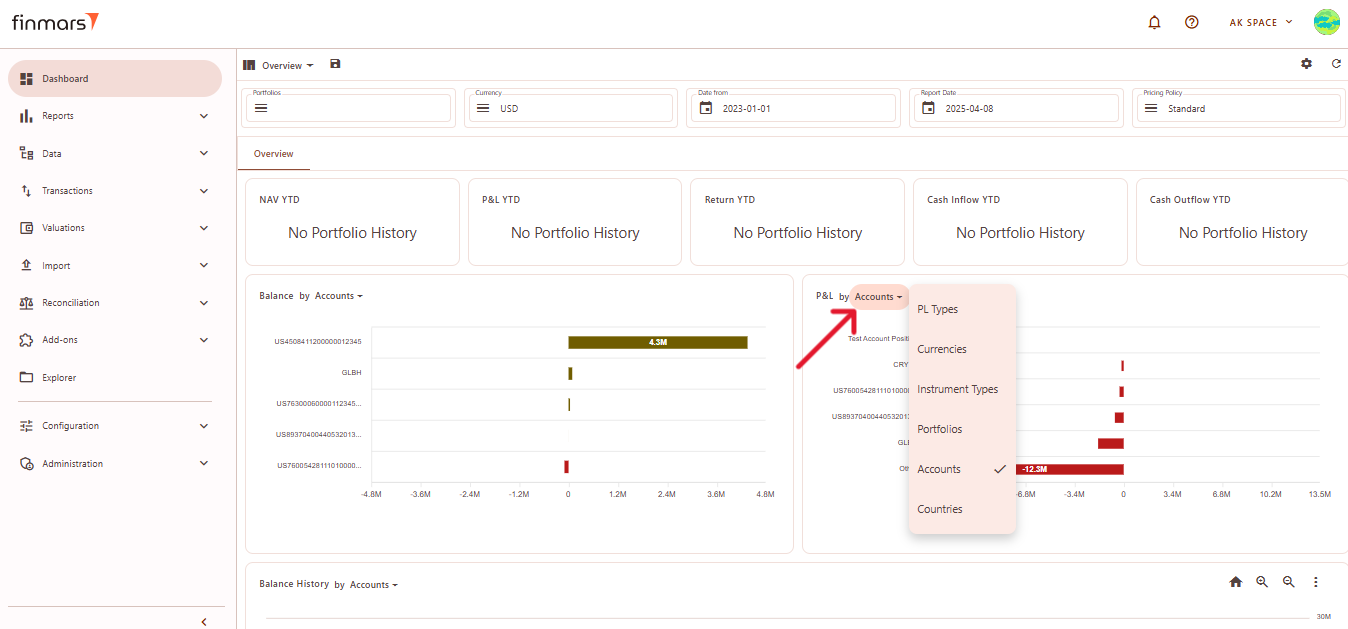
Elements:
The chart always displays up to six values. If there are more than six positions, the chart will show the top five values, and the sixth value will be labeled "Other", which aggregates all remaining positions beyond the first five.
The X-axis always represents numerical values, typically amounts or prices, while the Y-axis represents elements.
Balance History by Category
This section visualizes the historical changes in asset balances over time. The chart helps track trends in portfolio values, showing fluctuations across different accounts.
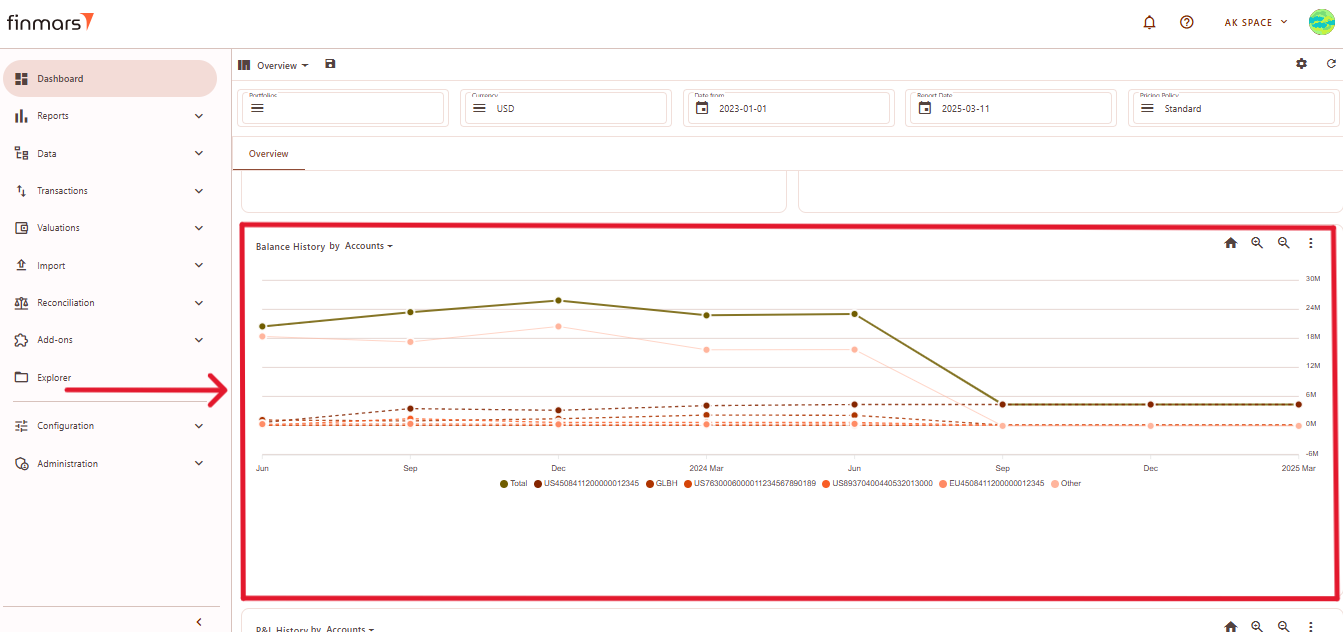
Elements:
- Time Axis (X-Axis) – Displays a timeline, illustrating changes in balances over time.
- Value Axis (Y-Axis) – Represents balance amounts, showing increases or decreases across different accounts.
- Colored Lines – Each account has a unique color, distinguishing different balance trends.
- Solid and Dotted Lines – Solid lines represent total balances or major accounts, while dotted lines indicate smaller accounts.
- Legend – Located at the bottom, mapping each color to its corresponding account.
- Trend Patterns – Some accounts show gradual changes, while others exhibit sharp declines, indicating significant balance shifts.
You can change the category of data displayed in the chart by clicking on the dropdown menu next to the window title.
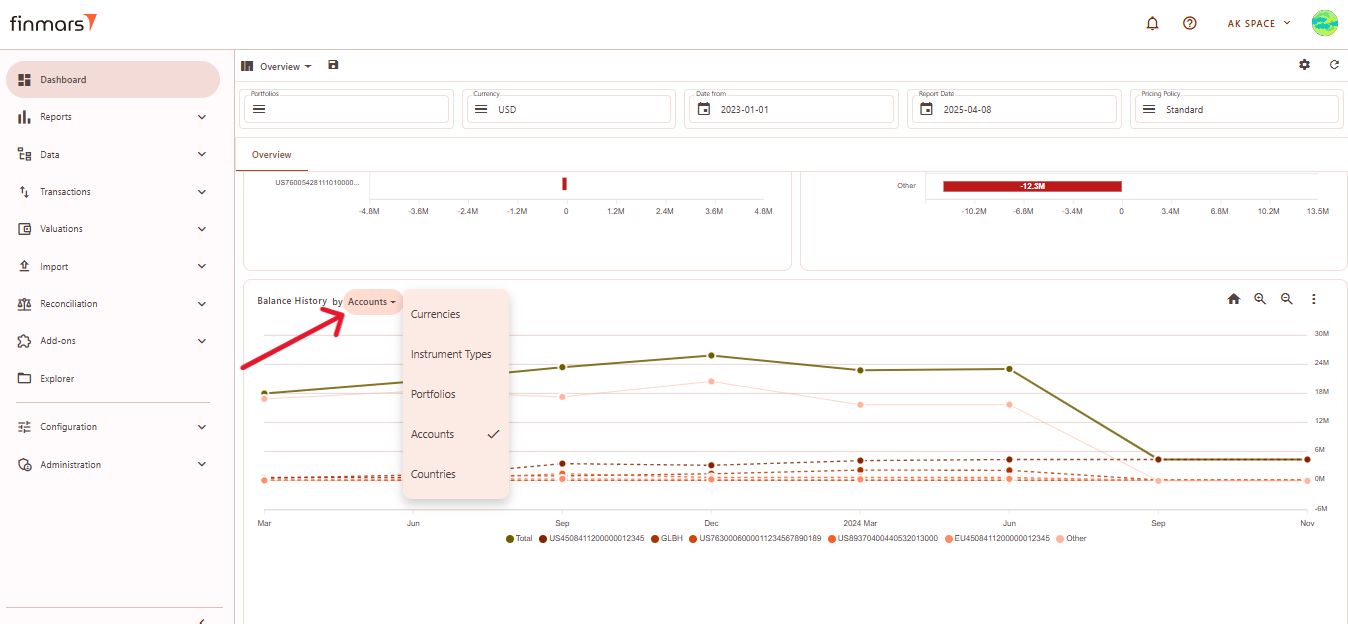
You can select category for a graph.
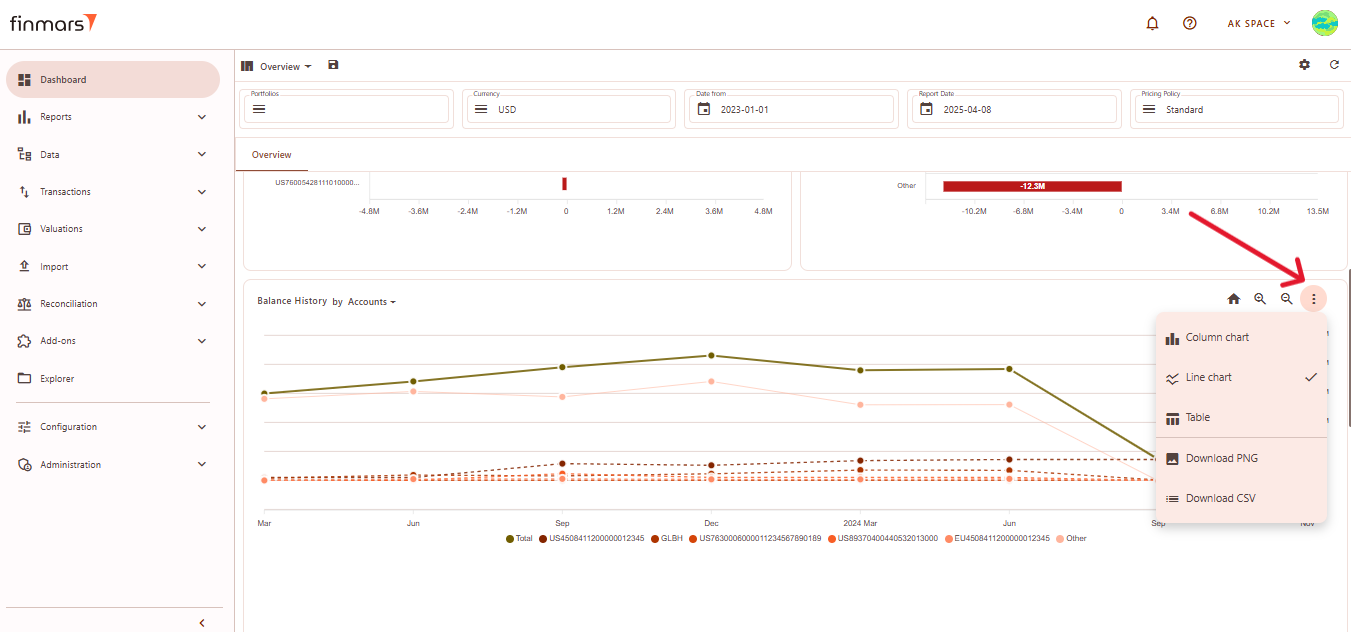
Chart Type Options:
- Column Chart – Displays historical balances as bar charts.

- Line Chart (default) – Shows trends over time with connected data points.

- Table – Converts the visual chart into a tabular format for numerical analysis.

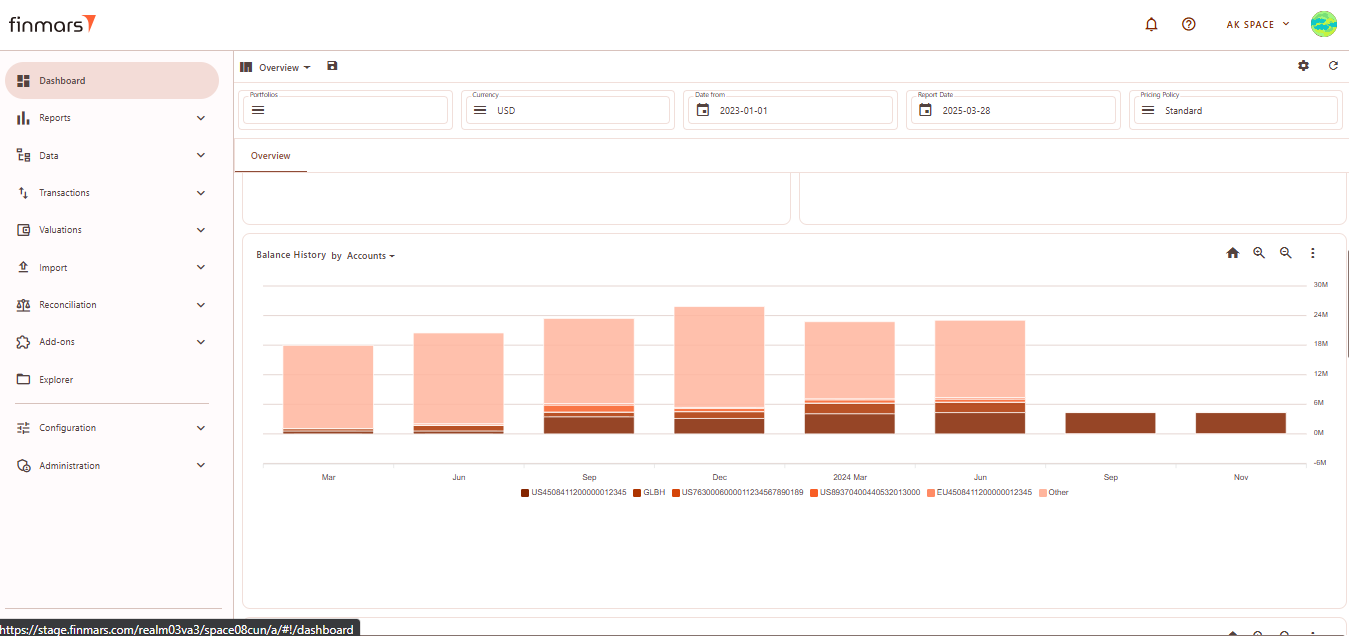
Download Options:
- Download PNG – Saves the chart as an image file.
- Download CSV – Exports balance history data as a CSV file for further analysis.
P&L History by Category
This module visualizes the historical changes in profit and loss (P&L) over time, allowing users to track financial performance trends across different accounts.

Elements:
- Time Axis (X-Axis) – Displays a timeline, illustrating changes in profit and loss over time.
- Value Axis (Y-Axis) – Represents profit and loss values, indicating financial performance across different accounts.
- Colored Lines – Each account is assigned a distinct color to differentiate financial trends.
- Solid and Dotted Lines – Solid lines represent total P&L movements, while dotted lines indicate individual accounts.
- Legend – Located at the bottom, linking each color to its corresponding account.
- Trend Patterns – Some accounts show steady performance, while others display sharp fluctuations, highlighting significant changes in financial results.
You can change the category of data displayed in the chart by clicking on the dropdown menu next to the window title.
You can select category for a graph.
Chart Type Options:
- Column Chart – Represents P&L data using vertical bars.

- Line Chart (default) – Shows P&L trends over time using connected data points.

- Table – Converts the graph into a tabular format for numerical analysis.

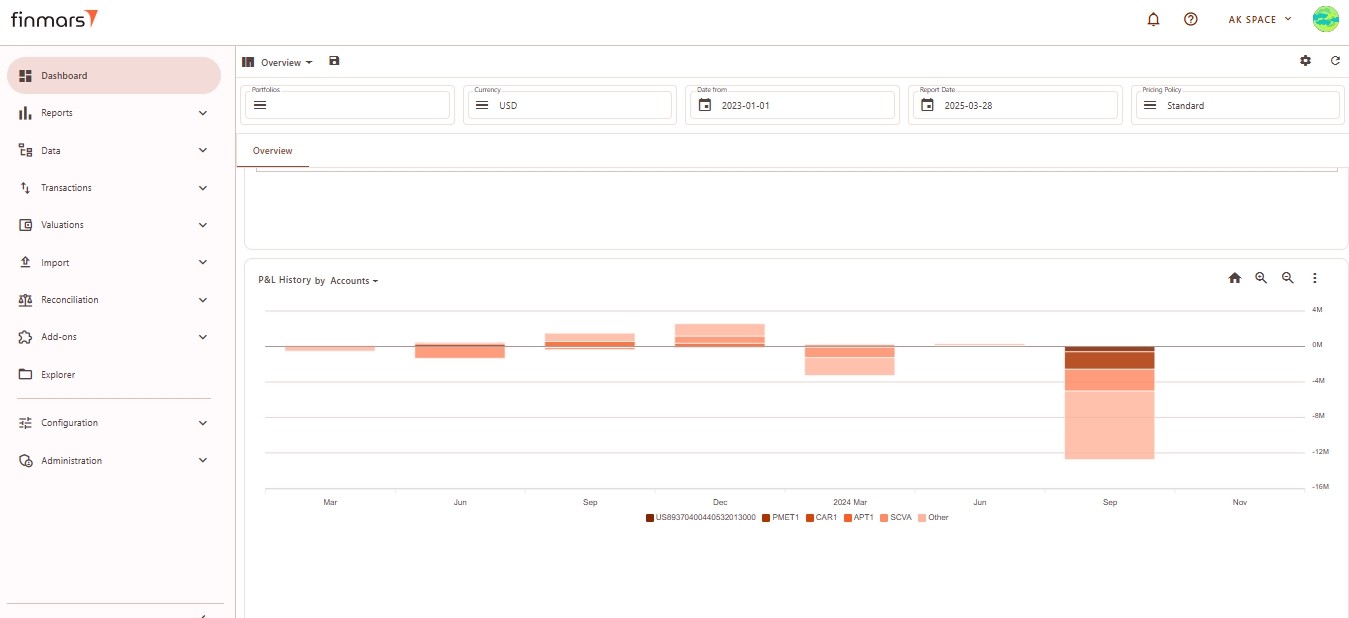

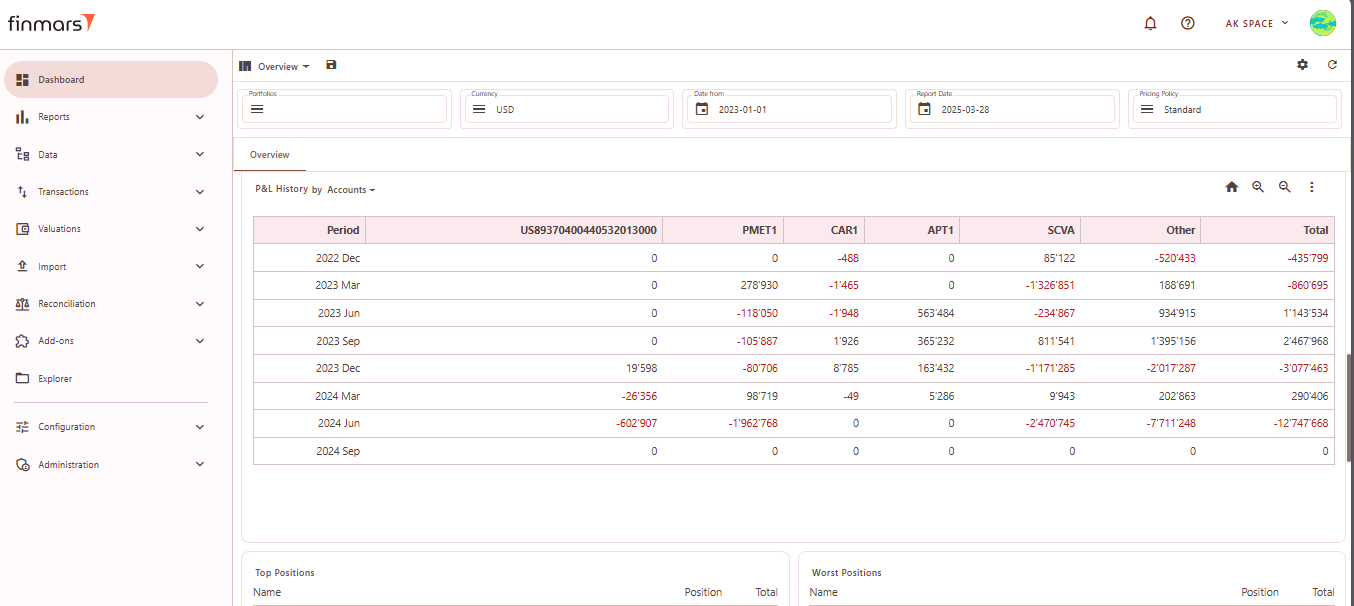
Download Options:
- Download PNG – Saves the chart as an image file for reporting purposes.
- Download CSV – Exports the P&L history in a CSV format for further analysis in spreadsheets.
Top Positions
Displays the largest holdings based on their total position value, ranked from highest to lowest.
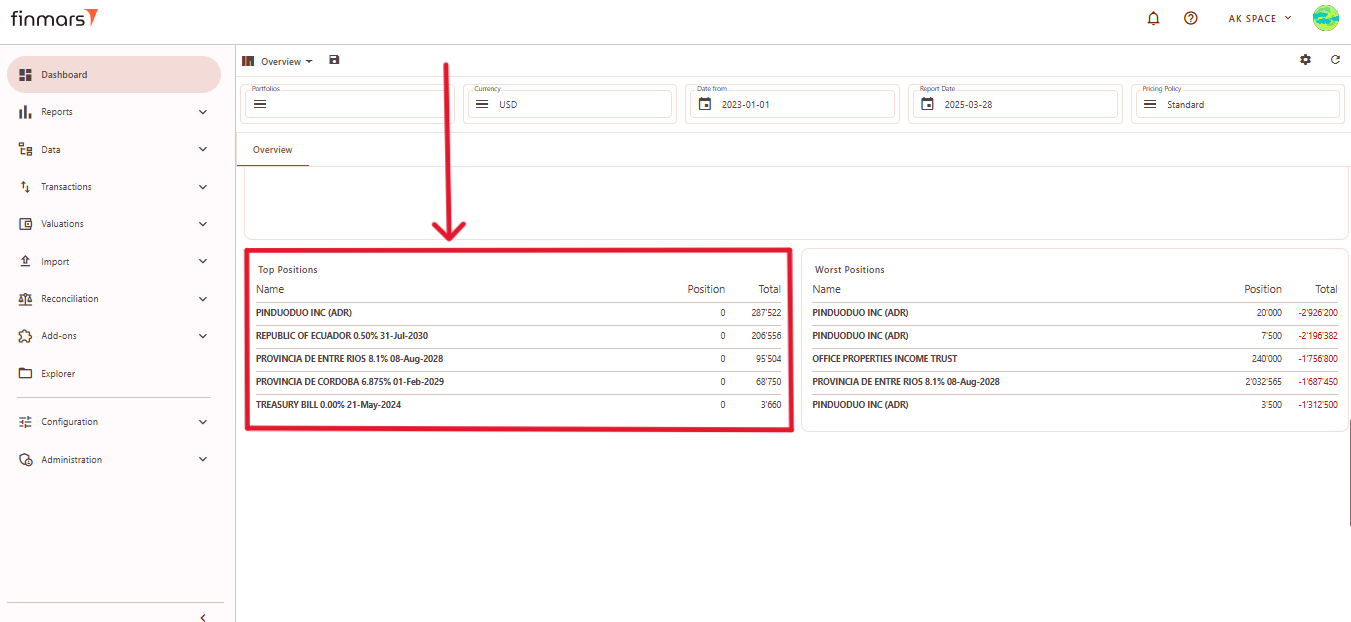
- Name – The name of the financial instrument.
- Position – The number of units held.
- Total – The total market value of the position.
Worst Positions
Displays the worst-performing positions sorted by total value (from lowest to highest).
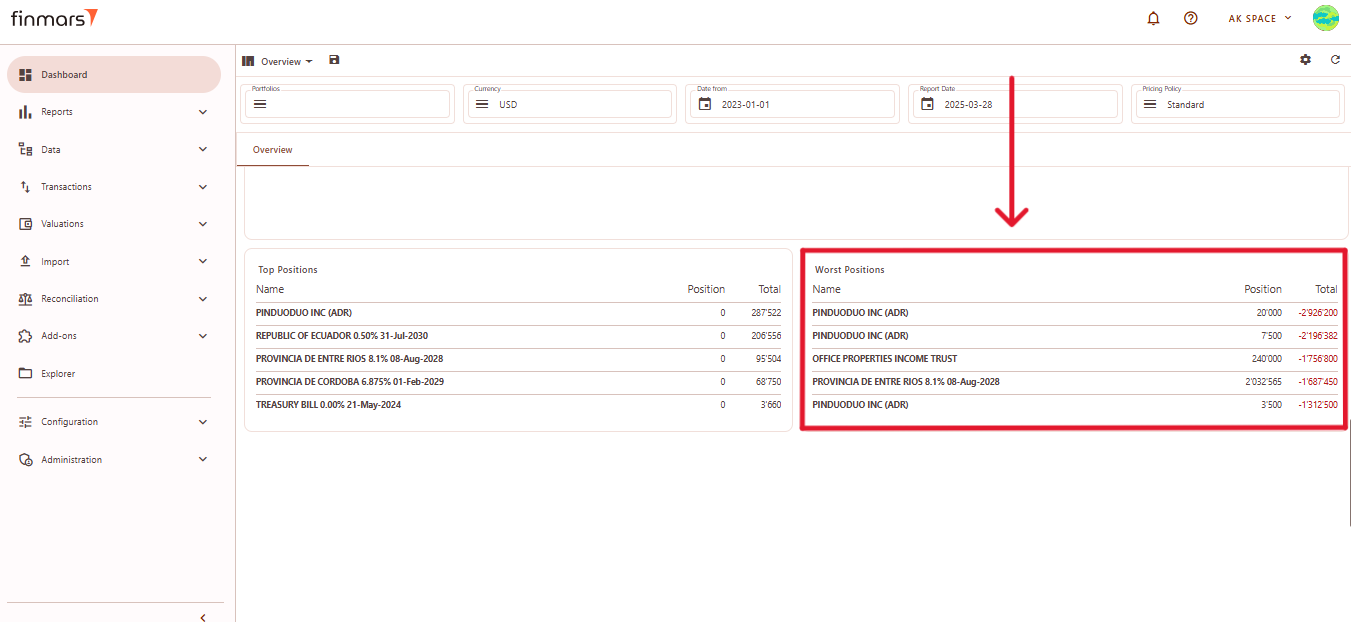
- Name – The name of the financial instrument.
- Position – The number of units held.
- Total – The total market value of the position, often displayed in red to indicate negative performance.
Balance Sheet (BS) Layout
The Balance Sheet (BS) layout provides an overview of asset distribution by different categories, such as countries, accounts, or asset types.
Filter Panel
At the top of the BS layout, the filter panel allows for the adjustment of key parameters:
- Portfolios – Select which portfolios to analyze.
- Currency – Choose the reporting currency.
- Report Date – will always display the balance as of the end of the selected day.
- Pricing Policy – Determines the valuation method for instruments.
Matrix
This section represents a Matrix Table where data is organized by category. This table is structured to analyze the distribution of value indicators across different regions.
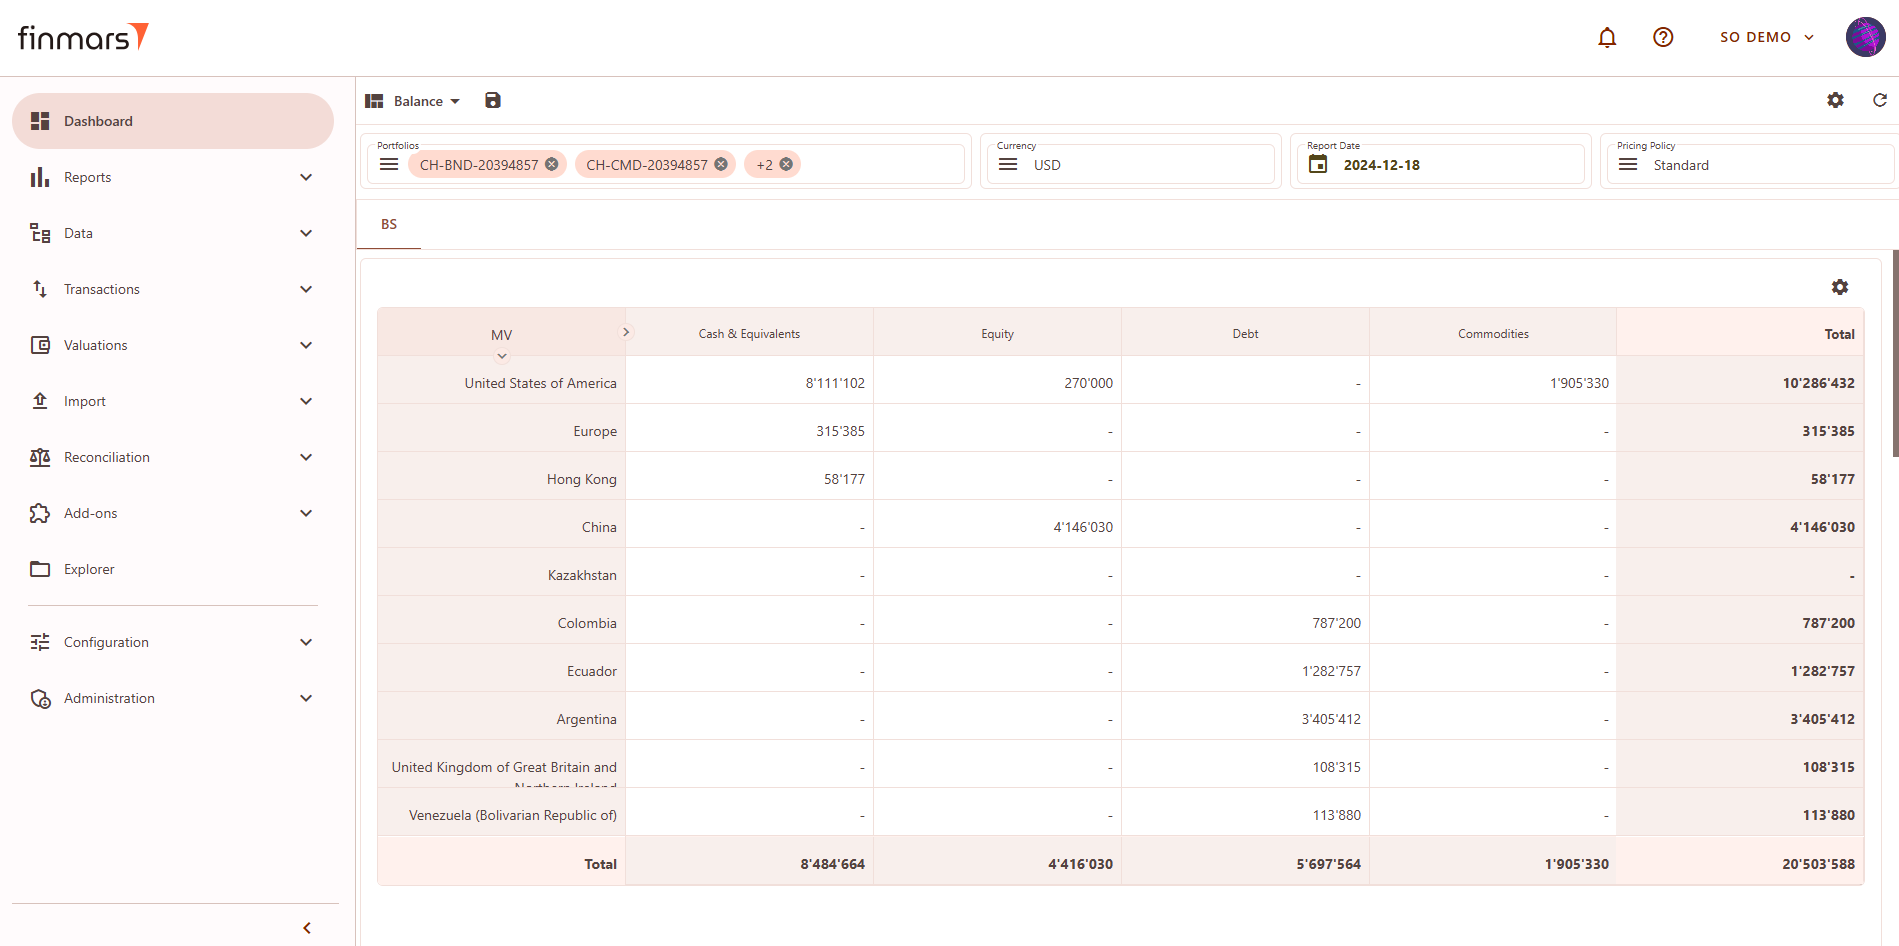
Matrix Component Editor
To customize the BS matrix, users can access the Matrix Component Editor by clicking on the settings icon in the top-right corner. The editor allows modifications to the data structure.
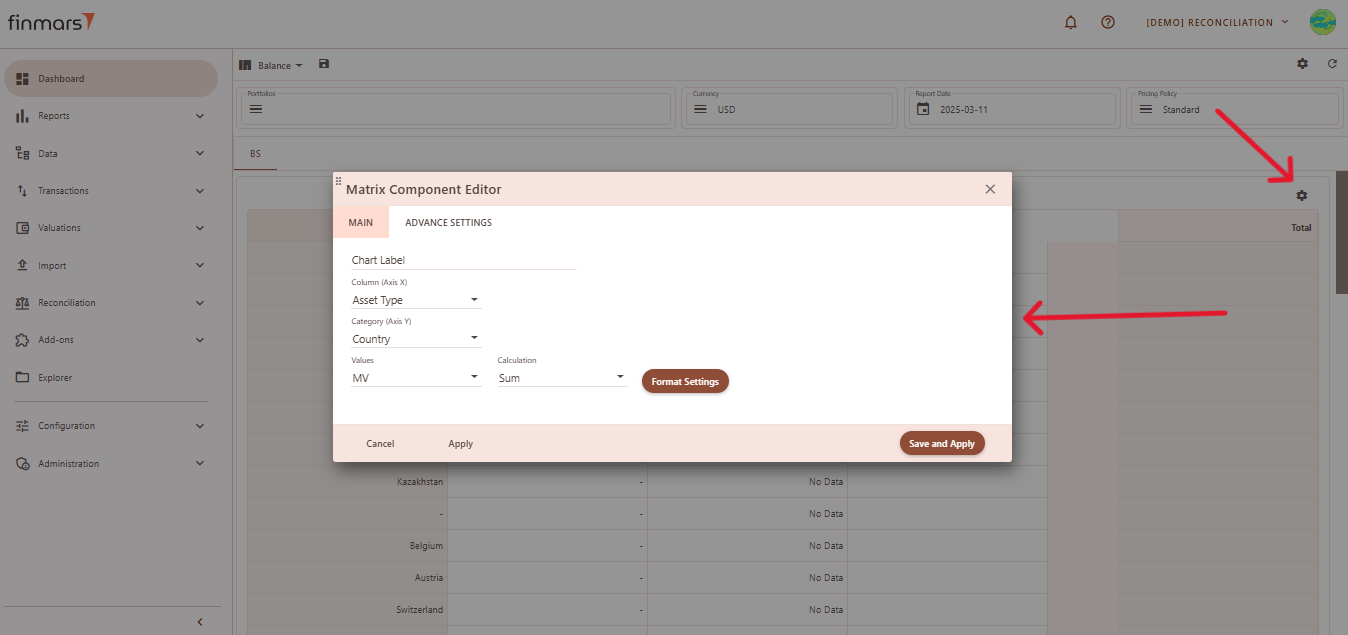
Customization Options:
- Main Tab
- Chart Label
- Column (X-Axis) – Defines default grouping criteria.
- Category (Y-Axis) – Selects default secondary grouping level.
- Values – Defines the key metric displayed in the table.
- Calculation Method – determines how the selected Value field (such as market value, exposure, or return) is calculated and displayed in the report. It defines whether the data will be shown as a simple sum, a weighted result based on the asset’s share in the portfolio, or as an average. For each method, there is also a corresponding percentage-based calculation, which expresses the result as a proportion of the total portfolio (e.g., total value or total exposure).
- Sum – a simple total of the selected value (e.g., market value or exposure), without considering weights.
- Weighted Market Value / Weighted Exposure – calculates the selected value (e.g., market value or exposure) multiplied by its weight (Market Value/Exposure).
- Weighted Market Value Percent / Weighted Exposure Percent – same as the weighted, but the result is expressed as a percentage of the resulting total value.
- Weighted Average Market Value / Weighted Average Exposure – the selected value weighted average (Market Value/Exposure fraction of their total).
- Weighted Average Market Value Percent / Weighted Average Exposure Percent – same as the weighted average, but the result is expressed as a percentage of the resulting total value.
- Advanced Settings Tab
-
Empty Data Handling – allows hiding empty columns, rows, or both to optimize matrix display.
-
Cell Text Alignment – supports alignment options such as right, center, and left.
-
Scale Matrix – ensures the matrix adjusts proportionally to fit the available space.
-
Auto Width for Name Column – automatically adjusts the width of the column containing names for better readability.
-
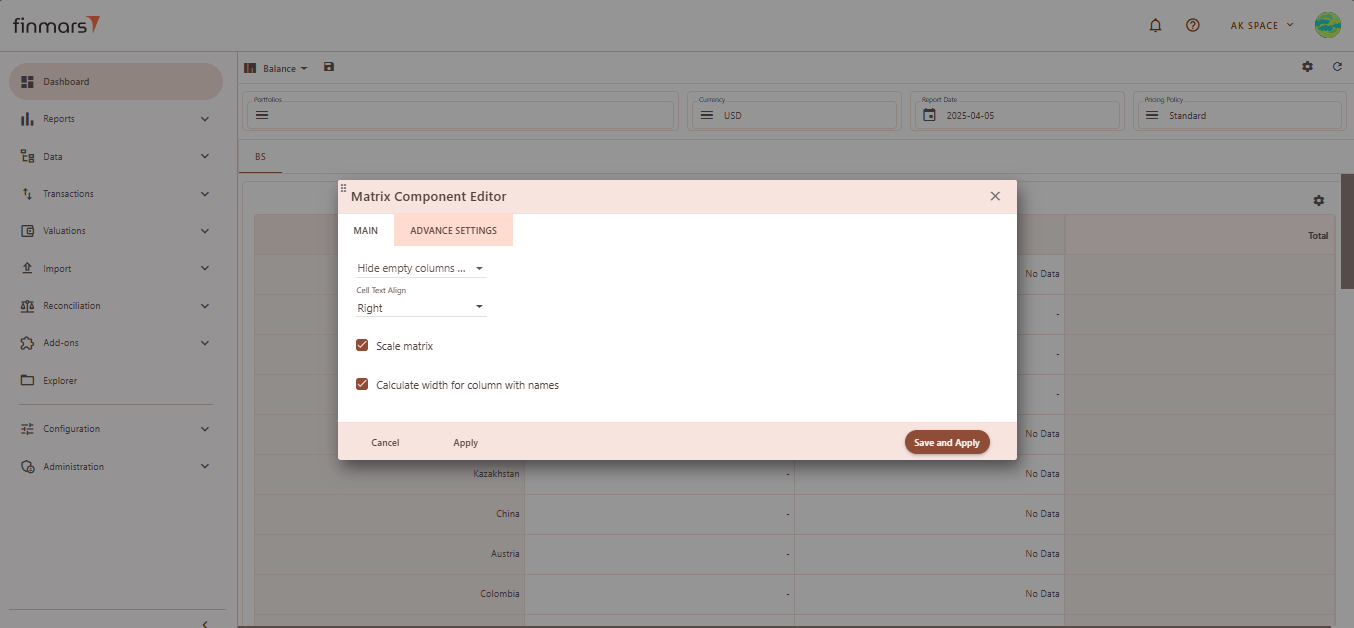
Balance Report
Linked to Matrix, if you click on matrix cell it will show related Balance Items. Details on use see in How to Check Balance Report.
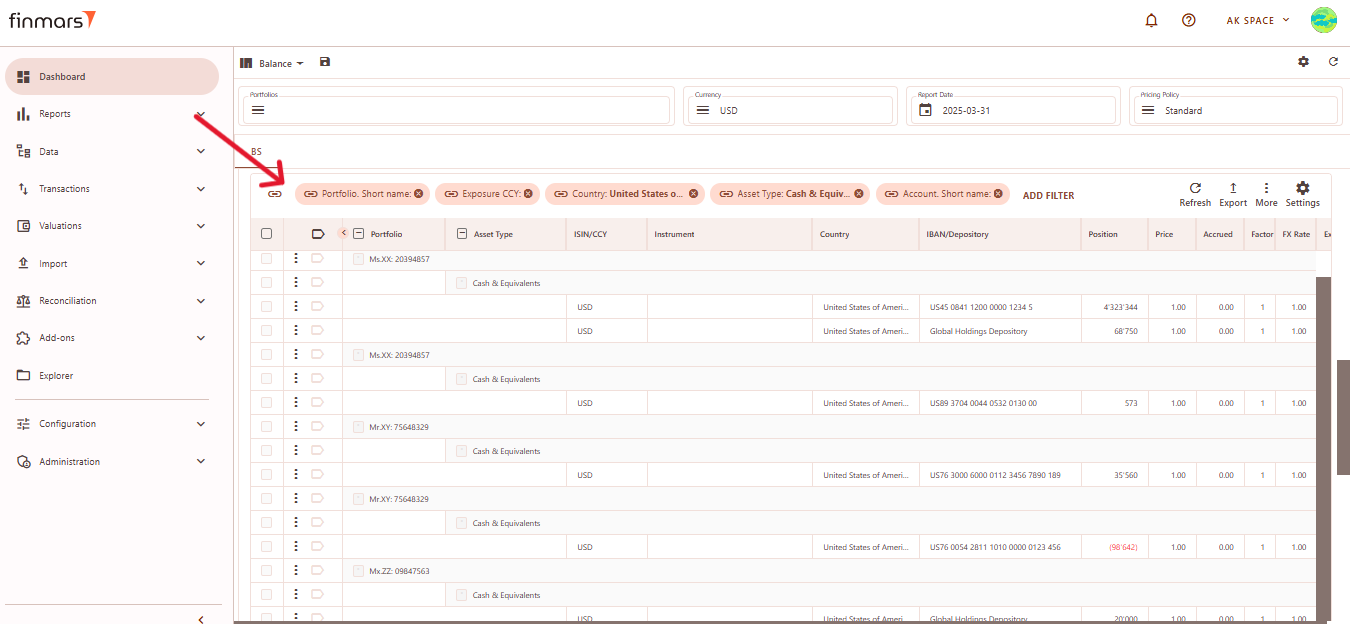
Linked Filters:
-
Portfolio Short Name – filters results by specific portfolio identifiers.
-
Exposure CCY – limits data to a particular exposure currency.
-
Country – shows results only for selected countries.
-
Asset Type – restricts the view to specific asset categories, such as "Cash & Equivalents."
-
Account Short Name – filters data by account identifiers.
Transaction Report
Linked to Balance Report, if you click on Balance Item it will show related Transactions. Details on use see in How To Check Transaction Report.
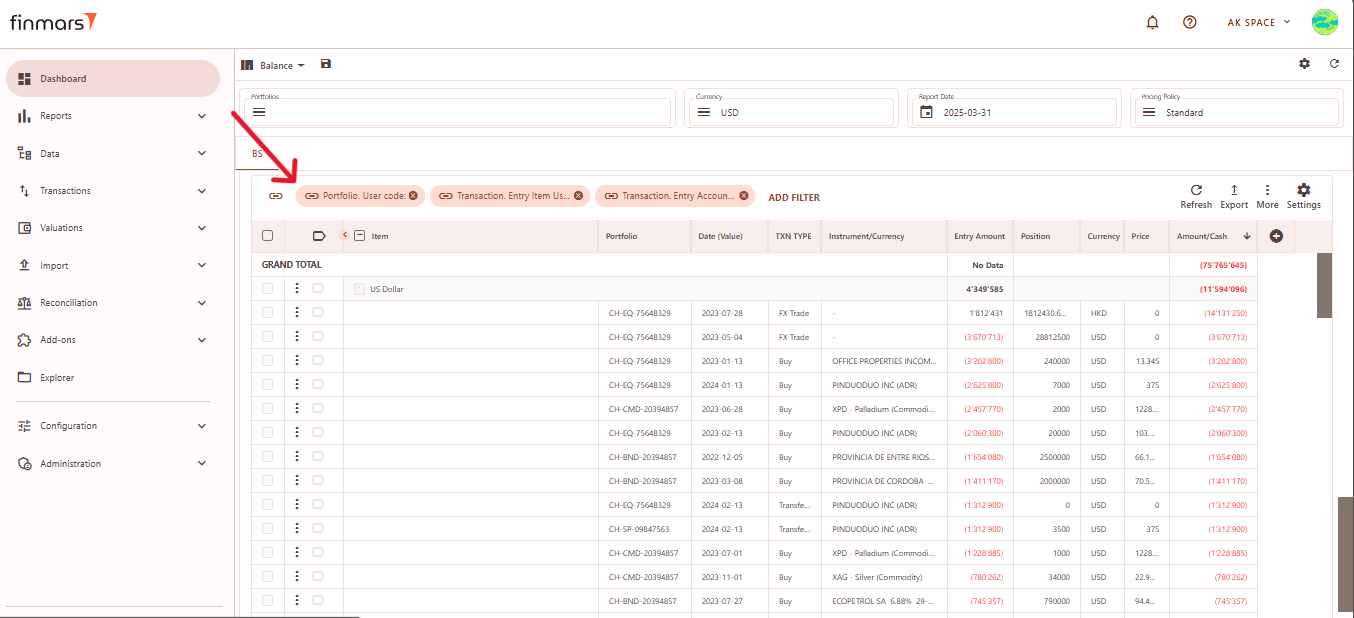
Linked Filters:
-
Portfolio User Code – filters transactions by specific portfolio identifiers.
-
Transaction Entry Item User Code – limits data to specific transaction entry items.
-
Transaction Entry Account – filters transactions based on specific accounts.
Profit & Loss (P&S) Layout
The P&L layout provides an overview of financial performance across different regions
Filter Panel
At the top of the P&L layout, you'll find the filter panel where you can adjust key parameters:
- Portfolios – Select which portfolios to analyze.
- Currency – Choose the reporting currency.
- Date From / Report Date – Define the time period for analysis. The Report Date will always display the balance as of the end of the selected day.
- Pricing Policy – Determines the valuation method for instruments.
Matrix
This section represents a P&L Matrix where data is presented by categories. The matrix is structured to provide a clear view of profit and loss results across different regions and financial instruments.
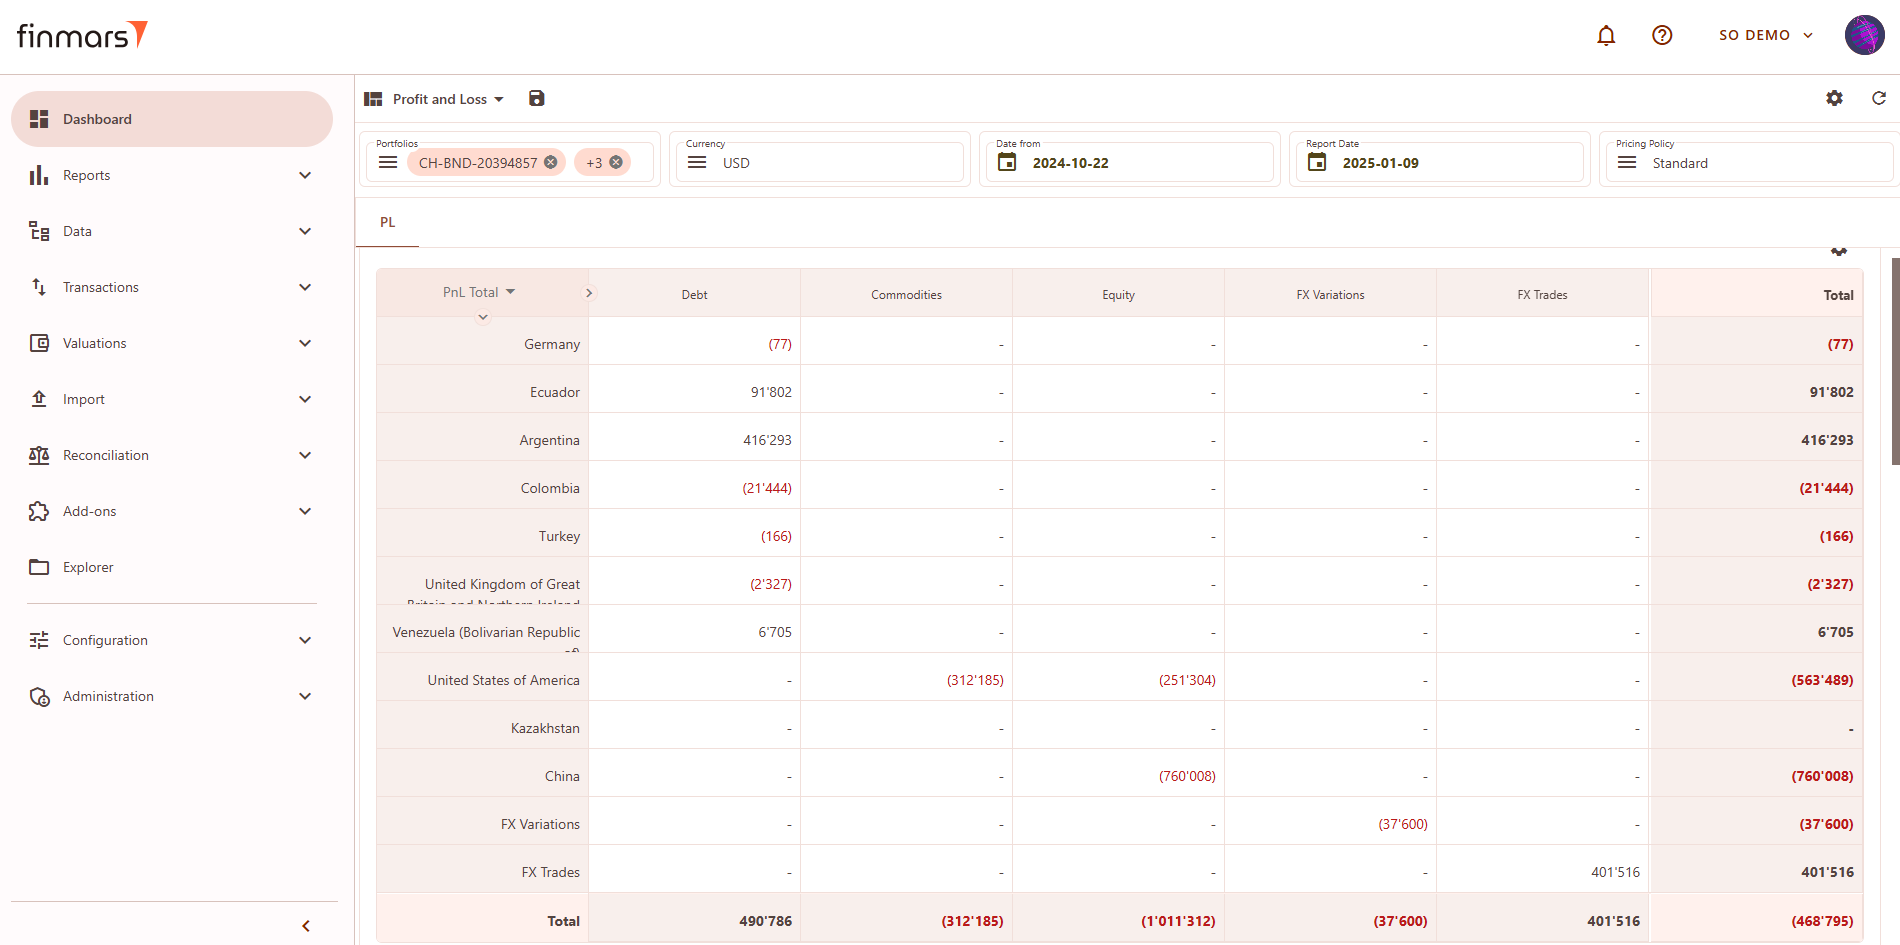
Matrix Component Editor (P&L)
To customize the P&L matrix, click the settings icon in the top-right corner. This editor allows modifications to the displayed data.
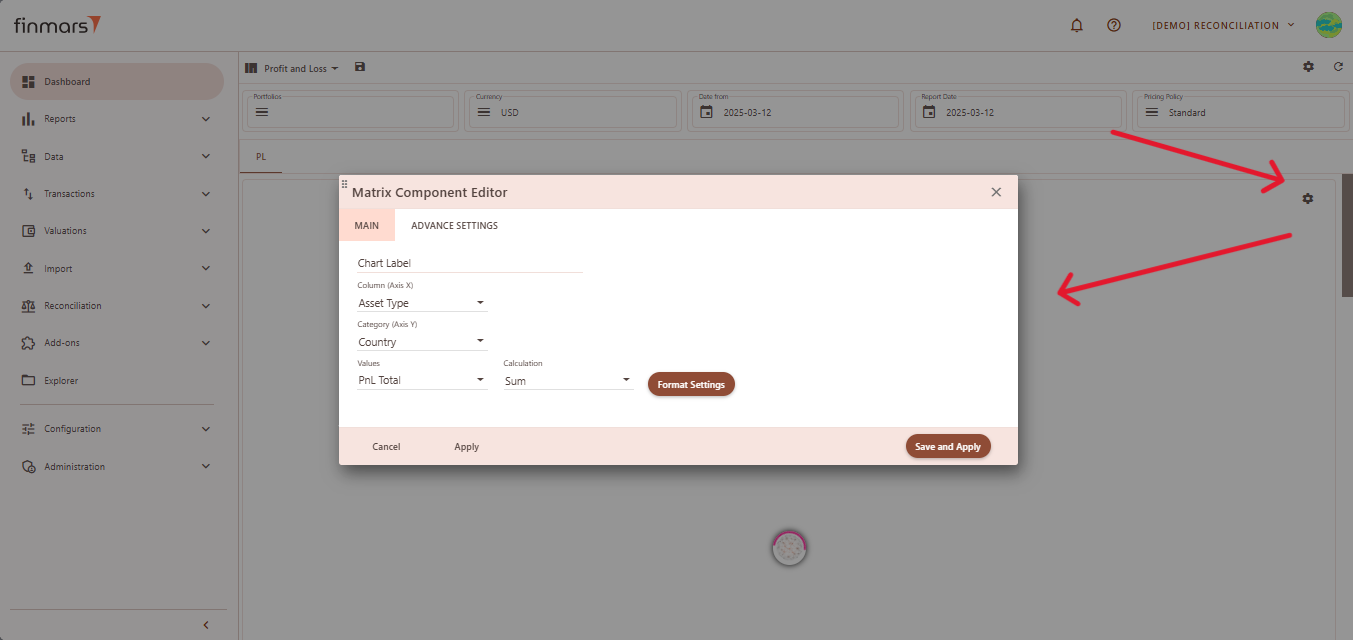
Customization Options:
- Main Tab
- Column (X-Axis) – Groups data by Asset Type, Country, Account, Portfolio, or PL Group.
- Category (Y-Axis) – Secondary grouping by Country, CCY, Account, Asset Type, or Portfolio.
- Values – Displays PnL Total (profit and loss) or MV (Market Value).
- Calculation Method – determines how the selected Value field (such as market value, exposure, or return) is calculated and displayed in the report. It defines whether the data will be shown as a simple sum, a weighted result based on the asset’s share in the portfolio, or as an average. For each method, there is also a corresponding percentage-based calculation, which expresses the result as a proportion of the total portfolio (e.g., total value or total exposure).
- Sum – a simple total of the selected value (e.g., market value or exposure), without considering weights.
- Weighted Market Value / Weighted Exposure – calculates the selected value (e.g., market value or exposure) multiplied by its weight (Market Value/Exposure).
- Weighted Market Value Percent / Weighted Exposure Percent – same as the weighted, but the result is expressed as a percentage of the resulting total value.
- Weighted Average Market Value / Weighted Average Exposure – the selected value weighted average (Market Value/Exposure fraction of their total).
- Weighted Average Market Value Percent / Weighted Average Exposure Percent – same as the weighted average, but the result is expressed as a percentage of the resulting total value.
- Advanced Settings Tab
-
Empty Data Handling – allows hiding empty columns, rows, or both to optimize matrix display.
-
Cell Text Alignment – supports alignment options such as right, center, and left.
-
Scale Matrix – ensures the matrix adjusts proportionally to fit the available space.
-
Auto Width for Name Column – automatically adjusts the width of the column containing names for better readability.
-
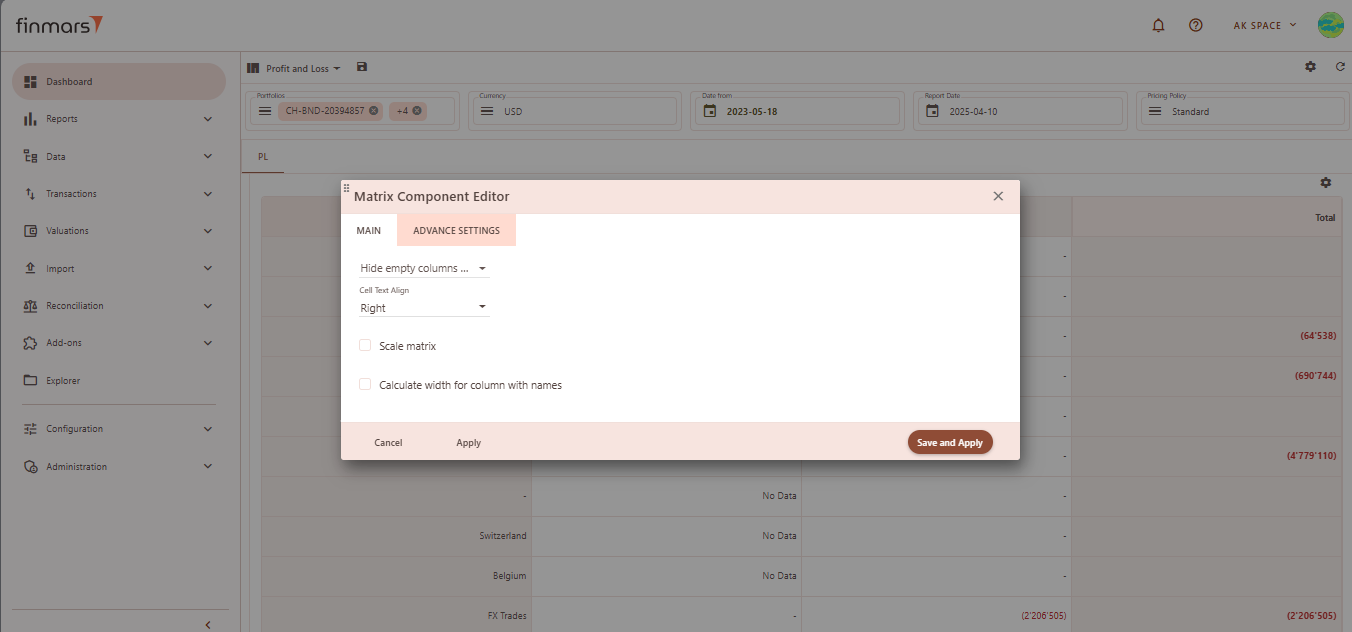
P&L Report
Linked to Matrix, if you click on a P&L Item, it will show related P&L items. For usage details, refer to How to Check Profit and Loss Report.
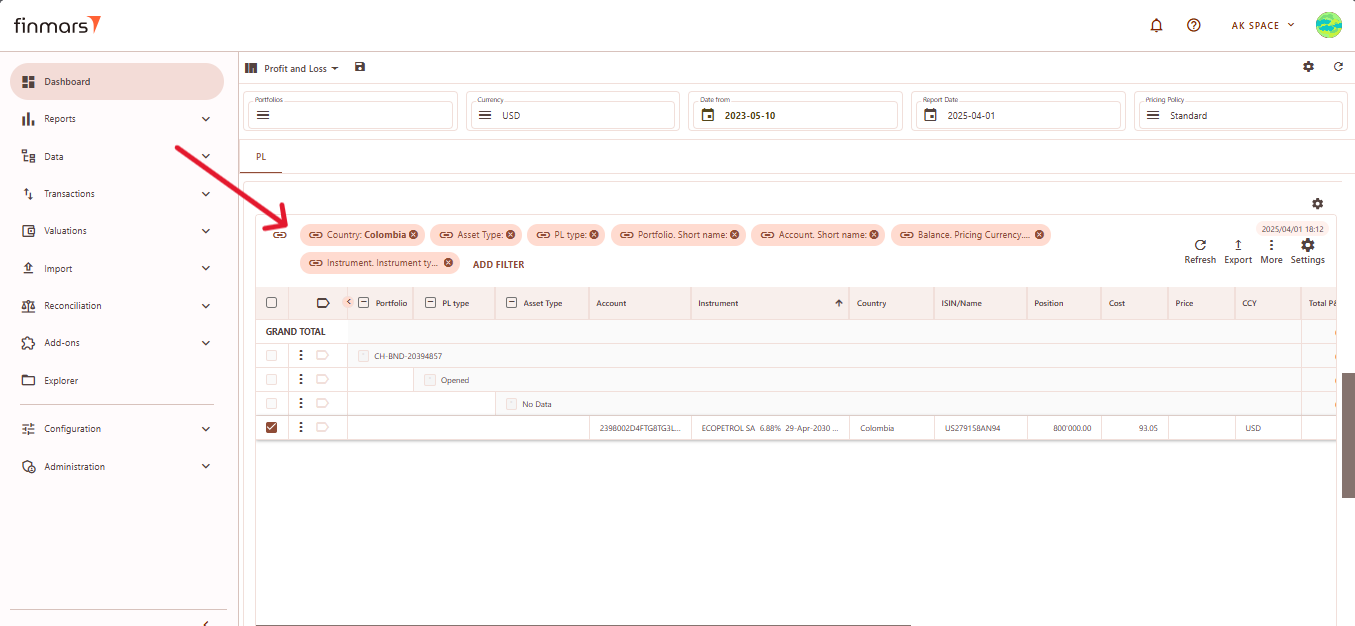
Linked Filters:
-
Country – Filters results based on the selected country.
-
Asset Type – Restricts the view to specific asset categories.
-
PL Type – Filters data by profit and loss type.
-
Portfolio Short Name – Filters results by specific portfolio identifiers.
-
Account Short Name – Limits the view to transactions within a selected account.
-
Balance Pricing Currency – Displays P&L details in the selected pricing currency.
-
Instrument Type – Filters results by specific instrument categories.
P&L Transactions Report
Linked to P&L Report, if you click on a P&L item, it will show related transactions.
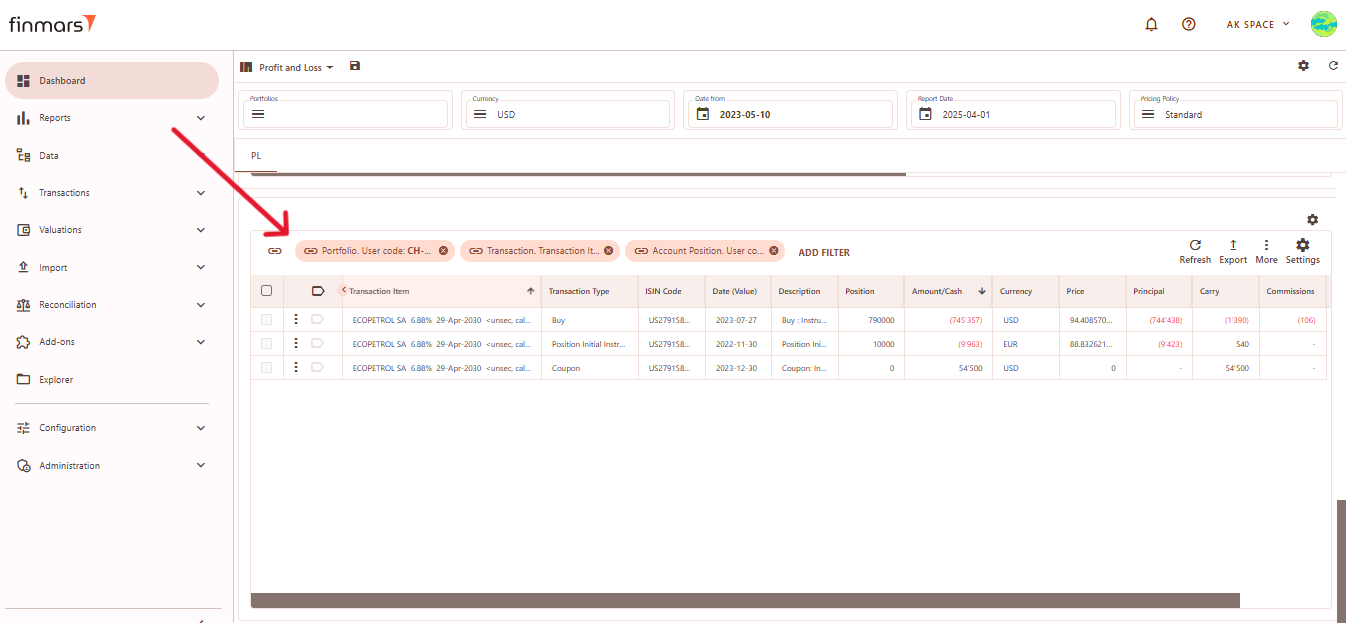
Linked Filters:
-
Portfolio User Code – Filters transactions by specific portfolio identifiers.
-
Transaction Entry Item User Code – Limits data to specific transaction entry items.
-
Transaction Entry Account Position User Code – Filters transactions based on specific account positions.
Maturity Layout
Maturity layout provides insights into financial instruments based on their maturity dates.
Filter Panel
At the top of the Maturity layout, you'll find the filter panel where you can adjust key parameters:
-
- Portfolios – Select which portfolios to analyze.
- Currency – Choose the reporting currency.
- Report Date – will always display the balance as of the end of the selected day.
- Pricing Policy – Determines the valuation method for instruments.
- Upper Section – Displays instruments sorted by maturity, including days to maturity, date, type, market value, price, position, and FX rate.
- Lower Section – Similar to the upper table but filtered by portfolio.
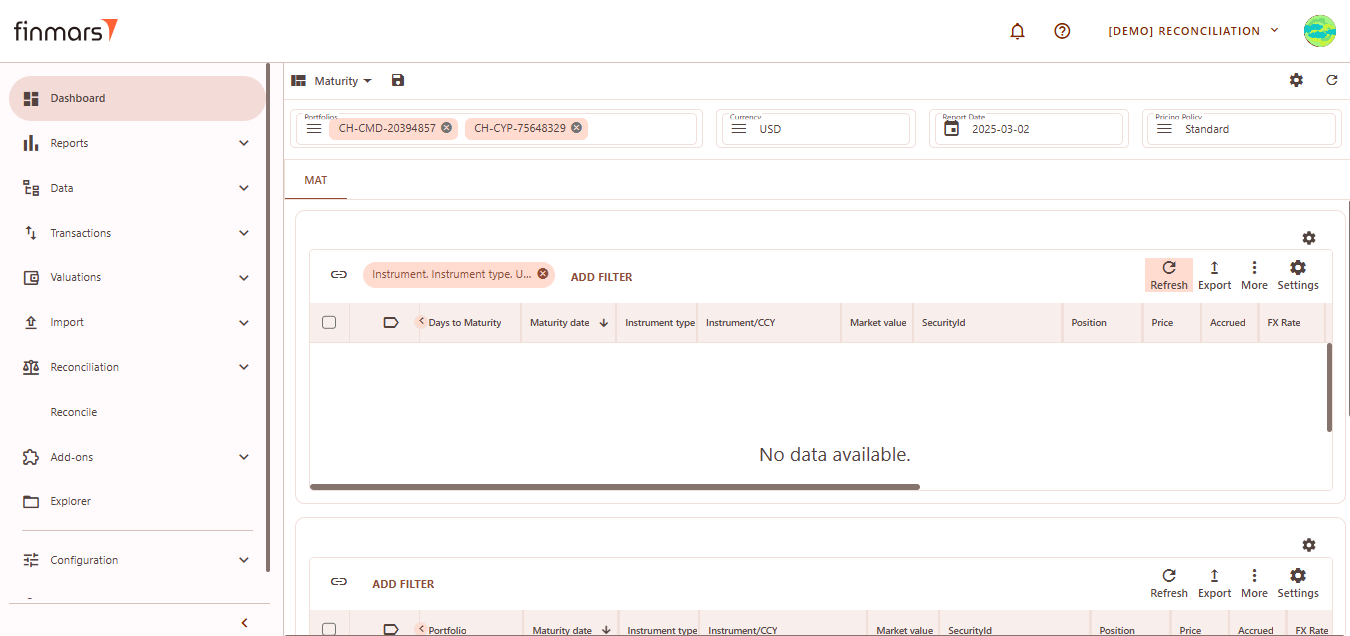
Configuration Helper Layout
The Configuration Helper layout provides various system tools for managing workflows, performing calculations, importing/exporting data, and running analytics.
General Tab
The Configuration Helper layout contains sections with workflows. Each workflow includes a description and tooltips for fields. Below is an overview of its sections:
STD Manual Import Layout
The STD Manual Import layout provides a structured interface for manually uploading key financial data files into the system.
See How to Import Files in PMS Core and PMS Plus
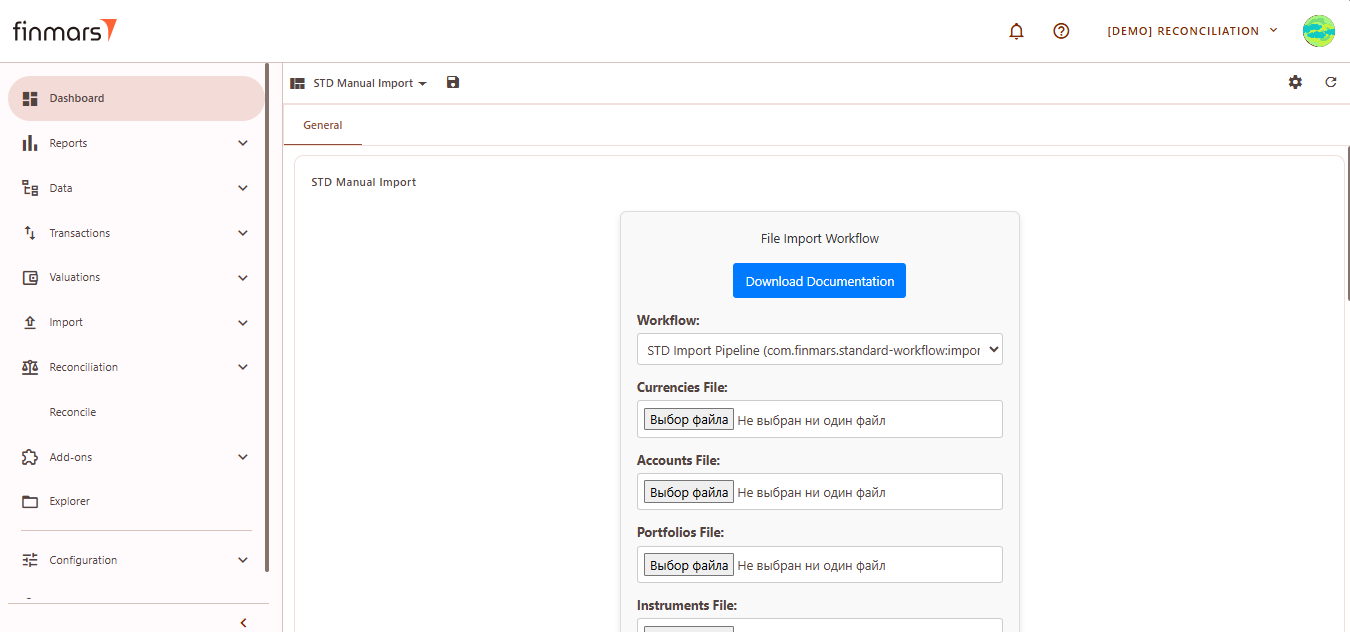
Use Mobile App [TO BE UPDATED]
Prerequisites
We assume you have all prerequisites you may need, including:
- Get Access to Finmars
- Link with Finmars ID
- Install PMS Core or PMS Plus add-on
- How to Import Files in PMS Core and PMS Plus
- How to Do Calculations for YTM and Modified Duration
- How to Do Calculations for Performance (Modified Dietz)
- Calculate data for Mobile/Dashboards
Use Mobile App
Step 1. Download the Finmars App. The Finmars app is available on both the Google Play Store (for Android) and the App Store (for iOS). Download and install the app on your mobile device.
To use the app, you need to have an account on EU Central. You can sign up or log in at Central Finmars.

Step 2. Once you have an account, open the Finmars app, and you will see a "Welcome to Finmars" screen. Make sure to select "Europe (eu-central)" as your region. Then, tap the "LOGIN" button to proceed.
Step 3. After selecting the region, you will be redirected to the login page. Enter the Username and Password you used during registration. (Optional) Check "Remember me" if you want to stay logged in. Click the "LOGIN TO YOUR ACCOUNT" button to proceed.
Step 4. After logging in, you will be redirected to the space selection page. Here, you will see a list of spaces that you have created in your workspace. Select the desired space from the list and click the "Start" button to proceed.

Step 5. After successfully logging in and selecting your workspace, you will be directed to the Balance tab. This is the main dashboard where you can view an overview of your investment portfolio and its distribution across different asset classes.
Main Page
After registering in Finmars, you will land on the main page, where you can find key information about your investment portfolio.
- In the top-right corner, you can adjust the report settings:
-
Report Date – Select the date for which you want to view data.
-
Currency – Choose the currency in which data will be displayed (USD, EUR, etc.).
-
Time Range Options:
-
YTD – Year-to-date
-
MTD – Month-to-date
-
QTD – Quarter-to-date
-
Daily – Current day
-
All time – Entire history
-
Custom – Set your own period
-
-
- "Total" Section-displays the total value of all your assets.
- "Portfolios" Section-lists all your active portfolios along with their current value.
- "Worst Performers" Section-highlights the investments that have performed the worst over the selected period. Each position includes:
-
Asset name (e.g., Pinduoduo Inc, Palladium USD, etc.)
-
Current loss (negative value)
-
Position size (e.g., 7,500 shares)
-
Depository or account type
-
Unique position identifier
-
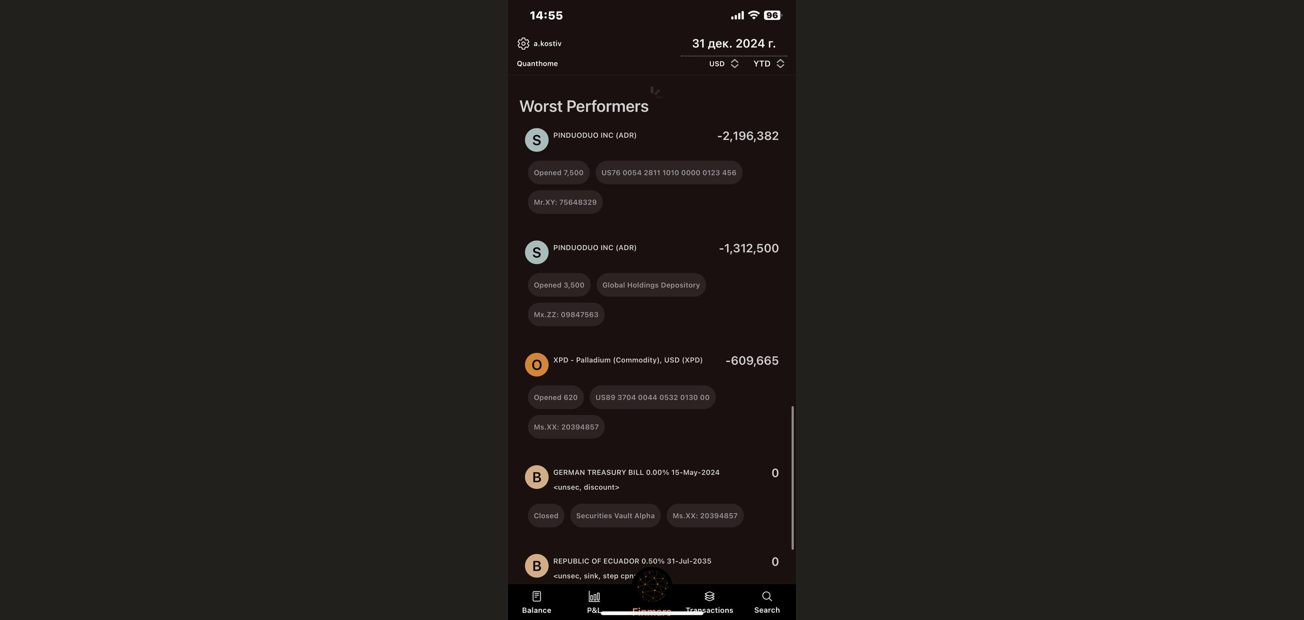
- "Best Performers" Section. This section showcases the assets that have generated the highest returns.
-
Asset name
-
Current profit (positive value)
-
Position size
-
Depository or account type
-
Unique position identifier
-
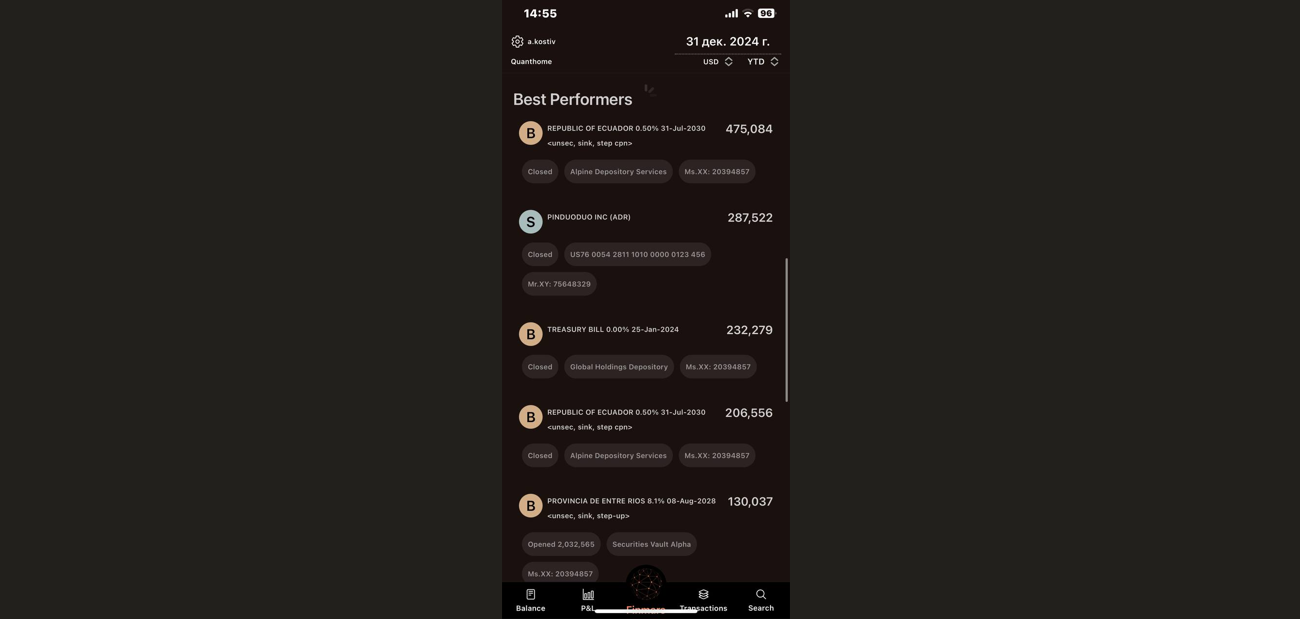
Settings Menu
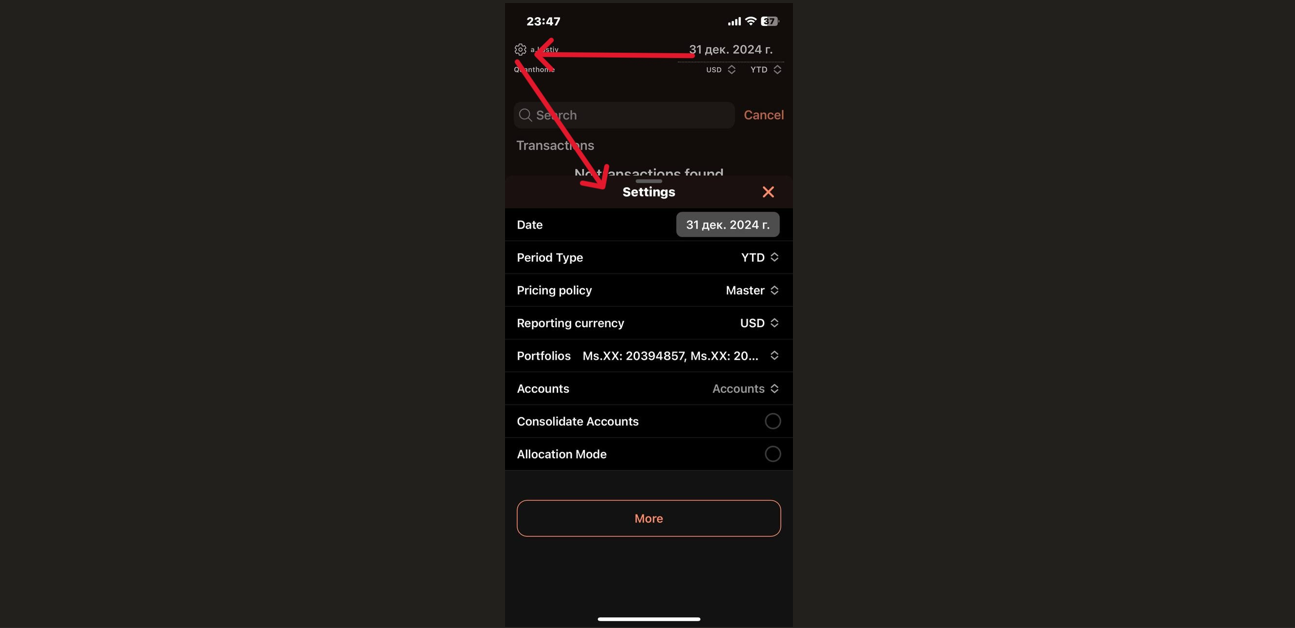
- Date Selection- choose a specific date for generating financial reports.
- Period Type- select reporting periods such as YTD (Year-to-Date), MTD (Month-to-Date), QTD (Quarter-to-Date), Daily or All-Time.
- Pricing policy- define how asset pricing is calculated (Master or other policies).
- Reporting Currency- set the preferred currency for displaying portfolio values (USD, EUR, etc.).
- Portfolio & Accounts Management:
-
View and manage multiple portfolios and accounts in one place.
-
Option to consolidate accounts for an aggregated financial view.
-
- Additional Settings- more customization options available via the “More” button.
The Balance Tab
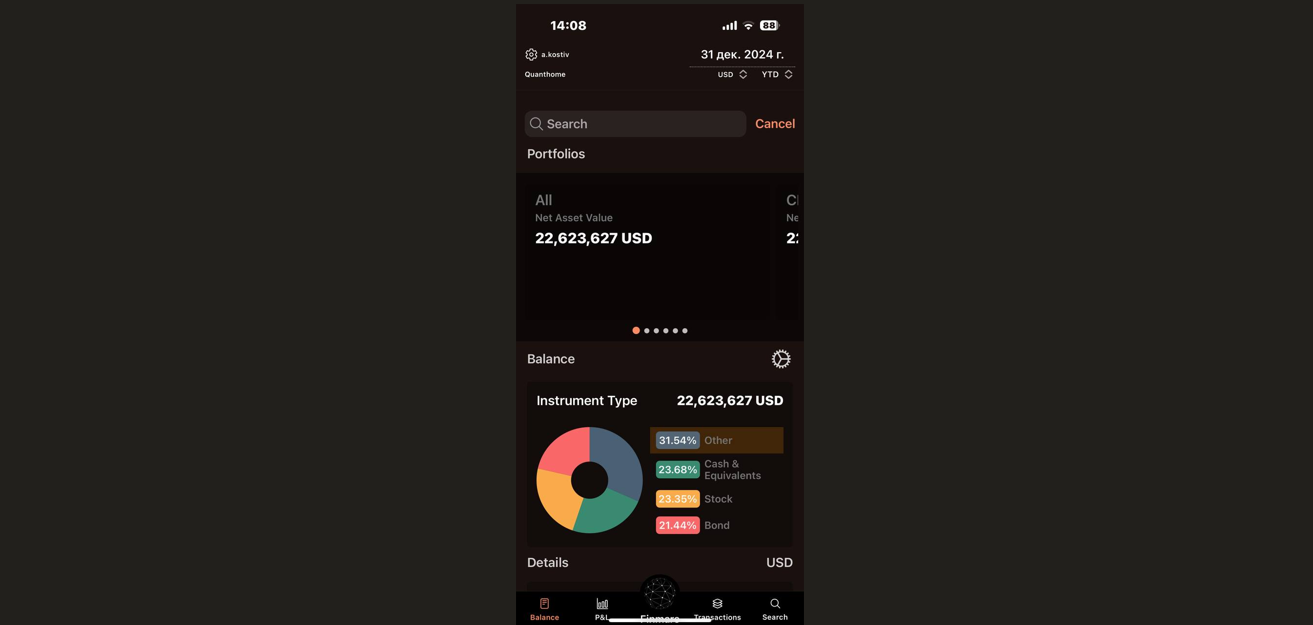
The Balance tab consists of the following sections:
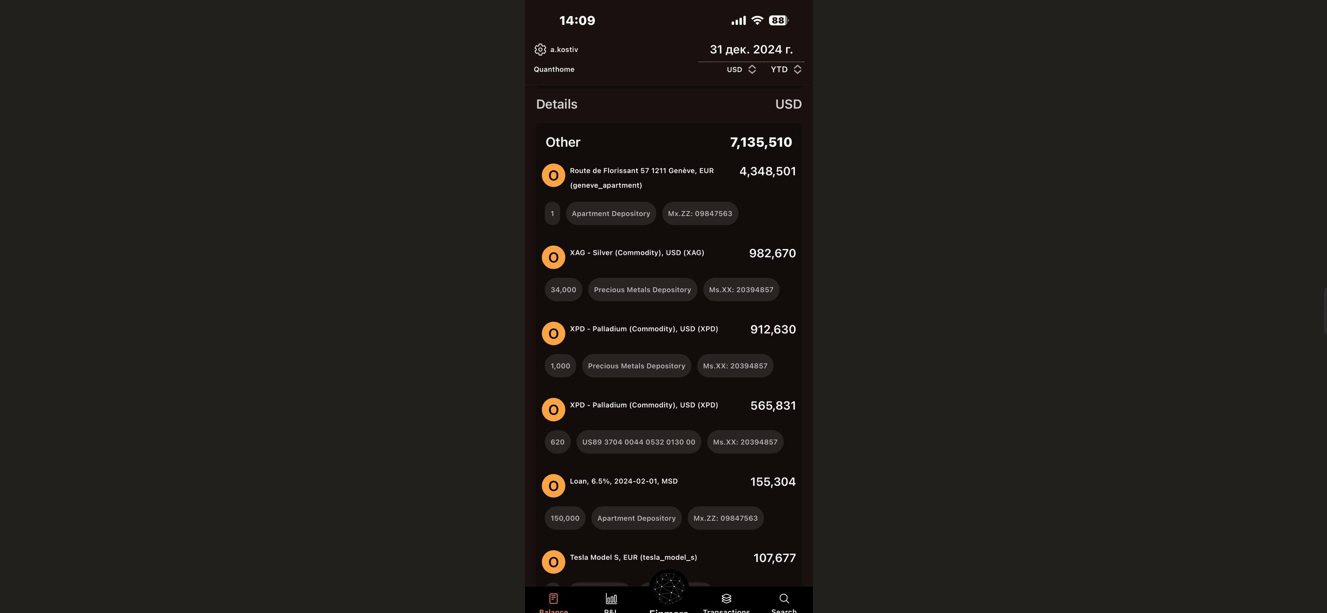
The P&L Tab
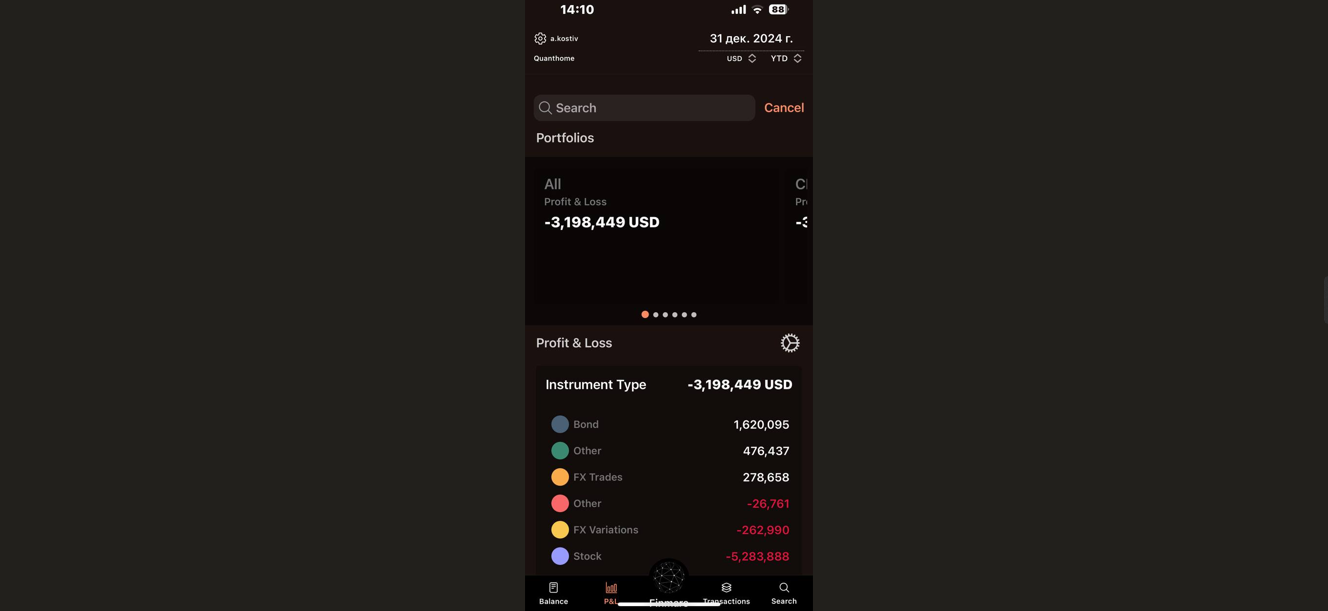
- Portfolio Overview- displays a list of portfolios along with their respective Profit & Loss values.
- Metrics Section- shows key performance indicators for the selected date.
At the top of the screen, you can modify:
-
Date of the report – Adjust to a different reporting period.
-
Currency – Change the display currency (e.g., USD, EUR, etc.).
-
Performance period – Adjust the timeframe (e.g., YTD - Year to Date).
Transactions Tab
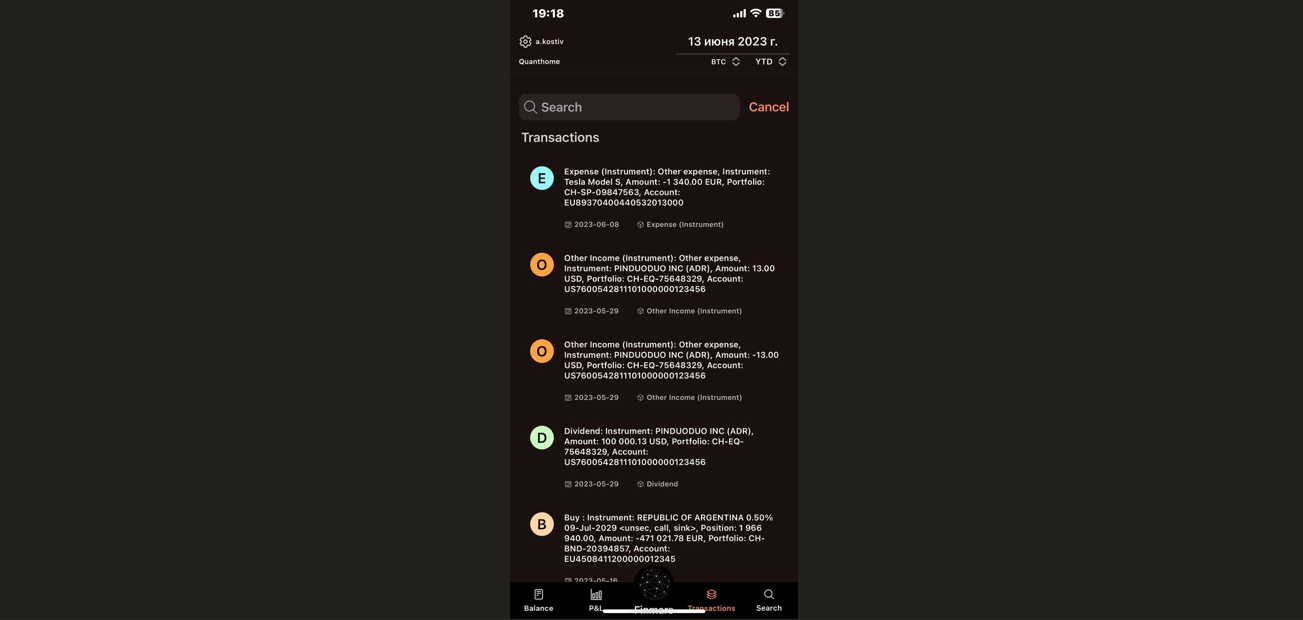
The Transactions tab in Finmars provides a detailed history of all financial activities within your investment portfolios. This section helps you track every expense, income, dividend, or trade in a structured format.
At the top of the screen, you will find a search bar that allows you to filter transactions based on keywords such as:
-
Asset name (e.g., "Tesla Model S", "PINDUODUO INC")
-
Transaction type (e.g., "Dividend", "Buy", "Expense")
-
Portfolio or account numbers
Transaction Type:
-
E (Blue) – Expense (e.g., fees, withdrawals, asset depreciation)
-
O (Orange) – Other Income (e.g., interest payments, refunds)
-
D (Green) – Dividend (profit distribution from stocks)
-
B (Brown) – Buy (purchase of an asset)
Detailed Transaction Information:
-
Instrument (Asset Name) – The name of the stock, bond, or other financial instrument (e.g., "Tesla Model S", "PINDUODUO INC (ADR)").
-
Amount – The transaction amount, including the currency (e.g., -1,340.00 EUR, 13.00 USD).
-
Portfolio & Account Number – The unique identifiers for the portfolio and account associated with the transaction.
-
Date – The date the transaction was executed (e.g., "2023-06-08").
Search Tab
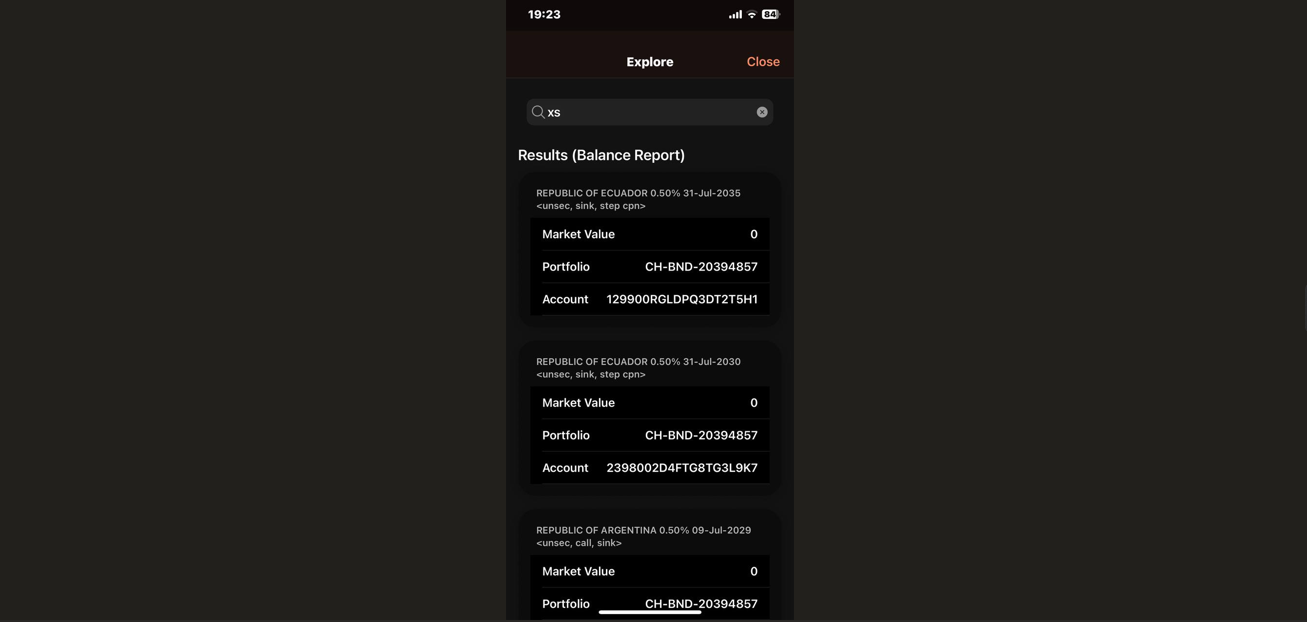
The Search tab in Finmars allows users to quickly find specific assets, transactions, or reports across their portfolios. This feature provides an efficient way to navigate large datasets and locate relevant financial details.
-
It enables users to enter keywords such as asset names, portfolio IDs, account numbers, or transaction types.
-
As you type, results dynamically update to match your query.
Duplicate the Layout
Prerequisites
We assume you have all prerequisites you may need, including:
Duplicate the Layout
- Go to the layout list. Click on the layout name to open the dropdown menu. Choose the layout you want to duplicate (for example, Profit and Loss).

- In the dropdown menu, select "Make a Copy" to create a duplicate of the selected layout.

- To confirm that the copy was successfully created, check the selected layout name at the top. It should indicate that it is a copy (e.g., Profit and Loss_copy).

- After copying, you can Rename the new layout for clarity and organization. Click on the Rename option.

- A dialog box will appear where you can enter any desired name for the copied layout. Also, you can change configuration and user code.

- After choosing a new name, click Save to confirm the changes.

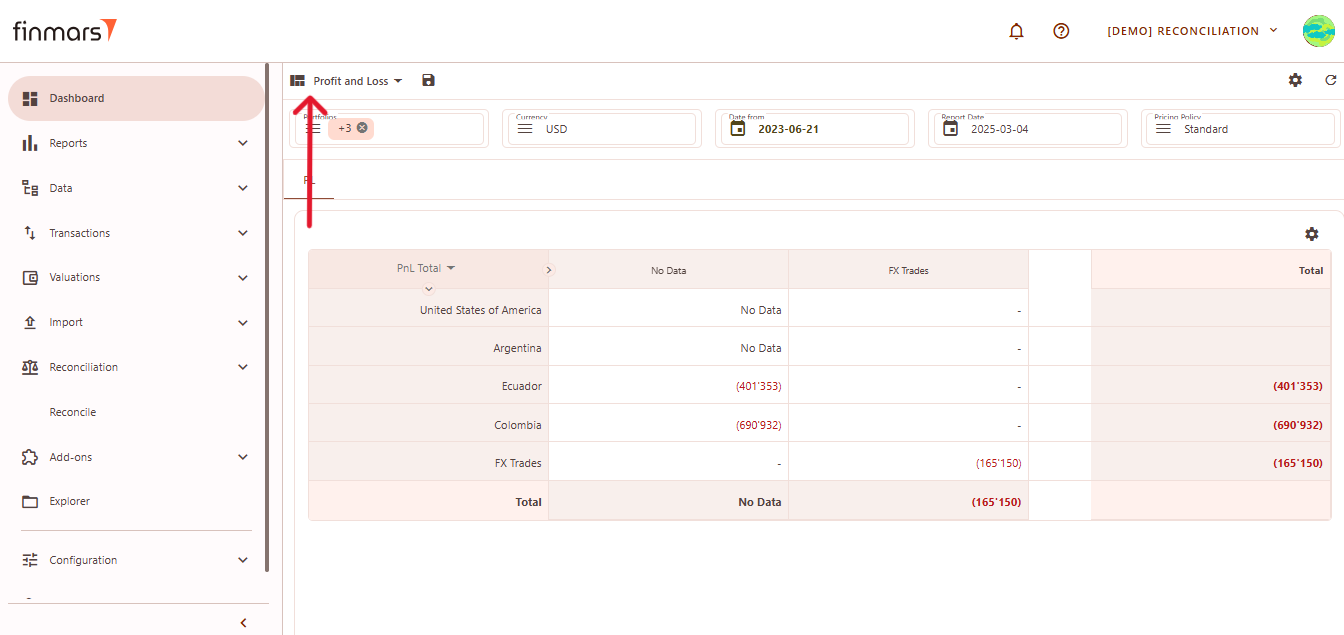
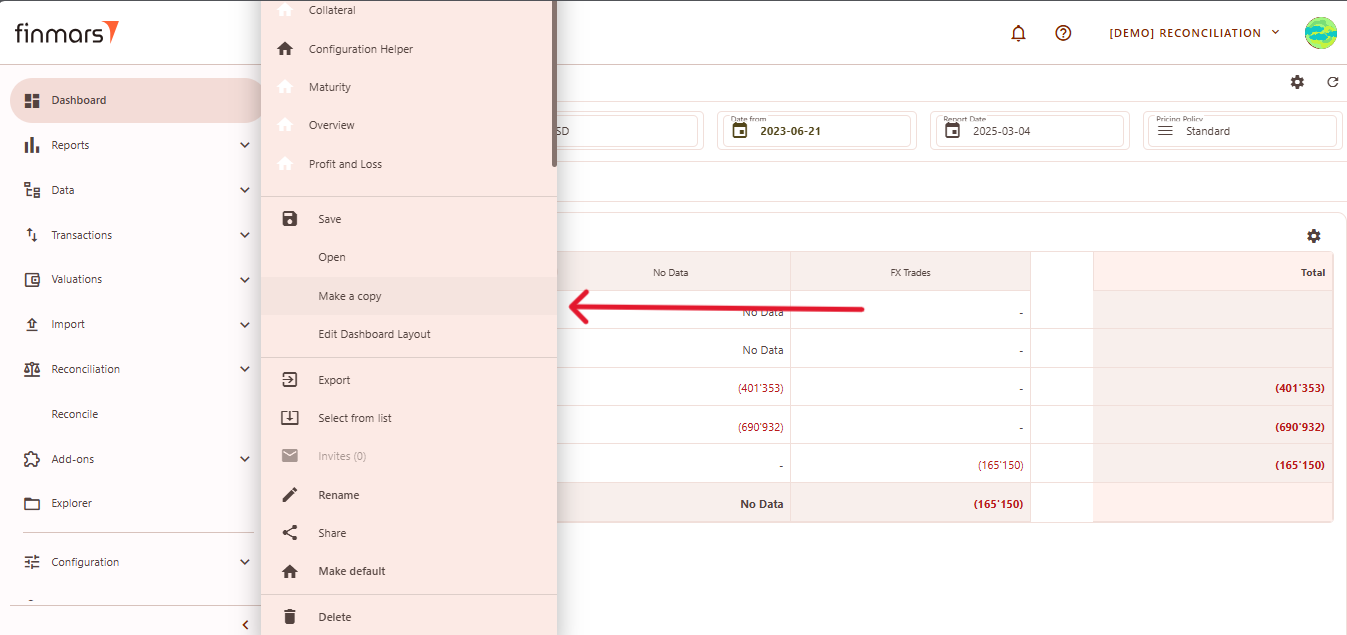
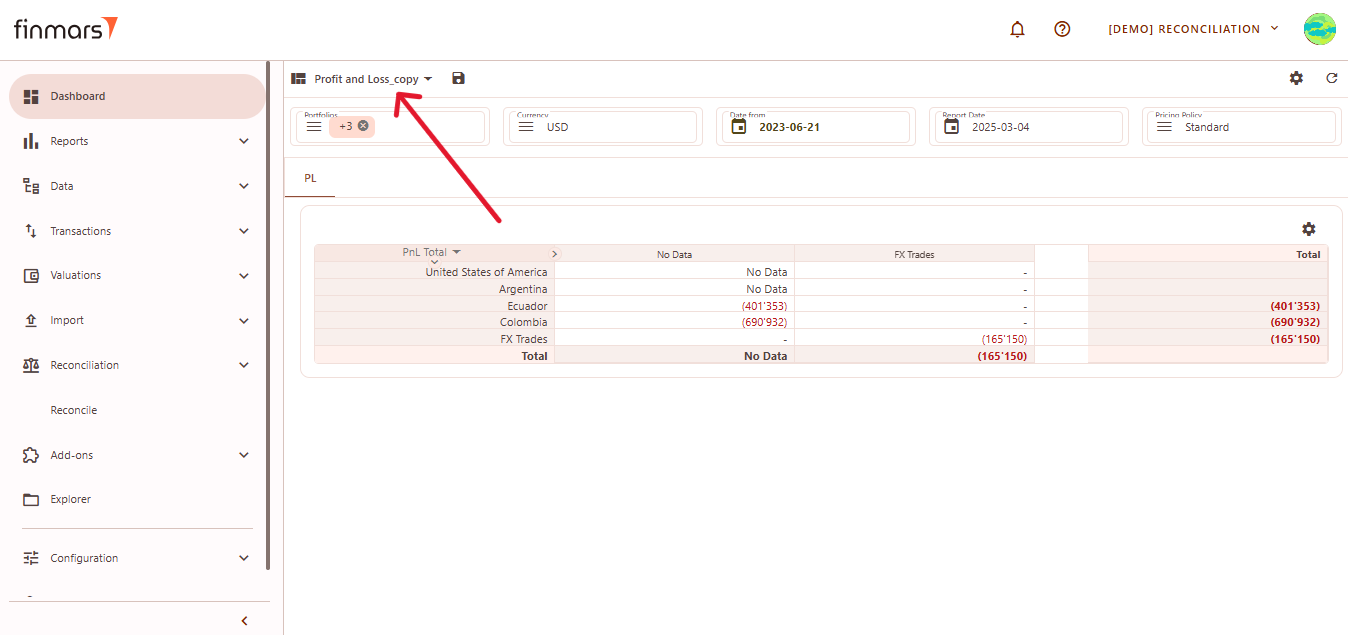
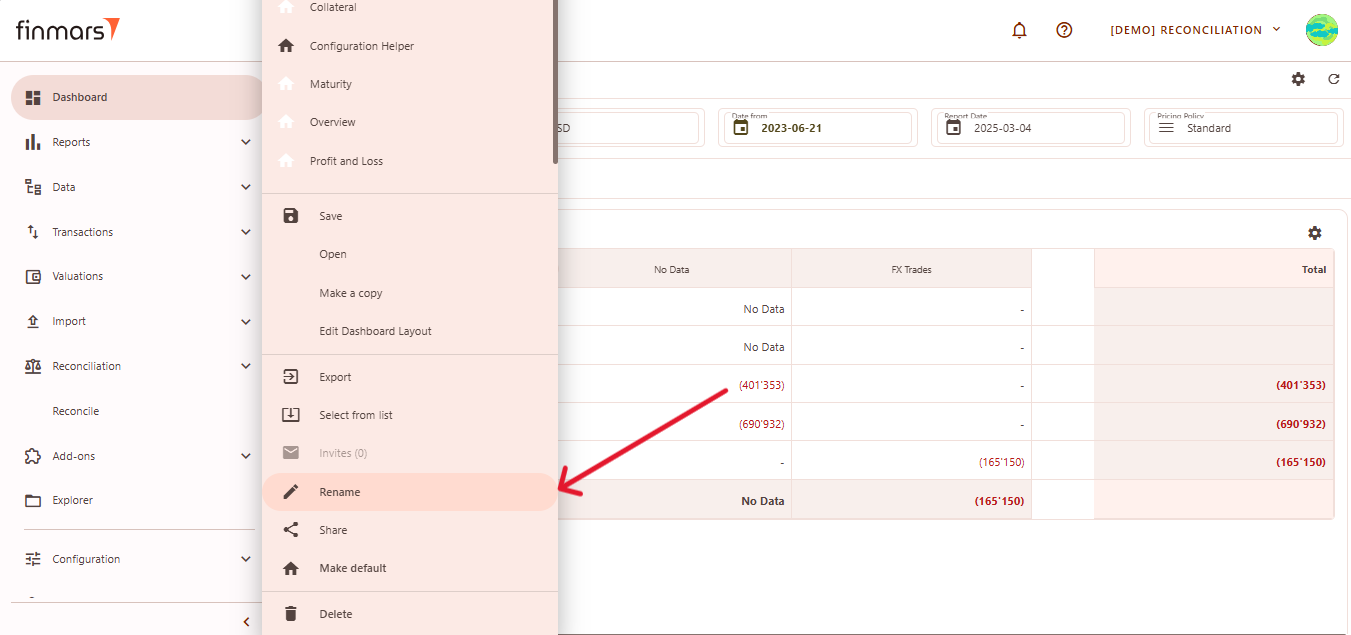
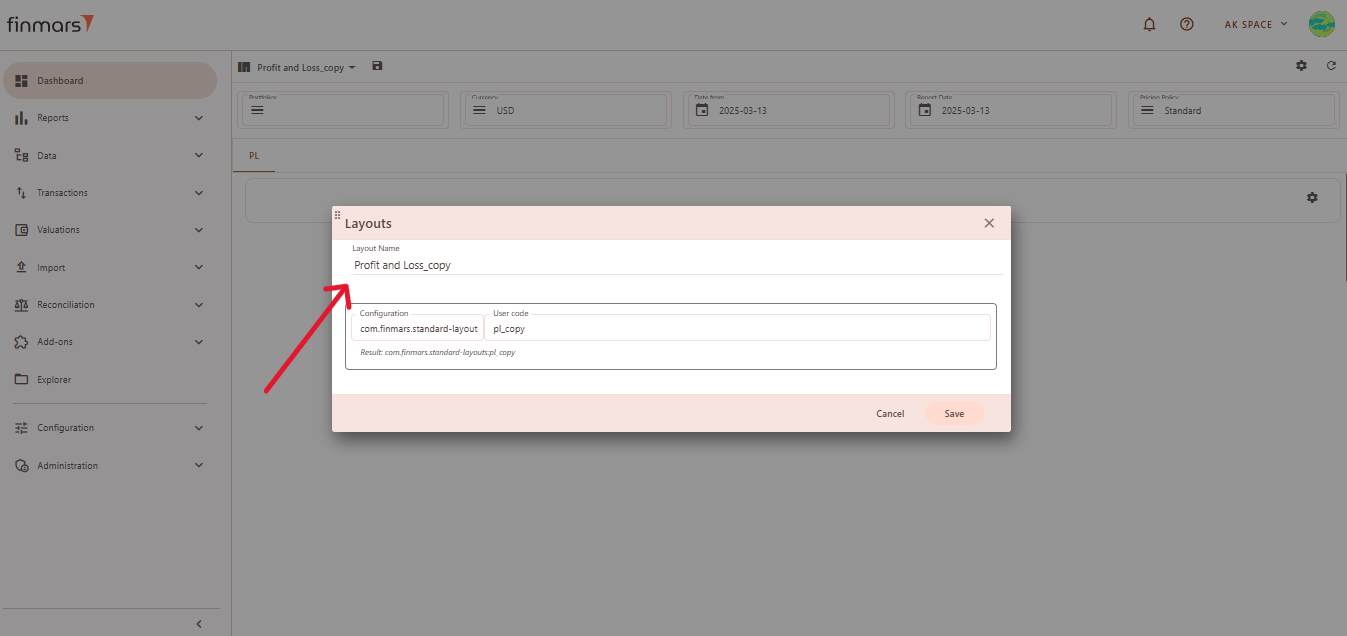
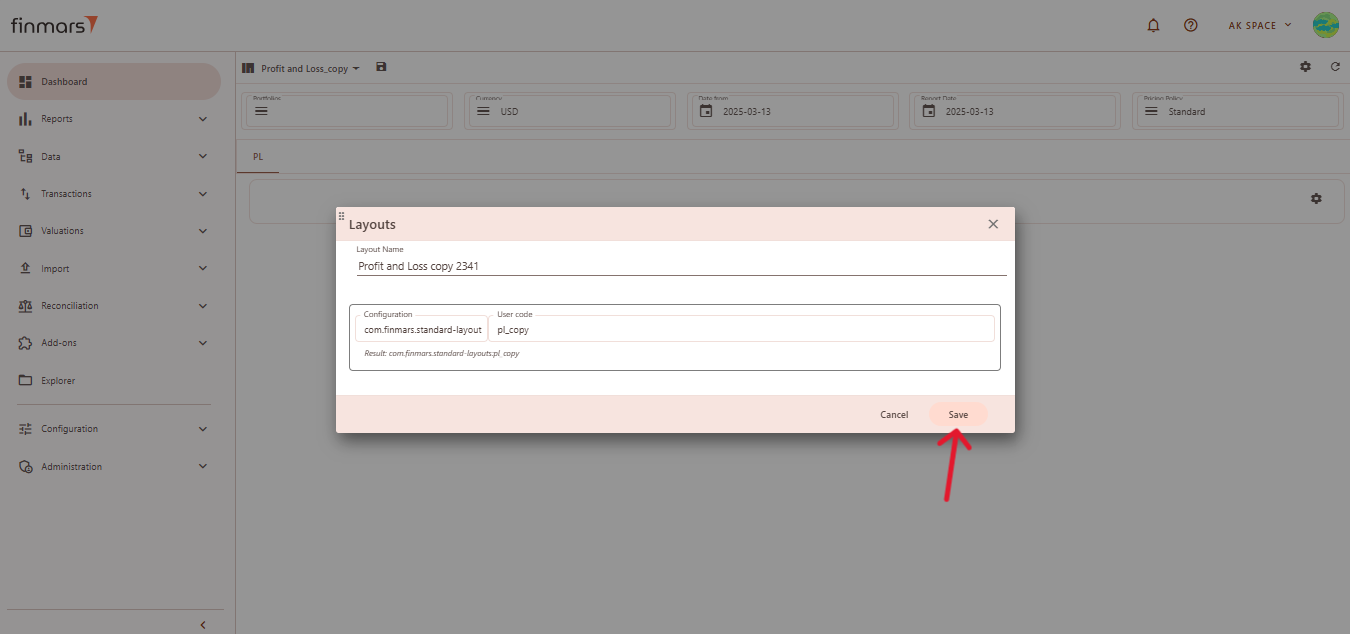
Get License for add-on [TO BE UPDATED]
Prerequisites
We assume you have all prerequisites you may need, including:
- Get Access to Finmars
- You have the internet access
Getting License for add-ons
- As of now contact sales@finmars.com