# Installation Guide
Initial proxy server setup and configuration
# APISIX Setup
## Finmars APISIX Setup Guide
### Abstract
As result of that instruction you will have proxy to Exante Broker
e.g. https://exante-proxy.client.com where client.com your domain
### Prerequisites
Before starting make sure you have the following:
1. A machine running Linux with Ubuntu 22.04.
2. Docker installed on your machine.
3. A public IP address.
4. Generated API keys in Exante Account Page
5. You need to convert `API Key` and `Secret Key` to Basic Auth Token String (Use any public base64 encoder, in other words it should be `base64(api_key + ":" + secret_key)` )
### Steps to Set Up APISIX
1. **Run the APISIX Docker Container:**
```bash
docker run -d --name apache-apisix -p 9080:9080 -p 9443:9443 -e APISIX_STAND_ALONE=true apache/apisix
```
2. **Create the `apisix.yaml` Configuration File:**
Create a file named `apisix.yaml` with your desired configuration.
3. **Copy the `apisix.yaml` File to the APISIX Container:**
```bash
docker cp apisix.yaml apache-apisix:/var/tmp/
```
4. **Move the `apisix.yaml` File to the APISIX Configuration Directory:**
```bash
docker exec -i apache-apisix sh -c 'cp /var/tmp/apisix.yaml /usr/local/apisix/conf/'
```
5. **Reload the APISIX Configuration:**
```bash
docker exec -it apache-apisix apisix reload
```
### Setting Up HTTPS
If you want your APISIX instance to listen for HTTPS connections, follow these additional steps:
1. **Obtain an SSL Certificate:**
Get or create an SSL certificate and export it along with its private key to PEM format.
2. **Update `ssls.yaml`:**
Put the PEM contents into the corresponding sections of `ssls.yaml`.
3. **Include SSL Configuration in `apisix.yaml`:**
Add the contents of `ssls.yaml` to `apisix.yaml` before the `#END` instruction.
---
```yaml
apisix:
node_listen: 9080 # HTTP inbound port
ssl:
enable: true
listen:
- port: 9443 # HTTPS inbound port
enable_http3: false
consumers:
- username: finmars # client name
plugins:
basic-auth:
username: foo # inbound credentials, that you will pass to Finmars IT Team
password: bar
# upstream.yaml
upstreams:
- id: 1
nodes:
api-demo.exante.eu:443: 1
scheme: https
pass_host: node
type: roundrobin
- id: 2
nodes:
api-live.exante.eu:443: 1
scheme: https
pass_host: node
type: roundrobin
# plugin_config.yaml
plugin_configs:
- id: 1
plugins:
basic-auth: {}
proxy-rewrite:
headers:
set: # credentials used to connect to api-demo.exante.eu # Basic Auth string from API key and Secret Key
Authorization: "Basic NDQ3YTIxNzEtYWNkMi00N2Q0LWEyOWYtOTk4ZTA5YzQ2Njk0OkJSMUpEQk9NUGdXVmxpN2wyeDBW"
regex_uri:
- "^/demo/(.*)"
- "/$1"
- id: 2
plugins:
basic-auth: {}
proxy-rewrite:
headers:
set: # credentials used to connect to api-live.exante.eu # Basic Auth string from API key and Secret Key
Authorization: "Basic NDQ3YTIxNzEtYWNkMi00N2Q0LWEyOWYtOTk4ZTA5YzQ2Njk0OkJSMUpEQk9NUGdXVmxpN2wyeDBW"
regex_uri:
- "^/live/(.*)"
- "/$1"
# routes.yaml
routes:
- uris:
- /demo/md/*/accounts
- /demo/md/*/symbols/*
- /demo/md/*/summary/*
- /demo/md/*/ohlc/*
- /demo/md/*/transactions
- /demo/trade/*/orders/*
upstream_id: 1
plugin_config_id: 1
- uris:
- /live/md/*/accounts
- /live/md/*/symbols/*
- /live/md/*/summary/*
- /live/md/*/ohlc/*
- /live/md/*/transactions
- /live/trade/*/orders/*
upstream_id: 2
plugin_config_id: 2
#END
```
## Also part if you dont have nginx proxy
```yaml
# ssls.yaml
ssls:
- id: 1
snis:
- test.com # hostname where apisix instance is running
cert: |
-----BEGIN CERTIFICATE-----
MIICojCCAYoCCQDoby1LjeWcZzANBgkqhkiG9w0BAQsFADARMQ8wDQYDVQQDDAZS
T09UQ0EwIBcNMjQwNzEyMjE1MjEzWhgPMjEyNDA2MTgyMTUyMTNaMBMxETAPBgNV
BAMMCHRlc3QuY29tMIIBIjANBgkqhkiG9w0BAQEFAAOCAQ8AMIIBCgKCAQEAzs5Y
uQvVwF3CFbNlJPk8OO7QlKA8UuapWdSKgT59Vqnkk0/7dfUHfP6pOFG8kxQexZBG
uxbID+nCM175pJyjXjd2mZngtj2E1l3vUHOH6hhE0o5xLAgrDbBxgHnMZHyh/4xz
quXgho0nv1R0i+OcIou4viyDp4BslYBJUONskEihOyUTJaSUS6zR6Q1aABEVEgYi
OF9Wyr2tJ58jTlrRvFgrsDXeOoyf81diAmWePg4mETanejbaDBhtCQH8PllFfU1b
TeqqZXRAdEOkbV23o4BfPYPB73Px1bdo0u/wGZTTY2DKQwd9QPg8fg0dT8dvegke
3dUUx/XozqekMt3w2QIDAQABMA0GCSqGSIb3DQEBCwUAA4IBAQAnBUBhEnk2zjP5
P9AJ/2cwfrQSBJ/Bti5vW/xAAEAWxOWqpccdsenr9/T8D4n1g5SZJeXhmRWdvSdB
pYbUrOa4ISjpvotxze4dCOhQo2EO9XupQZPKbioyZTWJczwgxmccdKLH8uJD2llZ
e/JKVfFH7AxO9Cz9I3+oyfEehPjemb5dJg/HQa+nWCC7ic7tC4mvd72GyGqAUb4e
omhzWfmSsDxQpmJauA6uW0swfH+Ws+id6YhwArsxgMYcwURQ6L1YeaXKs3kTRnrN
9XVOTt1NQ0aHPlBo4kGDujJ+aCfH9bReFbwa1CV6nS6wDqXuOSWEkKa69hXI3Wzp
gv0mZ+28
-----END CERTIFICATE-----
key: |
-----BEGIN RSA PRIVATE KEY-----
MIIEpAIBAAKCAQEAzs5YuQvVwF3CFbNlJPk8OO7QlKA8UuapWdSKgT59Vqnkk0/7
dfUHfP6pOFG8kxQexZBGuxbID+nCM175pJyjXjd2mZngtj2E1l3vUHOH6hhE0o5x
LAgrDbBxgHnMZHyh/4xzquXgho0nv1R0i+OcIou4viyDp4BslYBJUONskEihOyUT
JaSUS6zR6Q1aABEVEgYiOF9Wyr2tJ58jTlrRvFgrsDXeOoyf81diAmWePg4mETan
ejbaDBhtCQH8PllFfU1bTeqqZXRAdEOkbV23o4BfPYPB73Px1bdo0u/wGZTTY2DK
Qwd9QPg8fg0dT8dvegke3dUUx/XozqekMt3w2QIDAQABAoIBAHZaPQhZr5CRl7tX
mXDZeg+TDKeiNCO1ggG40zM4Ef8A56EuytgszIZKL4ndrS/2+c1SzkfPt9rzioJf
vjrosc3/q84n9CQXfOg5hfXiyEu+a9ScVERAwHLrIWnHSqPPd96KAMAzIpWePrsO
mExejEJw999OFmJL6th8PHkgTkcbYRKv8K7WnNDIHDUK6iSg0rtyvg2YDgRDDiRv
GS3ofHdO5WxQSrqxYdle8aThuKV31gjt3nlfDNinWKHGEmvXbSGu7HGCk61NlK+j
py3lkTZLeoxVaoZ5fIjdA/aOWDgv9HQBxtiCJd4VGC6xAsLT9gBy9c6cJFdb52Nc
w/jjn6ECgYEA/gx6UrCcp2TuZYU/xkEIMi6mVe7d60w7672pK6FxcNrBiV0T/+F1
o2CwdOiq0X9IJkBLDIGM2fFTPtpIER60f8P/RnfzlX7GenOX+voR9zpYePuyIKaf
UW6n4ZB4wlt7ZIoRwTAwo/Whhx+XGL4iVosw2DIf6tFXRWI0+8dCew0CgYEA0GT6
Xp0yi/D9UjZ1vM/fpojbZh6gZaK6zQjWi5CrcMzC2FyDOK9BTS2BWe28gmgV2Sab
9/fZJmXnpAn1eiI2Co8b4p+44QAPtPUpCslAiVROS1vaEv/S+0ag682jDFWnOR5C
VYSg4hyCOf3KAOJb9mgL/B/vFEnq1YBEr3P6af0CgYEAqeFOKt1O4+DqSZjA/KGg
CW6IbA4+94kSyKEa7sIWSZD+ugwzw3fQYl/Vn1e2YkDqzilQBhzbQyHMuMreRhRy
Pr2hhk3P5LfRoTCLAJkYSmoJn10v0AWbo6iLOpqRJeZmrORm2viOjhVC3kiRkUoT
TCvnjap3DV7PLOZu565nFkECgYEAtVC2Wi3RtdqWvboulHoU8HOw2Nga3HNKrmxb
JxFXaQxvFwrfDSnG2lyWZ+UmGBxxrf8ewxA9OmB9u8cCcyJi/KrpKzOnCvUftWV9
MSpLYXEdsgmX4uH88q3QA3pmu6umlFbUhk2gITuGvugmosBQHUMH8nTicjeh/+Lb
YAC7xw0CgYA8rePgM3xCn5U7zZPbvraYa7UZKvmrBAJpnh+oaYVpF4B1SCVJl23V
Ym/xVKzR3KOQ8eKiUOUTV23CeZ1CSIDeDS5Y3yjVmfBaBxlGmF/Z4kuvfTpk2Lns
AjX3slshjCQjfNtVfelqXW+9QDyZbDZpNs5Cfl8/awj0+Mwv/isxVA==
-----END RSA PRIVATE KEY-----
```
## How To Test
Make a CURL request to APISIX proxy
```bash
curl -u foo:bar 0.0.0.0:9080/demo/md/3.0/accounts
```
or open `0.0.0.0.9080/demo/md/3.0/accounts` in browser and pass Basic Auth Credentials
## Get help
* APISIX Documentation [https://apisix.apache.org/docs/apisix/getting-started/README/]
* Exante Documentation [https://api-live.exante.eu/api-docs/]
* Finmars IT Help: s.zhitenev@finmars.com
# Vault Setup
## Connecting Vault
Currently performed by a Finmars employee at the client's request.
## Initializing Vault
### Prerequisites
- A created database with an activated license
### Actions
1. Go to `Settings -> Vault`
2. Activate Vault and save the secret keys.
Do not lose these keys, as they cannot be recovered. If the keys are lost, the data saved in the Vault will be lost.
3. Inform the Finmars employee of the Vault token
## Unseal Vault
### Prerequisites
- A created database with an activated license
- Vault initialized
### Actions
1. Go to `Settings -> Vault`
2. Click the Unseal Vault button
3. Enter the three keys one by one
## Adding Access to Proxy Server
### Prerequisites
- A created database with an activated license
- Vault initialized
- Vault unsealed
- Proxy Server deployed
### Actions
1. Go to `Settings -> Vault`
2. Click the `Add Engine` button
4. Enter the name `finmars`
5. Click the `Add Secret` button
6. Add the following `json` content:
```json
{
"data_url": "{url_to_proxy_server}/md/3.0/",
"trading_url": "{url_to_proxy_server}/trade/3.0/",
"api_key": "foo",
"secret_key": "bar"
}
```
- `data_url` - URL to the proxy server's information endpoint specifying the API version - example `https://demo-exante.finmars.com/demo/md/3.0/`
- `trading_url` - URL to the proxy server's trading endpoint (required for enriching transaction information with orders) specifying the API version - example `https://demo-exante.finmars.com/demo/trade/3.0/`
- `api_key`, `secret_key` - credentials for `basic auth` to the proxy server
7. Click the "Save" button
# Configuration Installation
## Installing Modules
### Prerequisites
- A created database with an activated license
## Actions
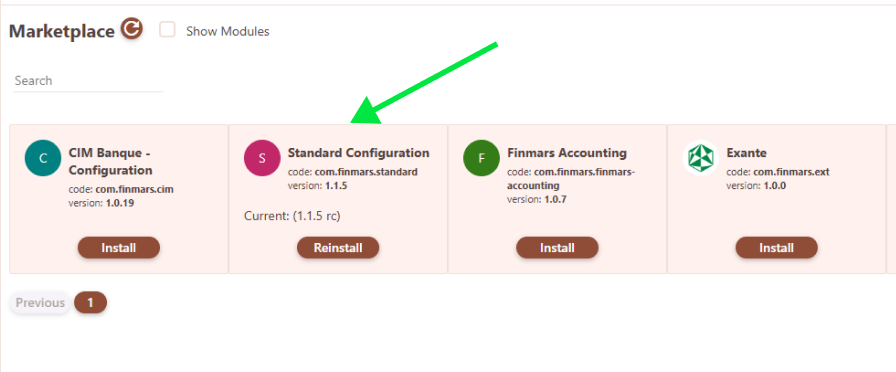
1. Go to `Settings -> Configuration -> Marketplace`
2. Select the `Standard Configuration` package and install it by clicking the install button
[](https://docs.finmars.com/uploads/images/gallery/2024-07/image-1721342042650.png)
3. Wait for the module installation to complete
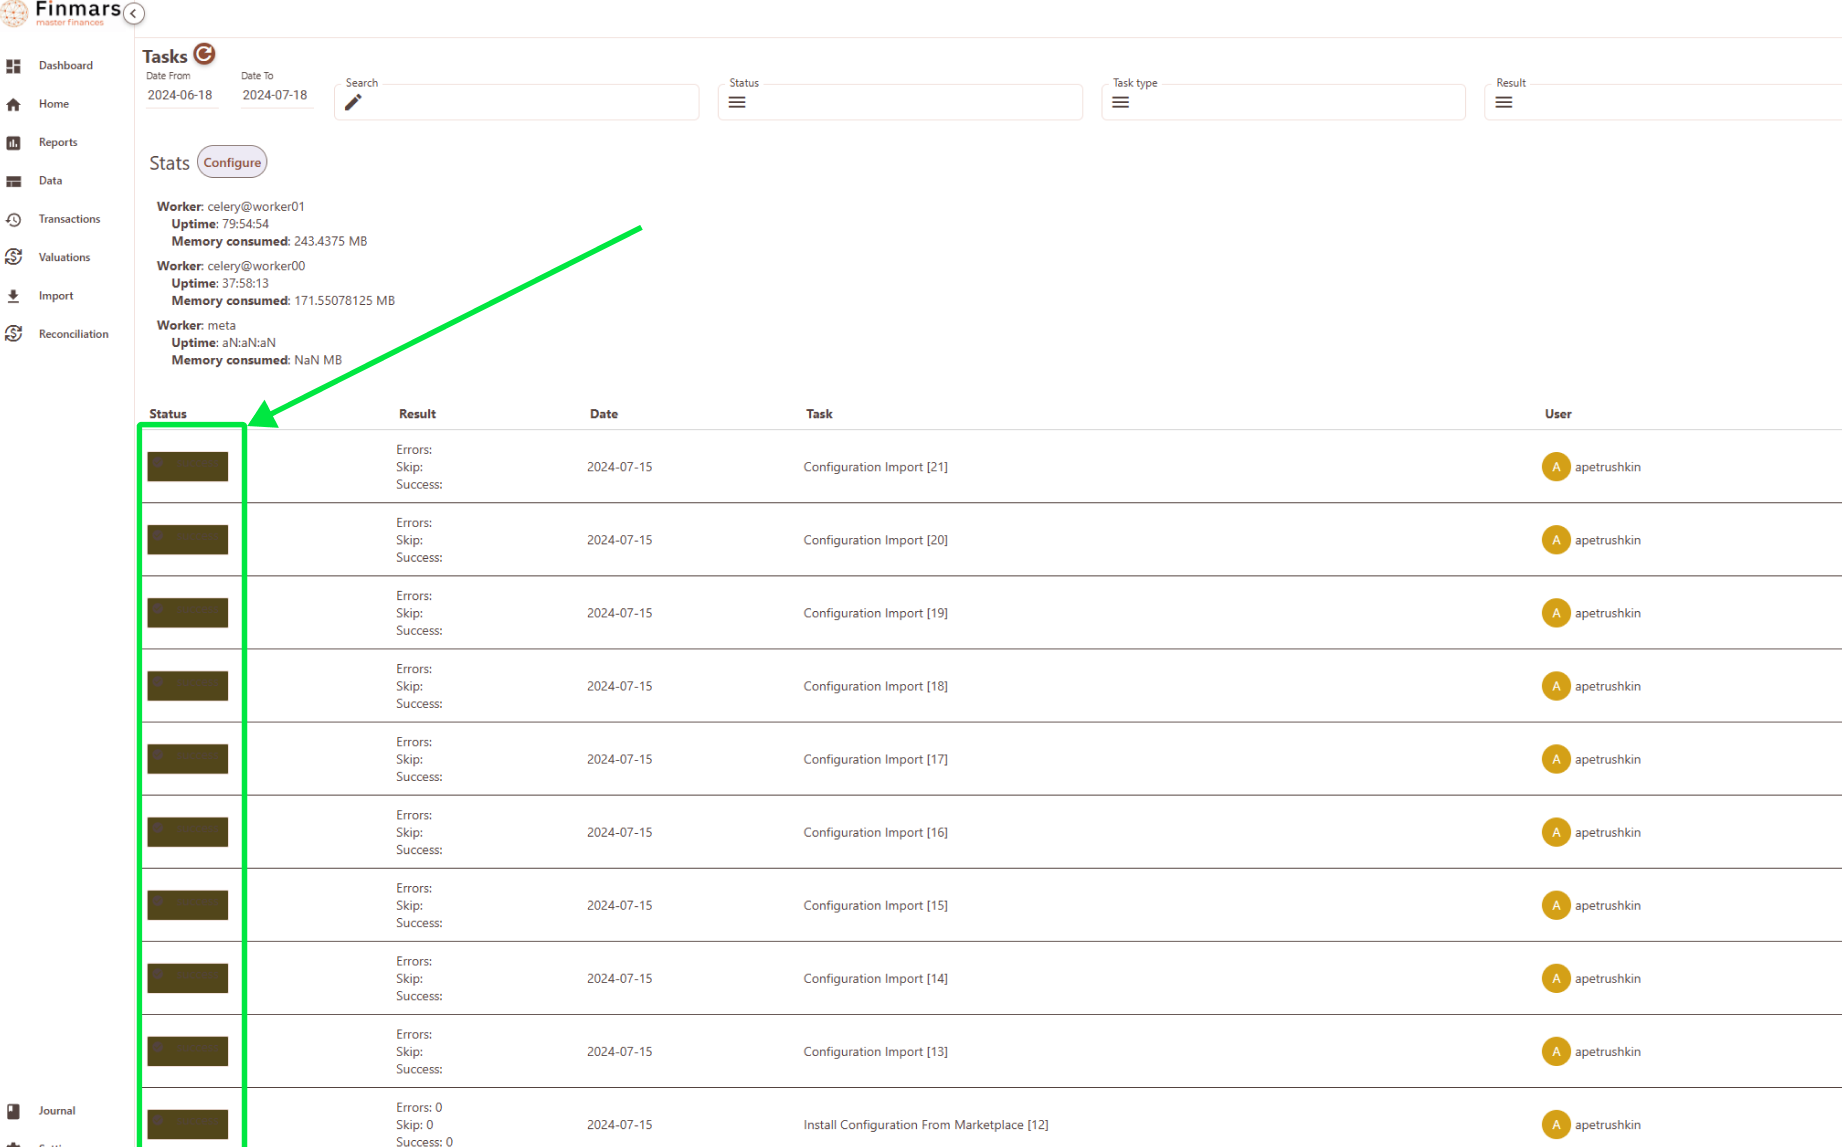
4. You can check the success of the module installation in the `Data -> Tasks` section. All tasks should be completed. Completion is indicated by a brown rectangle.
[](https://docs.finmars.com/uploads/images/gallery/2024-07/image-1721341922871.png)
# Setting up AWS EC2 with Ubuntu, Docker, and a Public IP
Follow these steps to quickly set up a basic server environment on Amazon Cloud (AWS).
****Step 1: Log in to AWS Console****
- Visit [https://console.aws.amazon.com](https://console.aws.amazon.com)
- Log in using your AWS account credentials.
****Step 2: Create an EC2 Instance****
- From the AWS console, search for and select ****EC2****.
- In the EC2 Dashboard, click ****Instances**** → ****Launch instances****.
****Step 3: Select Ubuntu Server****
- Under ****Name and tags****, give your server a recognizable name (e.g., "MyUbuntuServer").
- Under ****Application and OS Images (Amazon Machine Image)****, select ****Ubuntu Server 22.04 LTS****. (or 24.04 LTS)
- Leave other settings at default unless instructed otherwise.
****Step 4: Configure Security Settings****
- Under ****Network settings****, select ****Create security group****.
- Ensure that at least the following ports are allowed:
- - ****SSH (22)**** for secure access to your server.
- Add custom rules if needed, for example:
- - HTTP (80)
- HTTPS (443)
- Click ****Launch instance****.
****Step 5: Connect to Your Instance****
- After your instance launches, click on its name to see details.
- Locate the ****Public IPv4 address****; this is your public IP address.
****Step 6: Access Your Instance via SSH****
- Open your terminal or command prompt.
- Connect using SSH (replace your-key.pem with the path to your downloaded AWS key file, and public-ip-address with your actual public IP):
```
chmod 400 your-key.pem
ssh -i your-key.pem ubuntu@public-ip-address
```
****Step 7: Install Docker on Ubuntu****
Follow [Ubuntu | Docker Docs](https://docs.docker.com/engine/install/ubuntu/)
****You’re all set!****
You now have:
- Ubuntu Server 22.04 running on AWS
- Docker installed
- A public IP address to access your server remotely
---
****Secure Base64 Encoding via Linux Console****
****Step 1: Open your Linux terminal.****
****Step 2: Execute the following command (replace api\_key and secret\_key with your real keys):****
echo -n "api\_key:secret\_key" | base64
****Example:****
If your keys are:
- API Key: abc123
- Secret Key: xyz789
Then run:
echo -n "abc123:xyz789" | base64
****Output will look like:****
YWJjMTIzOnh5ejc4OQ==
---
****How it works securely:****
- echo -n prevents adding a newline at the end of the text, which ensures correct encoding.
- base64 is a built-in utility that encodes the data right on your system without internet exposure.
You can then safely use this encoded string as your Basic Auth token:
Authorization: Basic YWJjMTIzOnh5ejc4OQ==