Configurator Quick Start
- Prerequisites
- How to Modify Dashboards
- How to Create a New Module/Package in the Marketplace
- How to Push a Module/Package to the Marketplace and updating version
- How to Install/Update add-on from Marketplace
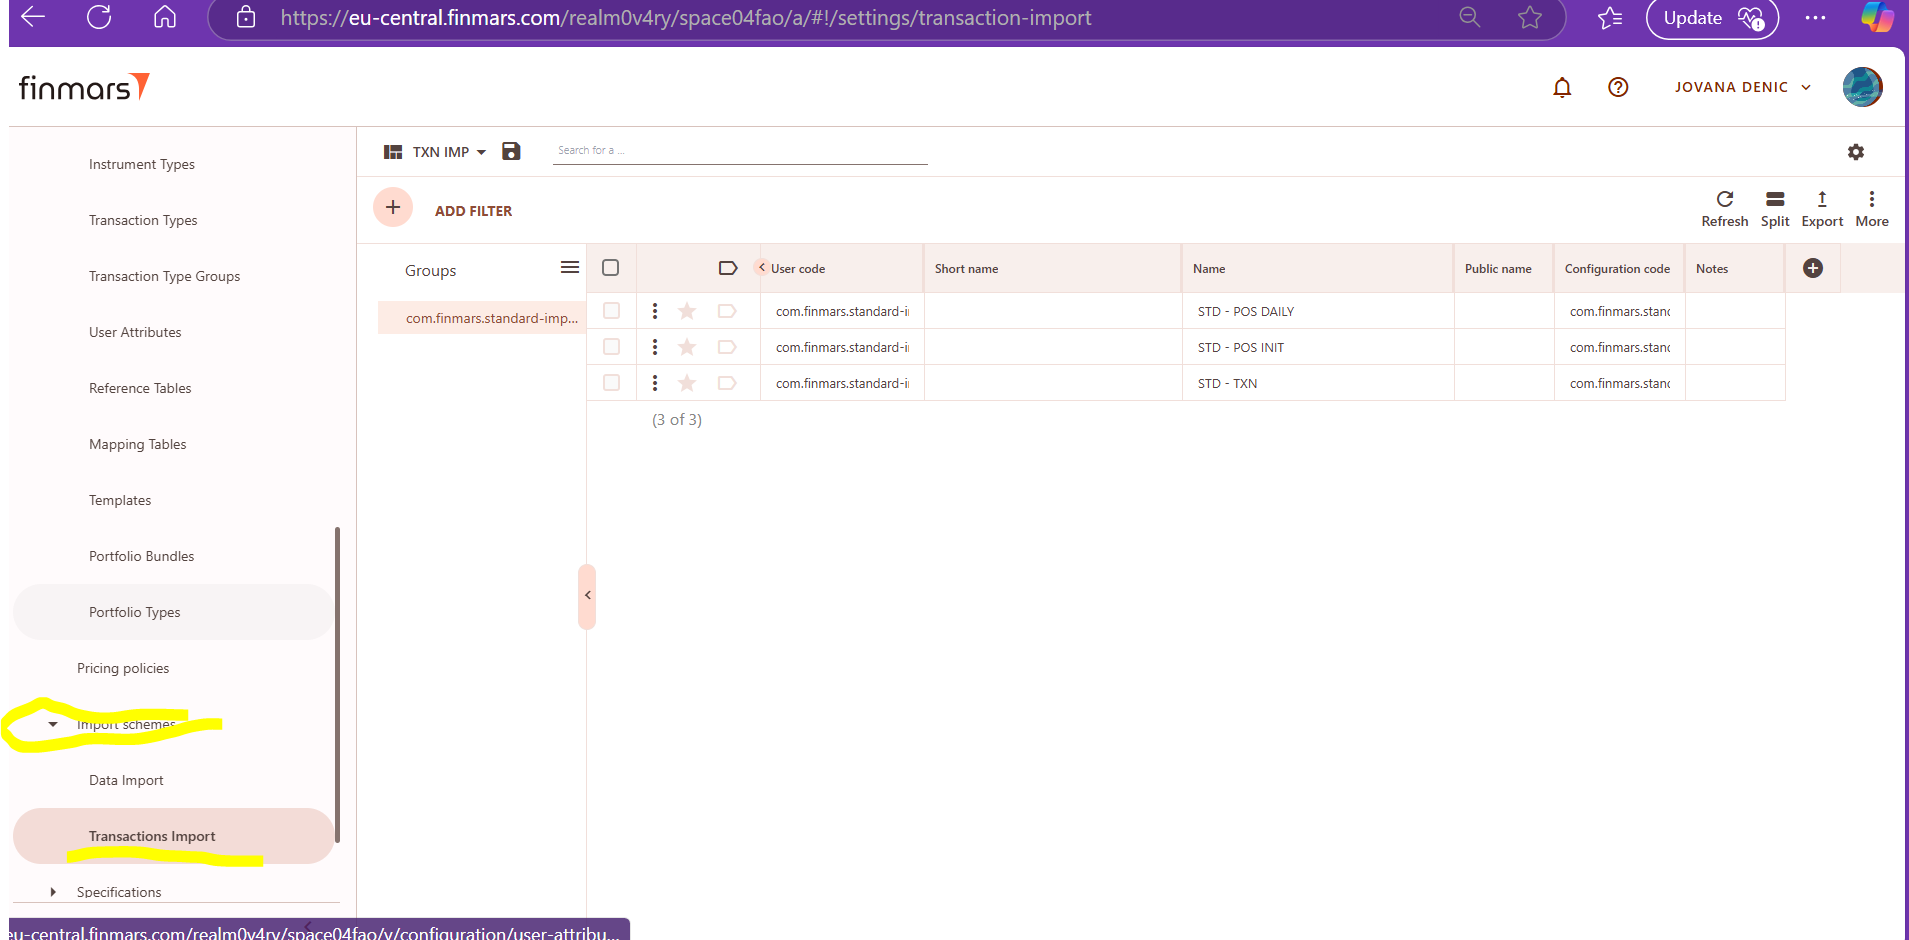
- How To Add an Input into Transaction Type
- How to Create Instrument Type
Prerequisites
Prerequisites
We assume you have one of the options:
How to Modify Dashboards
Prerequisites
We assume you have all prerequisites you may need, including:
- If needed: the VPN is configured to access the Finmars resources
- If needed: access to the Virtual Machine to work with the sensitive information
- Must have: registered in Finmars in the needed region environment (self-registered or registered by Finmars)
- Must have: having permissions set to allow continue with the Action in the Guide
- Must have: to create a new Workspace you must have a License Key (provided by Finmars)
*Guide Action*
- ***
- ***
- ***
How to Create a New Module/Package in the Marketplace
Prerequisites
We assume you have all prerequisites you may need, including:
- If needed: the VPN is configured to access the Finmars resources
- If needed: access to the Virtual Machine to work with the sensitive information
- Must have: registered in Finmars in the needed region environment (self-registered or registered by Finmars)
-
Must have: having permissions set to allow continue with the Action in the Guide
- Must have: registered in Finmars Marketplace to use credentials to push a module/package
Creating a New Module/Package in the Marketplace
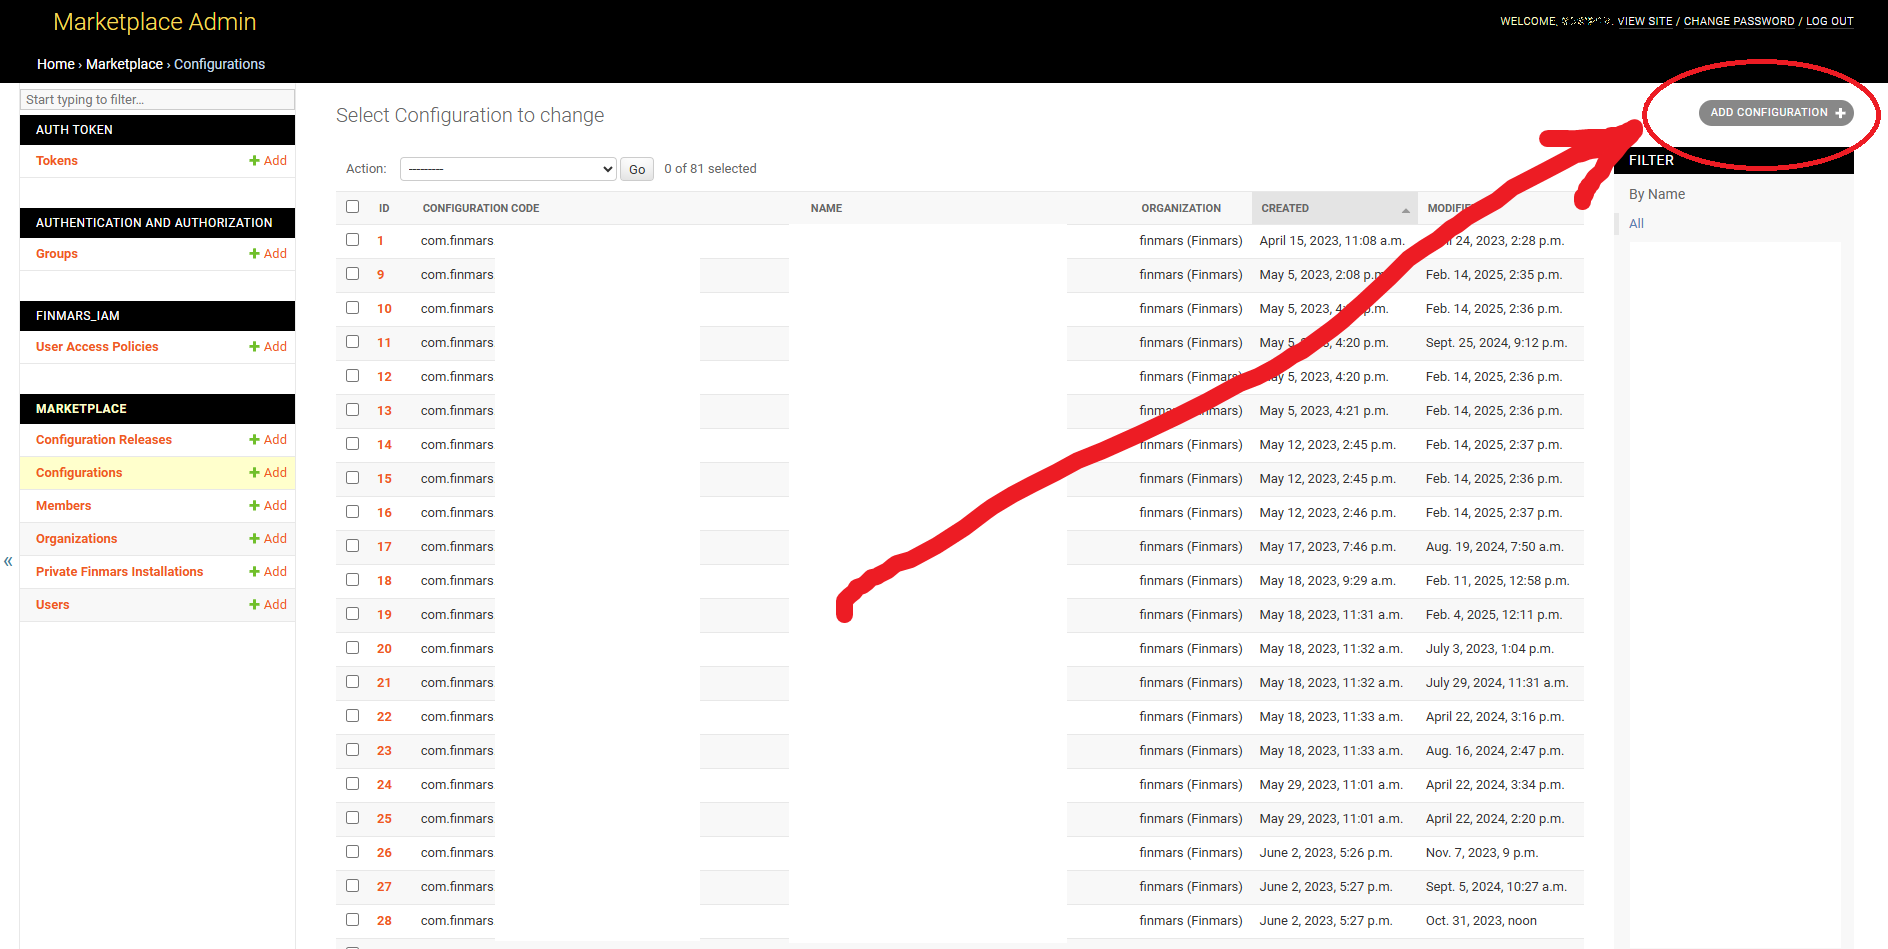
Step 1. Add a new module or package by navigating to Configuration > Configuration > Manage. Once there, click the "Add New Configuration" button in the top right corner, as shown in the picture below.
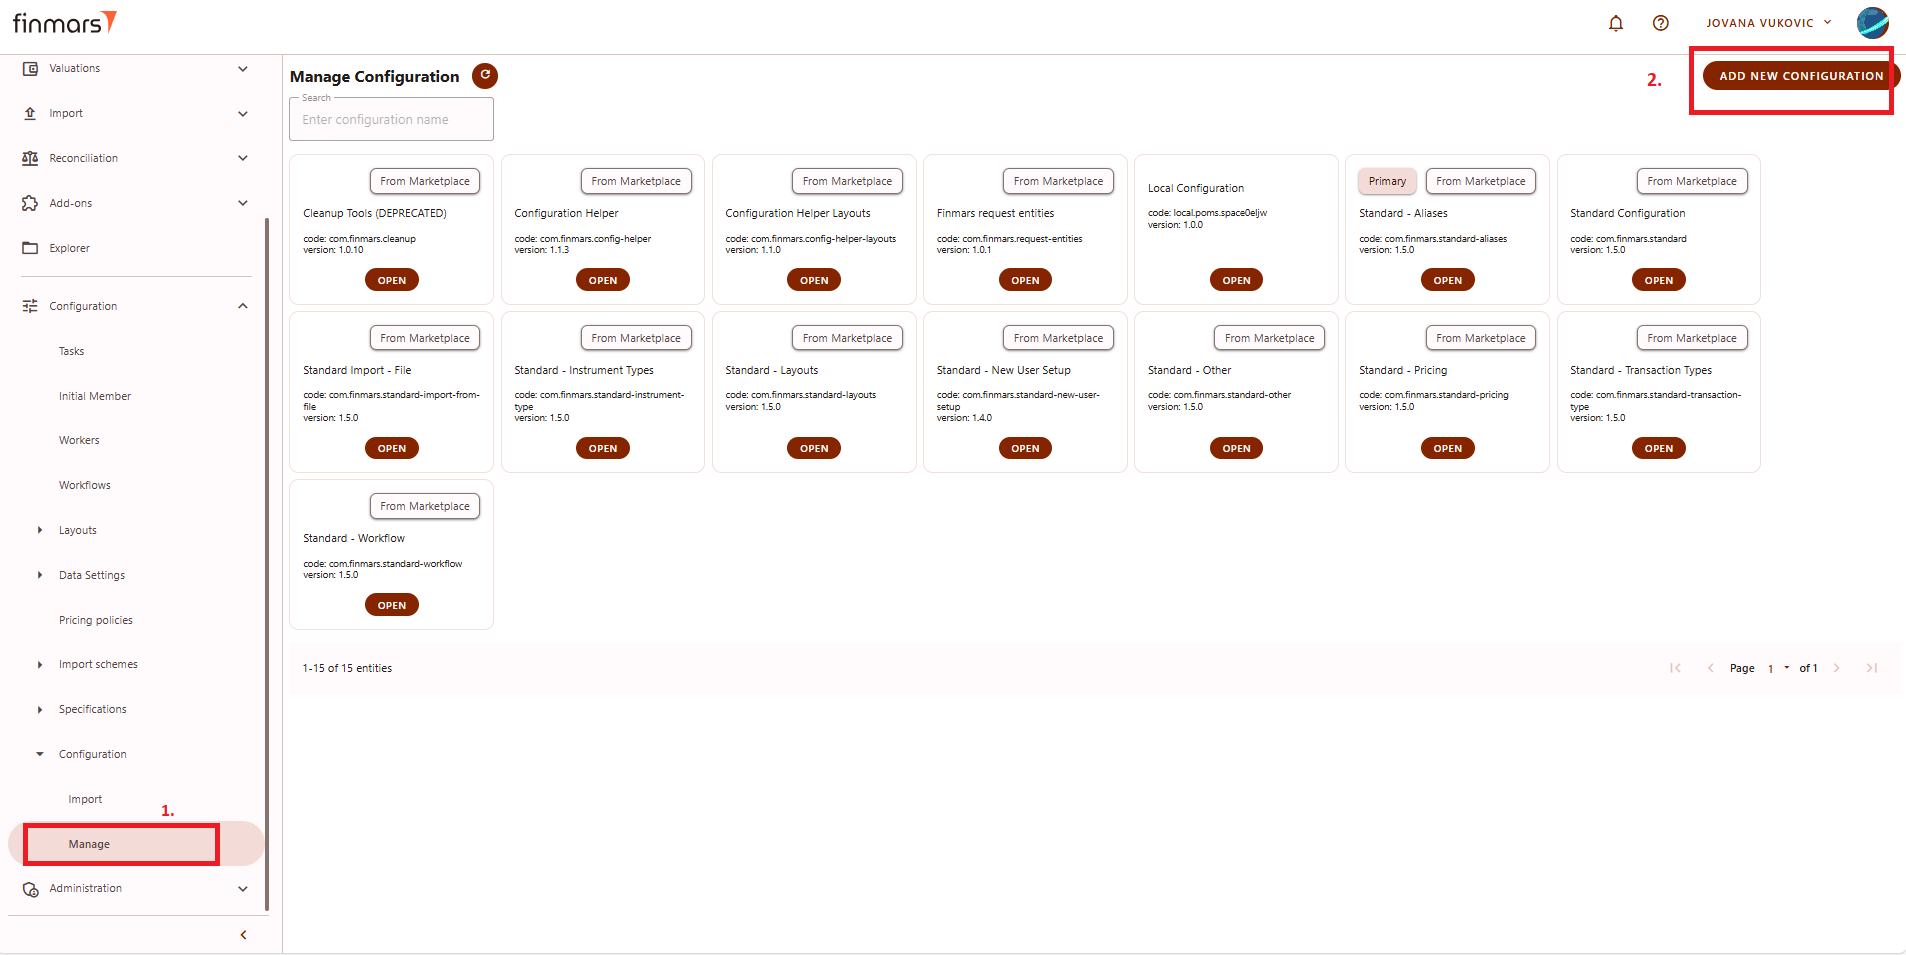
Picture 1. Finmars manage configuration
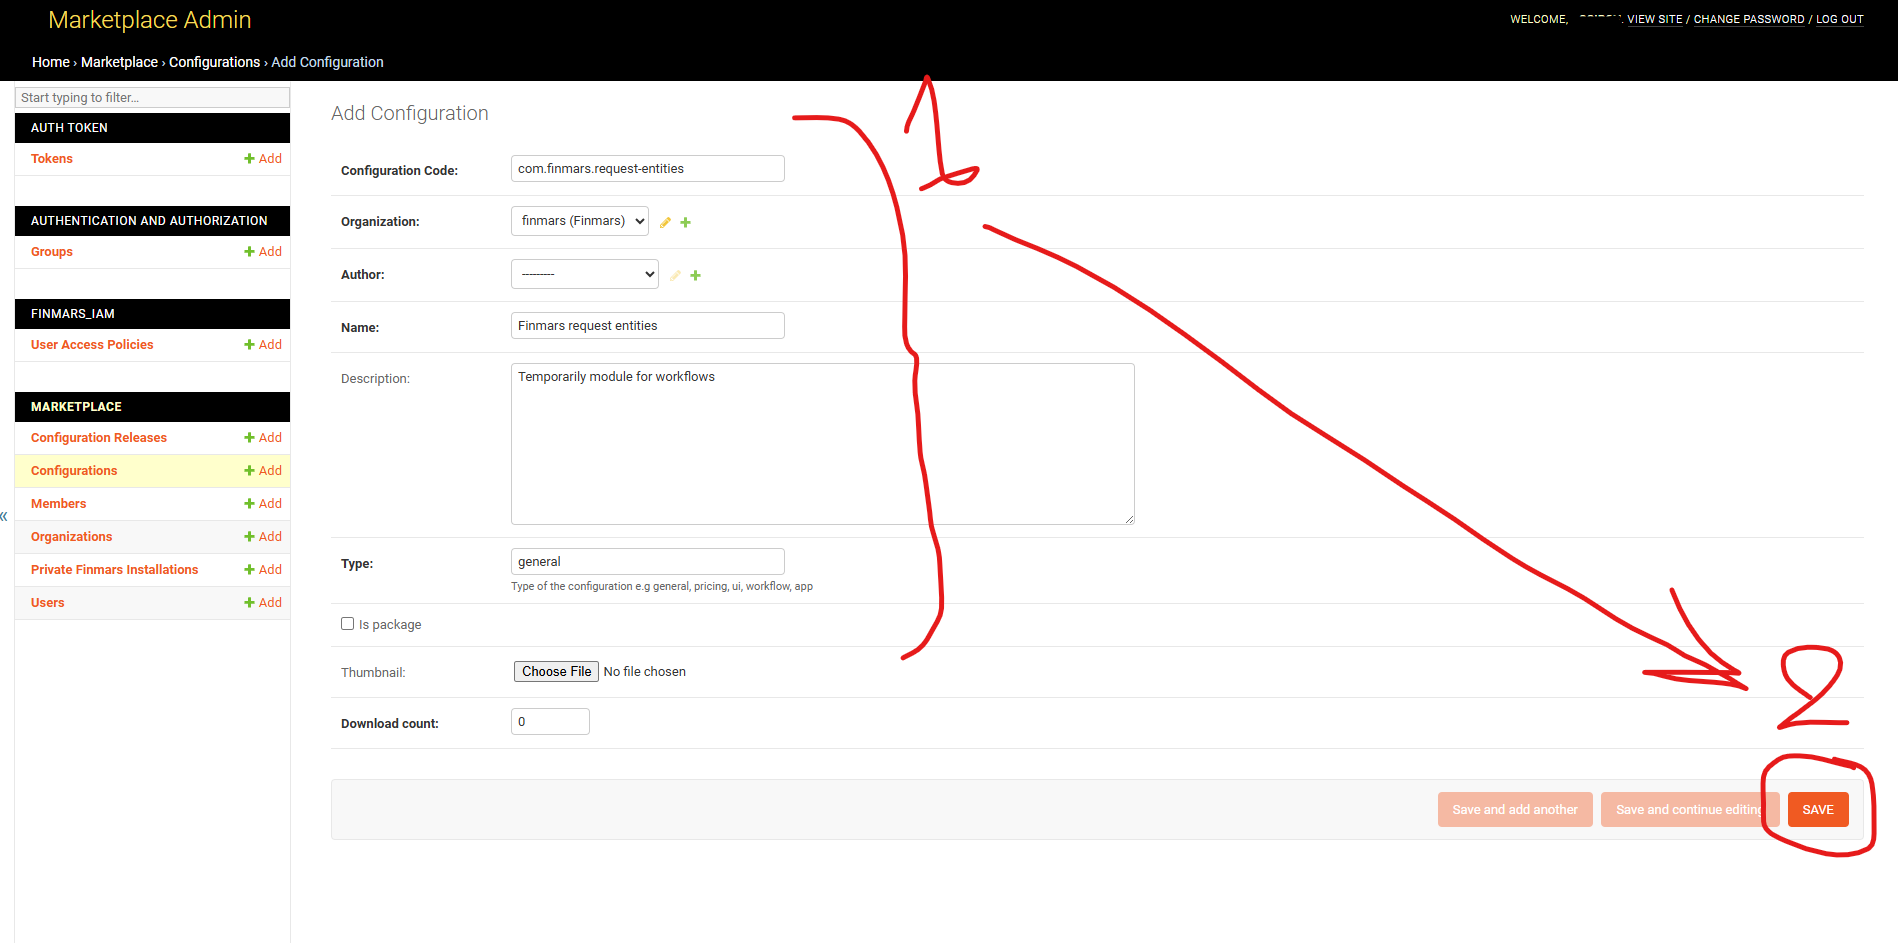
Step 2: After clicking the "Add New Configuration" button, a new window will appear where it's needed to fill in the required fields.
See the example below:
- Configuration Code: Enter the configuration code for your module. Follow the configuration pattern that is shown.
- Name: Enter the desired module name.
- Version: Add the version.
- Status: Choose between "Stable" or "Release Candidate."
- Category: Select from "General," "UI," "Pricing," or "Workflow." Choose "General" if unsure.
*** The 'Is Primary' checkbox indicates the primary configuration. When this option is enabled, user fields or other related entities should be retrieved from the primary configuration.
Modules are installable components on the Finmars platform that enhance its functionalities. A Package is a set of modules that will be installed in ordered sequence. To create a package, check the "Is Package" checkbox. If it’s a module, leave it empty.
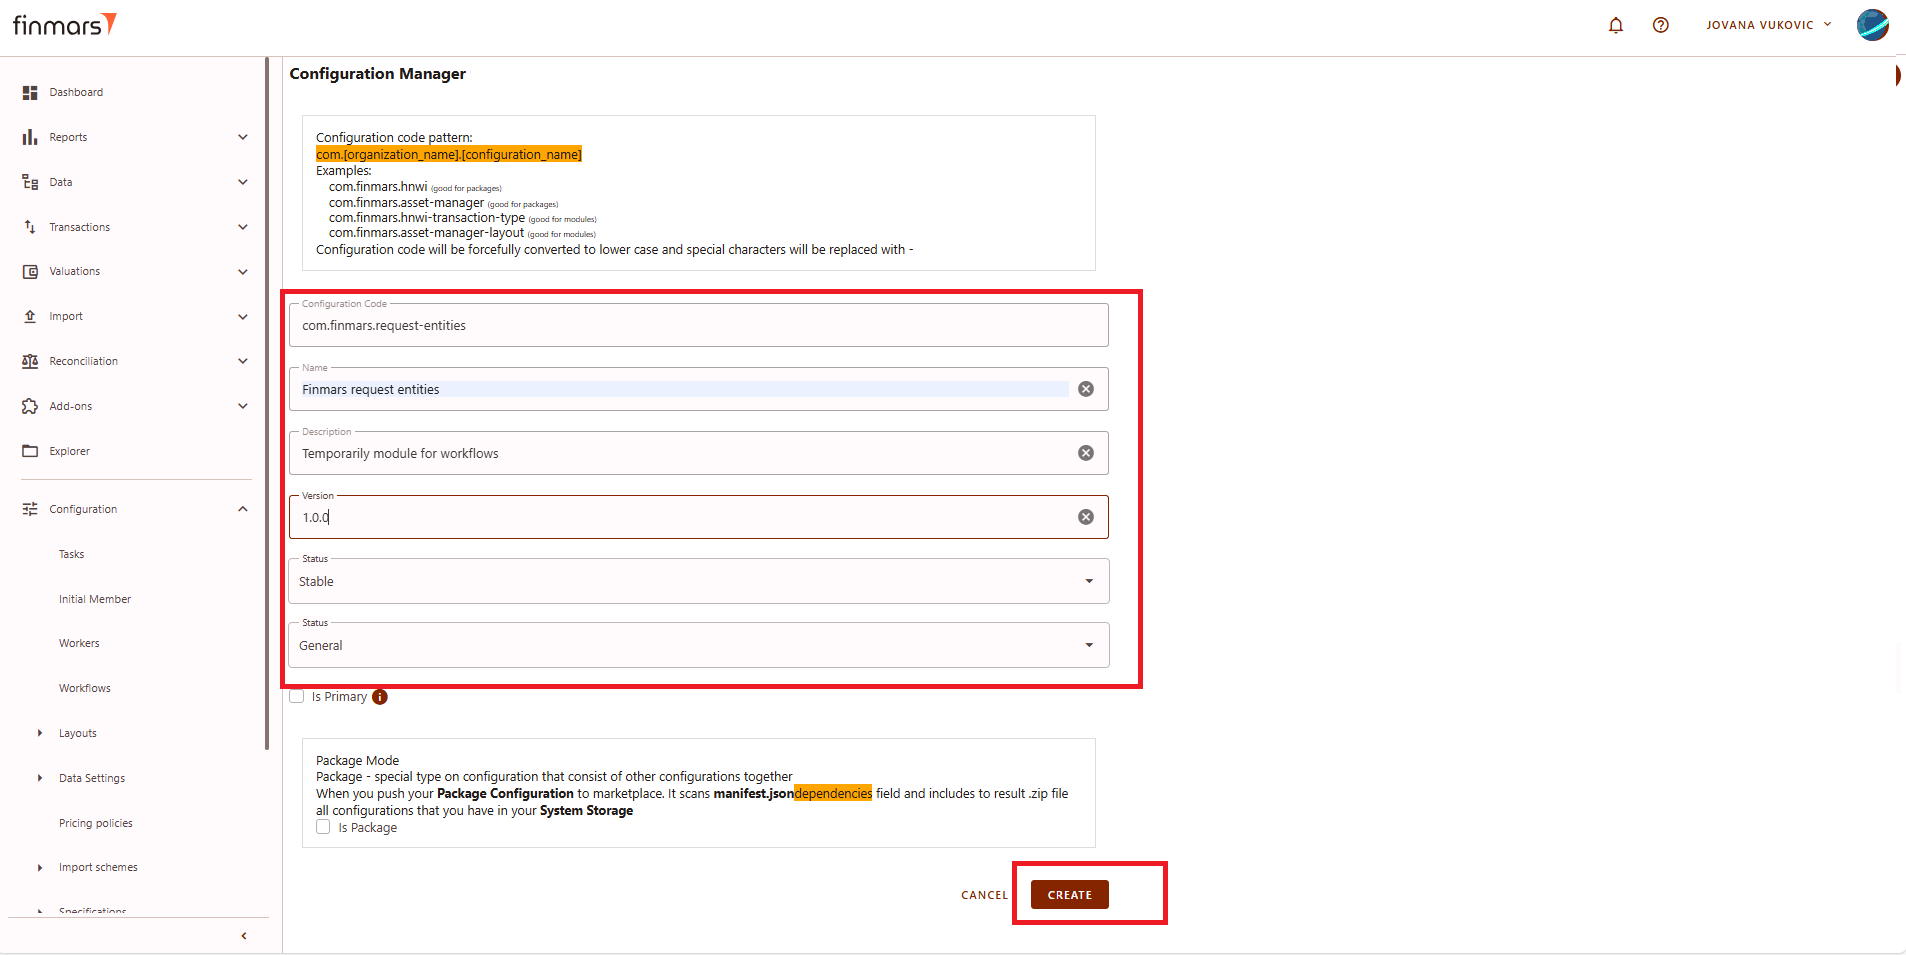
Picture 2. Finmars configuration manager
Step 3: To verify if your module has been created, go to the manage configurations and check if your package/module is created.
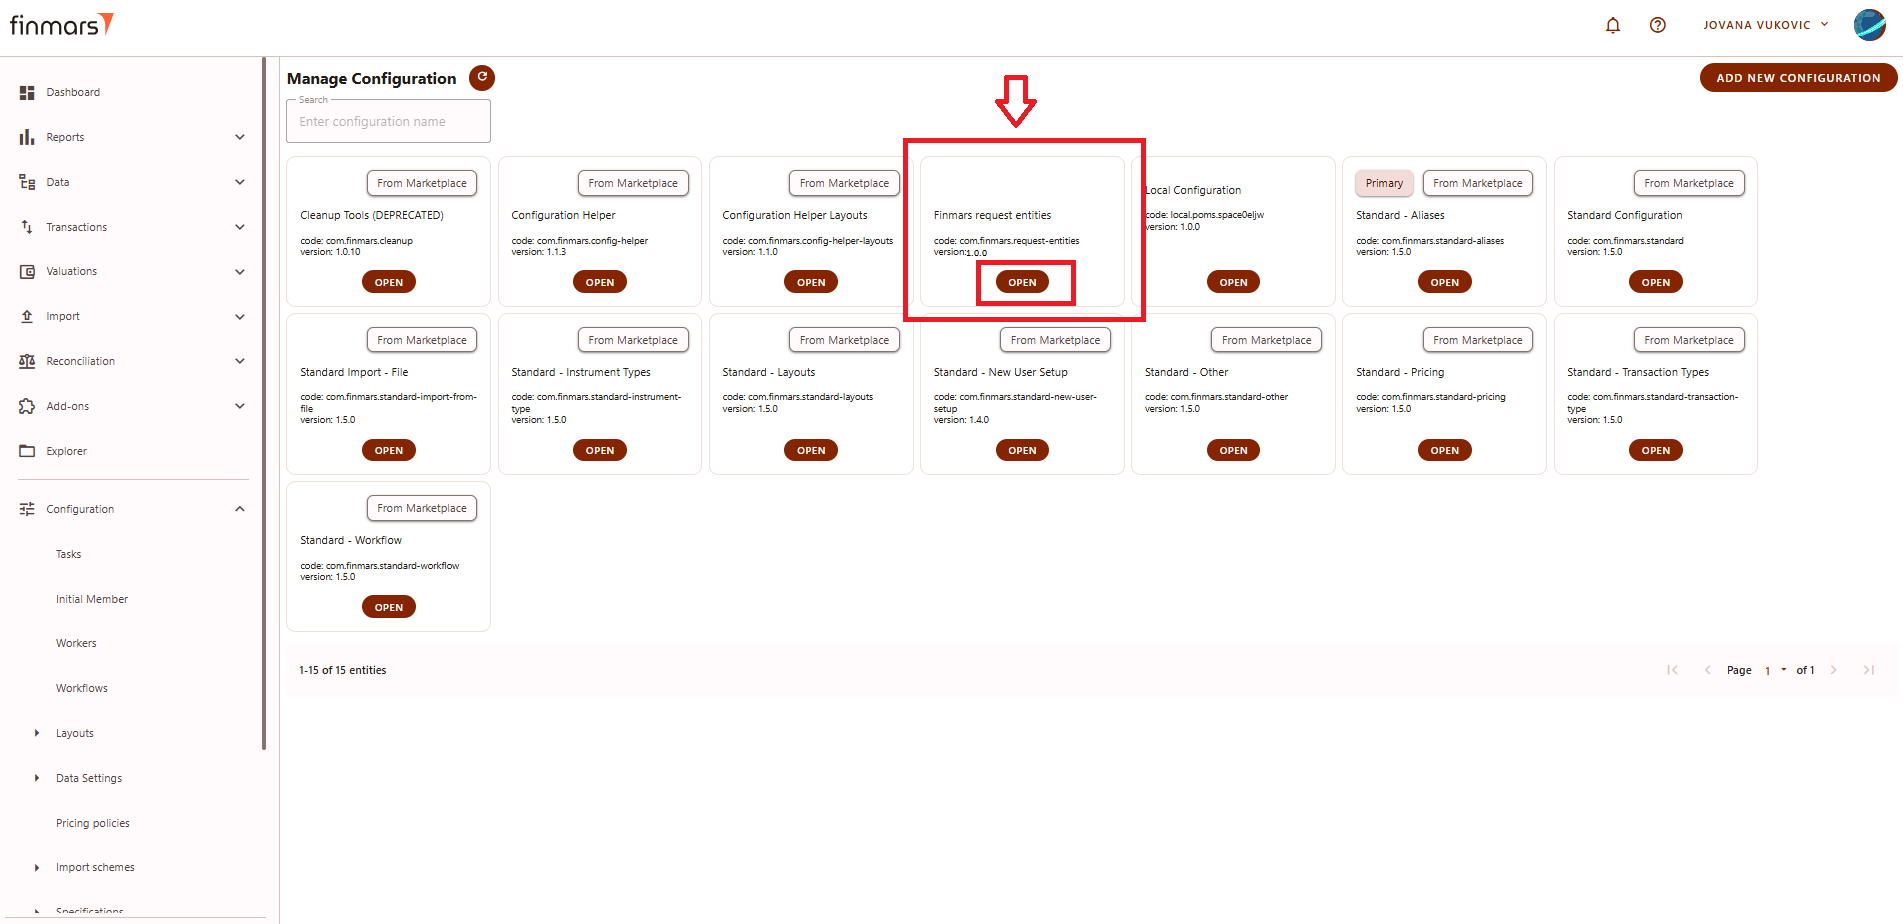
Picture 3. Locally created module
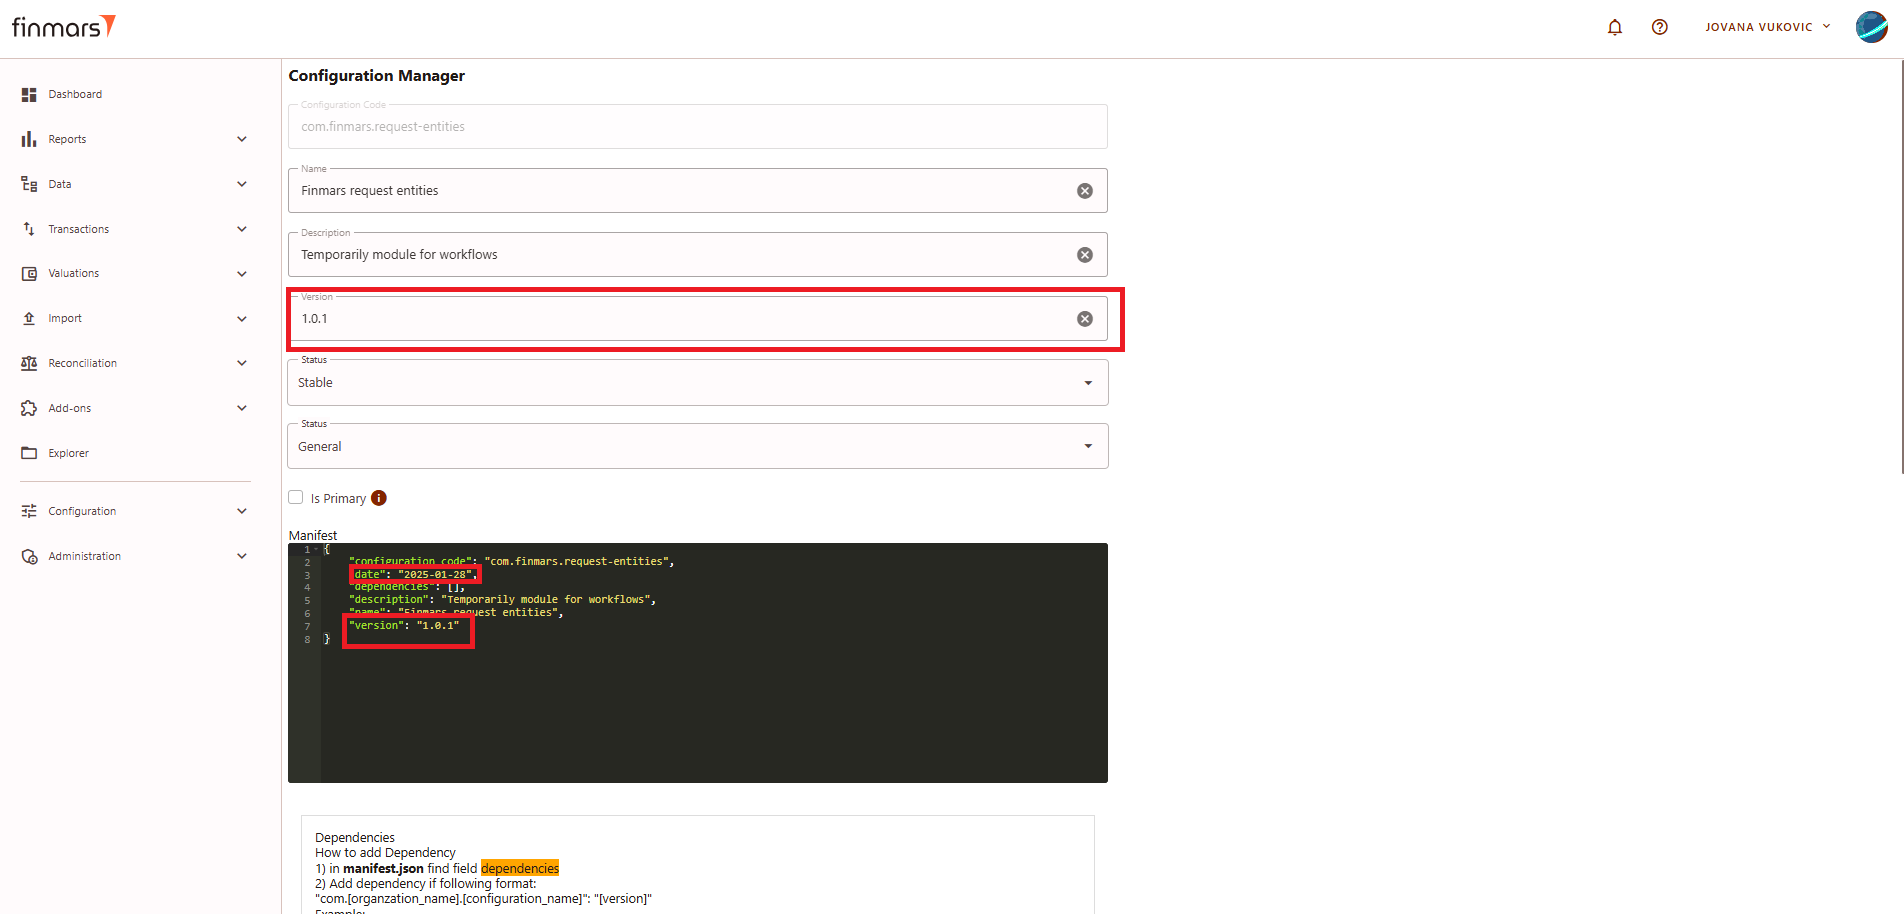
Step 4: Before pushing newly created module/package you need to make sure that the administrator of the Finmars Marketplace has created the same module/package in the Finmars Marketplace, otherwise you will have error pushing the module/package.
For the administrator of the Finmars Marketplace to correctly create a new module/package:
- Open the newly created module/package in the the manage configurations page
- Creating the module also generates the manifest JSON file. Copy that manifest JSON.
- Sent it to the administrator of the Finmars Marketplace
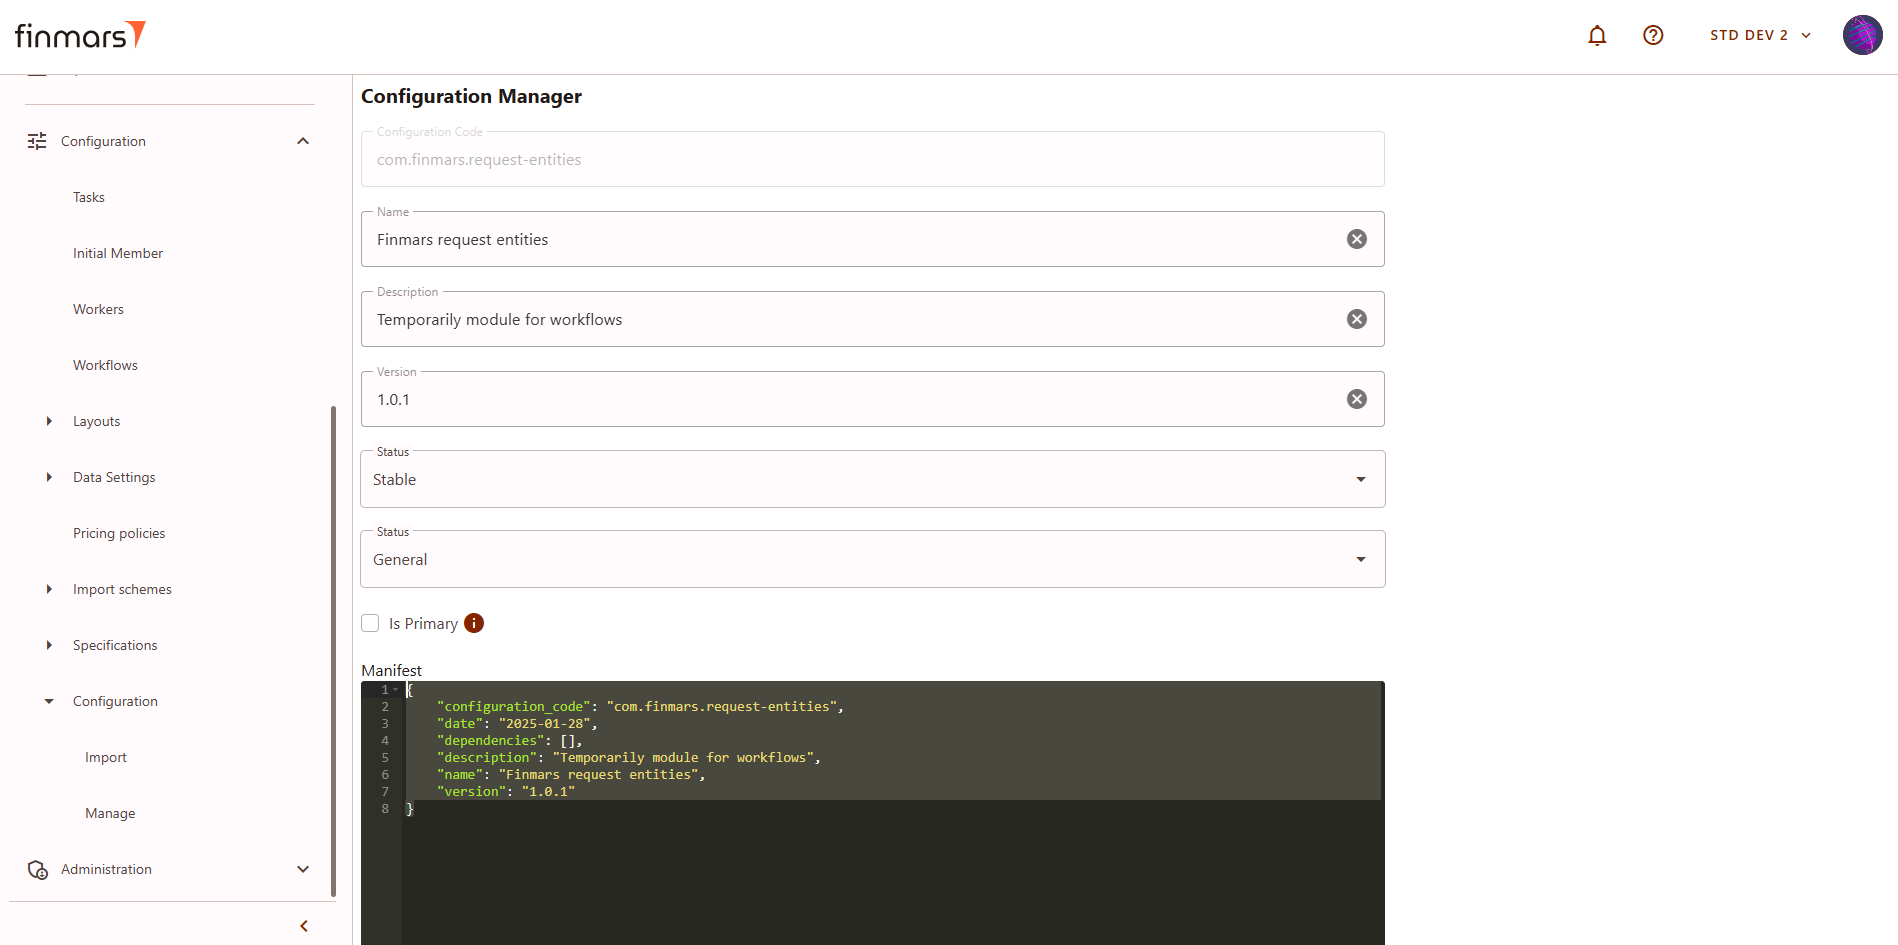
Picture 4. Manifest of the created module
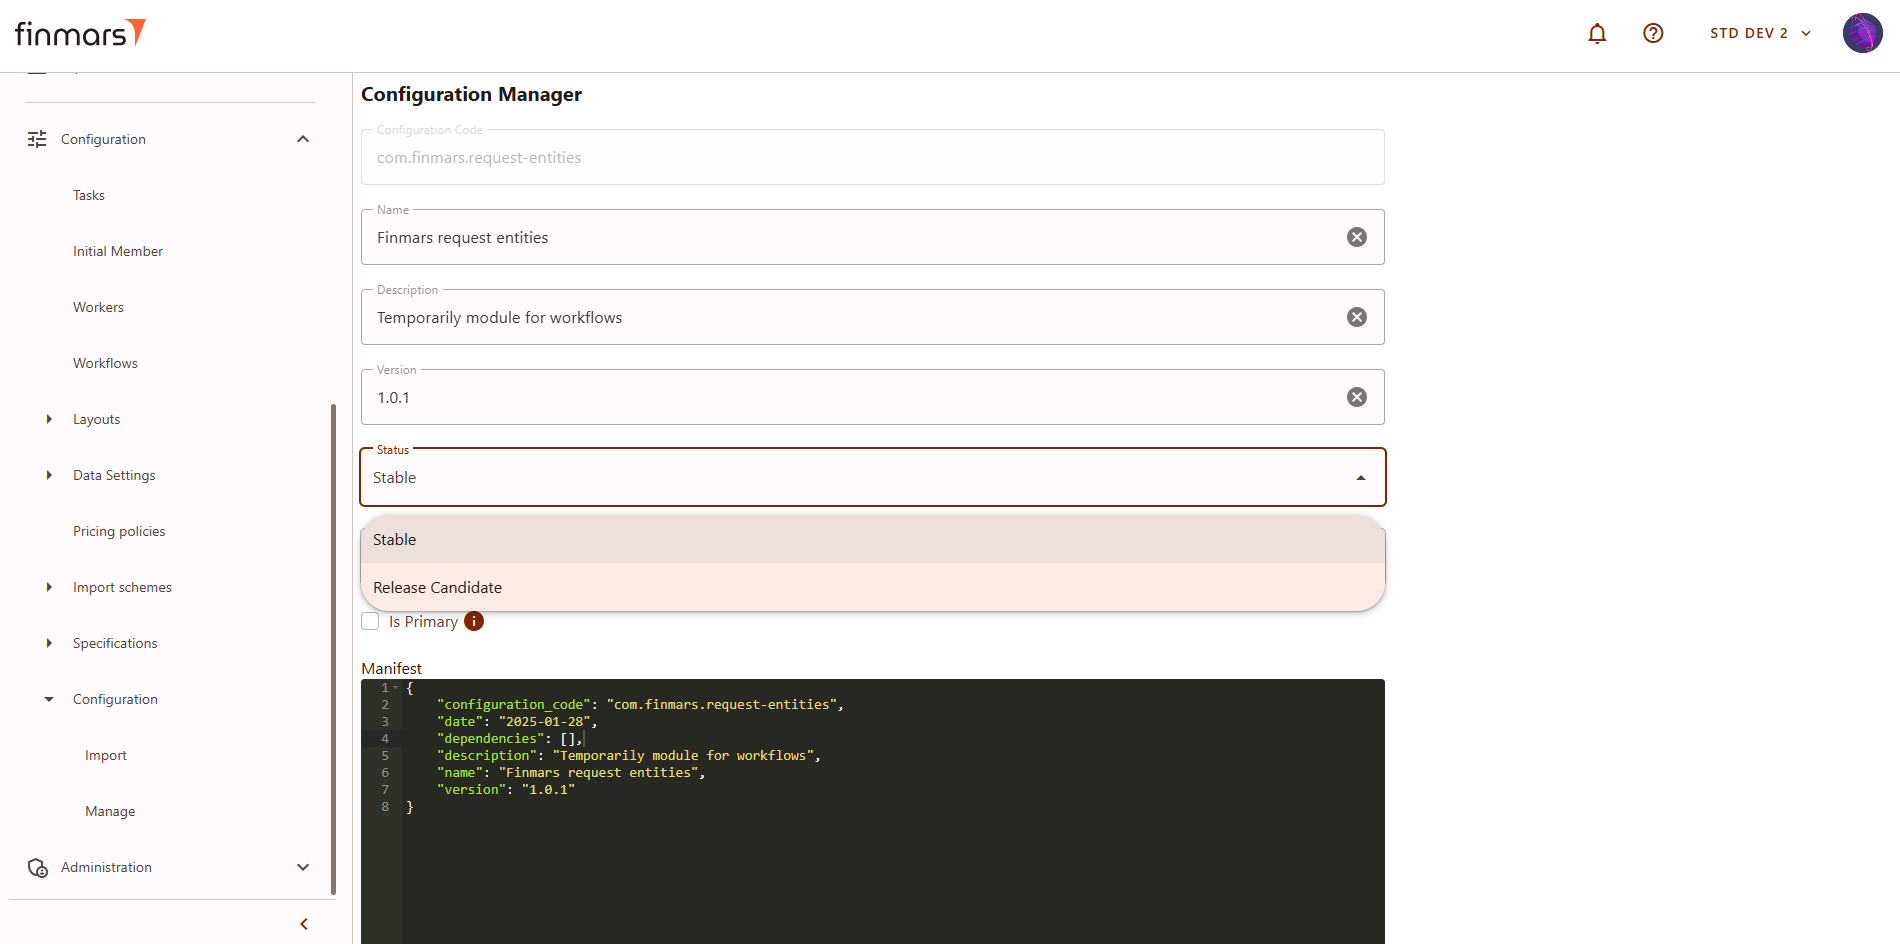
Step 5: If you are the administrator of the Finmars Marketplace
- Request/receive from the module/package creator the Manifest content/ For example like:
{ "configuration_code": "com.finmars.request-entities", "date": "2025-01-28", "dependencies": [], "description": "Temporarily module for workflows", "name": "Finmars request entities", "version": "1.0.1" } - Go to https://marketplace.finmars.com/admin/ and login with your credentials
- Go to https://marketplace.finmars.com/admin/marketplace/configuration/ and make sure that this configuration hasn't been already created (search)
- If the configuration hasn't been created click on the "Add Configuration +" button in the right upper corner:

- Fill in all the needed information from the Manifest (it's a must to have the same info in the Configuration Code) and click on "Save" button:

Step 6: How to Push a Module/Package to the Marketplace and updating version
How to Push a Module/Package to the Marketplace and updating version
Prerequisites
We assume you have all prerequisites you may need, including:
- If needed: the VPN is configured to access the Finmars resources
- If needed: access to the Virtual Machine to work with the sensitive information
- Must have: registered in Finmars in the needed region environment (self-registered or registered by Finmars)
-
Must have: having permissions set to allow continue with the Action in the Guide
- Must have: registered in Finmars Marketplace to use credentials to push a module/package
- Must have: the module/package is already created
Pushing a Module/Package to the Marketplace and updating version
Step 1: After creating/modified the module/package, go to the Configuration Manage page, click on the card for the module/package. It has been created/modified locally, but now it needs to be pushed to the marketplace.
* The example in the pictures shows a module, but the process is the same for a package.

Picture 1. Marketplace with new module
Step 2. Before pushing a new module/package, ensure that the date and version are correct. Usually a new version is needed, so increment the version number in the configuration manager and the manifest file so they will be the same.
Picture 2. Date and version of the released package/module
Step 3. Select appropriate Status for the configuration's version:
- Stable - the latest version of stable releases are installed by default from the Marketplace
- Release Candidate - this version can be installed manually from the Marketplace
Picture 3. Selecting Status
Step 4. When creating a package, ensure that all required dependencies are included in the Manifest JSON. Refer to the example below.
{
"actions": [
{
"workflow": "com.finmars.standard-workflow:init"
}
],
"configuration_code": "com.finmars.standard",
"date": "2025-02-08",
"dependencies": [
{
"channel": "stable",
"configuration_code": "com.finmars.standard-transaction-type",
"version": "1.6.1"
},
...
{
"channel": "stable",
"configuration_code": "com.finmars.standard-iam",
"version": "1.0.2"
}
],
"description": "Package for Standard configuration",
"name": "Standard - Configuration",
"primary_module": "com.finmars.standard-aliases",
"version": "1.6.4"
}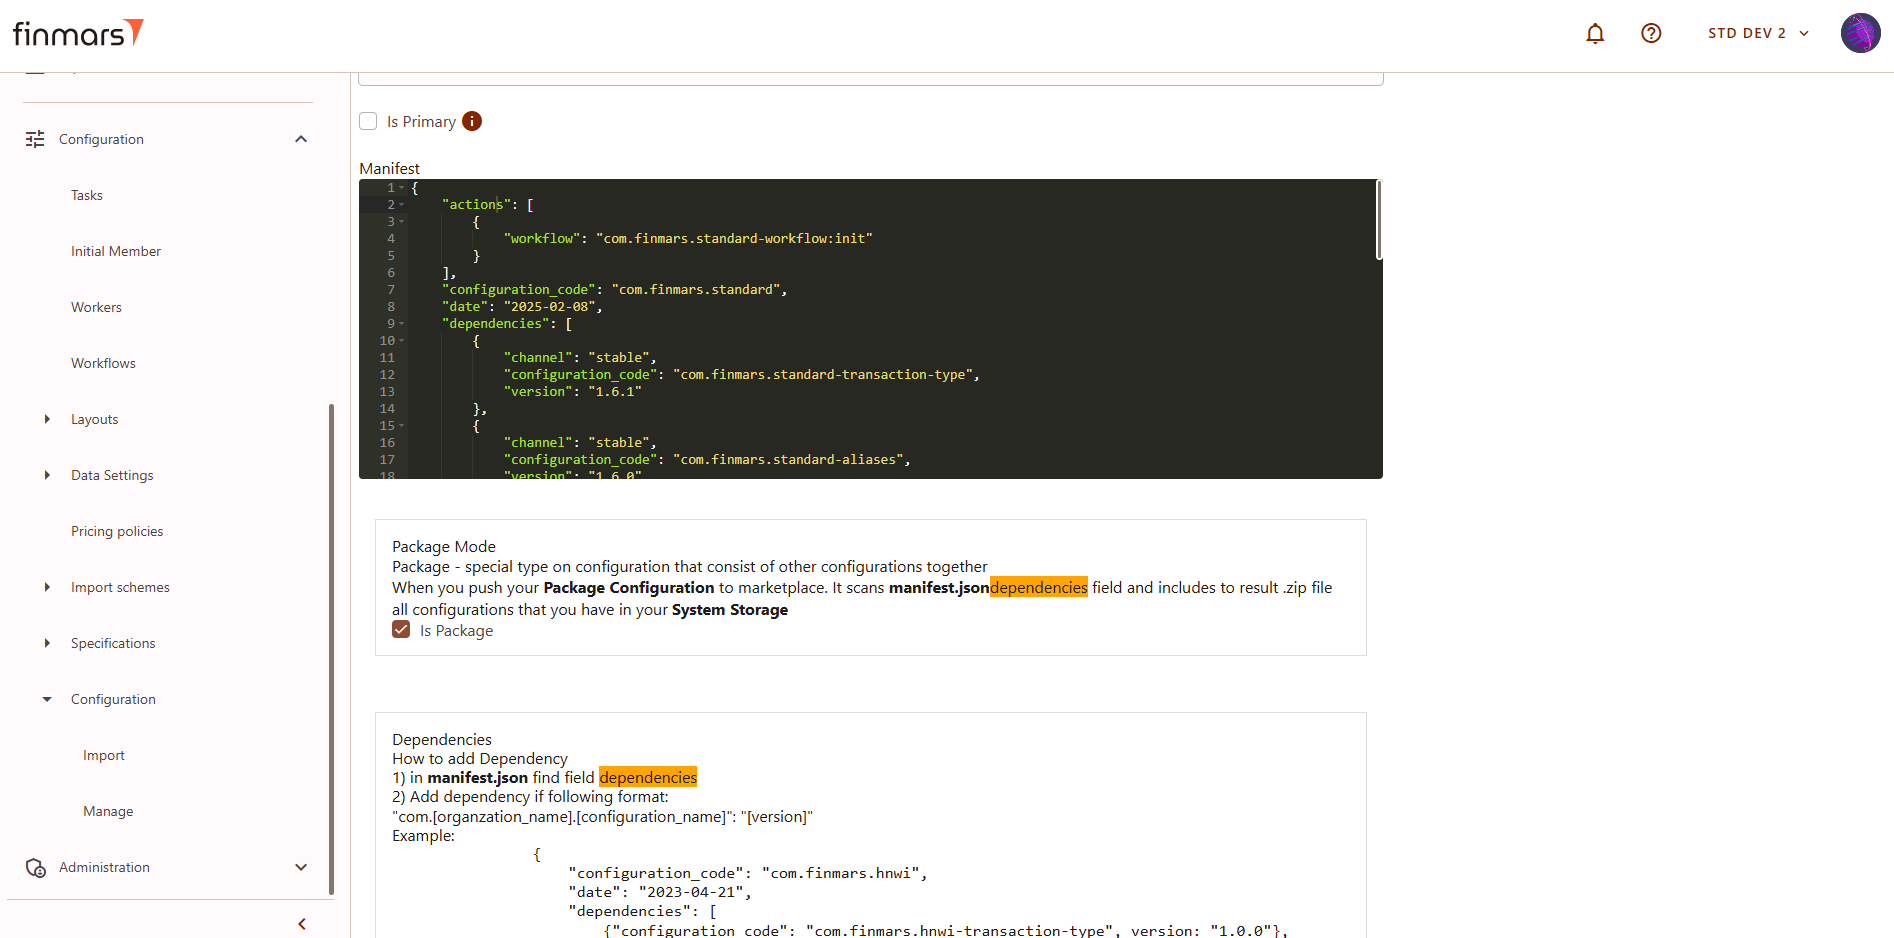
Picture 4. Adding dependencies in case of the package creating
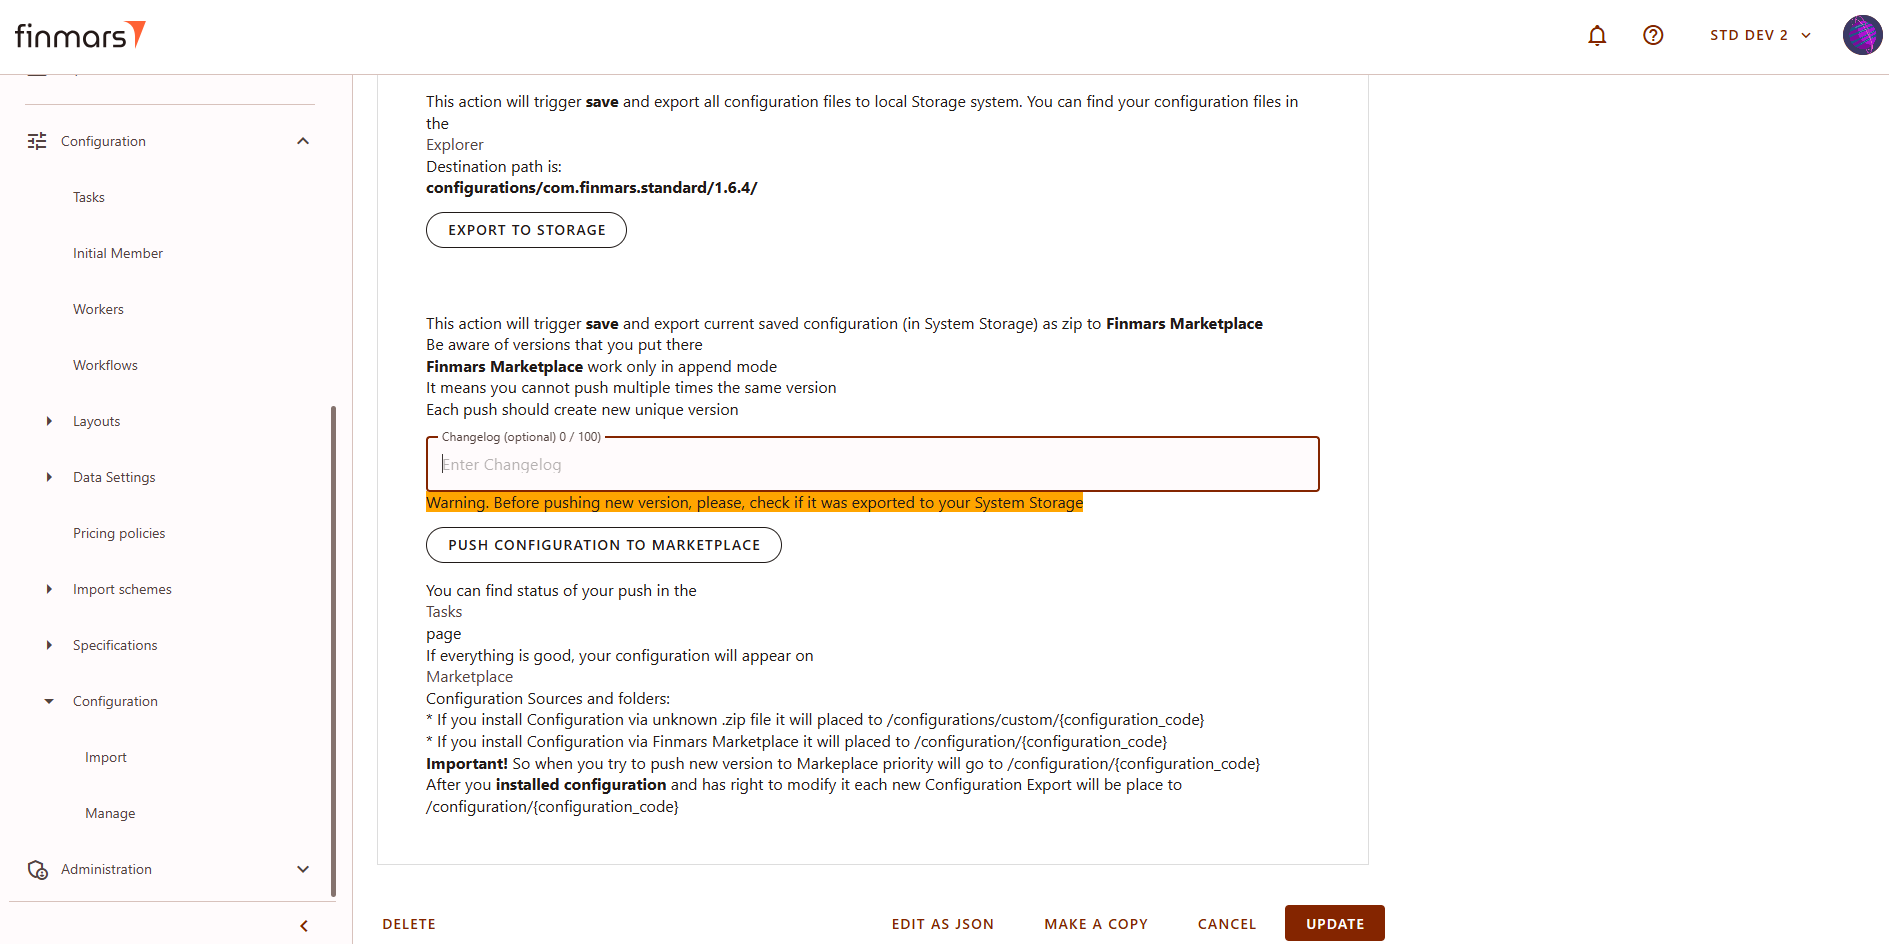
Step 5: Click the 'UPDATE' button to apply changes to the Manifest for further Export to Storage and Push.
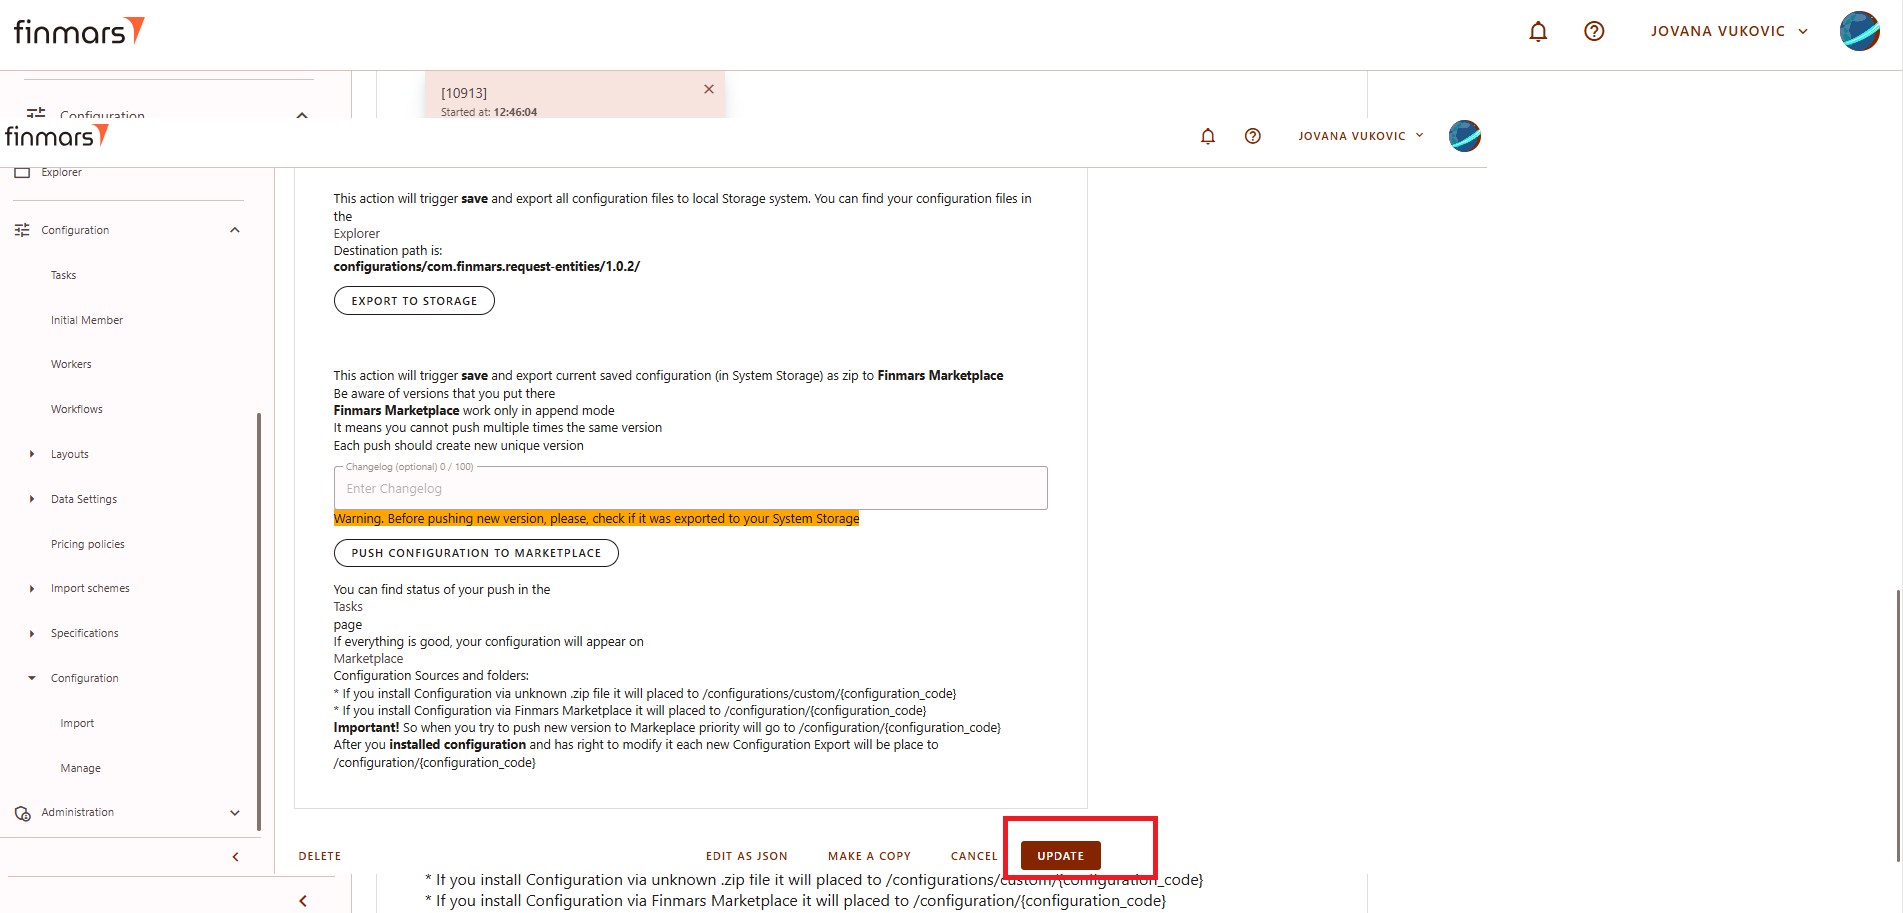
Picture 5. Updating the version of the released package/module
Step 6: After updating, open the configuration again and export the configuration to storage. Click on the button "Export to storage" This action will save and export all configuration files to the local system storage.
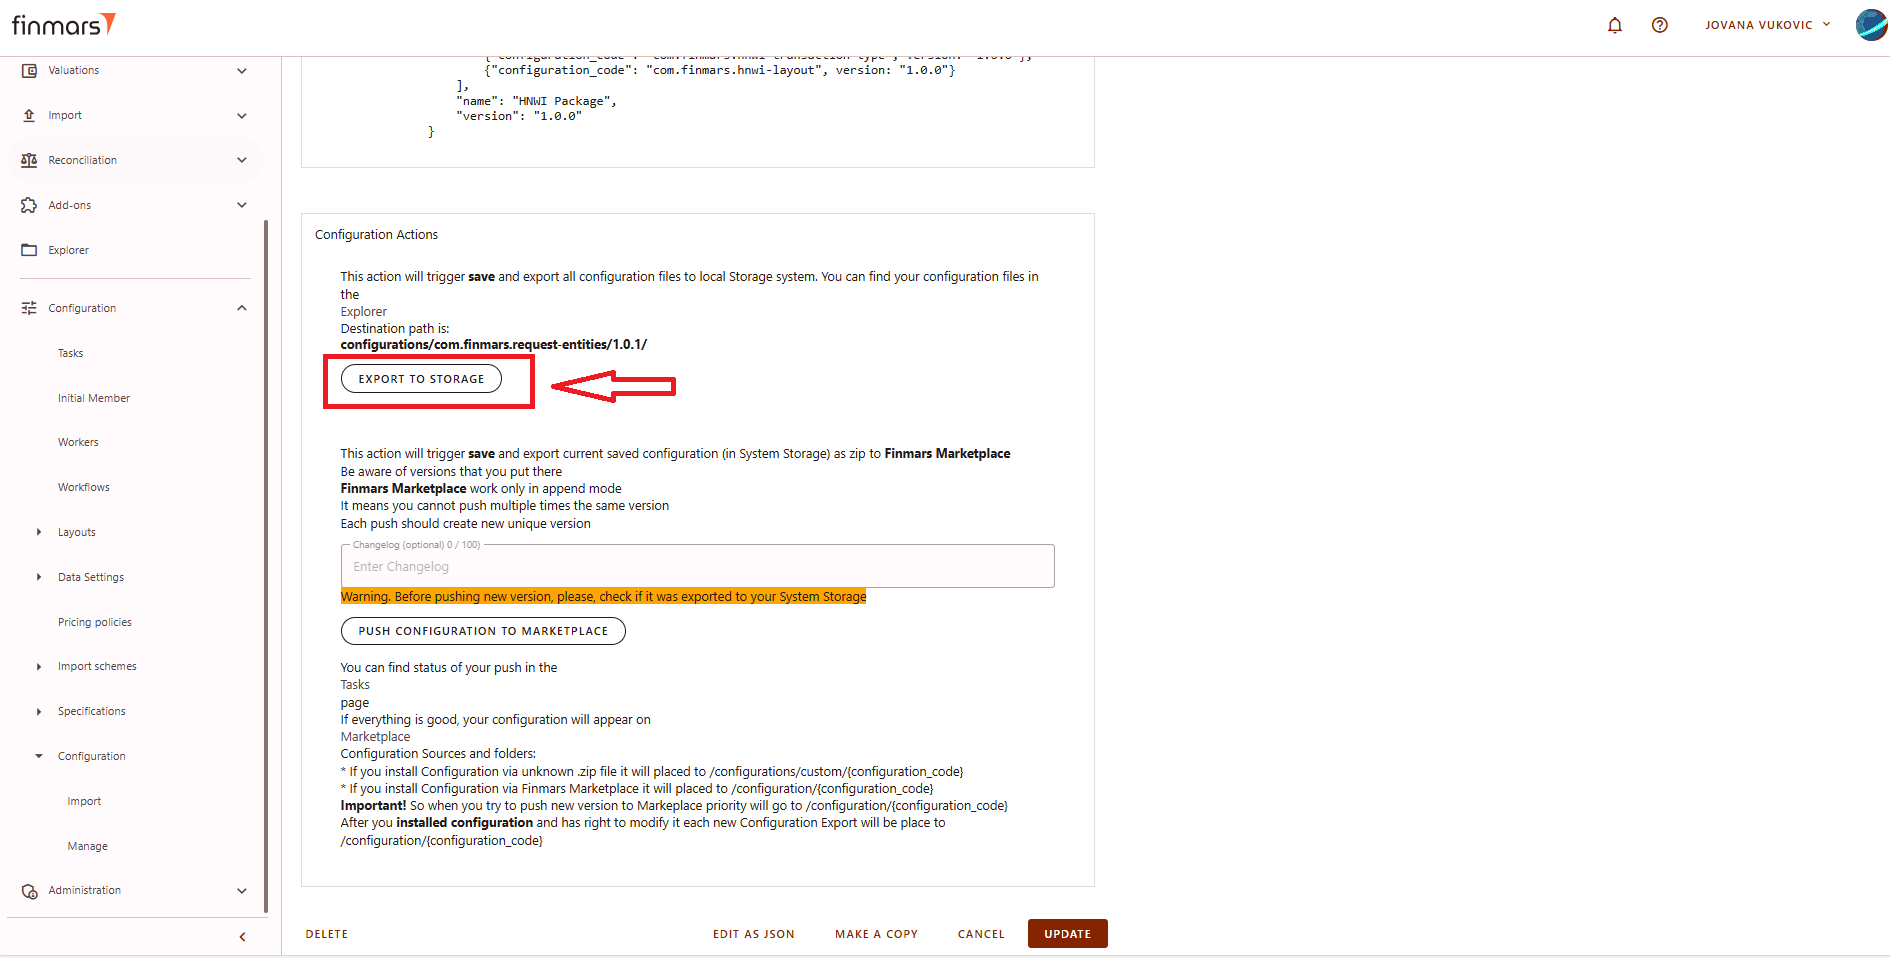
Picture 6. Export to storage
Step 7. Clicking the button will initiate export to storage.
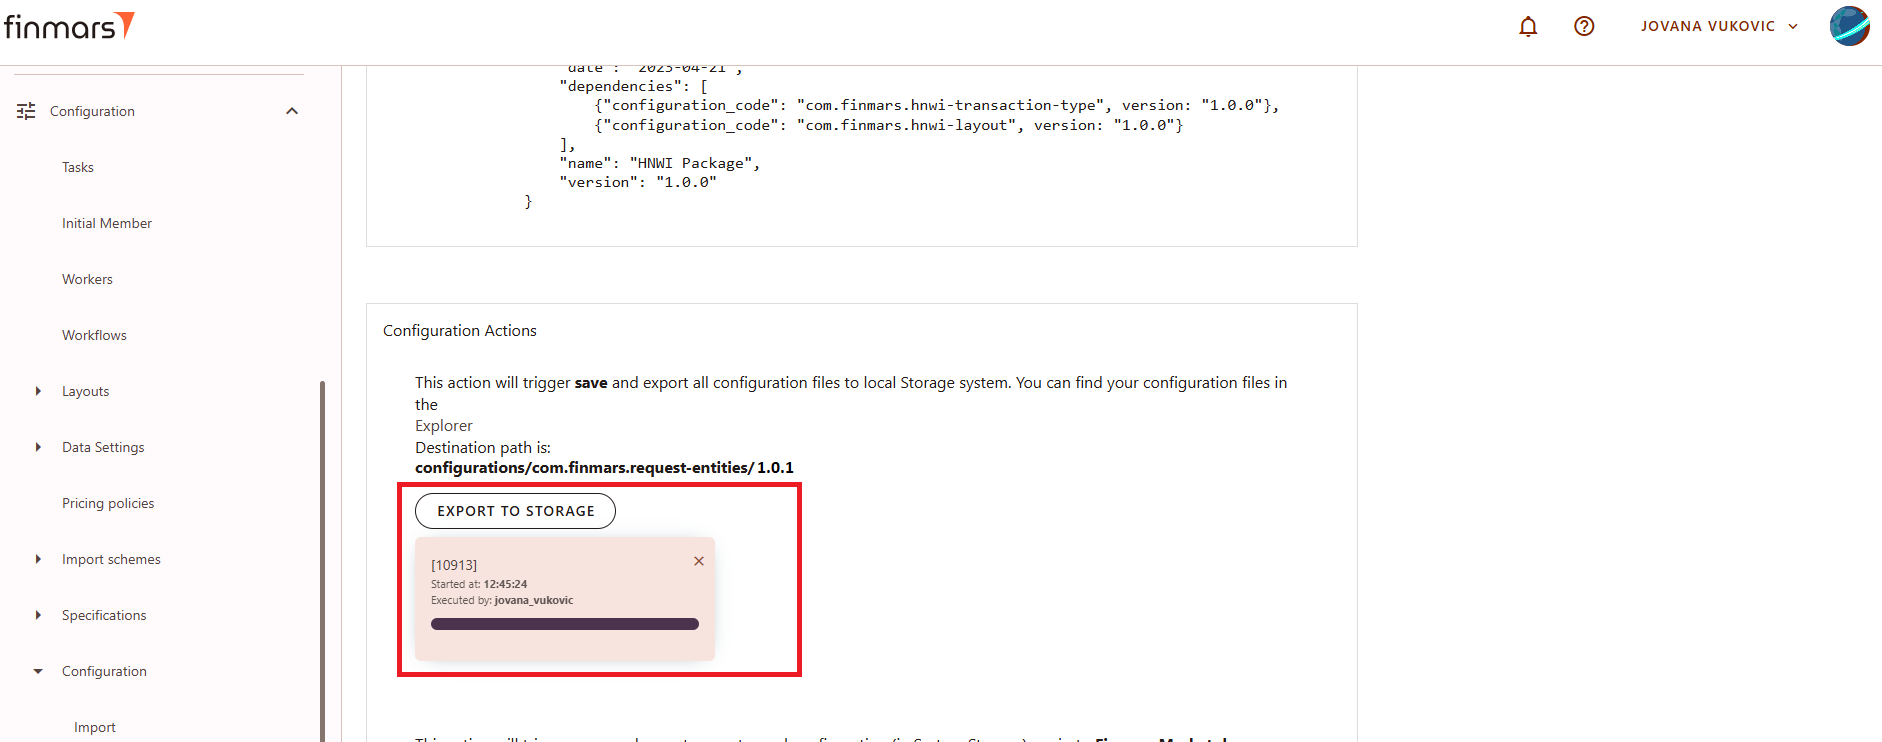
Picture 7. Exporting to storage
Step 8. Wait until the task status shows "Task Finished" and manually verify that the export was completed successfully to ensure everything is in order.
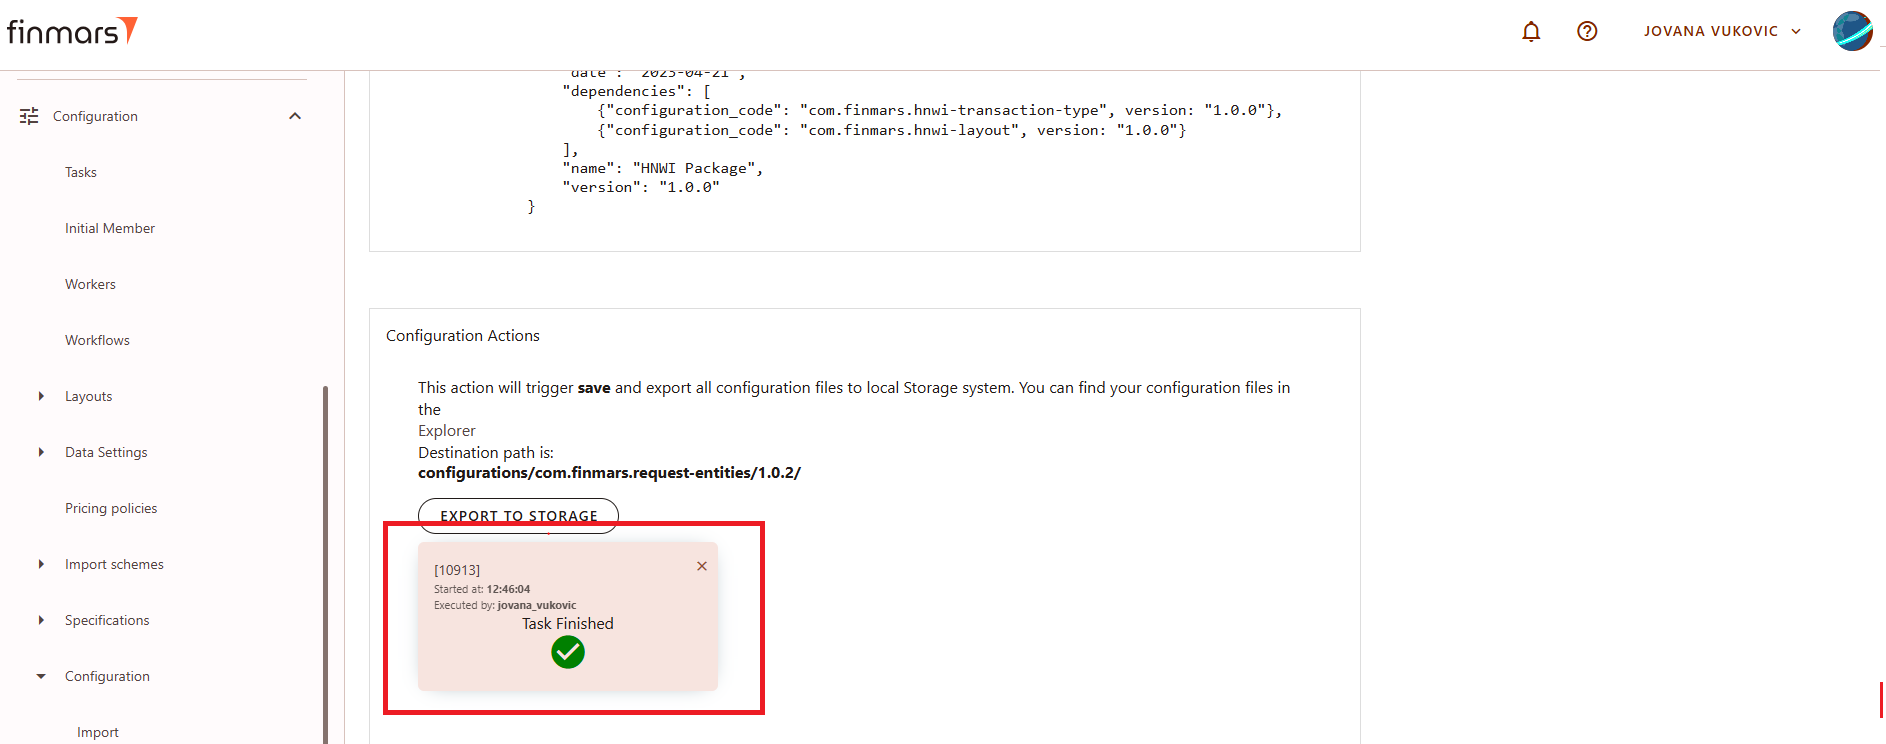
Picture 8. Successful export to storage
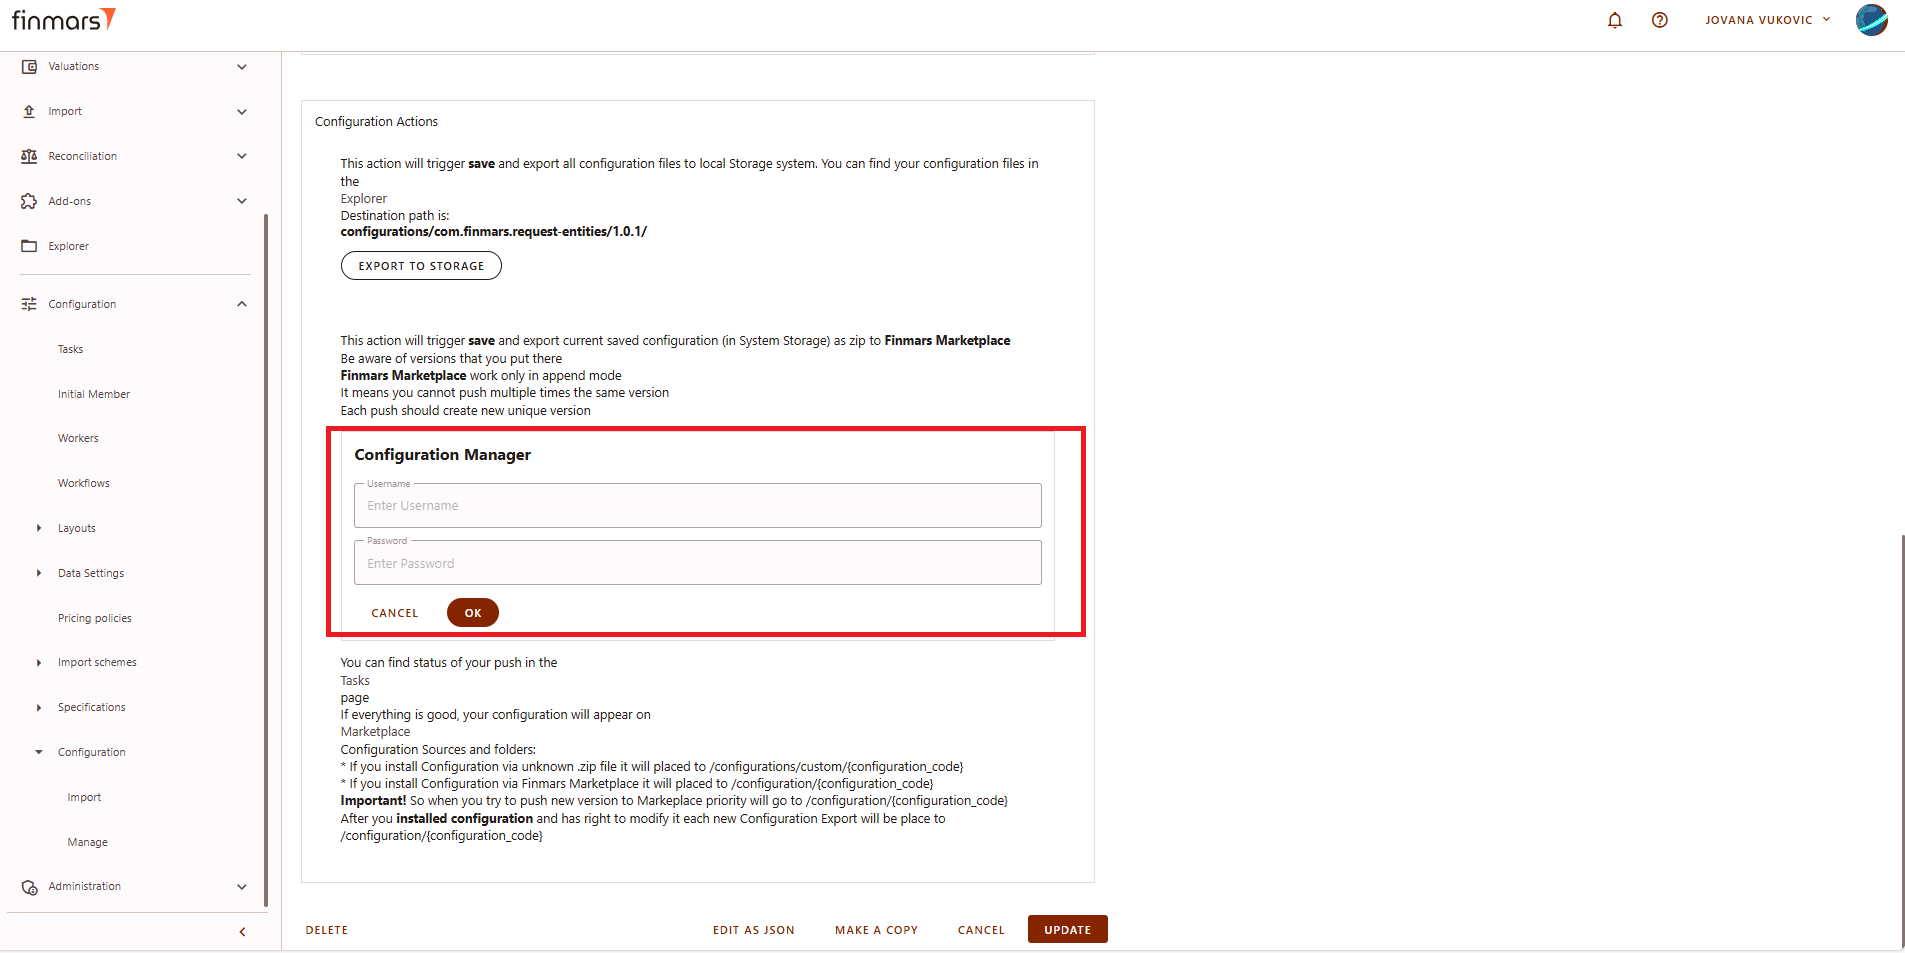
Step 9: Enter Changelog
Step 10: Once the files have been successfully exported, enter the username and password provided by the administrator, then click "OK."
Picture 9. Pushing configuration to the marketplace
Step 11. Wait and verify until the task status shows "Task finished."
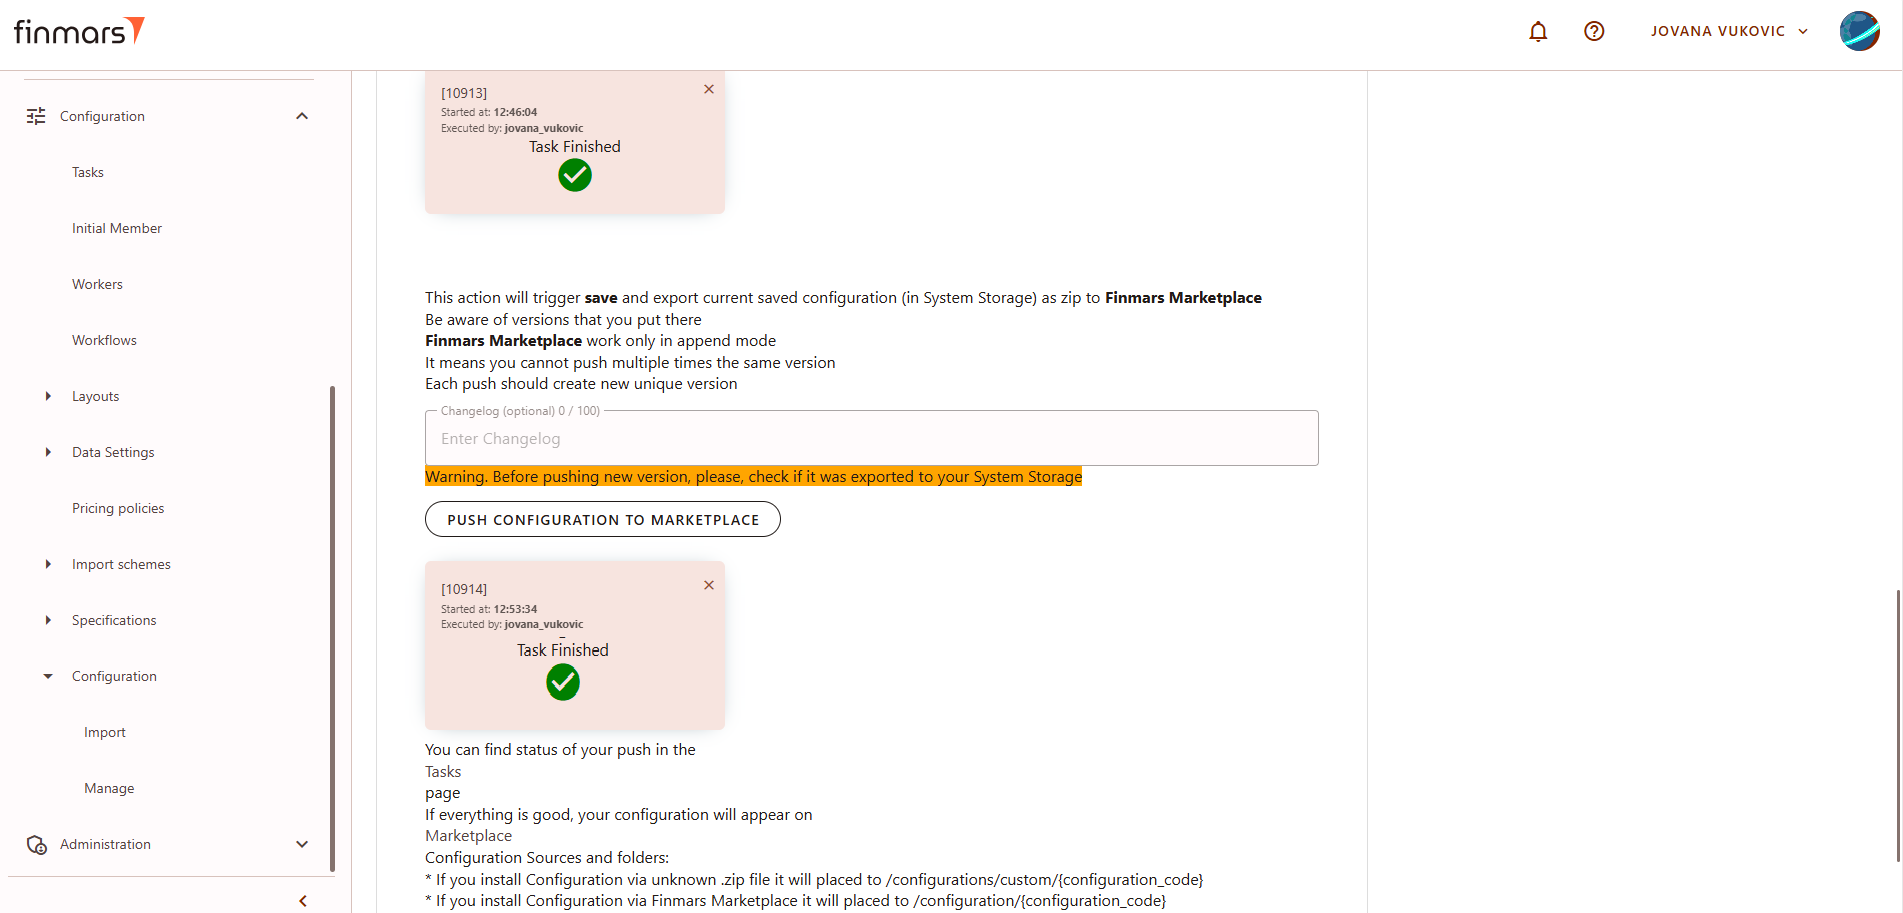
Picture 10. Successful pushing configuration to the marketplace
How to Install/Update add-on from Marketplace
Prerequisites
We assume you have all prerequisites you may need, including:
- Get Access to Finmars
- Get Access to Finmars Space
- You have the internet access
Installing/Updating add-on from Marketplace
Step 1. To install or update an add-on from the Marketplace, go to Marketplace. Locate the add-on you want to install or update.
- If you want to install latest stable version - click install/update on the add-on card.
- If you want to install particular version please refer to step 5.
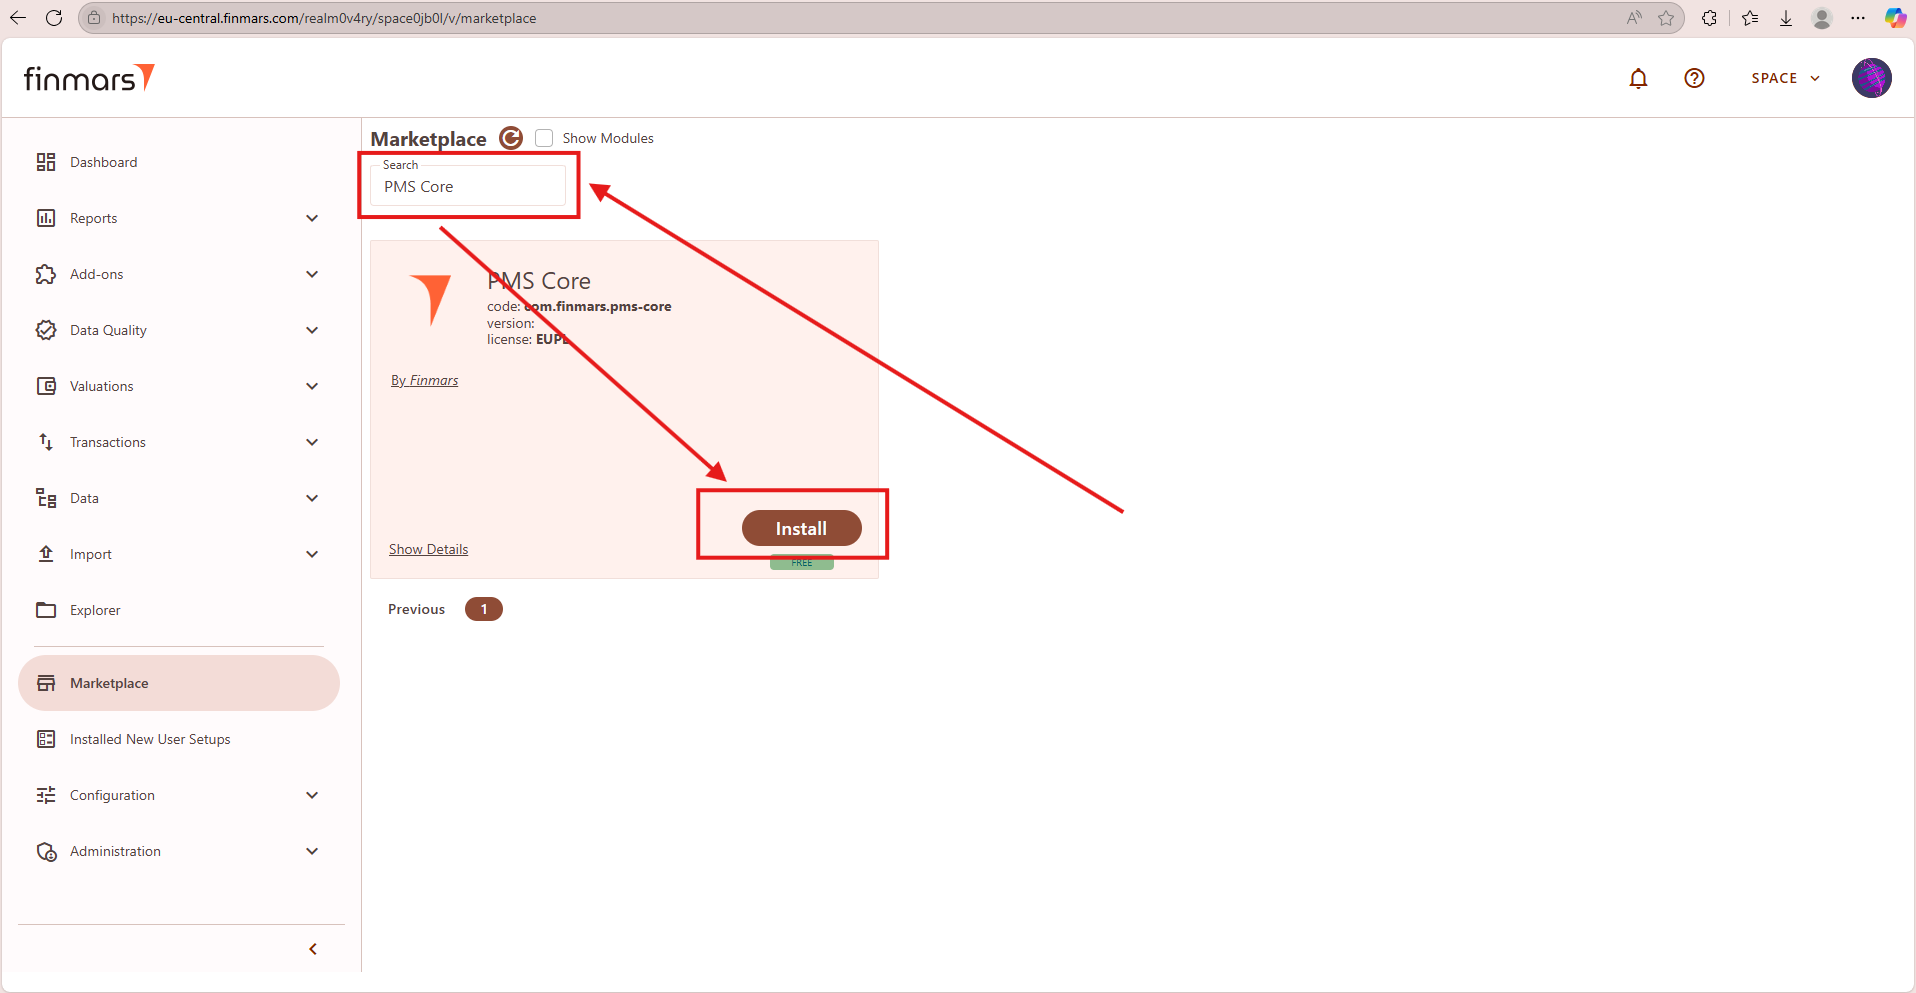
Picture 1. Installing/updating the add-on
Step 2. Confirm that the installation has started. A pop-up window will appear in the top-right corner.
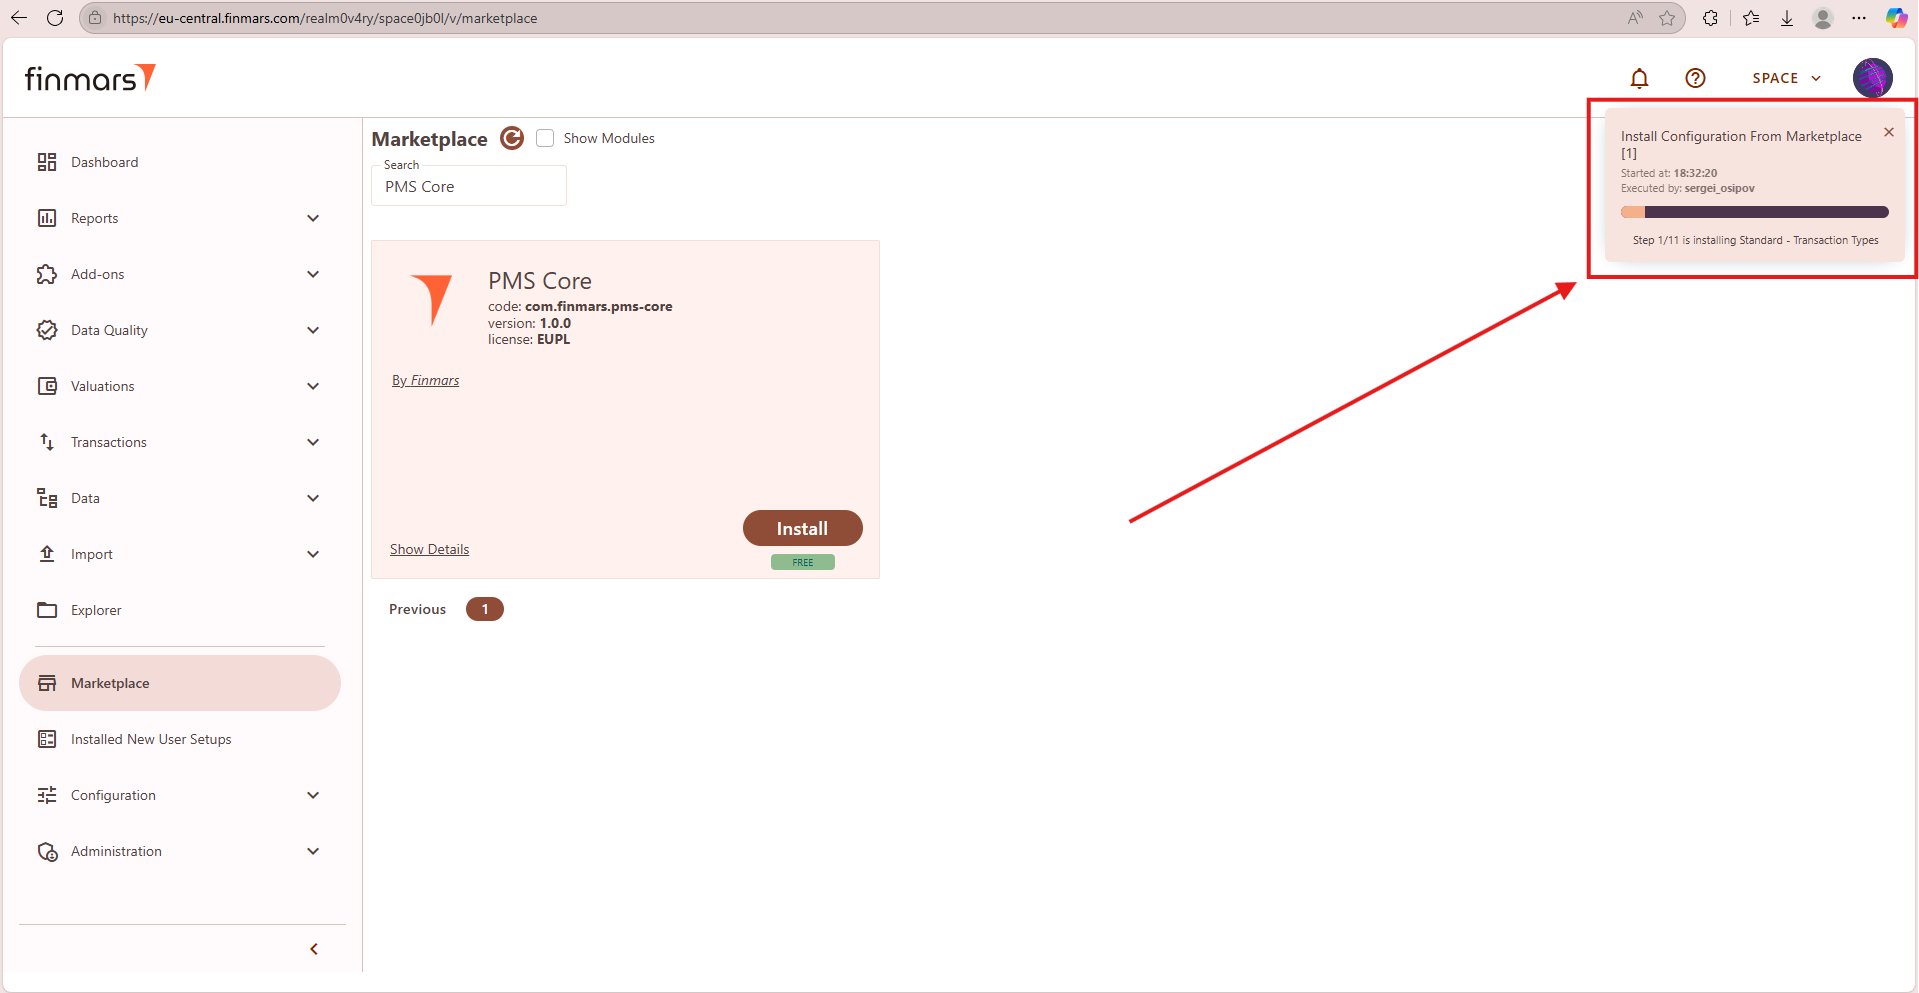
Picture 2. Starting installation
Step 3. Confirm that the installation was successful. A pop-up window will appear in the top-right corner with the message "Task Finished."
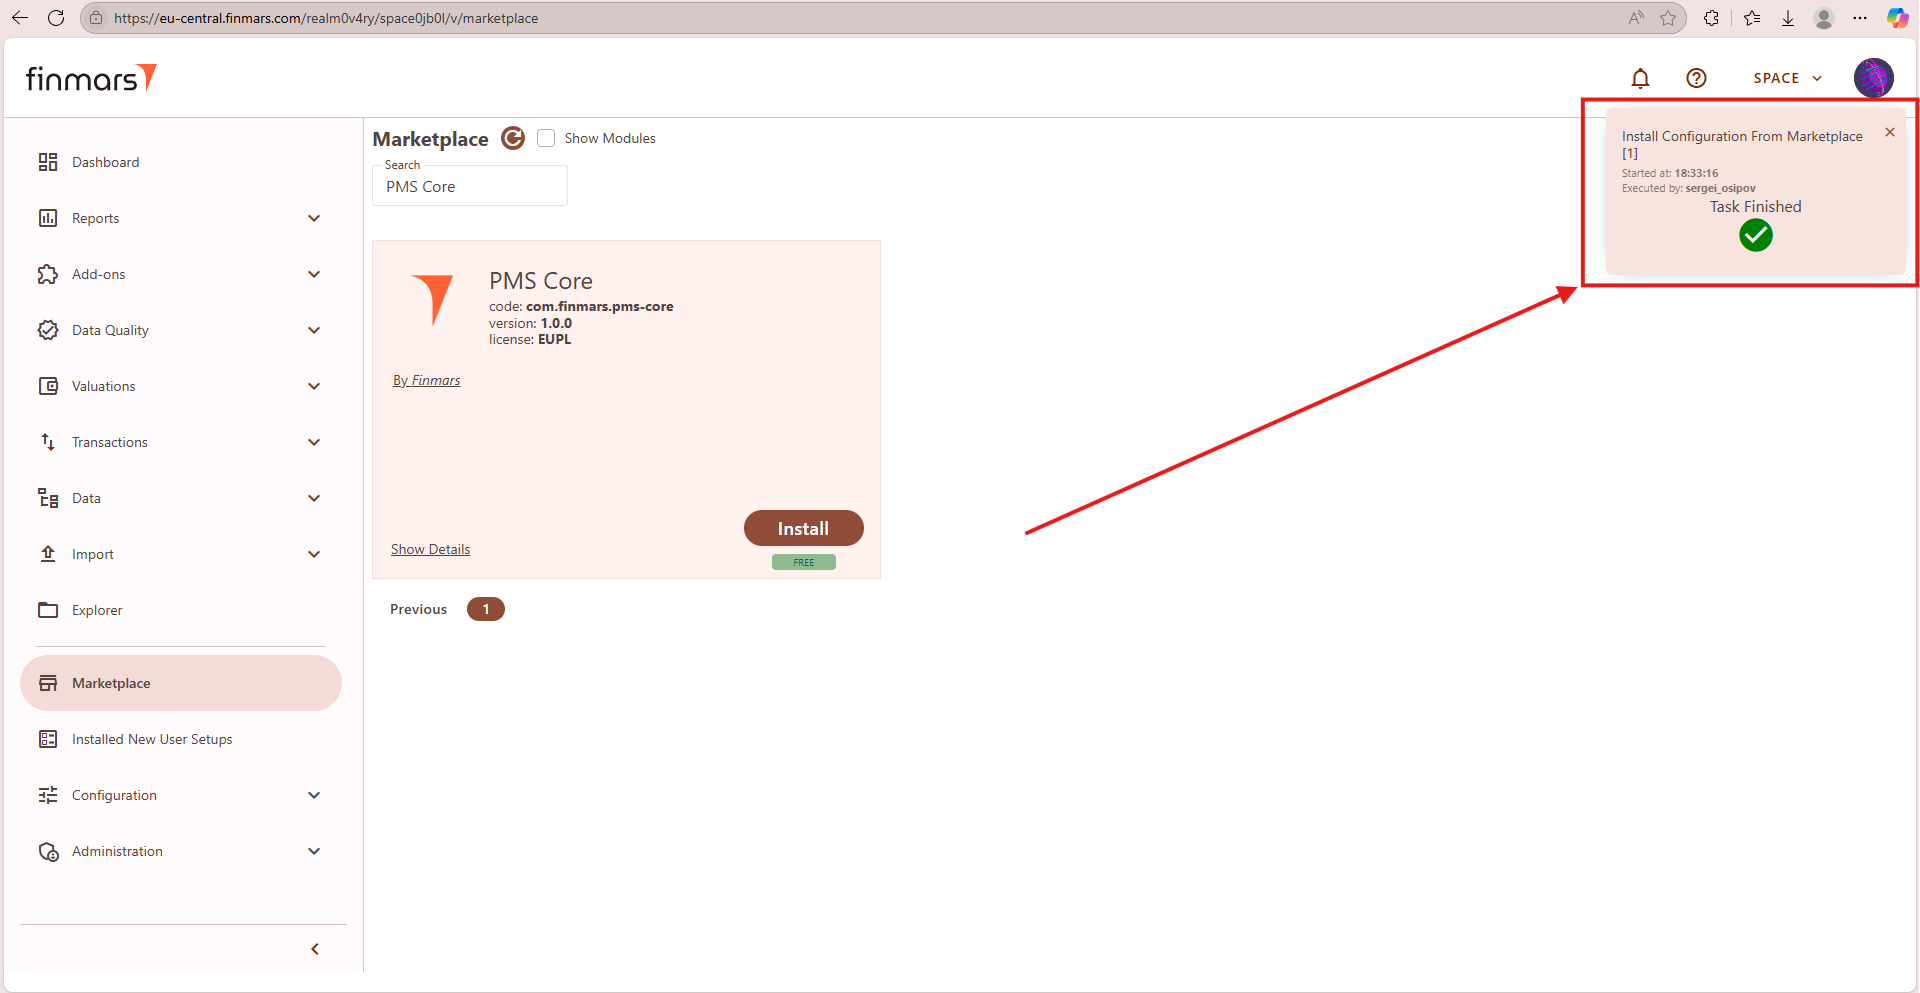
Picture 3. Successful installing/updating the add-on from marketplace
Step 4. Additional confirmation can be checked in the Task section. Navigate to Configuration > Tasks in the menu and verify the status. The expected result is "Success" without any errors.
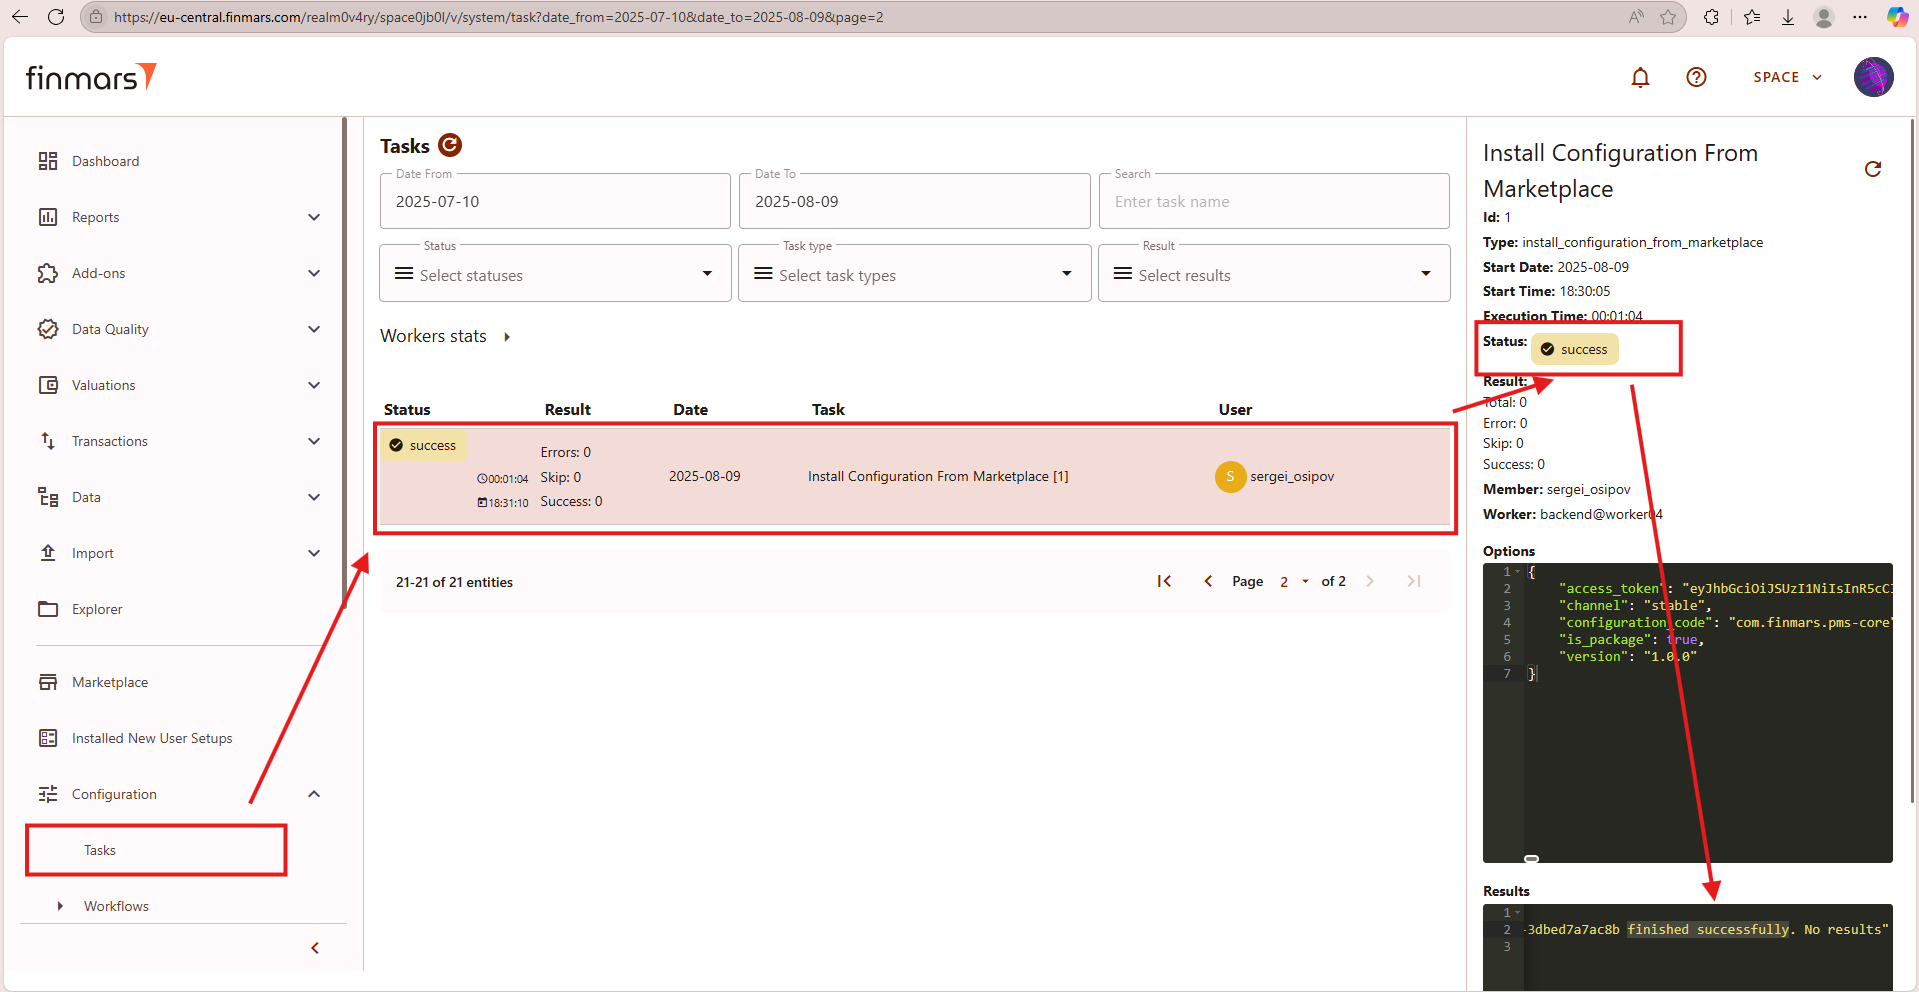
Picture 4. Successful installing/updating the add-on from marketplace checking the result
Step 5. If you want to install a different version of an add-on, navigate to the Marketplace from the left-side menu. Use the search bar at the top to find the required add-on. Click on the "Show Details".
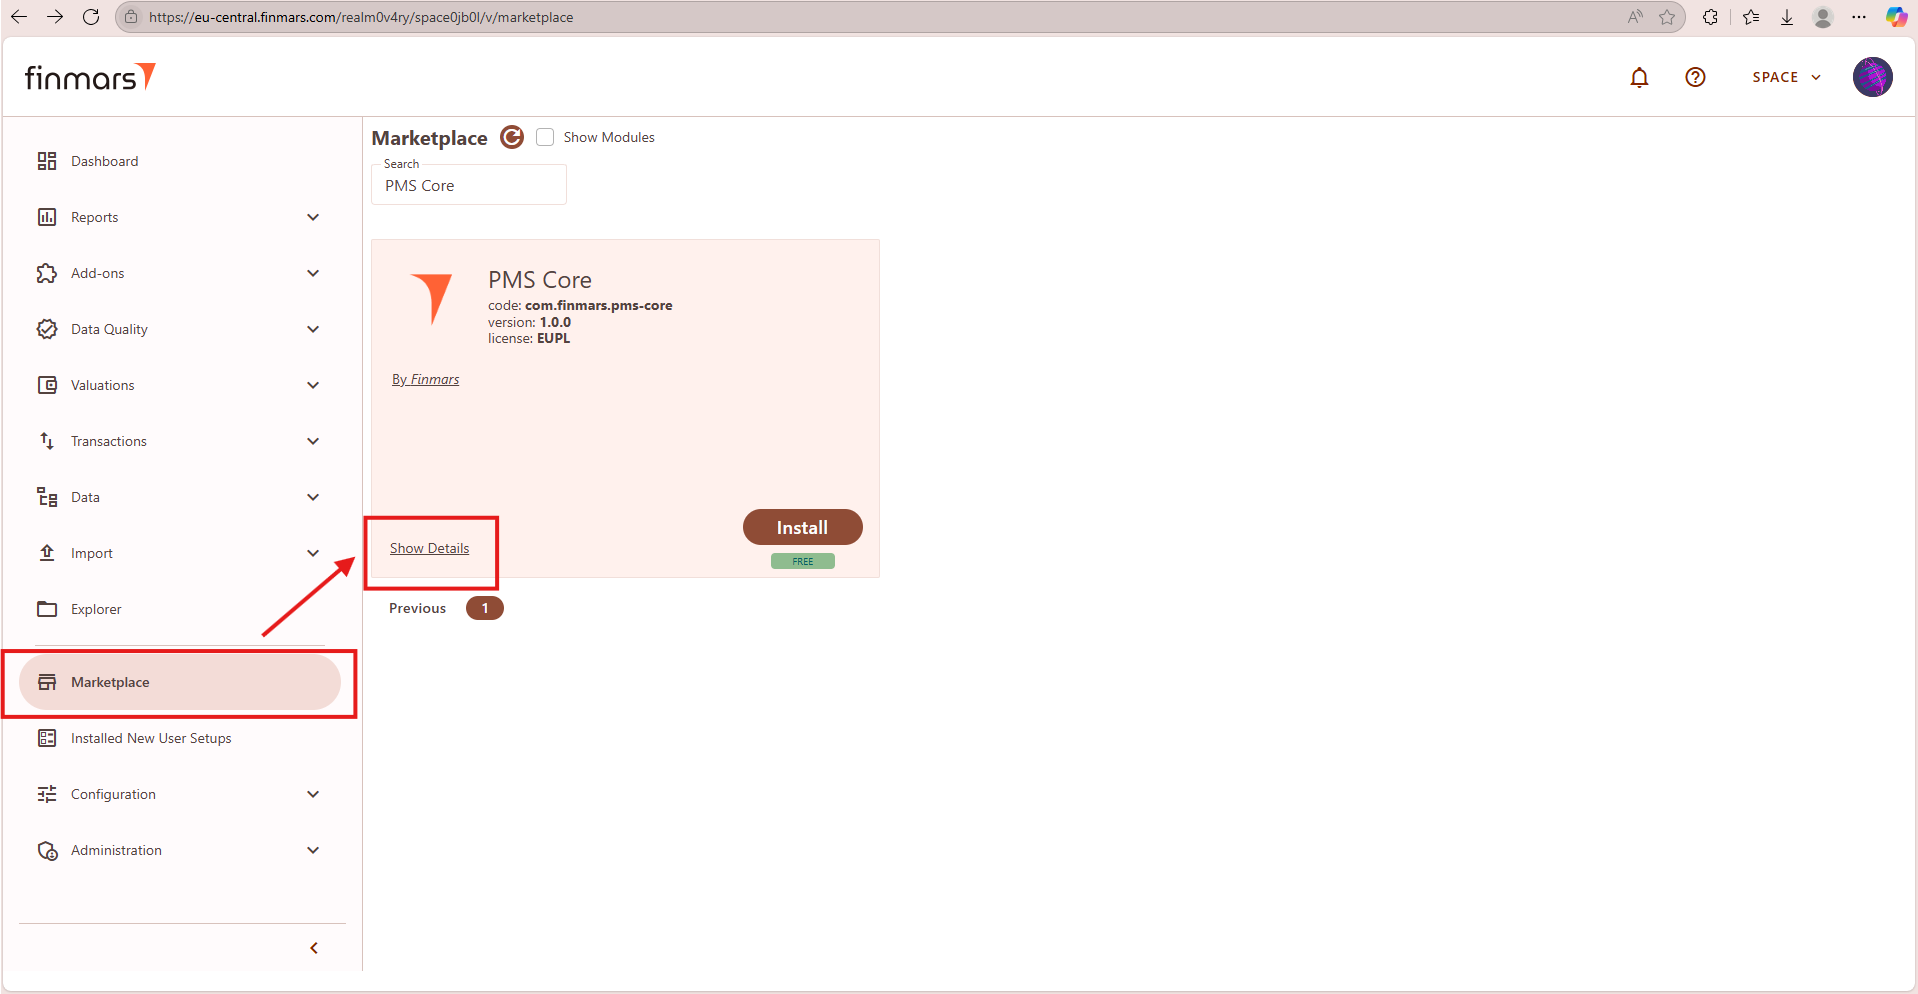
Step 6. In the add-on details, locate the version selection dropdown. First, you need to select the release type (Stable or Release Candidate) and then choose the desired version from the available options.
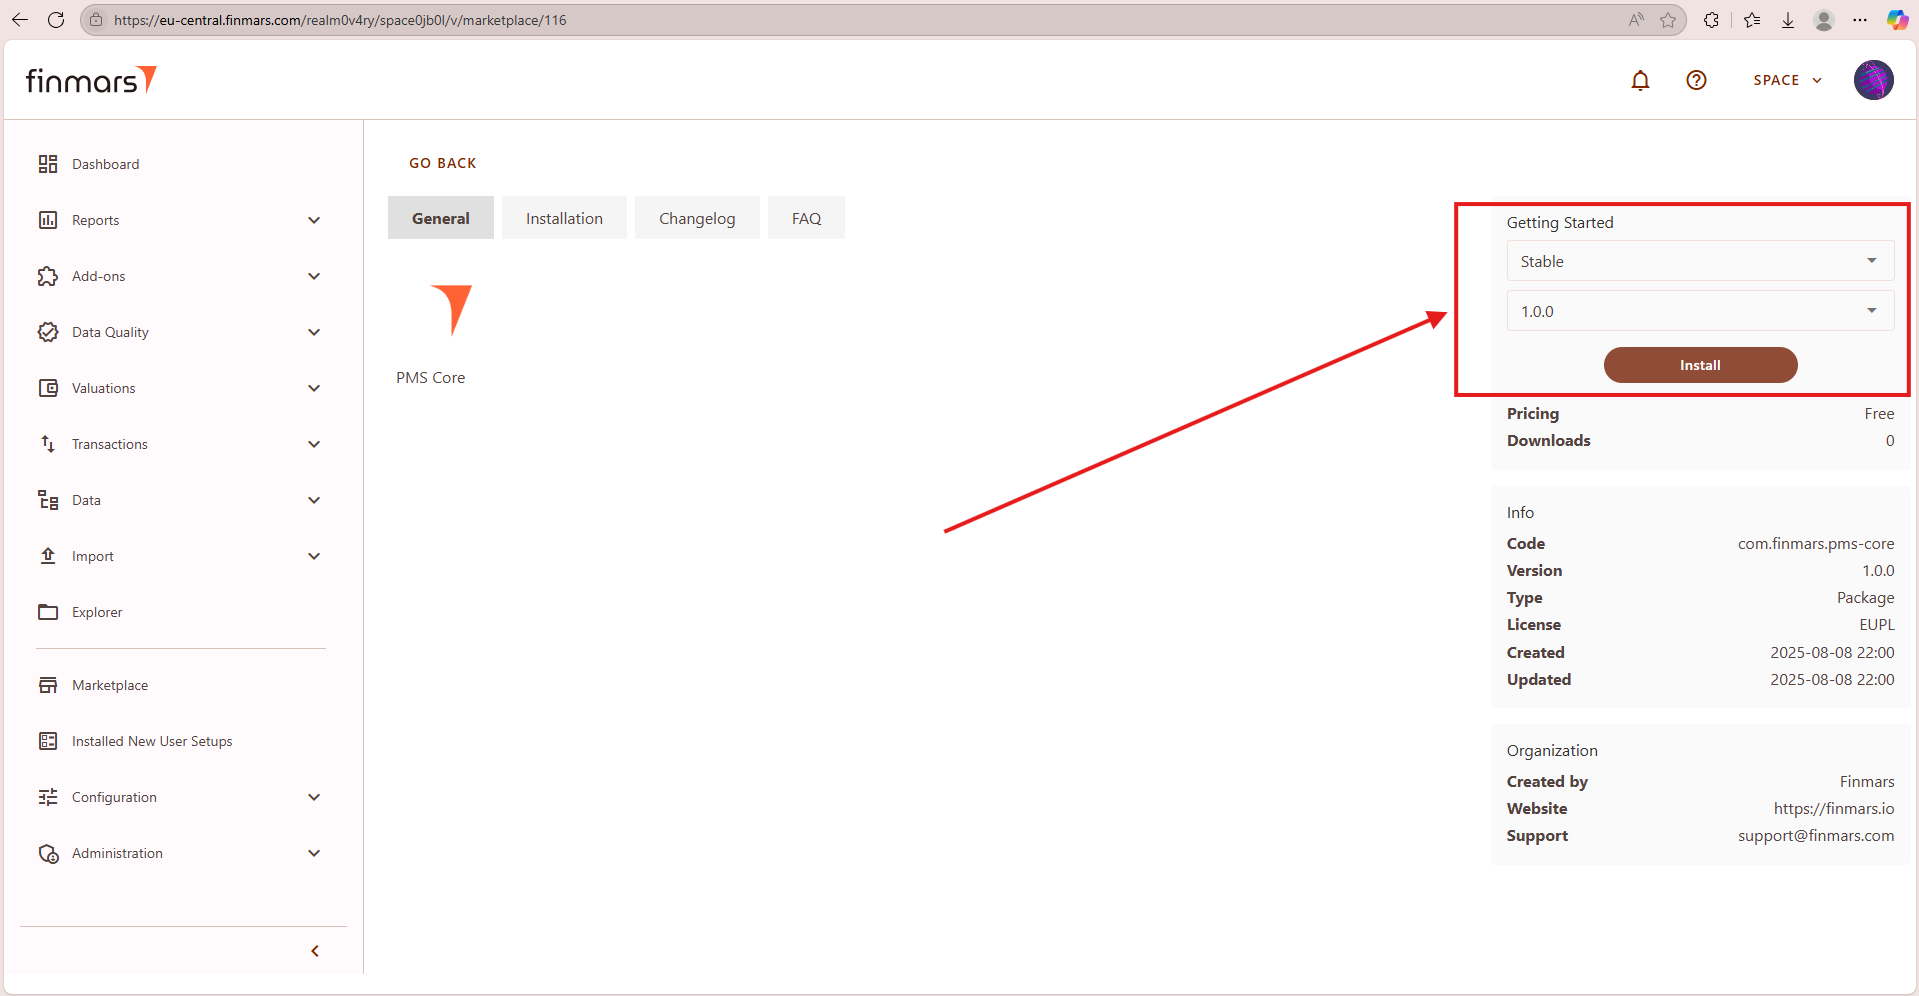
Picture 6. Changing the Version
Step 7. Click Install to apply the selected version. After installation, go to Configuration > Tasks to check the status and ensure the update was completed successfully. See Step 4.
How To Add an Input into Transaction Type
Prerequisites
We assume you have all prerequisites you may need, including:
- If needed: the VPN is configured to access the Finmars resources
- If needed: access to the Virtual Machine to work with the sensitive information
- Must have: registered in Finmars in the needed region environment (self-registered or registered by Finmars)
- Must have: having permissions set to allow continue with the Action in the Guide
- Must have: to create a new Workspace you must have a License Key (provided by Finmars)
How To Add an Input into Transaction Type
1. Open the Workspace, go to Configuration section, Data settings and select Transaction Types.
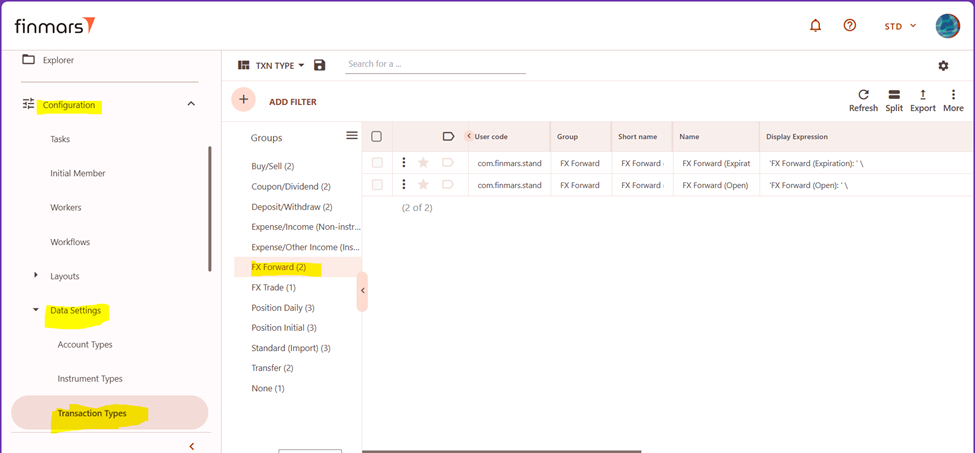
2. Select 3 dots on the left for the respective transaction and choose Edit.
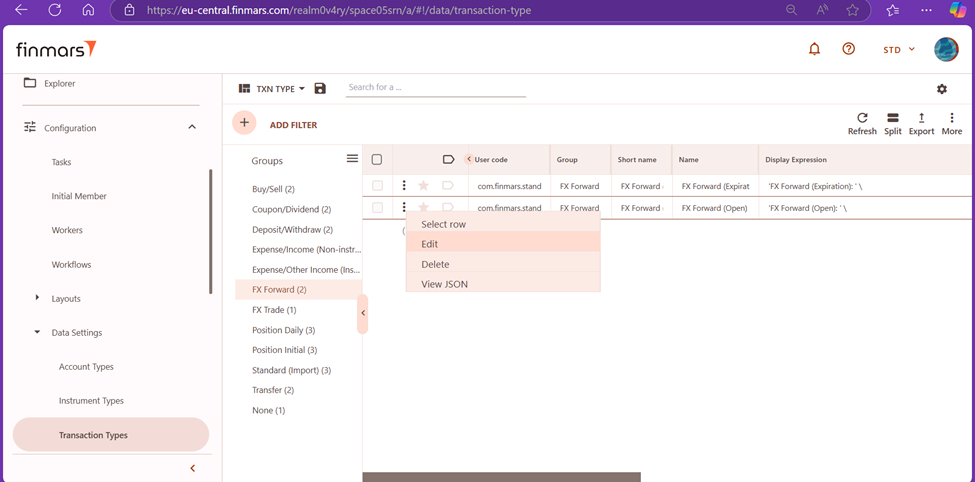
3. In the Editor, tab Inputs has to be selected. 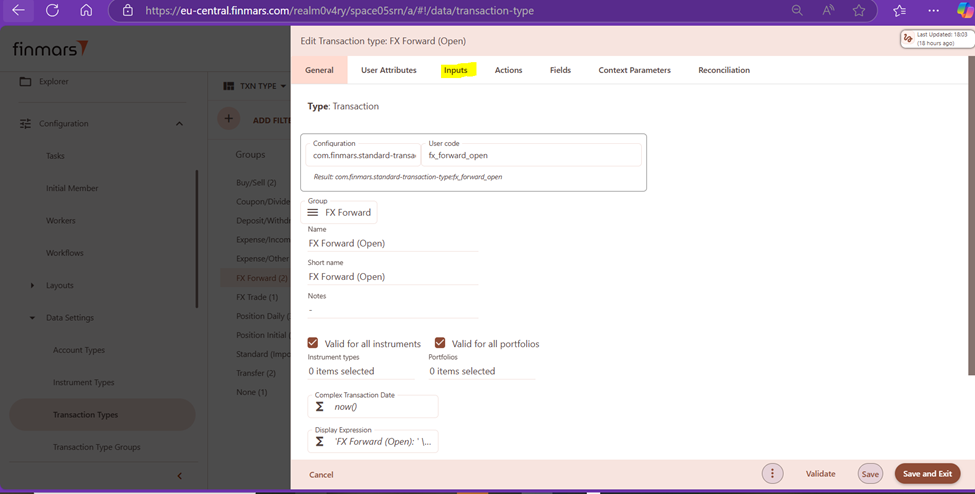
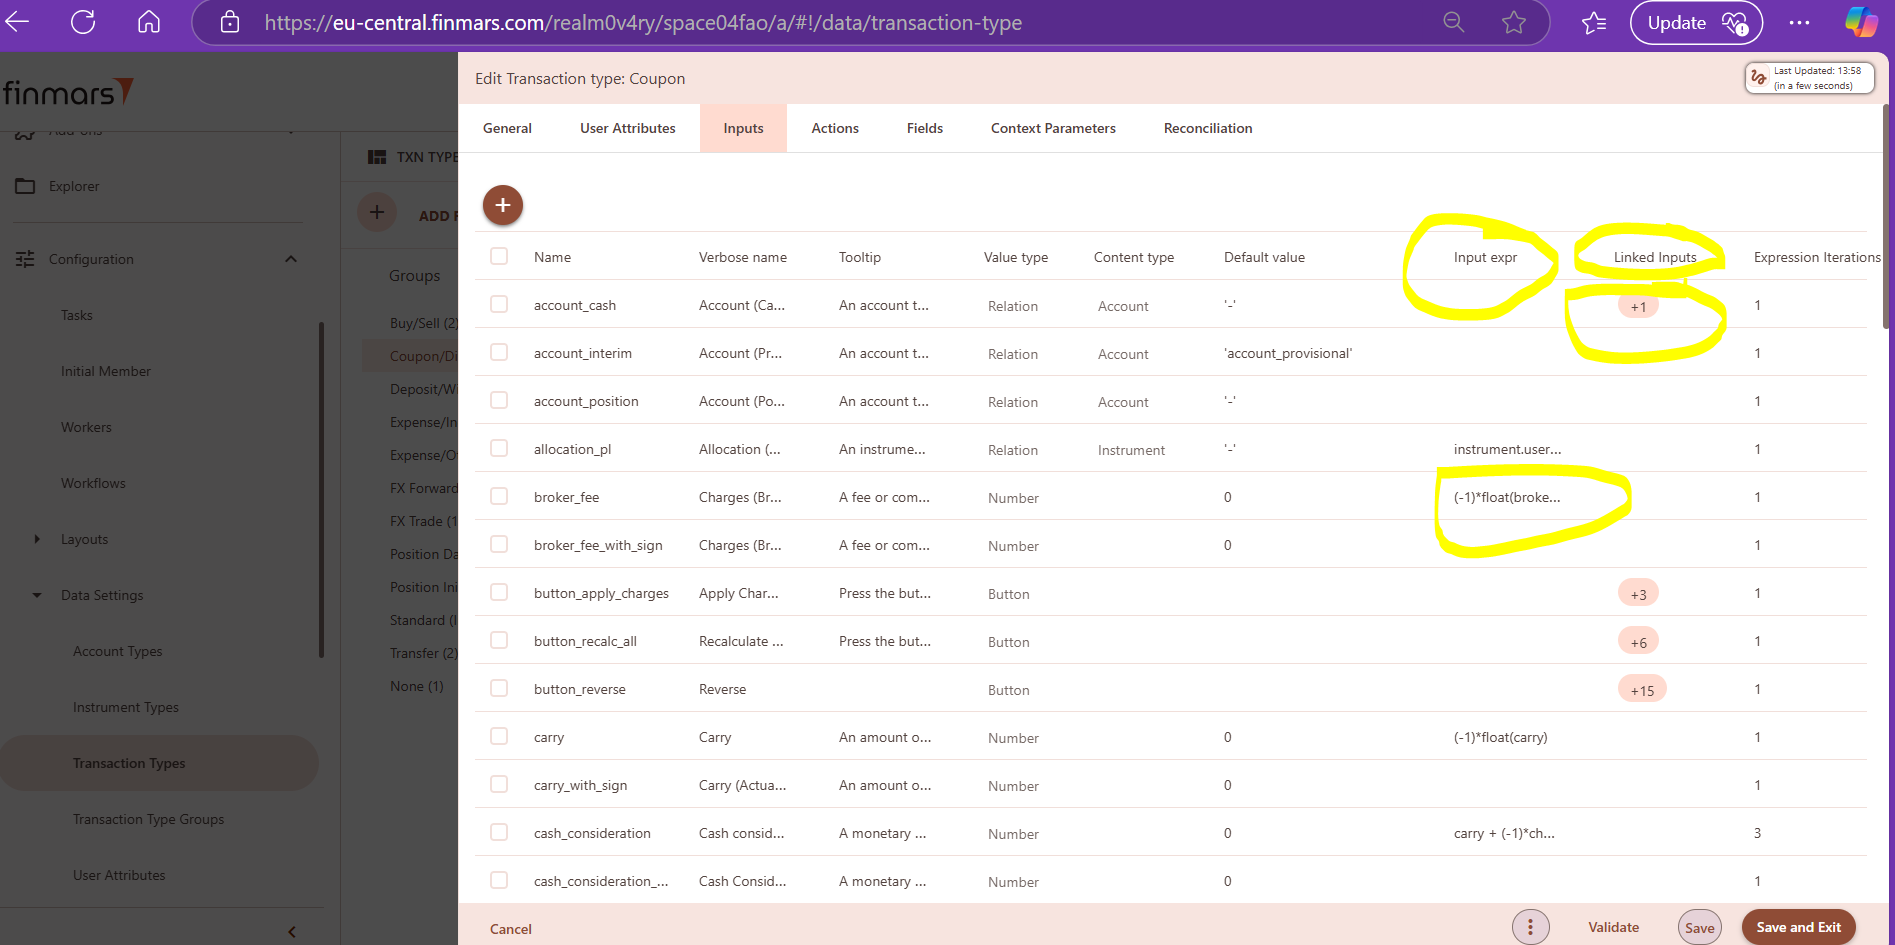
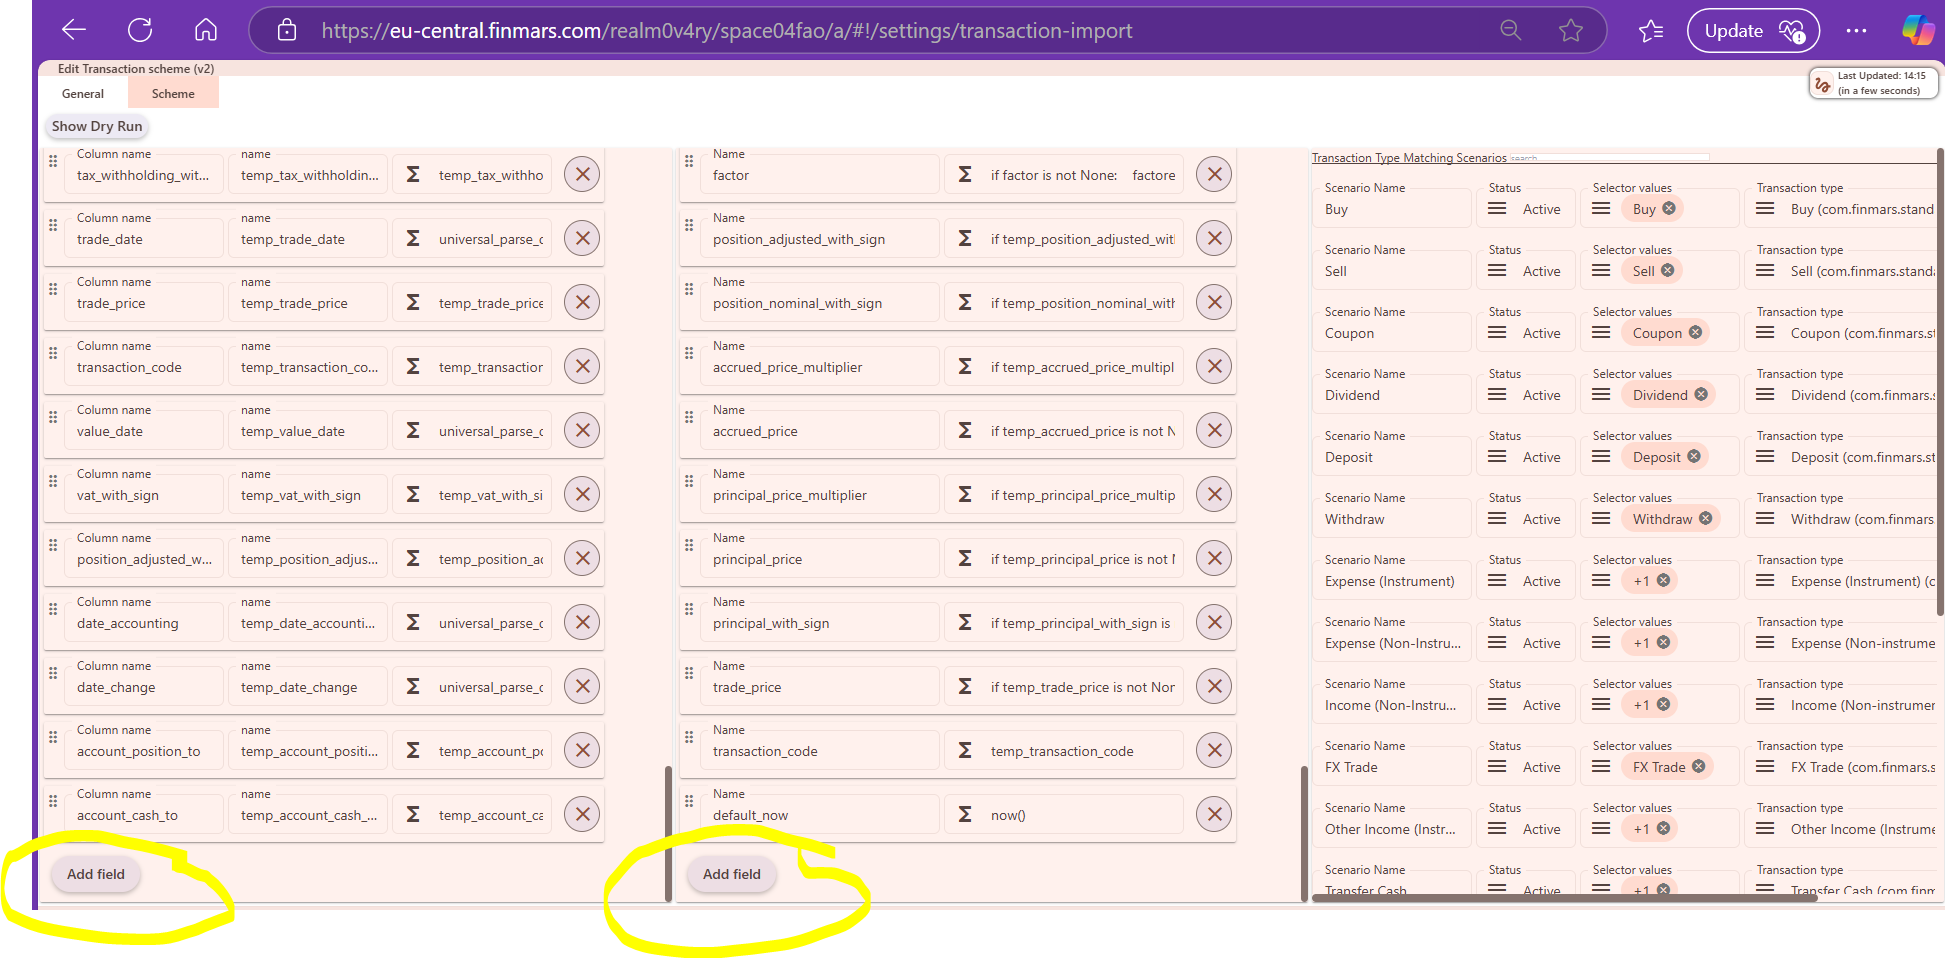
4. Tab Inputs shows all inputs already existing for the respective transaction type. For additional inputs, button + has to be selected.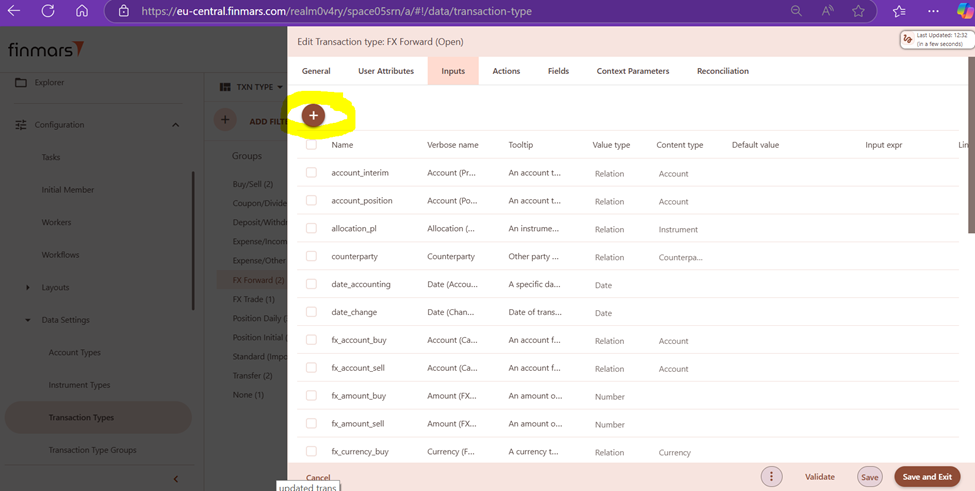 5. In the next step, Input is edited.
6. Details on Inputs are provided in the excel file for standard configuration. Tab “inputs” should be opened. https://finmars.sharepoint.com/:x:/r/sites/Finmars/_layouts/15/Doc.aspx?sourcedoc=%7B8596509E-F6A0-45D5-B7A4-2A82C5C24396%7D&file=standard-config.xlsx&action=default&mobileredirect=true
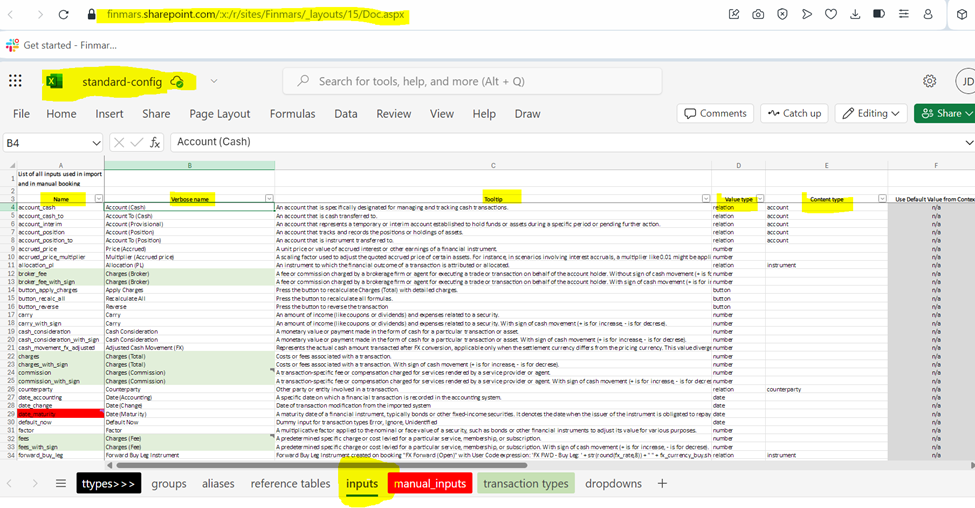
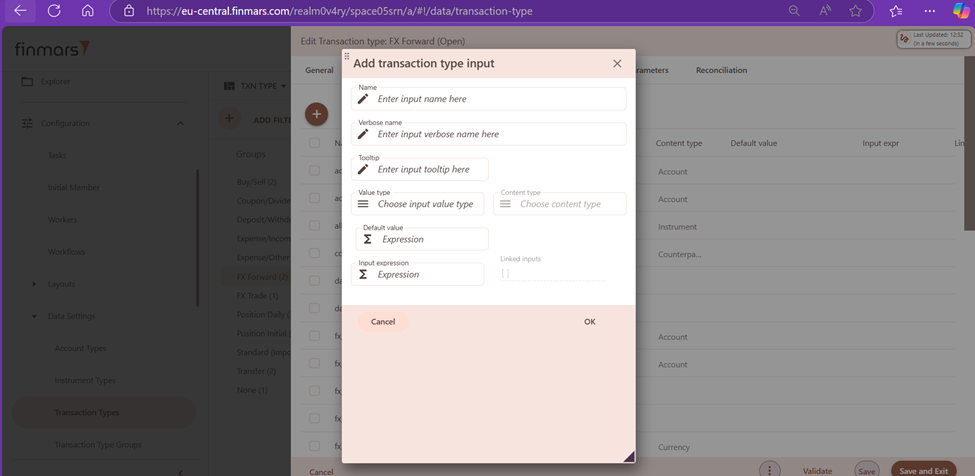
7. Name, Verbose Name and Tooltip should be copied from the excel file for standard configuration and pasted directly to respective fields. Each Input has unique Name.
8. Value type is selected from the drop-down menu.
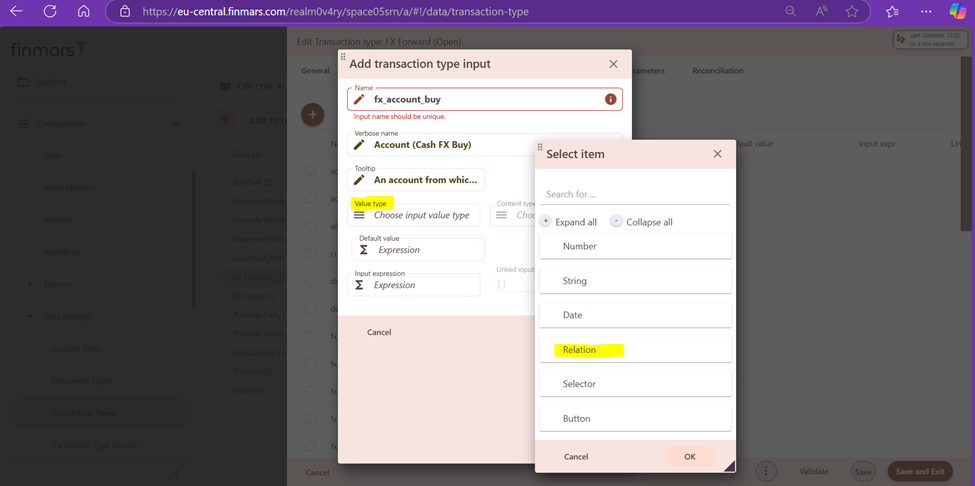
9. Content type is also selected from the drop-down menu.

10. Linked inputs can be selected from the drop-down menu as well, depending on the type of respective input.
If there is a linked input here, it means that change in this input will trigger input expression for this for listed linked inputs.
What's important here is express exploration. It means how much iterations there will be. So, if there is a dependency between these fields, for example in the first iterations there can be some errors, meaning that we probably need to add several more iterations.
Button - when we click on it, it also triggers all recalculation of input expression of the listed inputs.

Here are some examples of linked inputs and input expressions.
11. Default value is a value that we see by default on the form when we create. By clicking “OK” button, our Input is saved.
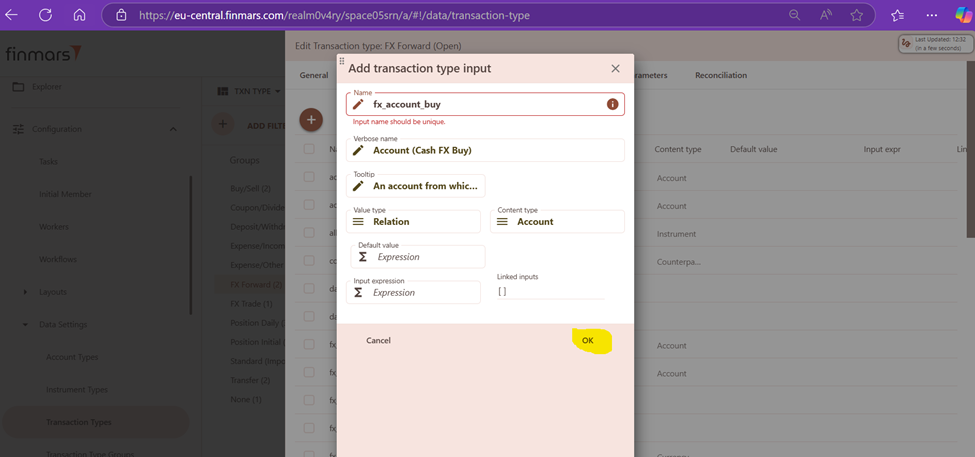
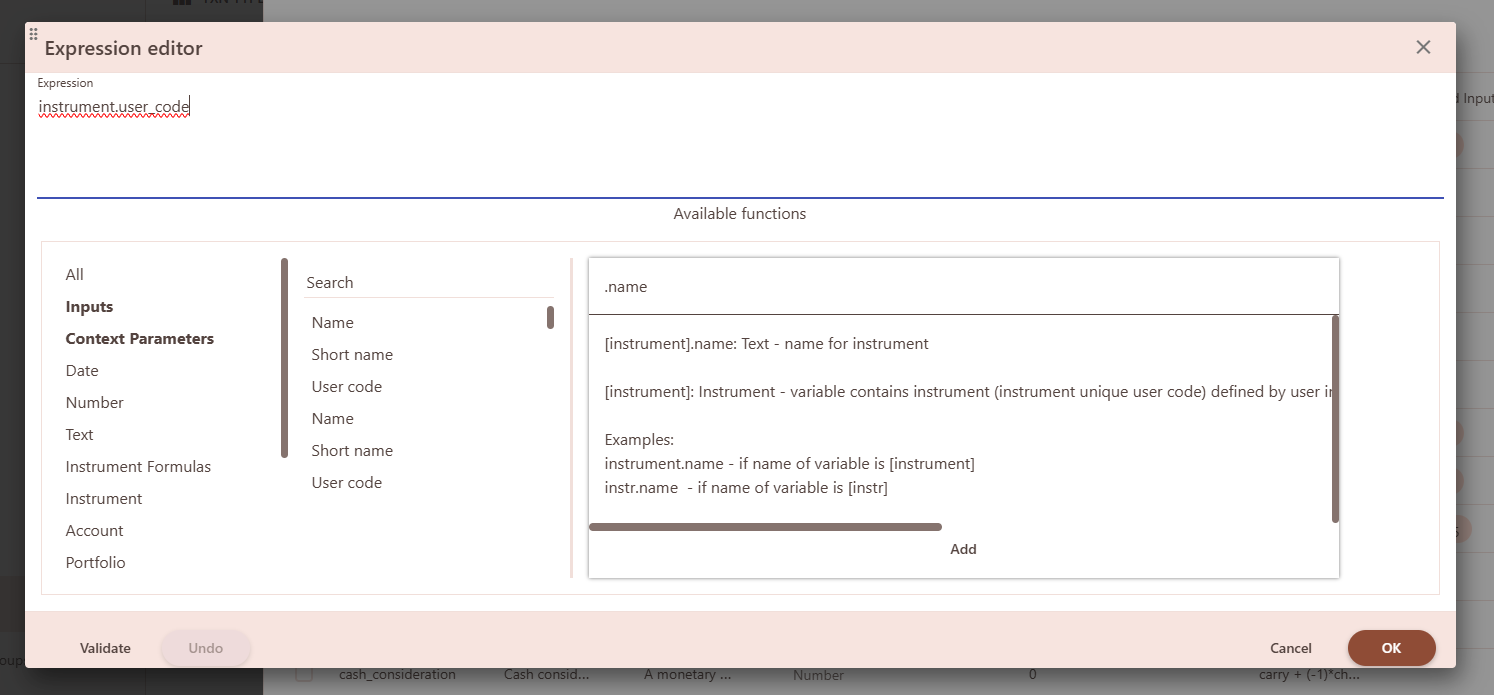
There is also expression editor available in the "Inputs "section.
12. When we update/modify Transaction Types, we always need to make sure that all inputs are updates as well.
13. Finally, we need to make sure that import schemes which are using these transaction types have all applicable input values.
If there are no variables, there are two possible situations:
1) either it’s provided in the source data and must be passed to the transaction types input;
2) or it’s calculated in the import scheme and passed to transaction type input.
1.
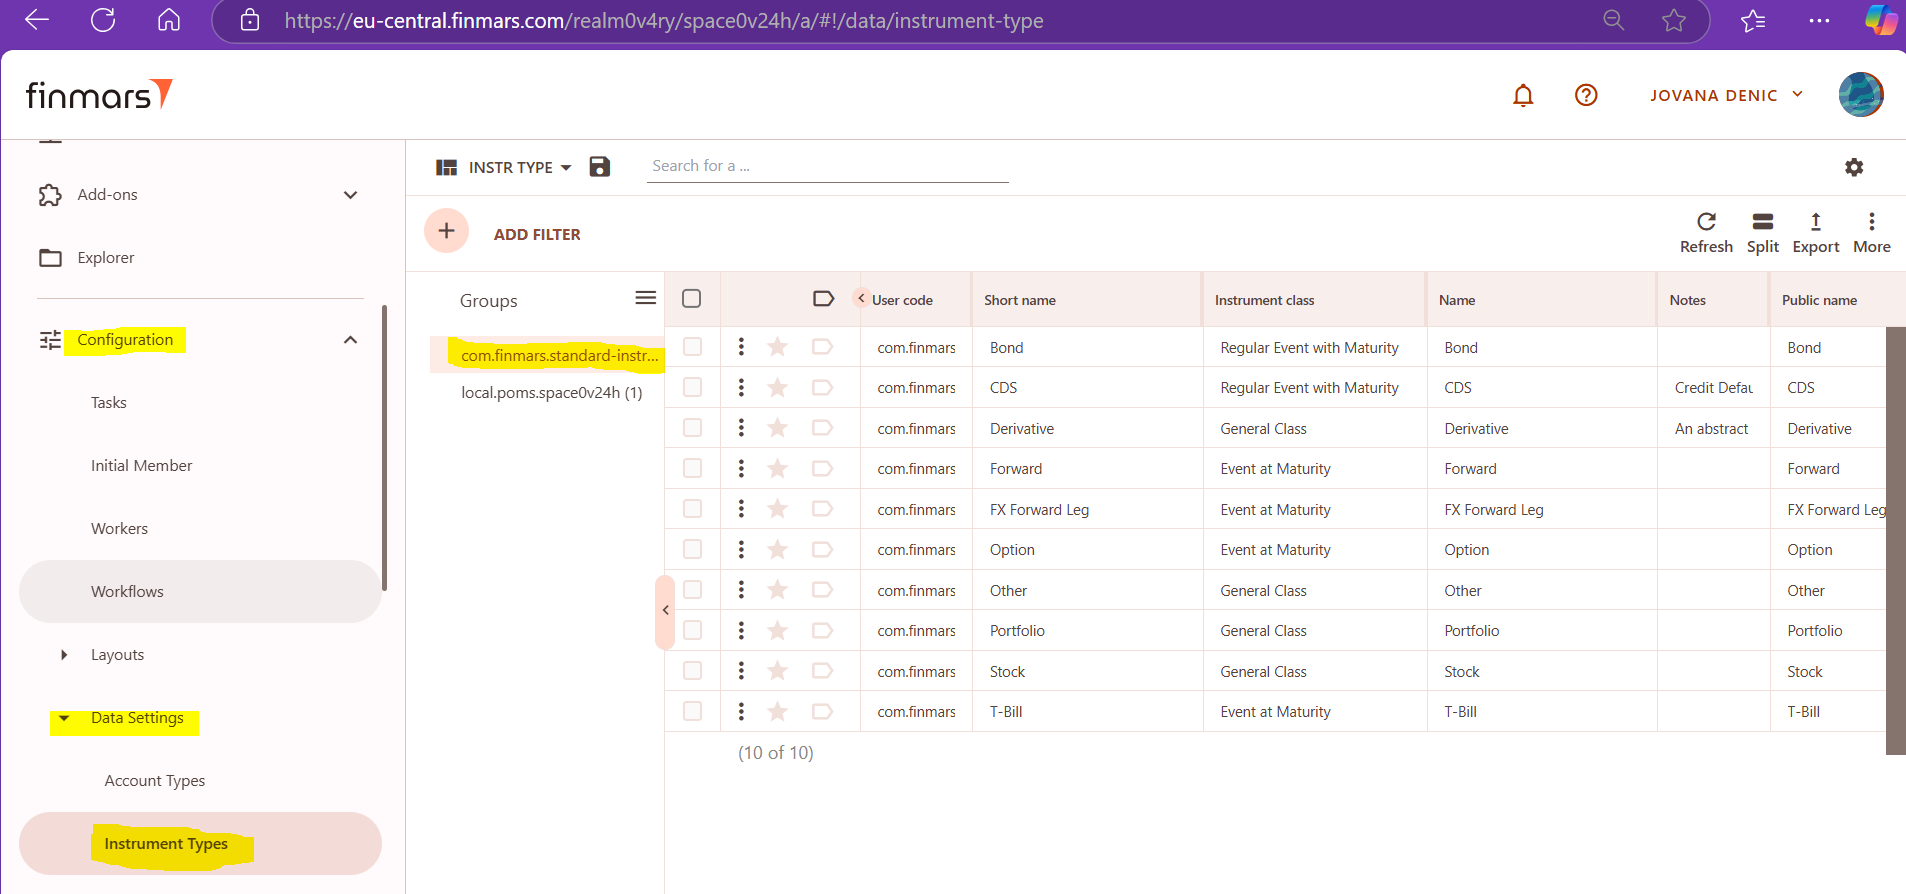
How to Create Instrument Type
Prerequisites
We assume you have all prerequisites you may need, including:
- If needed: the VPN is configured to access the Finmars resources
- If needed: access to the Virtual Machine to work with the sensitive information
- Must have: registered in Finmars in the needed region environment (self-registered or registered by Finmars)
- Must have: having permissions set to allow continue with the Action in the Guide
How to Create Instrument Type
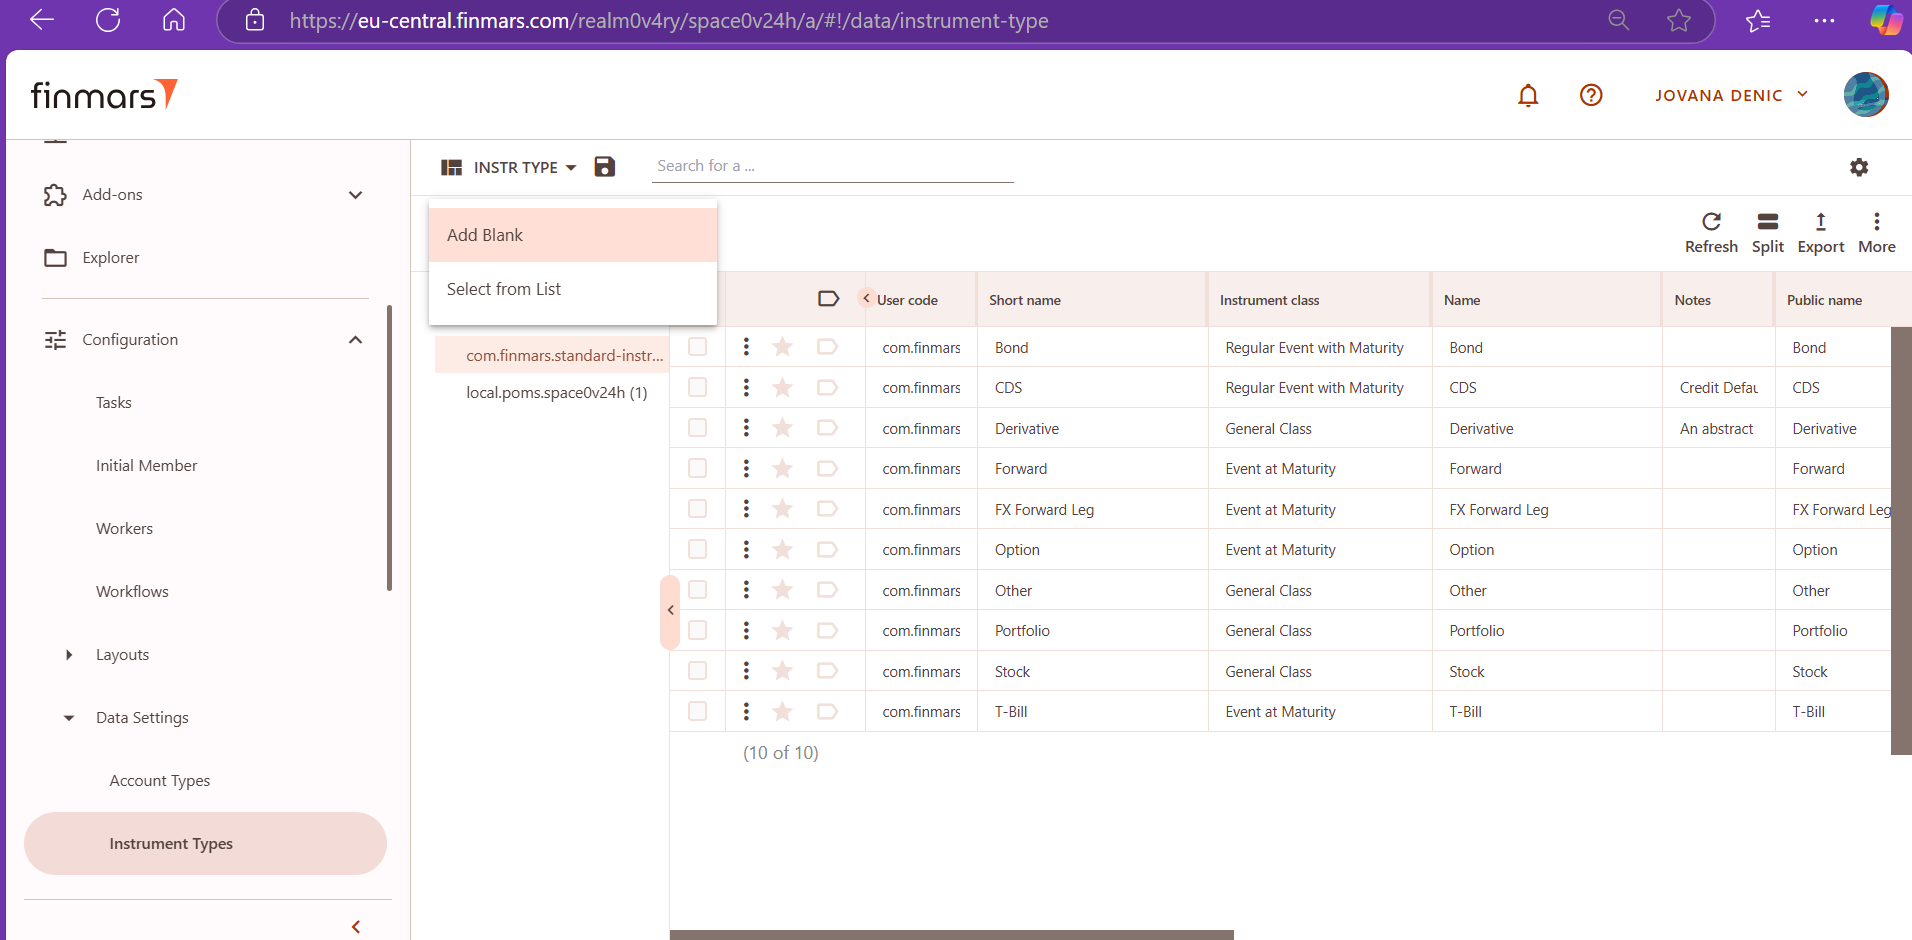
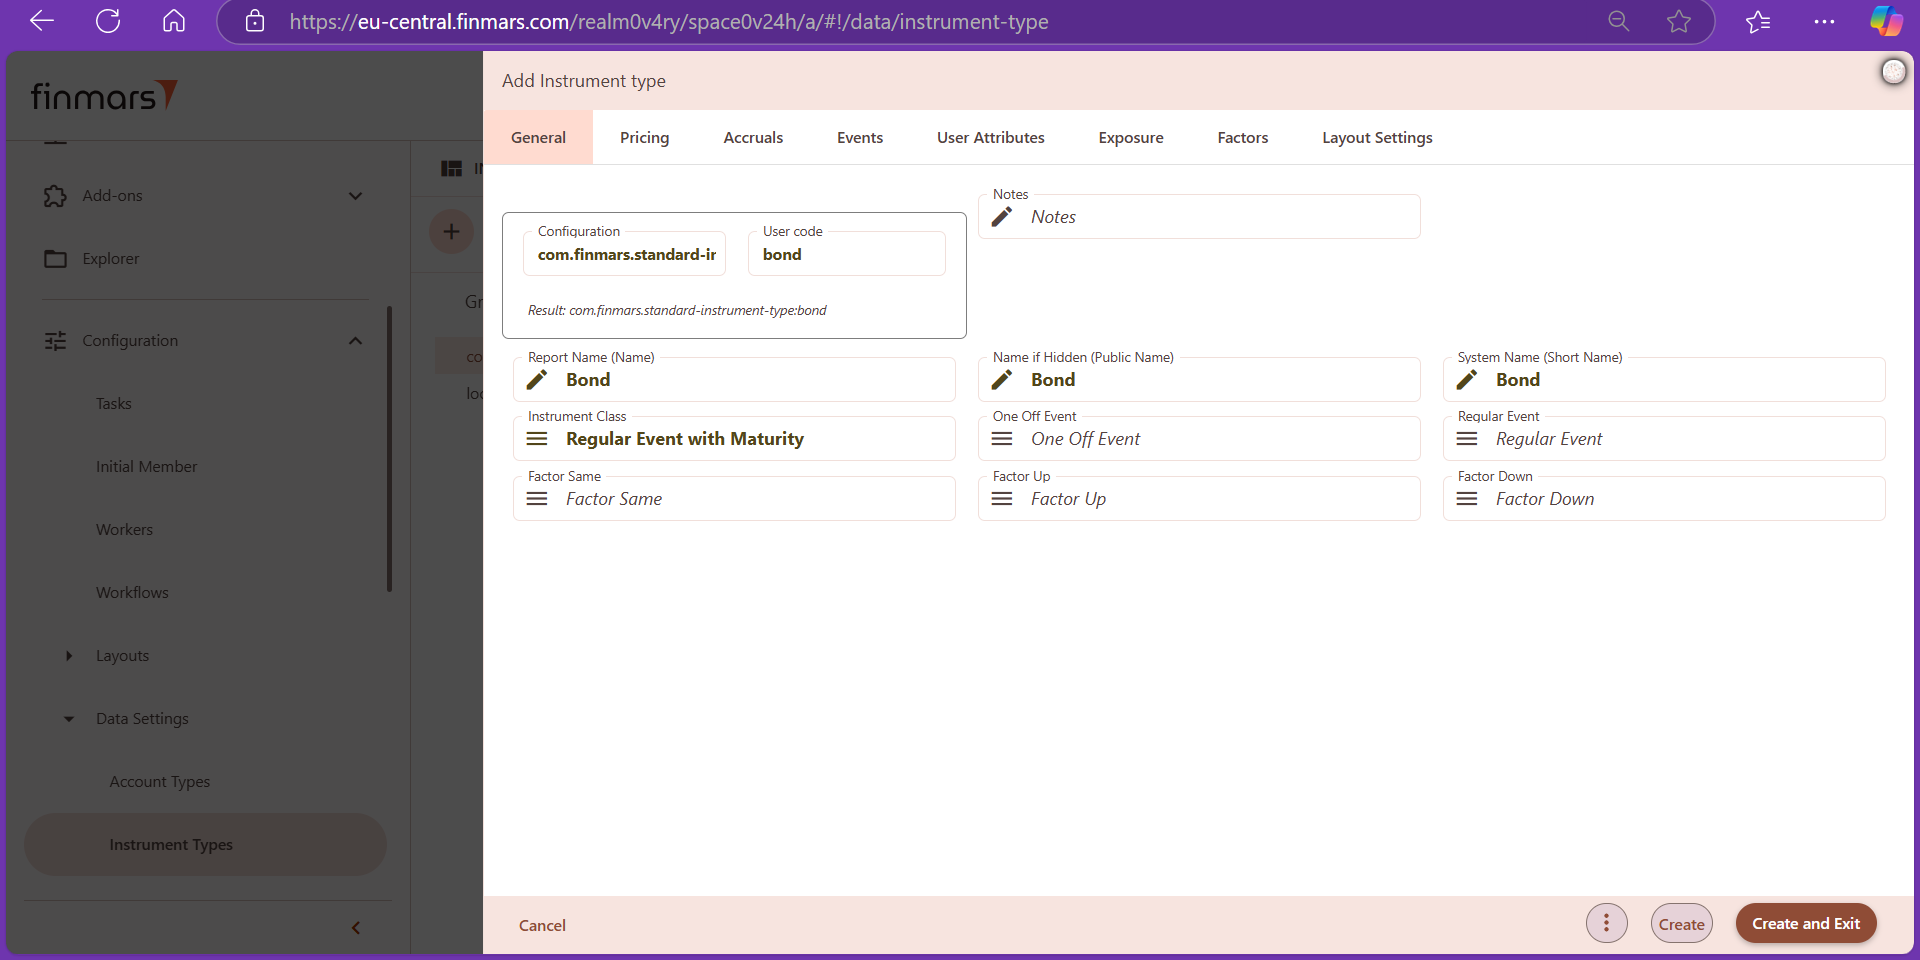
1. Open the Workspace, go to Configuration section, Data settings and select Instrument Types.
3. In General tab, we select relevant configuration. Please note that configuration should reflect the module in which this instrument type is created, it can be not only standard. In this particular example, we were working with standard configuration.
For User code, we use respective instrument type name (bond, stock, t-bill, forward, etc.). This name is also used for the following fields: Report Name (Name), Name if Hidden (Public Name) and System name (Short Name). We have convention for a singular form in user code and in Names.
Instrument Class can be different, but for the bond in this illustrative example, we have chosen "Regular Event With Maturity". Kindly note that "Regular Event" and "One-Off Event" are deprecated actions, thus no longer in use. Below is a brief summary of instrument classes which are in use.
-
Event at maturity - Used for instruments with an event at maturity (expiration) date. For instance, zero coupon bond, t-bills, forward, FX forward leg, options.
- Regular event with maturity - Used for instruments with event at maturity and regular events. For instance, coupon bonds, CDS.
- Perpetual regular event- Used for instruments with regular events, but no maturity. For instance, perpetual bonds.
- Default - Instrument with no mechanics behind.
- General class - Similar to default. For instance, stock, portfolio, other, derivative.
-
Contract for difference - Used for FX instruments. The market value is calculated differently comparing to other classes. It is calculated as P&L whereas other classes MV is calculated as price * position.
We don't make any selections for Factor Same, Factor Up and Factor Down. These fields are deprecated.
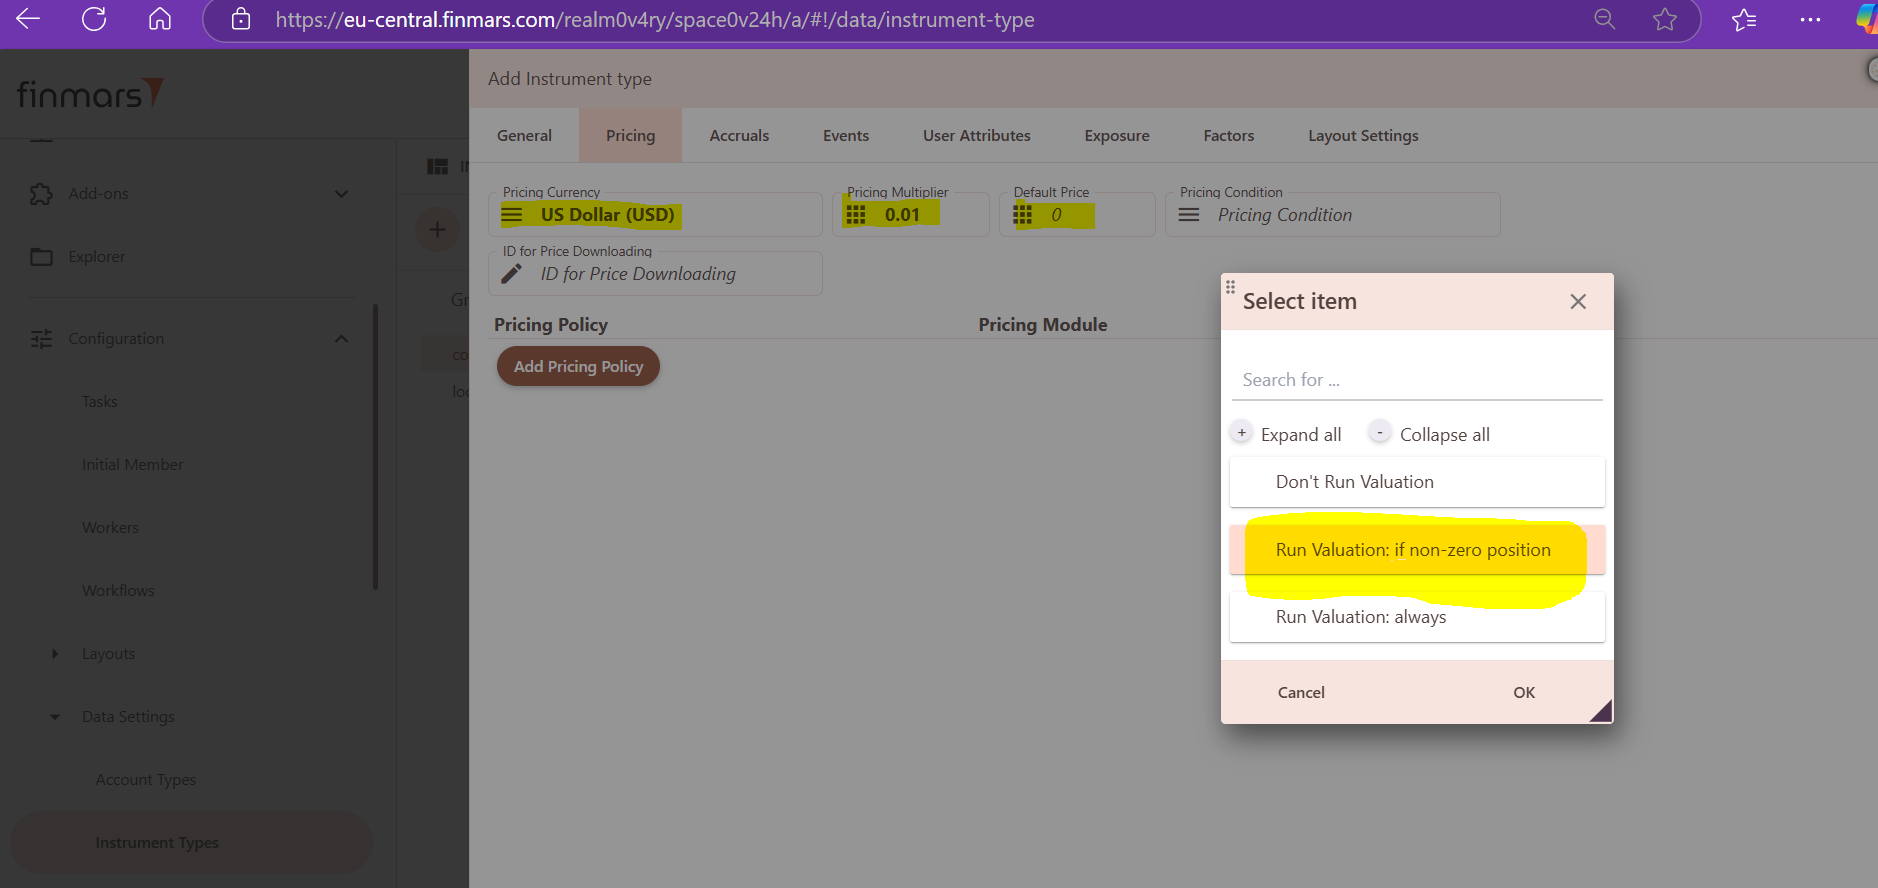
4. In Pricing Tab, we select Pricing Currency from the drop-down menu. Pricing Currency is conventional and it is recommended to use USD by default (the same as recommended system default currency).
When it comes to Price Multiplier, we use 1 for all instrument except for the bonds and t-bills, where we use 0.01 as a Price Multiplier. Price multiplier can have different values, depending on the way prices of the instruments are provided. Price multiplier is used in calculation of the market value of the instrument. Market value of the instrument equals: position * price * price multiplier * FX rate.
We set "0" (zero) as Default Price. Default price can have different values (not only 0); it is just a price which will be used in pricing if no price was provided for importing.
For Pricing Condition, from the drop-down menu we select: Run Valuation: if non-zero position. Please note that this is deprecated.
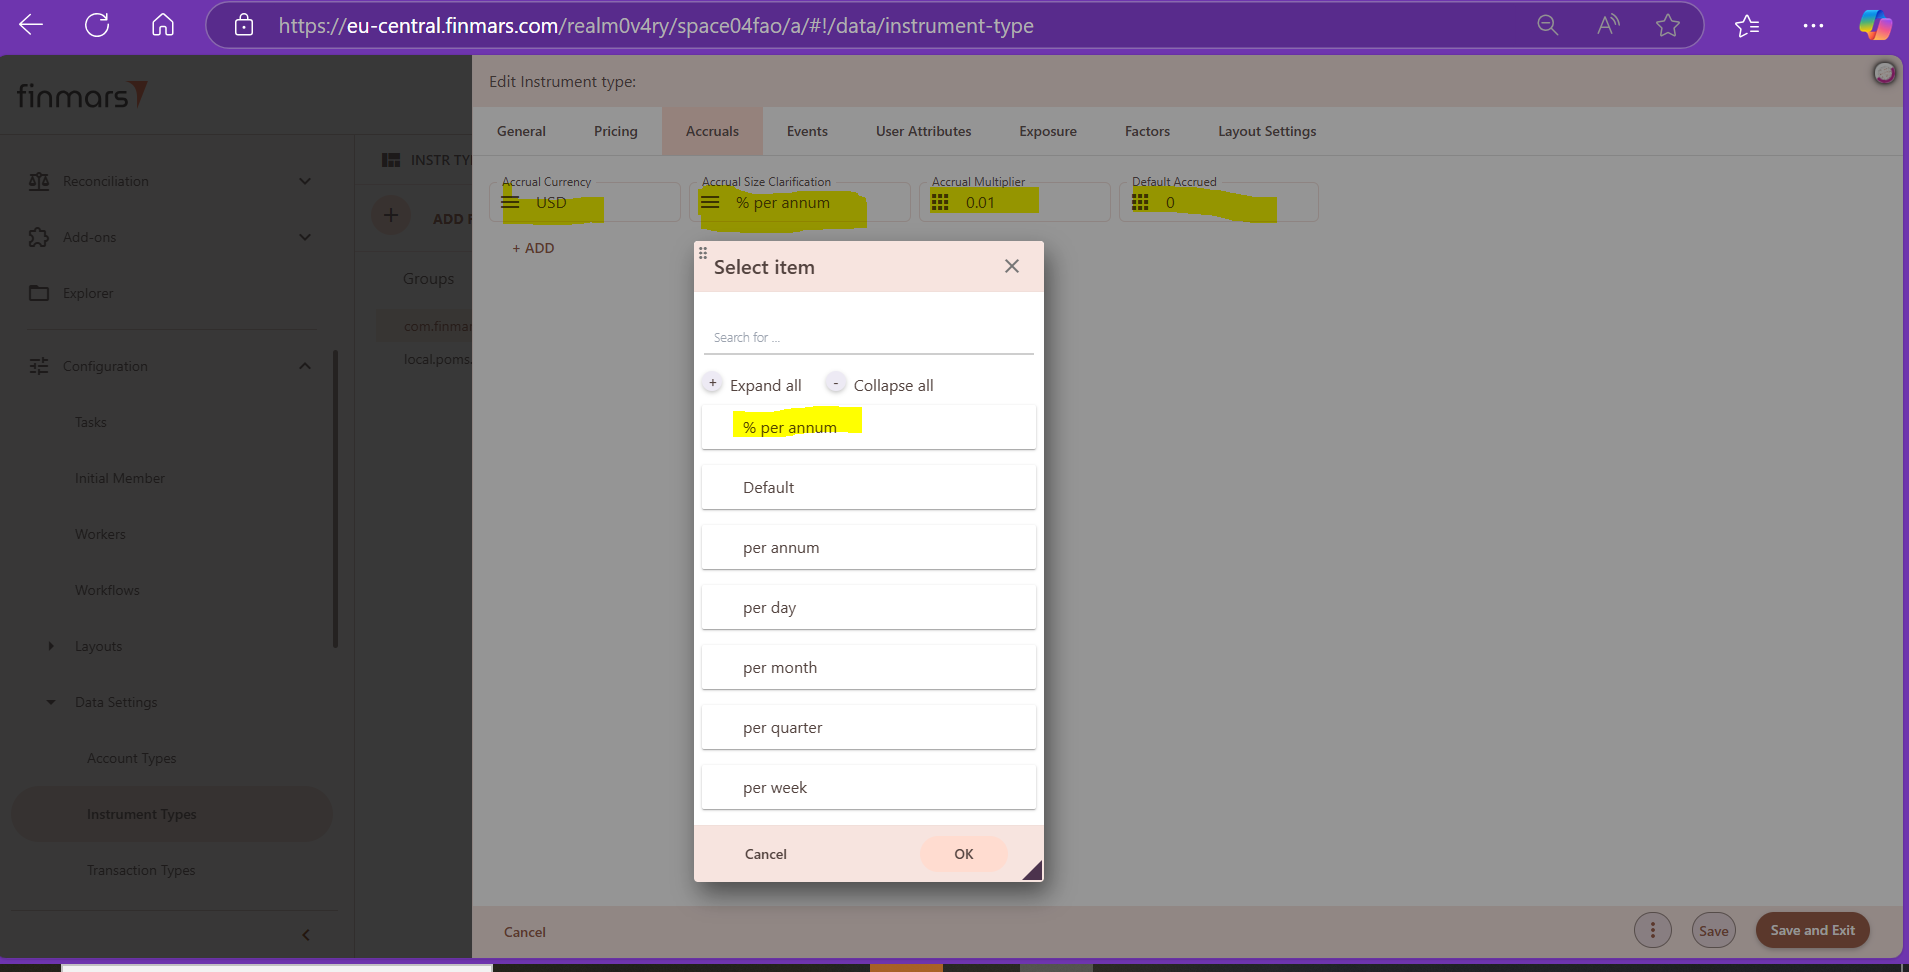
5. In Accruals tab, from the drop-down menu, we select USD as Accrual Currency. Currency is conventional and it is recommended to use USD by default (the same as recommended system default currency).
Further, from the second drop-down menu, we select % per annum as Accrual Size Clarification. Only for portfolio, we select Default as Accrual Size Clarification. Accrual Multiplier is set at 1 for all instruments except bonds and t-bills, for which Accrual Multiplier is set at 0.01. For all instrument types, we use 0 (zero) as Default Accrued. Default Accrued can have different values (not only 0), depending on particular instrument type.
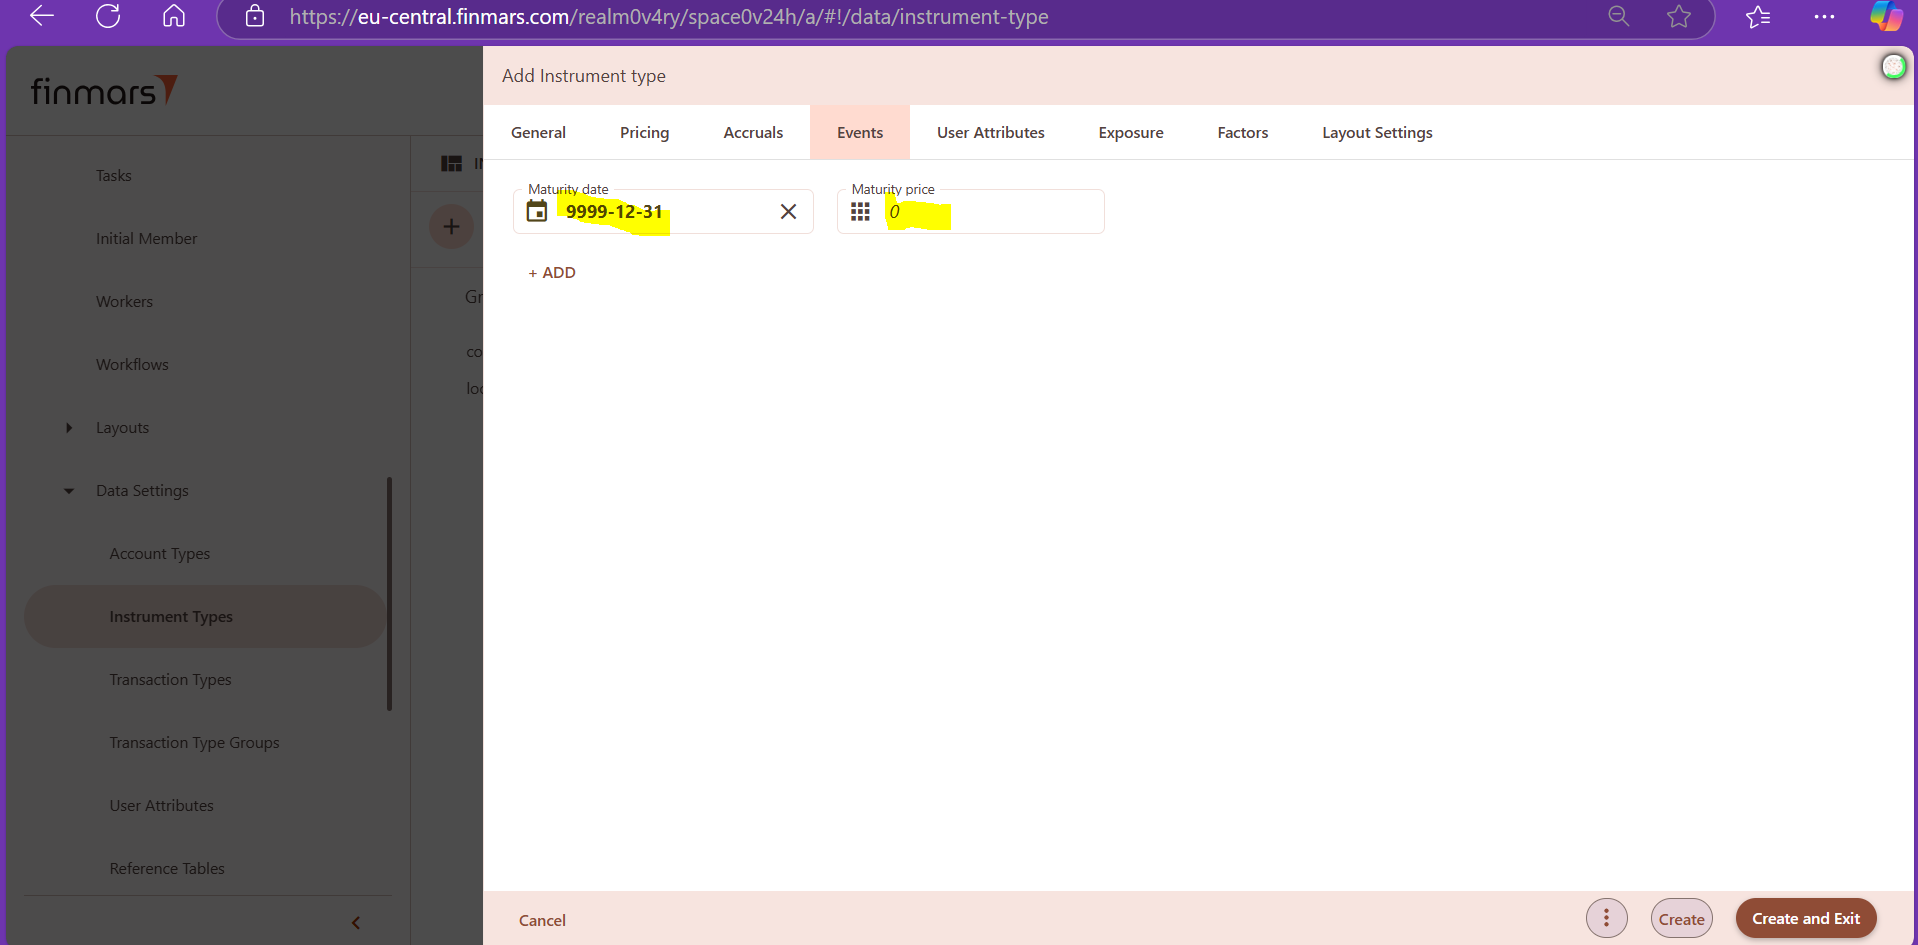
6. In Events tab, we set 9999-12-31 as a maturity date and 0 (zero) as maturity price. It is important to mention that for each instrument, maturity date and maturity price have to be updated to reflect actual contractual terms (this is done before importing data sets).
Maturity date is a date on which a financial agreement ends, triggering the payment of principal with interest or repayment of a loan with interest; it is the date on which the life of a transaction or financial instrument ends, after which it either ceases to exist or can be renewed. Maturity commonly applies to fixed-income investments such as bonds or CDs, as well as loans.
The maturity price of the instrument is the amount that will be paid to the holder of the instrument at its maturity date. This is typically the face value or principal amount of the instrument, such as a bond or a certificate of deposit, which is repaid to the investor when the instrument reaches its maturity.
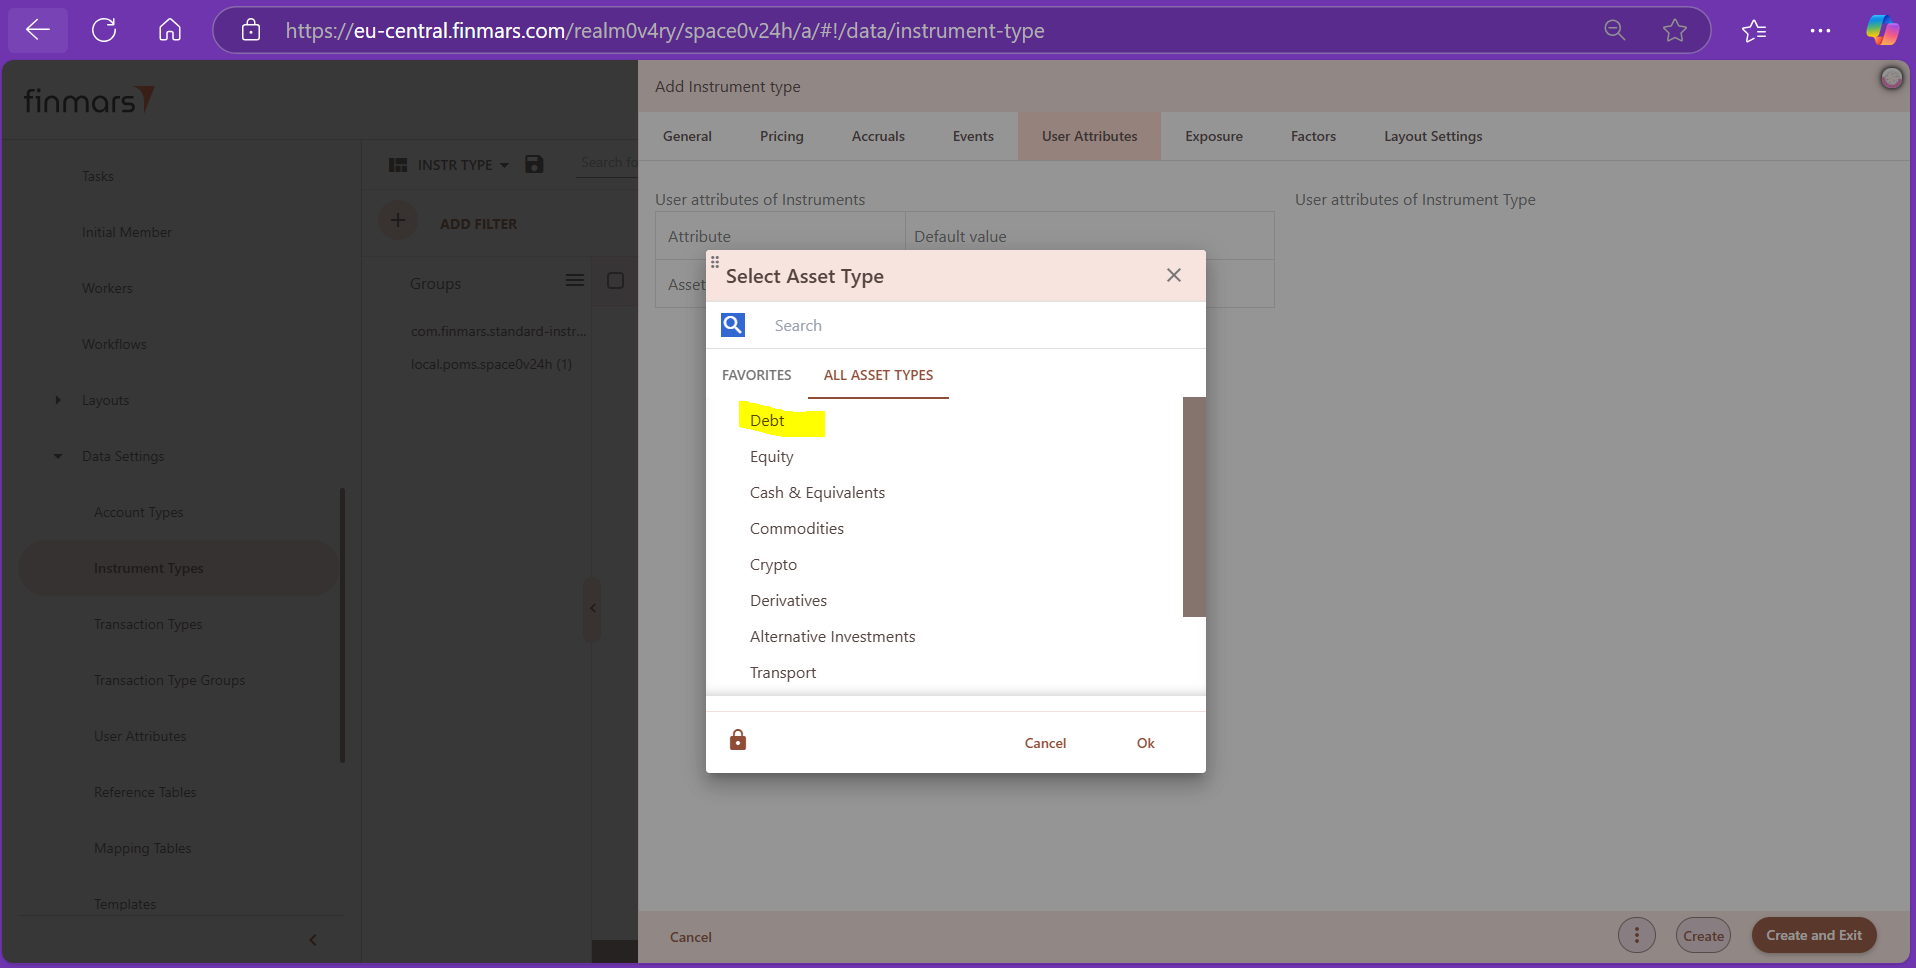
7. In User Attributes tab, from the drop-down menu we select Asset Types for respective instrument type. In standard configuration, bonds and t-bills are classified as debt; stocks are classified as equity; options, CDS, forward, FX forward leg are classified as derivative; portfolio and other are classified as other asset type. Here user will see all the user attributes installed in the workspace and they can set default values.
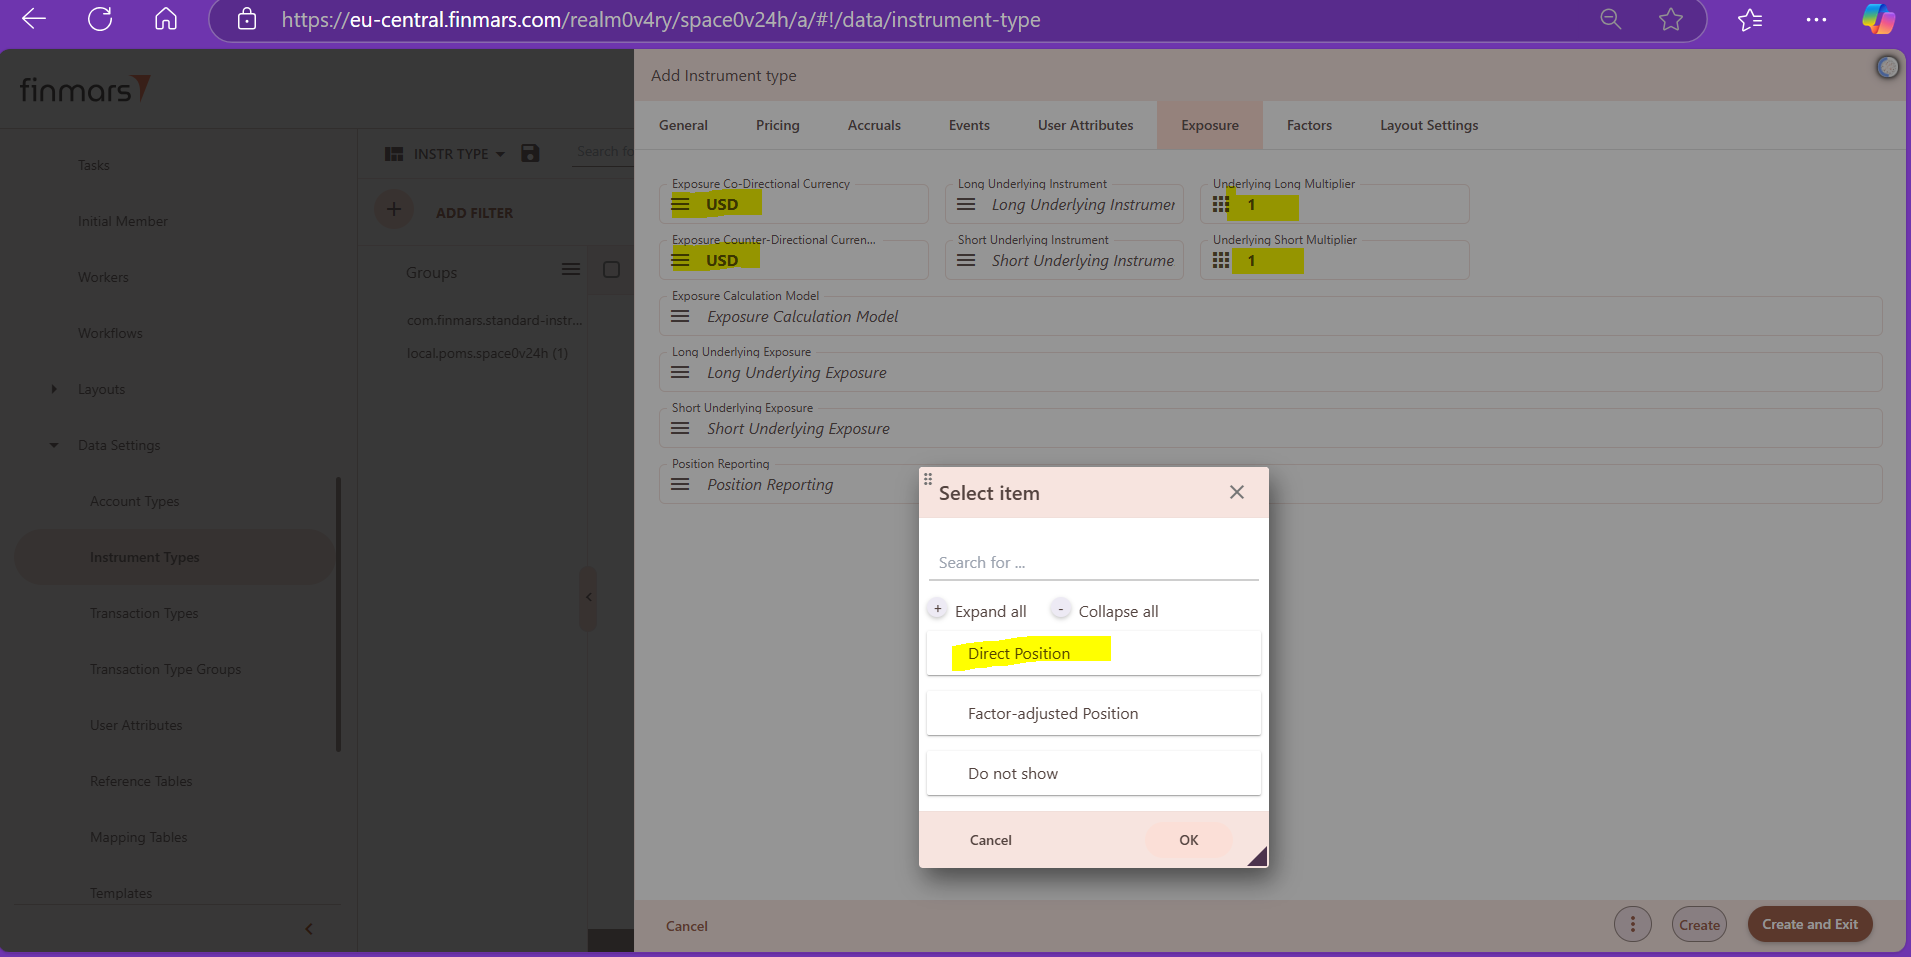
8. Exposure tab is deprecated. In Exposure tab, for Exposure Co-Directional Currency and Exposure Counter-Directional Currency, we select USD from the drop-down menu. Please note that we don't make any selection for currencies for FX forward leg, forward, option and derivative in this respect. We set Underlying Long Multiplier and Underlying Short Multiplier at 1. For Position Reporting, we select Direct Position from the drop-down menu. For other fields relevant for exposure calculation, we don't make any selections.
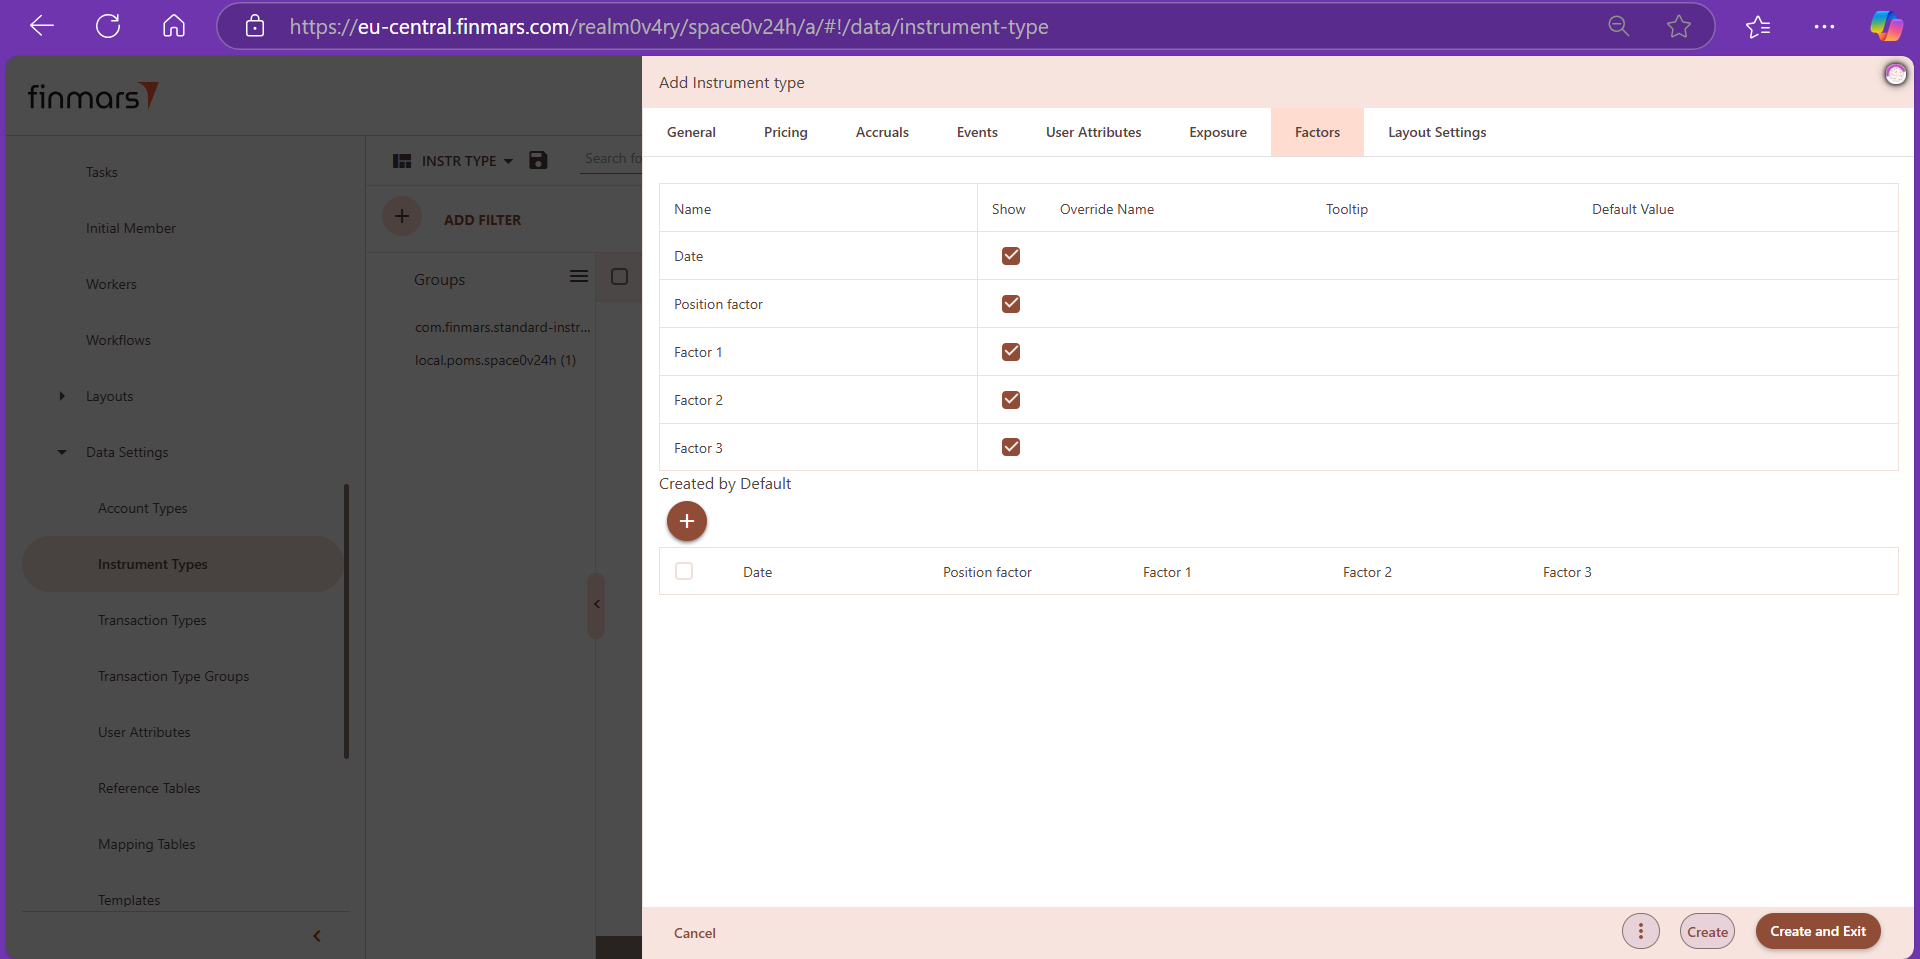
9. Factors tab is deprecated. In Factors tab, we currently do not make any selections.
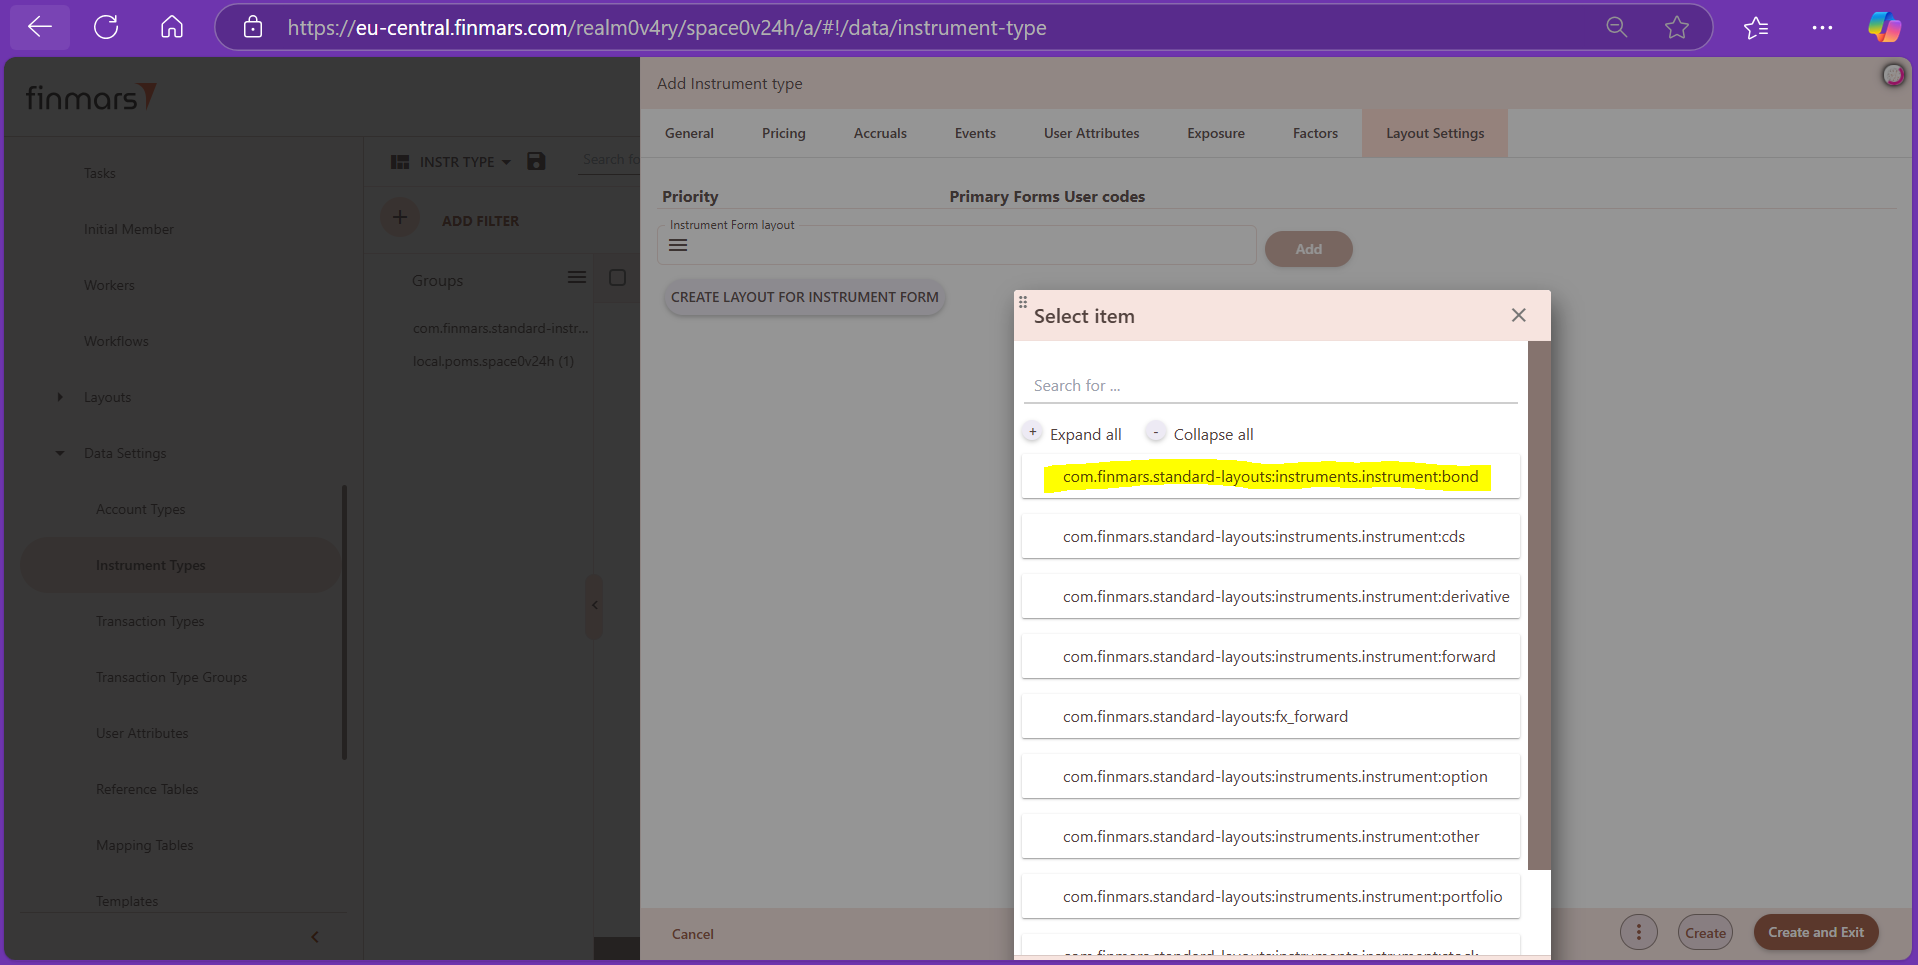
10. Layouts should be created beforehand, and they will affect the creation form. In Layout Settings tab, we select the layout of the respective instrument type, from the drop-down menu.
11. Final step is to click on "Create and Exit" button, after which all changes are saved, and new instrument type is displayed with existing instrument types in configuration section (Data Settings > instrument Types) of the platform.